
User Manual (ENGLISH)
Page 2
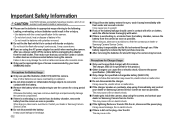
... or serious injury. ■ Do not attempt to modify this could pose a risk of the camera directly into the camera through access points e.g. Samsung Cameras take no responsibility for a trip or an important event). This may cause a fire or electric shock. ■ Do not insert ... AC Power Adapter). This could increase the risk of children or infants to your subject's eyes, may be carried out by your dealer or Samsung Camera Service centre. Positioning the flash too close to prevent accidents e.g.: • Swallowing batteries or small camera accessories. If an accident...
... or serious injury. ■ Do not attempt to modify this could pose a risk of the camera directly into the camera through access points e.g. Samsung Cameras take no responsibility for a trip or an important event). This may cause a fire or electric shock. ■ Do not insert ... AC Power Adapter). This could increase the risk of children or infants to your subject's eyes, may be carried out by your dealer or Samsung Camera Service centre. Positioning the flash too close to prevent accidents e.g.: • Swallowing batteries or small camera accessories. If an accident...
User Manual (ENGLISH)
Page 3
...with the battery. ■ Remove the battery when not planning to use the camera for a long period of time. Contact your dealer or Samsung Camera Service Centre. The charger, SBC-L6 is shortened through use. This may cause a fire. Otherwise the battery may leak corrosive ... may cause fire, electric shock or malfunction. ■ If the charger smokes or overheats, stop using it immediately and contact your local SAMSUNG dealer. When doing so, take care to avoid burns. It may cause leakage or breakage. 002 ■ If liquid from the wall socket...
...with the battery. ■ Remove the battery when not planning to use the camera for a long period of time. Contact your dealer or Samsung Camera Service Centre. The charger, SBC-L6 is shortened through use. This may cause a fire. Otherwise the battery may leak corrosive ... may cause fire, electric shock or malfunction. ■ If the charger smokes or overheats, stop using it immediately and contact your local SAMSUNG dealer. When doing so, take care to avoid burns. It may cause leakage or breakage. 002 ■ If liquid from the wall socket...
User Manual (ENGLISH)
Page 4
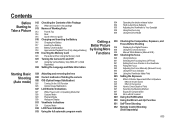
Contents Before Starting to Take a Picture Starting Basic Shooting (Auto mode) 012 Checking the Contents of the Package 012 What are included in the package 013 Names of Working Parts 013 Front & Top 014 Rear 015 Quick reference guide 016 Charging and Inserting the Battery 016 Charging the Battery 017 Inserting the Battery 018 Battery Level Indicator 018 Approximate Playback Time (Fully charged battery) 019 Inserting the Memory Card 020 Precautions When Using the Memory Card 021 Turning the Camera On and Off 021 Using the Vertical Battery Grip (SBG-D1V) (Sold ...
Contents Before Starting to Take a Picture Starting Basic Shooting (Auto mode) 012 Checking the Contents of the Package 012 What are included in the package 013 Names of Working Parts 013 Front & Top 014 Rear 015 Quick reference guide 016 Charging and Inserting the Battery 016 Charging the Battery 017 Inserting the Battery 018 Battery Level Indicator 018 Approximate Playback Time (Fully charged battery) 019 Inserting the Memory Card 020 Precautions When Using the Memory Card 021 Turning the Camera On and Off 021 Using the Vertical Battery Grip (SBG-D1V) (Sold ...

User Manual (ENGLISH)
Page 5
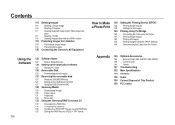
Unit 064 Noise Reduction 064 High Noise 064 ISO Display 065 ISO Steps 065 Set Max ISO Range 065 Reset Custom1 004 066 Using the CUSTOM2 MENU 066 E-Dial in Program / Sv / Tv / Av / TAv / M / X / B 066 Green Button in TAv&M 066 Use Aperture Ring 067 One-touch Bracketing 067 Bracketing Order 067 Remaining Count 067 Release in Charging 068 Preview Method 068 Initial Zoom 068 Auto Rotation 068 Saving Rotation Info. 069 Select Battery 069 Light of Settings 059 OIS (Optical Image Stabilization) 060 Using the CUSTOM1 MENU 060 Link AF Point & AE 060 ...
Unit 064 Noise Reduction 064 High Noise 064 ISO Display 065 ISO Steps 065 Set Max ISO Range 065 Reset Custom1 004 066 Using the CUSTOM2 MENU 066 E-Dial in Program / Sv / Tv / Av / TAv / M / X / B 066 Green Button in TAv&M 066 Use Aperture Ring 067 One-touch Bracketing 067 Bracketing Order 067 Remaining Count 067 Release in Charging 068 Preview Method 068 Initial Zoom 068 Auto Rotation 068 Saving Rotation Info. 069 Select Battery 069 Light of Settings 059 OIS (Optical Image Stabilization) 060 Using the CUSTOM1 MENU 060 Link AF Point & AE 060 ...

User Manual (ENGLISH)
Page 6
Contents Using Advanced Shooting Modes 080 Using the best programmed exposure, P (Program) mode 080 P (Automatic Program Exposure) Mode 082 Shooting in the different exposure rates 082 Sv (Sensitivity Priority) Mode 083 Taking a picture of a fast-moving subject 083 Tv (Shutter Priority) Mode 084 Expressing the background out of focus 084 Av (Aperture Priority) Mode 085 Using the automatic ISO setting mode 085 TAv (Shutter & Aperture Priority) Mode 086 Using the manual mode to choose your own camera settings 086 M (Manual) Mode 086 EV Bar 087 Shooting with long time ...
Contents Using Advanced Shooting Modes 080 Using the best programmed exposure, P (Program) mode 080 P (Automatic Program Exposure) Mode 082 Shooting in the different exposure rates 082 Sv (Sensitivity Priority) Mode 083 Taking a picture of a fast-moving subject 083 Tv (Shutter Priority) Mode 084 Expressing the background out of focus 084 Av (Aperture Priority) Mode 085 Using the automatic ISO setting mode 085 TAv (Shutter & Aperture Priority) Mode 086 Using the manual mode to choose your own camera settings 086 M (Manual) Mode 086 EV Bar 087 Shooting with long time ...
User Manual (ENGLISH)
Page 7
.../Vista 127 Setting up the USB Driver for MAC 127 Using the USB Driver for MAC 128 Samsung Master 128 Downloading images 130 Image viewer 131 Image edit 132 Movie edit 133 Using the Samsung RAW Converter 2.0 133 Developing the RAW files 134 Correcting the exposure 135 Handling the JPEG/TIFF...
.../Vista 127 Setting up the USB Driver for MAC 127 Using the USB Driver for MAC 128 Samsung Master 128 Downloading images 130 Image viewer 131 Image edit 132 Movie edit 133 Using the Samsung RAW Converter 2.0 133 Developing the RAW files 134 Correcting the exposure 135 Handling the JPEG/TIFF...

User Manual (ENGLISH)
Page 8
...-frame 35mm camera, you will differ between the GX-20 and 35mm SLR cameras even if the same lens is calculated in a opposite way of SAMSUNG digital camera sensor. (High dynamic range.) ● Built-in which the focus points on the viewfinder illuminate red. ● Features a large 2.7-inch LCD...
...-frame 35mm camera, you will differ between the GX-20 and 35mm SLR cameras even if the same lens is calculated in a opposite way of SAMSUNG digital camera sensor. (High dynamic range.) ● Built-in which the focus points on the viewfinder illuminate red. ● Features a large 2.7-inch LCD...

User Manual (ENGLISH)
Page 9
This "Note" symbol indicates information that failure to take or avoid a specific action could result in this user guide Please read this basic information thoroughly before you start using the product. ◄ ( ) This icon indicates the program mode dial. and (◄►) icons indicate the direction buttons or (►) icons indicates the each direction button. ( ) This icon indicates the front dial. This "Warning" symbol advises users that supplements important points of the main text. Understanding illustrated icons used in physical harm to the user or the hardware. (...
This "Note" symbol indicates information that failure to take or avoid a specific action could result in this user guide Please read this basic information thoroughly before you start using the product. ◄ ( ) This icon indicates the program mode dial. and (◄►) icons indicate the direction buttons or (►) icons indicates the each direction button. ( ) This icon indicates the front dial. This "Warning" symbol advises users that supplements important points of the main text. Understanding illustrated icons used in physical harm to the user or the hardware. (...
User Manual (ENGLISH)
Page 10
... Tv (Shutter-Priority AE) mode, Av (Aperture-Priority AE) mode, and so on . 7. Starting Basic Shooting (Auto mode) This chapter gives a quick guidelines for your SAMSUNG digital camera. 8. Contents of the Operating Manual This operating manual contains the following chapters. 1.
... Tv (Shutter-Priority AE) mode, Av (Aperture-Priority AE) mode, and so on . 7. Starting Basic Shooting (Auto mode) This chapter gives a quick guidelines for your SAMSUNG digital camera. 8. Contents of the Operating Manual This operating manual contains the following chapters. 1.

User Manual (ENGLISH)
Page 12
Before Starting to Take a Picture Explains camera characteristics, accessories and the names of various parts. 012 Checking the Contents of the Package 012 What are included in the package 013 Names of Working Parts 013 Front & Top 014 Rear 015 Quick reference guide 016 Charging and Inserting the Battery 016 Charging the Battery 017 Inserting the Battery 018 Battery Level Indicator 018 Approximate Playback Time (Fully charged battery) 019 Inserting the Memory Card 020 Precautions When Using the Memory Card 021 Turning the Camera On and Off 021 Using the Vertical ...
Before Starting to Take a Picture Explains camera characteristics, accessories and the names of various parts. 012 Checking the Contents of the Package 012 What are included in the package 013 Names of Working Parts 013 Front & Top 014 Rear 015 Quick reference guide 016 Charging and Inserting the Battery 016 Charging the Battery 017 Inserting the Battery 018 Battery Level Indicator 018 Approximate Playback Time (Fully charged battery) 019 Inserting the Memory Card 020 Precautions When Using the Memory Card 021 Turning the Camera On and Off 021 Using the Vertical ...

User Manual (ENGLISH)
Page 13
... battery (SLB-1674) Charger (SBC-L6) AC cord 012 User's Manual (AD68-01904A)/ Quick Guide (AD68-02661A) To buy the optional equipment, contact your nearest Samsung dealer or Samsung service centre. Checking the Contents of the Package Please check that you have the correct contents before using this product.
... battery (SLB-1674) Charger (SBC-L6) AC cord 012 User's Manual (AD68-01904A)/ Quick Guide (AD68-02661A) To buy the optional equipment, contact your nearest Samsung dealer or Samsung service centre. Checking the Contents of the Package Please check that you have the correct contents before using this product.
User Manual (ENGLISH)
Page 14
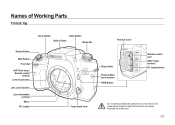
Failure to follow this instruction may cause the product to adjust the aperture lever or the mirror in Flash Mode dial Focus mode lever Terminal Cover Strap holder External flash sync terminal RAW Button Remote control port USB / Video terminal DC input terminal Do not attempt to malfunction. 013 Names of Working Parts Front & Top Shutter Button Main Switch Front dial Self-Timer lamp / Remote control receiver Lens mount index Lens unlock button Lens information contacts Mirror AF coupler Green Button Flash Button Built-in the camera body.
Failure to follow this instruction may cause the product to adjust the aperture lever or the mirror in Flash Mode dial Focus mode lever Terminal Cover Strap holder External flash sync terminal RAW Button Remote control port USB / Video terminal DC input terminal Do not attempt to malfunction. 013 Names of Working Parts Front & Top Shutter Button Main Switch Front dial Self-Timer lamp / Remote control receiver Lens mount index Lens unlock button Lens information contacts Mirror AF coupler Green Button Flash Button Built-in the camera body.

User Manual (ENGLISH)
Page 15
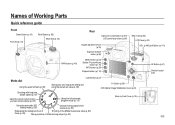
Names of Working Parts Rear Self-Timer lamp / Remote control receiver Hot shoe Diopter adjustment lever Metering mode lever Exposure bracket button Exposure Compensation / LCD panel lamp button Rear e-dial LCD Panel AE-L/Lock Button Strap Holder Memory Card Slot Memory Card Cover Viewfinder MENU button Delete / Picture Wizard INFO button Playback button LCD Monitor 014 Focus point selection dial AF Button OK Button Direction button Card access lamp Card cover lock OIS (Optical Image Stabilization) lever Fn Button
Names of Working Parts Rear Self-Timer lamp / Remote control receiver Hot shoe Diopter adjustment lever Metering mode lever Exposure bracket button Exposure Compensation / LCD panel lamp button Rear e-dial LCD Panel AE-L/Lock Button Strap Holder Memory Card Slot Memory Card Cover Viewfinder MENU button Delete / Picture Wizard INFO button Playback button LCD Monitor 014 Focus point selection dial AF Button OK Button Direction button Card access lamp Card cover lock OIS (Optical Image Stabilization) lever Fn Button
User Manual (ENGLISH)
Page 16
Names of Working Parts Quick reference guide Front Green Button (p. 66) Front dial (p. 53) Flash Button (p. 99) Mode dial (p. 33) Rear Exposure Compensation (p.47)/ LCD panel lamp button (p.69) Diopter adjustment lever (p.35) Exposure bracket button (p.90) Rear e-dial (p.53) LCD Panel (p.32) AE-L (p.48)/Lock Button (p.119) RAW button (p. 49) MENU button (p.53) Delete / Picture Wizard button (p.116) INFO button (p.28) Playback button (p.110) AF Button (p.61) Direction button (p.8) Mode dial Using the external flash (p. 88) LCD Monitor (p.27) Saving your own exposure setting ...
Names of Working Parts Quick reference guide Front Green Button (p. 66) Front dial (p. 53) Flash Button (p. 99) Mode dial (p. 33) Rear Exposure Compensation (p.47)/ LCD panel lamp button (p.69) Diopter adjustment lever (p.35) Exposure bracket button (p.90) Rear e-dial (p.53) LCD Panel (p.32) AE-L (p.48)/Lock Button (p.119) RAW button (p. 49) MENU button (p.53) Delete / Picture Wizard button (p.116) INFO button (p.28) Playback button (p.110) AF Button (p.61) Direction button (p.8) Mode dial Using the external flash (p. 88) LCD Monitor (p.27) Saving your own exposure setting ...
User Manual (ENGLISH)
Page 17
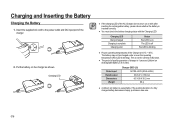
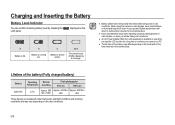
Charging LED ● If the charging LED of the AC Charger does not turn on the charger as shown. Rated input Rated output Dimensions Weight Charger (SBC-L6) AC100~240V (50Hz~60Hz) DC 8.4 V / 700 mA 60 X 90 X 30.2 mm 86 g ● A Lithium ion battery is 6 months. Put the battery on or blink after inserting the rechargeable battery, please check whether the battery is inserted correctly. ● You must check the battery charging status with the Charging LED. If the working duration of the charger. 2. This is not the camera malfunction. ● The period of quality guarantee of the...
Charging LED ● If the charging LED of the AC Charger does not turn on the charger as shown. Rated input Rated output Dimensions Weight Charger (SBC-L6) AC100~240V (50Hz~60Hz) DC 8.4 V / 700 mA 60 X 90 X 30.2 mm 86 g ● A Lithium ion battery is 6 months. Put the battery on or blink after inserting the rechargeable battery, please check whether the battery is inserted correctly. ● You must check the battery charging status with the Charging LED. If the working duration of the charger. 2. This is not the camera malfunction. ● The period of quality guarantee of the...

User Manual (ENGLISH)
Page 18
... cover lock lever as shown on . ● Remove the batteries when you insert new batteries after a long while, set date and time information by the Samsung warranty. ● Do not open the cover. 2. Batteries inserted incorrectly may leak. ● If the date and time settings have been reset when you insert...
... cover lock lever as shown on . ● Remove the batteries when you insert new batteries after a long while, set date and time information by the Samsung warranty. ● Do not open the cover. 2. Batteries inserted incorrectly may leak. ● If the date and time settings have been reset when you insert...
User Manual (ENGLISH)
Page 19
... photography 50% use 100% use 23°C Approx. 500 Approx. 430 Min./ Approx. 400 Min./ Min./1,000 860 800 These figures are measured under Samsung's standard conditions and shooting conditions and may differ depending on hand and keep them warm in cold conditions.
... photography 50% use 100% use 23°C Approx. 500 Approx. 430 Min./ Approx. 400 Min./ Min./1,000 860 800 These figures are measured under Samsung's standard conditions and shooting conditions and may differ depending on hand and keep them warm in cold conditions.
User Manual (ENGLISH)
Page 20
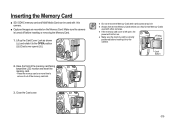
Also format Memory Cards used with other cameras. ● If the memory card cover is left open, the power will not turn on the Memory Card. Press the memory card one more time to remove it to the OPEN position (②) (Card cover opens (③)). 2. Close the Card cover. 019 Fitting groove Lock button 3. Lift up the Card Cover Lock as shown (①) and rotate it out of the memory card facing toward the LCD monitor and insert the memory card. - Inserting the Memory Card ■ SD / SDHC memory card and Multi Media Card can be used with this camera. ■ ...
Also format Memory Cards used with other cameras. ● If the memory card cover is left open, the power will not turn on the Memory Card. Press the memory card one more time to remove it to the OPEN position (②) (Card cover opens (③)). 2. Close the Card cover. 019 Fitting groove Lock button 3. Lift up the Card Cover Lock as shown (①) and rotate it out of the memory card facing toward the LCD monitor and insert the memory card. - Inserting the Memory Card ■ SD / SDHC memory card and Multi Media Card can be used with this camera. ■ ...
User Manual (ENGLISH)
Page 21
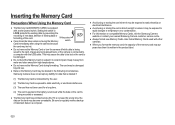
...bend the Memory Card or subject it is not used for a long time, the data on compatible Memory Cards, visit the Samsung Camera website or contact your nearest Samsung Camera customer service centre. ● Always format new Memory Cards. This may become unreadable. Also format Memory Cards used with a...off while data is being saved to the card, images are being recorded or accessed. ● The Memory Card has a limited service life. Samsung Camera does not accept any liability for data that is deleted if (1) The Memory Card is mishandled by preventing the recording of new data, ...
...bend the Memory Card or subject it is not used for a long time, the data on compatible Memory Cards, visit the Samsung Camera website or contact your nearest Samsung Camera customer service centre. ● Always format new Memory Cards. This may become unreadable. Also format Memory Cards used with a...off while data is being saved to the card, images are being recorded or accessed. ● The Memory Card has a limited service life. Samsung Camera does not accept any liability for data that is deleted if (1) The Memory Card is mishandled by preventing the recording of new data, ...
User Manual (ENGLISH)
Page 22
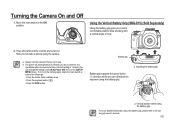
Using the Vertical Battery Grip (SBG-D1V) (Sold Separately) Using the battery grip gives you a more detailed information about the battery grip, please refer to the battery grip owner's manual. 021 Press the INFO button. Press the playback button ( ). - Turning the Camera On and Off 1. Battery grip ▲ Installing the battery grip Battery grip supports the green button ( ) function while you can still adjust the exposure using the battery grip. ▲ Vertical position when using the camera. ● Always turn the camera off when not in use. ● The power will ...
Using the Vertical Battery Grip (SBG-D1V) (Sold Separately) Using the battery grip gives you a more detailed information about the battery grip, please refer to the battery grip owner's manual. 021 Press the INFO button. Press the playback button ( ). - Turning the Camera On and Off 1. Battery grip ▲ Installing the battery grip Battery grip supports the green button ( ) function while you can still adjust the exposure using the battery grip. ▲ Vertical position when using the camera. ● Always turn the camera off when not in use. ● The power will ...