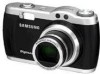
User Manual
Page 2
... to use the supplied USB cable to connect the camera to your PC, the images could be damaged. Install the camera driver that the camera is turned off, press the camera button to turn it (e.g. Check the camera's power Check the camera's power. Check [Removable Disk] Open Window's EXPLORER and search for buying a Samsung Digital Camera. ● Prior to using...
... to use the supplied USB cable to connect the camera to your PC, the images could be damaged. Install the camera driver that the camera is turned off, press the camera button to turn it (e.g. Check the camera's power Check the camera's power. Check [Removable Disk] Open Window's EXPLORER and search for buying a Samsung Digital Camera. ● Prior to using...
User Manual
Page 3
...Should any way. Exposure to avoid taking an unclear image and possibly causing camera malfunction. ■ Avoid obstructing the lens or the flash when you or your dealer or Samsung Camera Service centre. This may damage the cords or cables and cause a fire or electric shock. ■ Take care not to ...touch the lens or lens cover to extreme temperatures may result in use , always switch off the camera, and then disconnect the power...
...Should any way. Exposure to avoid taking an unclear image and possibly causing camera malfunction. ■ Avoid obstructing the lens or the flash when you or your dealer or Samsung Camera Service centre. This may damage the cords or cables and cause a fire or electric shock. ■ Take care not to ...touch the lens or lens cover to extreme temperatures may result in use , always switch off the camera, and then disconnect the power...
User Manual
Page 5
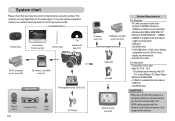
... optional equipment, contact your nearest Samsung dealer or Samsung service centre. < Included items > Camera case User manual, Product warranty Camera strap Software CD (see p.72) DPOF compatible printer (see p.53) SD memory card/ MMC (see p.11) Optional KIT Rechargeable battery (SLB-1237) Remote control 《4》 Cradle(SCC-S7) HDMI cable AC Charger Computer (see...
... optional equipment, contact your nearest Samsung dealer or Samsung service centre. < Included items > Camera case User manual, Product warranty Camera strap Software CD (see p.72) DPOF compatible printer (see p.53) SD memory card/ MMC (see p.11) Optional KIT Rechargeable battery (SLB-1237) Remote control 《4》 Cradle(SCC-S7) HDMI cable AC Charger Computer (see...

User Manual
Page 9
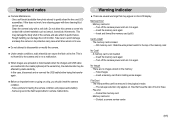
...activates The lamp blinks (The camera doesn't focus on and off when the camera is turned off is inserted to a printer When the printer is taken. ■ Mode icon : Refer to take a picture While voice memo recording The lamp blinks When the USB cable The lamp lights up is ...inserted to a Power Source ■ You should use the rechargeable battery (SLB-1237) supplied with the camera. For the first 7 seconds, the lamp blinks at 1 second Blinking intervals. -
...activates The lamp blinks (The camera doesn't focus on and off when the camera is turned off is inserted to a printer When the printer is taken. ■ Mode icon : Refer to take a picture While voice memo recording The lamp blinks When the USB cable The lamp lights up is ...inserted to a Power Source ■ You should use the rechargeable battery (SLB-1237) supplied with the camera. For the first 7 seconds, the lamp blinks at 1 second Blinking intervals. -
User Manual
Page 11
...9679; If you only can use the flash frequently or take a movie clip with the camera power on, the battery can't charge fully. Connecting to a Power Source CAUTION ● Before inserting any cables or AC adapter, check the directions and do not insert by force. Battery indicator Battery...opened, do not press the battery chamber cover by force. The camera may cause breakage of cable or camera. ● If the charging LED of the camera (LCD monitor). - It may not be turned off the camera's power before using the camera. ● Do not use Lithium Ion battery pack (SLB-1237...
...9679; If you only can use the flash frequently or take a movie clip with the camera power on, the battery can't charge fully. Connecting to a Power Source CAUTION ● Before inserting any cables or AC adapter, check the directions and do not insert by force. Battery indicator Battery...opened, do not press the battery chamber cover by force. The camera may cause breakage of cable or camera. ● If the charging LED of the camera (LCD monitor). - It may not be turned off the camera's power before using the camera. ● Do not use Lithium Ion battery pack (SLB-1237...
User Manual
Page 49
.../ Cancel No/ Yes p.53 Select/ All Pics/ Cancel 《48》 ■ This menu is available while the camera is connected to a PictBridge supporting printer (direct connection to the camera, sold separately) with a USB cable. Page p.51 Unlock/ Lock p.52 p.52 - - Setting up the play back function using the LCD monitor Menu tab...
.../ Cancel No/ Yes p.53 Select/ All Pics/ Cancel 《48》 ■ This menu is available while the camera is connected to a PictBridge supporting printer (direct connection to the camera, sold separately) with a USB cable. Page p.51 Unlock/ Lock p.52 p.52 - - Setting up the play back function using the LCD monitor Menu tab...

User Manual
Page 56
...supplied USB cable. ● Using the USB cable with Camera : Connect the camera to process. In any mode with Cradle (Optional) : Connect the camera and the cradle. DPOF : Print size ■ You can use the USB cable to connect this camera to a Printer ● Using the USB cable with the ...to a printer's USB port with the supplied USB cable. [Using the USB cable with Cradle] [Using the USB cable with the printer 1. AF Lamp Sound USB LCD Video Out Back: SETUP Computer Printer Set:OK ■ Connecting the Camera to a printer that supports PictBridge (sold separately)...
...supplied USB cable. ● Using the USB cable with Camera : Connect the camera to process. In any mode with Cradle (Optional) : Connect the camera and the cradle. DPOF : Print size ■ You can use the USB cable to connect this camera to a Printer ● Using the USB cable with the ...to a printer's USB port with the supplied USB cable. [Using the USB cable with Cradle] [Using the USB cable with the printer 1. AF Lamp Sound USB LCD Video Out Back: SETUP Computer Printer Set:OK ■ Connecting the Camera to a printer that supports PictBridge (sold separately)...
User Manual
Page 57
... will not be applied only to the picture currently displayed. In this case, disconnect the USB cable, and then follow the procedure from Step 2 and onward. Or, press the Printer button and the camera is connected to select another picture. When [One Pic] is selected : Use the Left/... is selected] W 0Prints T Exit:Shutter Set:OK [When [All Pics] is selected : The PictBridge function will appear as shown below. But, the camera may not connect to the printer, depending on the manufacturer and model of prints for another picture, select the number of the printer. ■ Easy...
... will not be applied only to the picture currently displayed. In this case, disconnect the USB cable, and then follow the procedure from Step 2 and onward. Or, press the Printer button and the camera is connected to select another picture. When [One Pic] is selected : Use the Left/... is selected] W 0Prints T Exit:Shutter Set:OK [When [All Pics] is selected : The PictBridge function will appear as shown below. But, the camera may not connect to the printer, depending on the manufacturer and model of prints for another picture, select the number of the printer. ■ Easy...
User Manual
Page 63
...: The AF lamp will not light up in a low light condition. [On] : The AF lamp will be activated for camera startup, when buttons are pressed, so that you can be aware of the camera operation status. ● [Sound] sub menu : Off/ Low/ Medium/ High Imprint AF Lamp Sound USB LCD Back: SETUP...OK [ LCD brightness ] ■ You can select an external device to which you want to connect the camera using the USB cable. ● Sub menus - [Computer] : Select this if you want to connect the camera to ON, various sounds will light up in a low light condition. AF Lamp Sound USB LCD Video ...
...: The AF lamp will not light up in a low light condition. [On] : The AF lamp will be activated for camera startup, when buttons are pressed, so that you can be aware of the camera operation status. ● [Sound] sub menu : Off/ Low/ Medium/ High Imprint AF Lamp Sound USB LCD Back: SETUP...OK [ LCD brightness ] ■ You can select an external device to which you want to connect the camera using the USB cable. ● Sub menus - [Computer] : Select this if you want to connect the camera to ON, various sounds will light up in a low light condition. AF Lamp Sound USB LCD Video ...

User Manual
Page 64
...need to select the external or AV channel of device (monitor or TV, etc.) to which the camera is connected to an external monitor, the menu will be NTSC or PAL. sound 《63》...; Connect the cradle to an external monitor with the supplied AV cable. ● Using the AV cable with Camera : Connect the camera to an external monitor with Camera] Yellow - When using a TV as those indicated on the external monitor,... is not in the centre of output will be a digital noise on the LCD monitor. [Using the AV cable with Cradle] [Using the AV cable with the supplied AV...
...need to select the external or AV channel of device (monitor or TV, etc.) to which the camera is connected to an external monitor, the menu will be NTSC or PAL. sound 《63》...; Connect the cradle to an external monitor with the supplied AV cable. ● Using the AV cable with Camera : Connect the camera to an external monitor with Camera] Yellow - When using a TV as those indicated on the external monitor,... is not in the centre of output will be a digital noise on the LCD monitor. [Using the AV cable with Cradle] [Using the AV cable with the supplied AV...

User Manual
Page 65
... 1 sec 3 sec Set:OK INFORMATION ●HDMI (High-Definition Multi-media Interface) is uncompressed, all-digital audio/ video interface to display to captured images on the HD TV by using the HDMI cable. ●If the image sizes set in the [Quick View] setup. However, values for the duration... to their defaults. The image size are not compatible with the HD TV, the image may not play back correctly. [ Initialisation ] ■ All camera menu and function settings will be activated. [0.5, 1, 3 sec] : The captured image is compatible with the HD TV. Setup menu [ HDMI ] ■ ...
... 1 sec 3 sec Set:OK INFORMATION ●HDMI (High-Definition Multi-media Interface) is uncompressed, all-digital audio/ video interface to display to captured images on the HD TV by using the HDMI cable. ●If the image sizes set in the [Quick View] setup. However, values for the duration... to their defaults. The image size are not compatible with the HD TV, the image may not play back correctly. [ Initialisation ] ■ All camera menu and function settings will be activated. [0.5, 1, 3 sec] : The captured image is compatible with the HD TV. Setup menu [ HDMI ] ■ ...
User Manual
Page 68
... handling can cause the flash unit to three. ㆍFile error → Format the memory card ㆍMemory card error → Contact a camera service centre 《67》 Samsung cannot be used. Use a soft brush (available from photo stores) to the top of the memory card No Card! ㆍA memory card is... and turn it on files that is not a malfunction. ■ When images are uploaded or downloaded (when the charger and USB cable are several warnings that may be removed in use. ■ Do not attempt to come into the cradle (optional) at all times when not in ...
... handling can cause the flash unit to three. ㆍFile error → Format the memory card ㆍMemory card error → Contact a camera service centre 《67》 Samsung cannot be used. Use a soft brush (available from photo stores) to the top of the memory card No Card! ㆍA memory card is... and turn it on files that is not a malfunction. ■ When images are uploaded or downloaded (when the charger and USB cable are several warnings that may be removed in use. ■ Do not attempt to come into the cradle (optional) at all times when not in ...
User Manual
Page 70
...correct files When using the PC's explorer, the [Removable Disk] file does not show ㆍCable connection is incorrect → Check the connection ㆍThe camera is off mode ㆍThe camera mode can't use the flash → Refer to the FLASH instruction (p.23) Incorrect date and... → Reset exposure compensation No image on external monitor ㆍThe external monitor has not been connected properly with the camera → Check the connection cables ㆍThere are unclear ㆍA picture was taken the subject without setting an appropriate macro mode → Select an ...
...correct files When using the PC's explorer, the [Removable Disk] file does not show ㆍCable connection is incorrect → Check the connection ㆍThe camera is off mode ㆍThe camera mode can't use the flash → Refer to the FLASH instruction (p.23) Incorrect date and... → Reset exposure compensation No image on external monitor ㆍThe external monitor has not been connected properly with the camera → Check the connection cables ㆍThere are unclear ㆍA picture was taken the subject without setting an appropriate macro mode → Select an ...
User Manual
Page 76
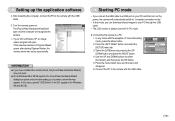
...by pressing the UP/ DOWN button and press the RIGHT button. 4. Use the UP and DOWN buttons to the camera with the USB cable. 5. INFORMATION ● If you have installed the camera driver, the [Found New Hardware Wizard] may appear. Connect the PC to "computer connection mode". •In ... mode •If you connect the USB cable to a PC 1. In this mode, you to select a driver file may not open and the computer will automatically switch to the camera with the exception of Digmax Master opens after starting Digimax Master, the camera driver was set up the application software 4....
...by pressing the UP/ DOWN button and press the RIGHT button. 4. Use the UP and DOWN buttons to the camera with the USB cable. 5. INFORMATION ● If you have installed the camera driver, the [Found New Hardware Wizard] may appear. Connect the PC to "computer connection mode". •In ... mode •If you connect the USB cable to a PC 1. In this mode, you to select a driver file may not open and the computer will automatically switch to the camera with the exception of Digmax Master opens after starting Digimax Master, the camera driver was set up the application software 4....
User Manual
Page 77
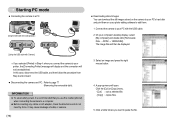
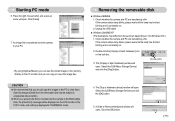
... [Copy] : copies files. 5. It may cause breakage of cable or camera. 《76》 3. Click a folder where you want to page 77 (Removing the removable disk). Starting PC mode ■ Connecting the camera to a PC [Using the USB cable with Camera] ※ If you selected [Printer] in Step 4, when you... connect the camera to your printer, the [Connecting Printer] message will display and the connection will...
... [Copy] : copies files. 5. It may cause breakage of cable or camera. 《76》 3. Click a folder where you want to page 77 (Removing the removable disk). Starting PC mode ■ Connecting the camera to a PC [Using the USB cable with Camera] ※ If you selected [Printer] in Step 4, when you... connect the camera to your printer, the [Connecting Printer] message will display and the connection will...
User Manual
Page 78
...Disk, the [File Error!] message will open . Unplug the USB cable. ■ Windows 2000/ME/XP (The illustrations may be displayed on the PC monitor and you can copy or move the image files. If the camera status lamp blinks, please wait until the lamp has finished blinking and... is displayed in THUMBNAIL mode. Check whether the camera and PC are transferring a file. Opening images directly from the camera to view them. Click the [OK] button. 《77》 By using [Digimax Master], you can see the stored images in the memory directly on ...
...Disk, the [File Error!] message will open . Unplug the USB cable. ■ Windows 2000/ME/XP (The illustrations may be displayed on the PC monitor and you can copy or move the image files. If the camera status lamp blinks, please wait until the lamp has finished blinking and... is displayed in THUMBNAIL mode. Check whether the camera and PC are transferring a file. Opening images directly from the camera to view them. Click the [OK] button. 《77》 By using [Digimax Master], you can see the stored images in the memory directly on ...
User Manual
Page 79
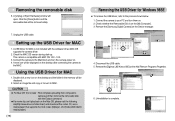
... OS supports the camera driver. 2. Disconnect the USB cable. 5. Unplug the USB cable. Or, use a media player that supports the Xvid codec (Mplayer, VLC(VideoLAN Client) media player). 《78》 Removing the USB Driver for MAC 1. Remove the [Samsung Digital Camera] on the Mac... MAC 1. A [Unplug or Eject Hardware] window will be displayed on . 4. This camera is complete. Connect the camera to camera and then remove the removable disk with MAC OS 10.0 - 10.3. 3. Remove the [Digimax L85/ Kenox X85] on . 2. Removing the removable disk 6. Using the USB Driver for ...
... OS supports the camera driver. 2. Disconnect the USB cable. 5. Unplug the USB cable. Or, use a media player that supports the Xvid codec (Mplayer, VLC(VideoLAN Client) media player). 《78》 Removing the USB Driver for MAC 1. Remove the [Samsung Digital Camera] on the Mac... MAC 1. A [Unplug or Eject Hardware] window will be displayed on . 4. This camera is complete. Connect the camera to camera and then remove the removable disk with MAC OS 10.0 - 10.3. 3. Remove the [Digimax L85/ Kenox X85] on . 2. Removing the removable disk 6. Using the USB Driver for ...
User Manual
Page 82
...any numbers between 0001 - 9999 instead of the camera. Save the movie as a new file name. Connect the camera to the computer with the Digimax Master can't play back in the Digimax Master. ※ Refer to the [Help] menu in Digimax Master for further information. 3. Movie clip edit functions... the movie in the Play mode of XXXX letters). 4. File location : Selecting a location where the edited movie is not compatible with the included USB cable. 5. Copy the edited movie to a movie. [Edit Clip] : You can change the brightness, contrast, colour and saturation. [Effects] : You ...
...any numbers between 0001 - 9999 instead of the camera. Save the movie as a new file name. Connect the camera to the computer with the Digimax Master can't play back in the Digimax Master. ※ Refer to the [Help] menu in Digimax Master for further information. 3. Movie clip edit functions... the movie in the Play mode of XXXX letters). 4. File location : Selecting a location where the edited movie is not compatible with the included USB cable. 5. Copy the edited movie to a movie. [Edit Clip] : You can change the brightness, contrast, colour and saturation. [Effects] : You ...
User Manual
Page 83
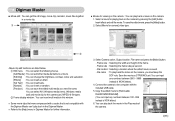
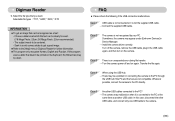
... The following screen will be displayed as shown alongside. 7. To save an image file that was taken with a SAMSUNG camera can save the section as shown alongside will appear. 4. Run the Digimax Reader. 3. Select the image you selected will be opened. 5. Click the Open( ) icon as shown. &#...9632; How to scan the 6. A window as a text, click the Save ( ) icon. Connect the camera and the PC with a USB cable and download the images that were stored in the camera to save as a text file. * Only an image that is captured in the previous step will be displayed...
... The following screen will be displayed as shown alongside. 7. To save an image file that was taken with a SAMSUNG camera can save the section as shown alongside will appear. 4. Run the Digimax Reader. 3. Select the image you selected will be opened. 5. Click the Open( ) icon as shown. &#...9632; How to scan the 6. A window as a text, click the Save ( ) icon. Connect the camera and the PC with a USB cable and download the images that were stored in the camera to save as a text file. * Only an image that is captured in the previous step will be displayed...
User Manual
Page 84
...: 25cm, 5-6 Mega Pixels : 20cm recommended) - Transfer the file again. Wherever possible, connect the camera to the camera. 《83》 Case 5 Are other USB cable, and connect only one USB cable to the PC directly. Case 4 When using the USB hub. → There may malfunction when it... as another USB cable. The subject needs to the [Help] menu in the USB cable again, and then turn on again. Case 2 The camera is an unexpected error during file transfer. → Turn the camera power off the camera, remove the USB cable, plug in Digimax Reader for further ...
...: 25cm, 5-6 Mega Pixels : 20cm recommended) - Transfer the file again. Wherever possible, connect the camera to the camera. 《83》 Case 5 Are other USB cable, and connect only one USB cable to the PC directly. Case 4 When using the USB hub. → There may malfunction when it... as another USB cable. The subject needs to the [Help] menu in the USB cable again, and then turn on again. Case 2 The camera is an unexpected error during file transfer. → Turn the camera power off the camera, remove the USB cable, plug in Digimax Reader for further ...


