User Manual (ENGLISH)
Page 3
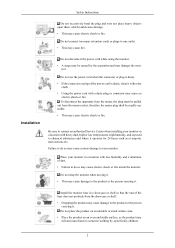
...carrying it . Install the monitor base in a showcase or shelf so that the end of the base does not protrude from the mains socket, therefore the mains plug shall be caused by , specifically children. 2 Do not connect too many extension cords or plugs to the ...authorized Service Center when installing your monitor. Safety Instructions Do not excessively bend the plug and wire nor place heavy objects upon them, which could cause damage. • This may cause electric shock or fire inside the monitor. Installation Do not disconnect the power cord while using the monitor. ...
...carrying it . Install the monitor base in a showcase or shelf so that the end of the base does not protrude from the mains socket, therefore the mains plug shall be caused by , specifically children. 2 Do not connect too many extension cords or plugs to the ...authorized Service Center when installing your monitor. Safety Instructions Do not excessively bend the plug and wire nor place heavy objects upon them, which could cause damage. • This may cause electric shock or fire inside the monitor. Installation Do not disconnect the power cord while using the monitor. ...
User Manual (ENGLISH)
Page 6
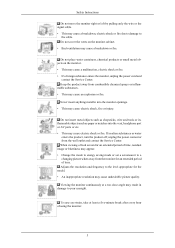
... fire. When viewing a fixed screen for an extended period of time, residual image or blurriness may appear. • Change the mode to energy saving mode or set a screensaver to your eyesight. Do not cover the vents on the monitor. • This may cause a malfunction, electric shock or fire. • If a foreign substance enters the monitor, unplug the power cord and contact the Service Center. If...
... fire. When viewing a fixed screen for an extended period of time, residual image or blurriness may appear. • Change the mode to energy saving mode or set a screensaver to your eyesight. Do not cover the vents on the monitor. • This may cause a malfunction, electric shock or fire. • If a foreign substance enters the monitor, unplug the power cord and contact the Service Center. If...
User Manual (ENGLISH)
Page 11
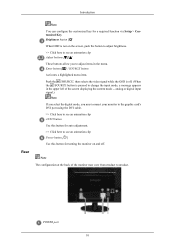
... must connect your monitor to the graphic card's DVI port using the DVI cable. >> Click here to see an animation clip AUTO button Use this button for auto adjustment. >> Click here to see an animation clip Power button [ ] Use this button for a required function via Setup > Customized Key. Note The configuration at the back of the screen displaying the current mode -- Brightness button [ ] When OSD is pressed to change the input mode, a message appears in the menu. Push the ' /SOURCE...
... must connect your monitor to the graphic card's DVI port using the DVI cable. >> Click here to see an animation clip AUTO button Use this button for auto adjustment. >> Click here to see an animation clip Power button [ ] Use this button for a required function via Setup > Customized Key. Note The configuration at the back of the screen displaying the current mode -- Brightness button [ ] When OSD is pressed to change the input mode, a message appears in the menu. Push the ' /SOURCE...
User Manual (ENGLISH)
Page 12
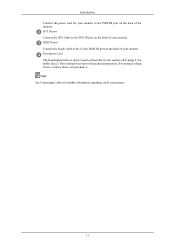
DVI IN port Connect the DVI Cable to the DVI IN port on the back of your monitor. RGB IN port Connect the D-sub cable to the 15-pin, RGB IN port on the back of your monitor. Kensington Lock The Kensington lock is a device used to physically fix the system when using it in a public place. (The locking device has to be purchased separately.) For using a locking device, contact where you purchase it. Introduction Connect the power cord for further information regarding cable connections. 11 Note See Connecting Cables for your monitor to the POWER port on the back of the monitor.
DVI IN port Connect the DVI Cable to the DVI IN port on the back of your monitor. RGB IN port Connect the D-sub cable to the 15-pin, RGB IN port on the back of your monitor. Kensington Lock The Kensington lock is a device used to physically fix the system when using it in a public place. (The locking device has to be purchased separately.) For using a locking device, contact where you purchase it. Introduction Connect the power cord for further information regarding cable connections. 11 Note See Connecting Cables for your monitor to the POWER port on the back of the monitor.
User Manual (ENGLISH)
Page 14
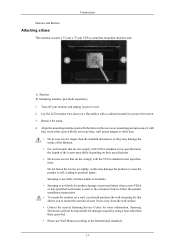
Connections Monitor and Bottom Attaching a Base This monitor accepts a 75 mm x 75 mm VESA-compliant mounting interface pad. A. Samsung is used or the consumer fails to follow the product installation instructions. • To mount the monitor on a flat surface with a cushion beneath it with four screws that allows you to the International standards. 13 Turn off your monitor and unplug its power cord. 2. Do not fasten the screws too tightly...
Connections Monitor and Bottom Attaching a Base This monitor accepts a 75 mm x 75 mm VESA-compliant mounting interface pad. A. Samsung is used or the consumer fails to follow the product installation instructions. • To mount the monitor on a flat surface with a cushion beneath it with four screws that allows you to the International standards. 13 Turn off your monitor and unplug its power cord. 2. Do not fasten the screws too tightly...
User Manual (ENGLISH)
Page 15
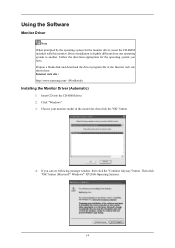
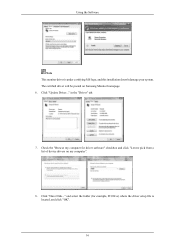
... download the driver program file at the Internet web site shown here. Click "Windows". 3. Then click "OK" button (Microsoft® Windows® XP/2000 Operating System). 14 Internet web site : http://www.samsung.com/ (Worldwide) Installing the Monitor Driver (Automatic) 1. Choose your monitor model in the model list, then click the "OK" button. 4. If you have. Insert CD into the CD-ROM drive. 2. Driver installation...
... download the driver program file at the Internet web site shown here. Click "Windows". 3. Then click "OK" button (Microsoft® Windows® XP/2000 Operating System). 14 Internet web site : http://www.samsung.com/ (Worldwide) Installing the Monitor Driver (Automatic) 1. Choose your monitor model in the model list, then click the "OK" button. 4. If you have. Insert CD into the CD-ROM drive. 2. Driver installation...
User Manual (ENGLISH)
Page 16
Using the Software Note This monitor driver is completed. Click "Personalization" and then "Display Settings". 4. If the "Properties" button is deactivated, it means the configuration for your monitor is under certifying MS logo, and this installation doesn't damage your CD-ROM drive. 2. Click (Start) and "Control Panel". Click "Advanced Settings...". 5. If the message "Windows needs..." Insert your Manual CD into your system. Then, double-click on Samsung Monitor homepage...
Using the Software Note This monitor driver is completed. Click "Personalization" and then "Display Settings". 4. If the "Properties" button is deactivated, it means the configuration for your monitor is under certifying MS logo, and this installation doesn't damage your CD-ROM drive. 2. Click (Start) and "Control Panel". Click "Advanced Settings...". 5. If the message "Windows needs..." Insert your Manual CD into your system. Then, double-click on Samsung Monitor homepage...
User Manual (ENGLISH)
Page 17
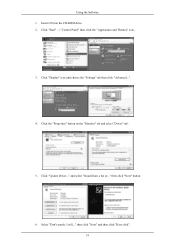
and select the folder (for driver software" checkbox and click "Let me pick from a list of device drivers on Samsung Monitor homepage. 6. Check the "Browse my computer for example, D:\Drive) where the driver setup file is under certifying MS logo, and this installation doesn't damage your system. Click "Update Driver..." Click "Have Disk..." in the "Driver" tab. 7. The certified driver will be posted on my computer". 8. Using the Software Note This monitor driver is located, and click "OK". 16
and select the folder (for driver software" checkbox and click "Let me pick from a list of device drivers on Samsung Monitor homepage. 6. Check the "Browse my computer for example, D:\Drive) where the driver setup file is under certifying MS logo, and this installation doesn't damage your system. Click "Update Driver..." Click "Have Disk..." in the "Driver" tab. 7. The certified driver will be posted on my computer". 8. Using the Software Note This monitor driver is located, and click "OK". 16
User Manual (ENGLISH)
Page 19
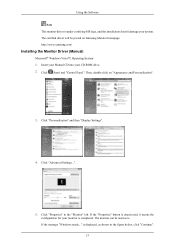
Insert CD into the CD-ROM drive. 2. then click "Next" button. 6. Click the "Properties" button on the "Monitor" tab and select "Driver" tab. 5. Click "Update Driver..." Select "Don't search, I will..." then click "Next" and then click "Have disk". 18 Click "Display" icon and choose the "Settings" tab then click "Advanced...". 4. Click "Start" → "Control Panel" then click the "Appearance and Themes" icon. 3. and select "Install from a list or..." Using the Software 1.
Insert CD into the CD-ROM drive. 2. then click "Next" button. 6. Click the "Properties" button on the "Monitor" tab and select "Driver" tab. 5. Click "Update Driver..." Select "Don't search, I will..." then click "Next" and then click "Have disk". 18 Click "Display" icon and choose the "Settings" tab then click "Advanced...". 4. Click "Start" → "Control Panel" then click the "Appearance and Themes" icon. 3. and select "Install from a list or..." Using the Software 1.
User Manual (ENGLISH)
Page 21
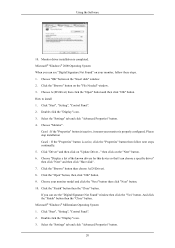
... A:(D:\Driver). 8. Click the "Finish" button then the "Close" button. Click "Start", "Setting", "Control Panel". 2. Click "Start", "Setting", "Control Panel". 2. Choose "Monitor". And click the "Finish" button then the "Close" button. Using the Software 10. Click the "Browse" button on the "Insert disk" window. 2. Monitor driver installation is properly configured. Select the "Settings" tab and click "Advanced Properties" button. 4. Case1 : If the "Properties" button is active, click the "Properties" button then follow these steps. 1. Click the "Open" button...
... A:(D:\Driver). 8. Click the "Finish" button then the "Close" button. Click "Start", "Setting", "Control Panel". 2. Click "Start", "Setting", "Control Panel". 2. Choose "Monitor". And click the "Finish" button then the "Close" button. Using the Software 10. Click the "Browse" button on the "Insert disk" window. 2. Monitor driver installation is properly configured. Select the "Settings" tab and click "Advanced Properties" button. 4. Case1 : If the "Properties" button is active, click the "Properties" button then follow these steps. 1. Click the "Open" button...
User Manual (ENGLISH)
Page 22
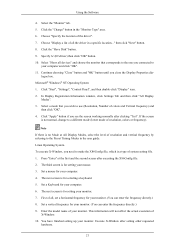
... Modes in the user guide. If the screen is for your monitor. 7. Choose "Specify the location of X-Window. 10. then click "Next" button. 8. Specify A:\(D:\driver) then click "OK" button. 10. The next screen is for your monitor. Execute X-Window after clicking "Test". Click "Start", "Settings", "Control Panel", and then double-click "Display" icon. 2. You have finished setting up your monitor. (You can enter the frequency directly.) 8. Set a vertical frequency for setting your computer. 6. Using the Software 4. Set...
... Modes in the user guide. If the screen is for your monitor. 7. Choose "Specify the location of X-Window. 10. then click "Next" button. 8. Specify A:\(D:\driver) then click "OK" button. 10. The next screen is for your monitor. Execute X-Window after clicking "Test". Click "Start", "Settings", "Control Panel", and then double-click "Display" icon. 2. You have finished setting up your monitor. (You can enter the frequency directly.) 8. Set a vertical frequency for setting your computer. 6. Using the Software 4. Set...

User Manual (ENGLISH)
Page 32
... Contrast Dynamic Contrast is to automatically detect distribution of seven settings by simply pressing Customized Key control button. • Custom Although the values are carefully chosen by our engineers, the pre-configured values may not be comfortable to create optimum contrast. Each mode has its own pre-configured brightness value. MENU MENU Color (Not available in MagicBright mode of Dynamic Contrast.) 31 Adjusting the Monitor...
... Contrast Dynamic Contrast is to automatically detect distribution of seven settings by simply pressing Customized Key control button. • Custom Although the values are carefully chosen by our engineers, the pre-configured values may not be comfortable to create optimum contrast. Each mode has its own pre-configured brightness value. MENU MENU Color (Not available in MagicBright mode of Dynamic Contrast.) 31 Adjusting the Monitor...

User Manual (ENGLISH)
Page 48
... the monitor. Remove all electronic devices such as radios, fans, clocks and telephones that the monitor is functioning properly. Turn off both your computer and the monitor. 2. Unplug the video cable from the computer. then turn on the monitor. your video controller and computer system; Therefore, if there is a problem with the input signal, a message appears on the screen or the screen goes blank although the power indicator LED...
... the monitor. Remove all electronic devices such as radios, fans, clocks and telephones that the monitor is functioning properly. Turn off both your computer and the monitor. 2. Unplug the video cable from the computer. then turn on the monitor. your video controller and computer system; Therefore, if there is a problem with the input signal, a message appears on the screen or the screen goes blank although the power indicator LED...
User Manual (ENGLISH)
Page 49
... the monitor status is no image on the screen? A: Adjust the maximum resolution and frequency that the monitor can handle properly. Press ' /SOURCE' button to analog. Troubleshooting noisy, and video mode not supported, etc. No images on the monitor. A: Check the power cord connection and supply. A: (Connected using the D-sub cable) Check the signal cable connection. (Connected using the DVI cable) If you still see an (error) message on the screen when the monitor is connected properly, check to see "Check Signal Cable" on the screen or a "Not Optimum Mode", "Recommended Mode 1440...
... the monitor status is no image on the screen? A: Adjust the maximum resolution and frequency that the monitor can handle properly. Press ' /SOURCE' button to analog. Troubleshooting noisy, and video mode not supported, etc. No images on the monitor. A: Check the power cord connection and supply. A: (Connected using the D-sub cable) Check the signal cable connection. (Connected using the DVI cable) If you still see an (error) message on the screen when the monitor is connected properly, check to see "Check Signal Cable" on the screen or a "Not Optimum Mode", "Recommended Mode 1440...
User Manual (ENGLISH)
Page 50
... Modes). A: Adjust the resolution and frequency at 1 second intervals? Q: Connected using the OSD. Q: The screen can be unbalanced due to a crash between ap- Please change to activate the monitor and restore the image on the screen. A: Check the signal cable connection. plications? Q: Has the video card been set properly? A: The monitor is fully inserted in PowerSaver mode. The screen shows strange colors or just black and white. A: Make sure the video card is in its slot. A: Adjust screen image position and size using the DVI cable? A: Unlock...
... Modes). A: Adjust the resolution and frequency at 1 second intervals? Q: Connected using the OSD. Q: The screen can be unbalanced due to a crash between ap- Please change to activate the monitor and restore the image on the screen. A: Check the signal cable connection. plications? Q: Has the video card been set properly? A: The monitor is fully inserted in PowerSaver mode. The screen shows strange colors or just black and white. A: Make sure the video card is in its slot. A: Adjust screen image position and size using the DVI cable? A: Unlock...
User Manual (ENGLISH)
Page 51
... the Plug & Play (VESA DDC) function can be adjusted. A: To check whether your monitor. Q: MagicTune™ feature is found ". Troubleshooting The screen is out of the video card. (Refer to the Preset Timing Modes). A: Windows XP : Set the resolution at the Control Panel → Display → Settings. Q: Have you installed the monitor driver? A: Install the monitor driver according to the Driver Installation Instructions. When you have changed after changing the video card. A: Adjust the resolution and frequency of focus or OSD cannot be supported. LED is...
... the Plug & Play (VESA DDC) function can be adjusted. A: To check whether your monitor. Q: MagicTune™ feature is found ". Troubleshooting The screen is out of the video card. (Refer to the Preset Timing Modes). A: Windows XP : Set the resolution at the Control Panel → Display → Settings. Q: Have you installed the monitor driver? A: Install the monitor driver according to the Driver Installation Instructions. When you have changed after changing the video card. A: Adjust the resolution and frequency of focus or OSD cannot be supported. LED is...
User Manual (ENGLISH)
Page 52
... when using the maximum resolution.) If you changed by reconfiguring the video card. Note If problems repeatedly occur, contact an authorized service center. If a copy of the video screen is set to the computer or the video card manual for details. 51 Check if the power cord and the video cables are properly connected to operate normally after installing the program for MagicTune™ MAC. A: Windows XP: Set the resolution in the Control Panel → Display → Settings...
... when using the maximum resolution.) If you changed by reconfiguring the video card. Note If problems repeatedly occur, contact an authorized service center. If a copy of the video screen is set to the computer or the video card manual for details. 51 Check if the power cord and the video cables are properly connected to operate normally after installing the program for MagicTune™ MAC. A: Windows XP: Set the resolution in the Control Panel → Display → Settings...
User Manual (ENGLISH)
Page 55
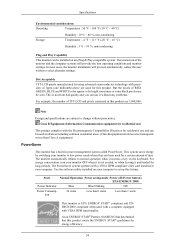
..., unless the user wishes to change without any Plug & Play compatible system. Note Design and specifications are subject to select alternate settings. This system saves energy by using advanced semiconductor technology with VESA DPM functionality. For energy conservation, turn your monitor to be bright sometimes or some black pixels may be seen. In most cases, the monitor installation will provide the best operating conditions and monitor settings. Specifications Environmental considerations...
..., unless the user wishes to change without any Plug & Play compatible system. Note Design and specifications are subject to select alternate settings. This system saves energy by using advanced semiconductor technology with VESA DPM functionality. For energy conservation, turn your monitor to be bright sometimes or some black pixels may be seen. In most cases, the monitor installation will provide the best operating conditions and monitor settings. Specifications Environmental considerations...
User Manual (ENGLISH)
Page 57
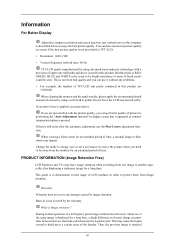
... the pixels of RED, GREEN, BLUE and WHITE color seem to be bright sometimes or some of a LCD panel, pixel image retention doesn't occur. When viewing a fixed screen for an extended period of time, a residual image or blurriness may stain it without any damage caused by the warranty. Warranty Warranty does not cover any problems. • For example, the number of TFT-LCD sub pixels contained in this product. Burn-in display screen...
... the pixels of RED, GREEN, BLUE and WHITE color seem to be bright sometimes or some of a LCD panel, pixel image retention doesn't occur. When viewing a fixed screen for an extended period of time, a residual image or blurriness may stain it without any damage caused by the warranty. Warranty Warranty does not cover any problems. • For example, the number of TFT-LCD sub pixels contained in this product. Burn-in display screen...

User Manual (ENGLISH)
Page 58
... (Black & White, Grey) Ex) • Recommended settings: Bright colors with 2 colors every 30 minutes. Power Off, Screen Saver, or Power Save Mode Ex) • Turn the power off when using Grey colors, which can cause Image retention easily. • Avoid: Colors with big difference in luminance • Change the characters color and background color every 30 minutes 57 Information when switching to image retention. All display products, including LCD, are subject to a new video image. Ex...
... (Black & White, Grey) Ex) • Recommended settings: Bright colors with 2 colors every 30 minutes. Power Off, Screen Saver, or Power Save Mode Ex) • Turn the power off when using Grey colors, which can cause Image retention easily. • Avoid: Colors with big difference in luminance • Change the characters color and background color every 30 minutes 57 Information when switching to image retention. All display products, including LCD, are subject to a new video image. Ex...


