Quick Guide (ENGLISH)
Page 3
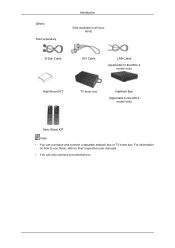
Others Sold separately Introduction (Not available in all locations) D-Sub Cable DVI Cable LAN Cable (Applicable to the MXn-2 model only) Wall Mount KIT TV tuner box NetWork Box (Applicable to their respective user manuals. • You can purchase and connect a separate network box or TV tuner box. For information on how to use these, refer to the MX-2 model only) Semi Stand KIT Note • You can only connect one external box.
Others Sold separately Introduction (Not available in all locations) D-Sub Cable DVI Cable LAN Cable (Applicable to the MXn-2 model only) Wall Mount KIT TV tuner box NetWork Box (Applicable to their respective user manuals. • You can purchase and connect a separate network box or TV tuner box. For information on how to use these, refer to the MX-2 model only) Semi Stand KIT Note • You can only connect one external box.
Quick Guide (ENGLISH)
Page 4
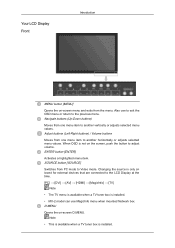
... or return to adjust volume. ENTER button [ENTER] Activates a highlighted menu item. Also use MagicInfo menu when mounted Network box. Changing the source is only allowed for external devices that are connected to the LCD Display at the time. [PC] → [DVI] → [AV] → [HDMI] → [MagicInfo...] → [TV] Note • The TV menu is available when a TV tuner box is installed. Your LCD Display Front Introduction MENU button [MENU] Opens...
... or return to adjust volume. ENTER button [ENTER] Activates a highlighted menu item. Also use MagicInfo menu when mounted Network box. Changing the source is only allowed for external devices that are connected to the LCD Display at the time. [PC] → [DVI] → [AV] → [HDMI] → [MagicInfo...] → [TV] Note • The TV menu is available when a TV tuner box is installed. Your LCD Display Front Introduction MENU button [MENU] Opens...

Quick Guide (ENGLISH)
Page 14
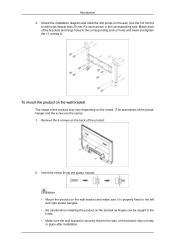
... between the two locking holes at the back of the product is too short or long, loosen all or some of the arrow. When done, mount the wall bracket on the wall bracket to adjust the length. Use the correct one . 1. A - Wall Bracket C - If the length is correct. Hinge (Right) 2. Before...
... between the two locking holes at the back of the product is too short or long, loosen all or some of the arrow. When done, mount the wall bracket on the wall bracket to adjust the length. Use the correct one . 1. A - Wall Bracket C - If the length is correct. Hinge (Right) 2. Before...
Quick Guide (ENGLISH)
Page 15
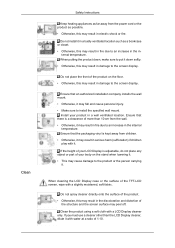
... the 11 screws A. Remove the 4 screws on the wall. Match each anchor in the corresponding hole. Insert the screw B into the plastic hanger. Notice • Mount the product on the wall bracket and make sure it is properly fixed to the wall, or the product may not stay in the holes... when installing the product on the model. (The assemblies of the plastic hanger and the screw are the same) 1. Fix each of the product. 2. To mount the product on the wall bracket The shape of the product may vary depending on the bracket as fingers can be caught in place after...
... the 11 screws A. Remove the 4 screws on the wall. Match each anchor in the corresponding hole. Insert the screw B into the plastic hanger. Notice • Mount the product on the wall bracket and make sure it is properly fixed to the wall, or the product may not stay in the holes... when installing the product on the model. (The assemblies of the plastic hanger and the screw are the same) 1. Fix each of the product. 2. To mount the product on the wall bracket The shape of the product may vary depending on the bracket as fingers can be caught in place after...
User Manual (ENGLISH)
Page 4
... may fall and cause personal injury. • Make sure to install the specified wall mount. Ensure that an authorized installation company installs the wall mount. • Otherwise, it . When cleaning the LCD Display case or the surface of 1:10. Ensure that the packaging vinyl is adjustable, do... Do not spray cleaner directly onto the surface of the product. • Otherwise, this may result in the discoloration and distortion of your LCD Display is kept away from children. • Otherwise, it down softly. • Otherwise, this may result in a well ventilated location. If...
... may fall and cause personal injury. • Make sure to install the specified wall mount. Ensure that an authorized installation company installs the wall mount. • Otherwise, it . When cleaning the LCD Display case or the surface of 1:10. Ensure that the packaging vinyl is adjustable, do... Do not spray cleaner directly onto the surface of the product. • Otherwise, this may result in the discoloration and distortion of your LCD Display is kept away from children. • Otherwise, it down softly. • Otherwise, this may result in a well ventilated location. If...
User Manual (ENGLISH)
Page 11
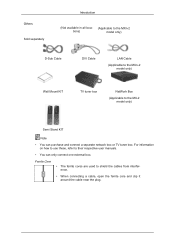
... (Not available in all loca- (Applicable to the MXn-2 tions) model only) D-Sub Cable DVI Cable LAN Cable (Applicable to the MXn-2 model only) Wall Mount KIT TV tuner box NetWork Box (Applicable to the MX-2 model only) Semi Stand KIT Note • You can only connect one external box. For...
... (Not available in all loca- (Applicable to the MXn-2 tions) model only) D-Sub Cable DVI Cable LAN Cable (Applicable to the MXn-2 model only) Wall Mount KIT TV tuner box NetWork Box (Applicable to the MX-2 model only) Semi Stand KIT Note • You can only connect one external box. For...

User Manual (ENGLISH)
Page 12
... exit the OSD menu or return to the LCD Display at the time. [PC] → [DVI] → [AV] → [HDMI] → [MagicInfo] → [TV] Note • The TV menu is available when a TV tuner box is installed. • MX-2 model can use MagicInfo menu when mounted Network box. Adjust buttons (Left-Right buttons... from one menu item to Video mode. Navigate buttons (Up-Down buttons) Moves from PC mode to another vertically or adjusts selected menu values. Your LCD Display Front Introduction MENU button [MENU] Opens the on -screen D.MENU.
... exit the OSD menu or return to the LCD Display at the time. [PC] → [DVI] → [AV] → [HDMI] → [MagicInfo] → [TV] Note • The TV menu is available when a TV tuner box is installed. • MX-2 model can use MagicInfo menu when mounted Network box. Adjust buttons (Left-Right buttons... from one menu item to Video mode. Navigate buttons (Up-Down buttons) Moves from PC mode to another vertically or adjusts selected menu values. Your LCD Display Front Introduction MENU button [MENU] Opens the on -screen D.MENU.

User Manual (ENGLISH)
Page 22
... some of the arrow. Insert and tighten the Captive Screw in the direction of the 4screws on the wall. Use the correct one . 1. When done, mount the wall bracket on the wall bracket to adjust the length. Hinge (Left) D - Introduction Wall Bracket Assembly Note There are two hinges(left and right...
... some of the arrow. Insert and tighten the Captive Screw in the direction of the 4screws on the wall. Use the correct one . 1. When done, mount the wall bracket on the wall bracket to adjust the length. Hinge (Left) D - Introduction Wall Bracket Assembly Note There are two hinges(left and right...

User Manual (ENGLISH)
Page 23
... brackets and hinge holes to the corresponding anchor holes and insert and tighten the 11 screws A. Match each anchor in place after installation. Notice • Mount the product on the wall bracket and make sure it is securely fixed to drill holes deeper than 35 mm. Use the 5.0 mm bit to... the wall, or the product may vary depending on the wall. Fix each of the product. 2. To mount the product on the wall bracket The shape of the product may not stay in the corresponding hole. Introduction 3. Insert the screw B into the plastic...
... brackets and hinge holes to the corresponding anchor holes and insert and tighten the 11 screws A. Match each anchor in place after installation. Notice • Mount the product on the wall bracket and make sure it is securely fixed to drill holes deeper than 35 mm. Use the 5.0 mm bit to... the wall, or the product may vary depending on the wall. Fix each of the product. 2. To mount the product on the wall bracket The shape of the product may not stay in the corresponding hole. Introduction 3. Insert the screw B into the plastic...
User Manual (ENGLISH)
Page 59
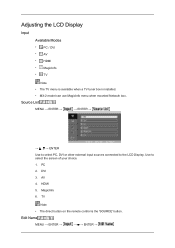
...8226; HDMI • MagicInfo • TV Note • The TV menu is available when a TV tuner box is the 'SOURCE' button. Use to the LCD Display. MagicInfo 6. Edit Name MENU → ENTER → → → ENTER → DVI 3. TV Note • The direct button on the remote control... is installed. • MX-2 model can use MagicInfo menu when mounted Network box. Source List MENU → ENTER → → ENTER → → , → ENTER Use to select PC, DVI or other ...
...8226; HDMI • MagicInfo • TV Note • The TV menu is available when a TV tuner box is the 'SOURCE' button. Use to the LCD Display. MagicInfo 6. Edit Name MENU → ENTER → → → ENTER → DVI 3. TV Note • The direct button on the remote control... is installed. • MX-2 model can use MagicInfo menu when mounted Network box. Source List MENU → ENTER → → ENTER → → , → ENTER Use to select PC, DVI or other ...
User Manual (ENGLISH)
Page 60
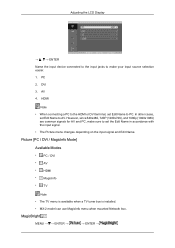
... • MagicInfo • TV Note • The TV menu is available when a TV tuner box is installed. • MX-2 model can use MagicInfo menu when mounted Network box. MagicBright MENU → → ENTER → → ENTER → In other cases, set the Edit Name in accordance with the input signal. •...; The Picture menu changes depending on the input signal and Edit Name. AV 4. Adjusting the LCD Display → , → ENTER Name the input device connected to the input jacks to AV. PC 2. DVI 3.
... • MagicInfo • TV Note • The TV menu is available when a TV tuner box is installed. • MX-2 model can use MagicInfo menu when mounted Network box. MagicBright MENU → → ENTER → → ENTER → In other cases, set the Edit Name in accordance with the input signal. •...; The Picture menu changes depending on the input signal and Edit Name. AV 4. Adjusting the LCD Display → , → ENTER Name the input device connected to the input jacks to AV. PC 2. DVI 3.
User Manual (ENGLISH)
Page 67
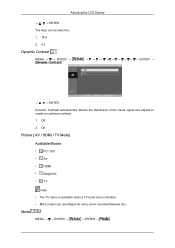
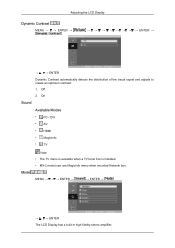
... → ENTER → → , → ENTER Dynamic Contrast automatically detects the distribution of the visual signal and adjusts to create an optimum contrast. 1. Adjusting the LCD Display → , → ENTER The Size can use MagicInfo menu when...
... → ENTER → → , → ENTER Dynamic Contrast automatically detects the distribution of the visual signal and adjusts to create an optimum contrast. 1. Adjusting the LCD Display → , → ENTER The Size can use MagicInfo menu when...
User Manual (ENGLISH)
Page 72
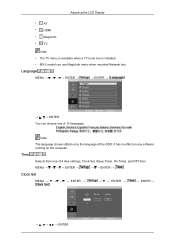
... automatically detects the distribution of the visual signal and adjusts to create an optimum contrast. 1. MENU ENTER → → ENTER → → , → ENTER The LCD Display has a built-in high fidelity stereo amplifier. On Sound Available Modes • PC / DVI • AV • HDMI • MagicInfo • TV Mode Note •...
... automatically detects the distribution of the visual signal and adjusts to create an optimum contrast. 1. MENU ENTER → → ENTER → → , → ENTER The LCD Display has a built-in high fidelity stereo amplifier. On Sound Available Modes • PC / DVI • AV • HDMI • MagicInfo • TV Mode Note •...
User Manual (ENGLISH)
Page 75
... ENTER → → → ENTER → Clock Set MENU → → → → ENTER → → → ENTER → → ENTER→ ENTER Adjusting the LCD Display • AV • HDMI • MagicInfo • TV Note • The TV menu is available when a TV tuner box is installed. • MX-2 model can..., Clock Set, Sleep Timer, On Timer, and Off Timer. Language MENU ENTER → → ENTER → → , → ENTER You can use MagicInfo menu when mounted Network box.
... ENTER → → → ENTER → Clock Set MENU → → → → ENTER → → → ENTER → → ENTER→ ENTER Adjusting the LCD Display • AV • HDMI • MagicInfo • TV Note • The TV menu is available when a TV tuner box is installed. • MX-2 model can..., Clock Set, Sleep Timer, On Timer, and Off Timer. Language MENU ENTER → → ENTER → → , → ENTER You can use MagicInfo menu when mounted Network box.
User Manual (ENGLISH)
Page 87
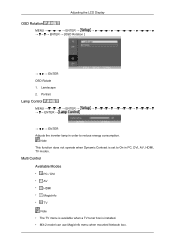
Note This function does not operate when Dynamic Contrast is installed. • MX-2 model can use MagicInfo menu when mounted Network box. Multi Control Available Modes • PC / DVI • AV • HDMI • MagicInfo • TV Note • The TV menu is available when a ... Control MENU ENTER ENTER → → , → ENTER Adjusts the inverter lamp in order to On in PC, DVI, AV, HDMI, TV modes. Adjusting the LCD Display OSD Rotation MENU ENTER ENTER → [OSD Rotation ] → , → ENTER OSD Rotate 1.
Note This function does not operate when Dynamic Contrast is installed. • MX-2 model can use MagicInfo menu when mounted Network box. Multi Control Available Modes • PC / DVI • AV • HDMI • MagicInfo • TV Note • The TV menu is available when a ... Control MENU ENTER ENTER → → , → ENTER Adjusts the inverter lamp in order to On in PC, DVI, AV, HDMI, TV modes. Adjusting the LCD Display OSD Rotation MENU ENTER ENTER → [OSD Rotation ] → , → ENTER OSD Rotate 1.
User Manual (ENGLISH)
Page 89
...mounted Network box. z To access other sources, press the SOURCE button in the process of up external devices only if the LCD Display turns on a Windows screen, a keyboard and mouse are required. z When using MagicInfo with the device directly connected to LCD Display : execute Device mode. z For pivoted LCD Displays...MagicInfo Window screen. z Do not unplug the LAN cable used for movies. z For pivoted LCD Displays, ticker transparency is supported for the network (ex: video display). z By selecting Disable, Enable or Commit, the system is not applied. Otherwise, the ...
...mounted Network box. z To access other sources, press the SOURCE button in the process of up external devices only if the LCD Display turns on a Windows screen, a keyboard and mouse are required. z When using MagicInfo with the device directly connected to LCD Display : execute Device mode. z For pivoted LCD Displays...MagicInfo Window screen. z Do not unplug the LAN cable used for movies. z For pivoted LCD Displays, ticker transparency is supported for the network (ex: video display). z By selecting Disable, Enable or Commit, the system is not applied. Otherwise, the ...
User Manual (ENGLISH)
Page 98
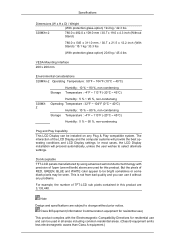
...LCD Display settings. lbs VESA Mounting Interface 200 x 200 mm Environmental considerations 320MX-2 Operating Temperature : 50°F ~ 104°F (10°C ~ 40°C) Humidity : 10 % ~ 80 %, non-condensing Storage Temperature : -4°F ~ 113°F (-20°C ~ 45°C) 320MX2 Humidity : 5 % ~ 95 %, non-condensing Operating Temperature : 32... Dot Acceptable TFT-LCD panels manufactured by using advanced semiconductor technology with the Electromagnetic Compatibility Directives for residential use) This product complies with precision of the LCD Display and the computer systems...
...LCD Display settings. lbs VESA Mounting Interface 200 x 200 mm Environmental considerations 320MX-2 Operating Temperature : 50°F ~ 104°F (10°C ~ 40°C) Humidity : 10 % ~ 80 %, non-condensing Storage Temperature : -4°F ~ 113°F (-20°C ~ 45°C) 320MX2 Humidity : 5 % ~ 95 %, non-condensing Operating Temperature : 32... Dot Acceptable TFT-LCD panels manufactured by using advanced semiconductor technology with the Electromagnetic Compatibility Directives for residential use) This product complies with precision of the LCD Display and the computer systems...


