Samsung 320MXn-2 - SyncMaster - 32" LCD Flat Panel Display Support and Manuals
Get Help and Manuals for this Samsung item
View All Support Options Below
Free Samsung 320MXn-2 manuals!
Problems with Samsung 320MXn-2?
Ask a Question
Free Samsung 320MXn-2 manuals!
Problems with Samsung 320MXn-2?
Ask a Question
Samsung 320MXn-2 Videos

Samsung 320MXn-3 Digital Signage Displays (LED LCD)
Duration: 3:30
Total Views: 666
Duration: 3:30
Total Views: 666
Popular Samsung 320MXn-2 Manual Pages
Quick Guide (ENGLISH) - Page 13
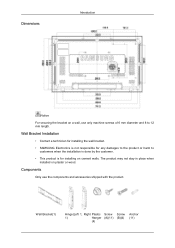
Wall Bracket Installation
• Contact a technician for installing the wall bracket.
• SAMSUNG Electronics is not responsible for installing on plaster or wood. The product may not stay in place when installed on cement walls.
Wall Bracket(1)
Hinge(Left 1, Right Plastic Screw Screw
1)
Hanger (A)(11) (B)(4)
(4)
Anchor (11)
Dimensions
Introduction
Notice
For securing the ...
Quick Guide (ENGLISH) - Page 23
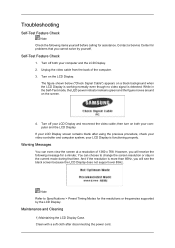
... solve by the LCD Display. Maintenance and Cleaning
1) Maintaining the LCD Display Case. Turn off both your computer and the LCD Display
If your LCD Display screen remains blank after disconnecting the power cord. You can even view the screen at a resolution of the computer. 3. Troubleshooting
Self-Test Feature Check
Note Check the following message for problems that time. then...
Quick Guide (ENGLISH) - Page 24
... their solutions are properly connected to become blank, have problems in installing the Adaptor (video) driver, boot the computer in Safe Mode, remove the Display Adaptor in the "Control Panel −> System −> Device Administrator" and then reboot the computer to the MagicInfo Troubleshooting section. Q: The LCD Display screen flickers.
Check if the computer beeps more network...
User Manual (ENGLISH) - Page 21

... the customer.
• This product is for installing on plaster or wood.
Wall Bracket Installation
• Contact a technician for installing the wall bracket.
• SAMSUNG Electronics is not responsible for any damages to the product or harm to 12 mm length. Dimensions
Introduction
Notice
For securing the bracket on a wall, use the components and accessories shipped with the...
User Manual (ENGLISH) - Page 31
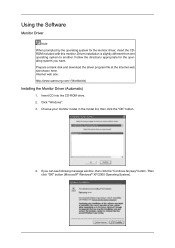
... web site shown here. Then click "OK" button (Microsoft® Windows® XP/2000 Operating System). Internet web site : http://www.samsung.com/ (Worldwide)
Installing the Monitor Driver (Automatic)
1. Follow the directions appropriate for the monitor driver, insert the CDROM included with this monitor. Choose your monitor model in the model list, then click the "OK" button.
4. Click...
User Manual (ENGLISH) - Page 32
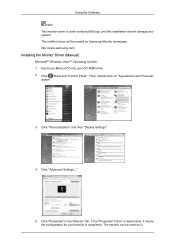
...is deactivated, it means the configuration for your monitor is . http://www.samsung.com/
Installing the Monitor Driver (Manual)
Microsoft® Windows Vista™, Operating System 1.
Click (Start) and "Control Panel". Click "Personalization" and then "Display Settings".
4. The monitor can be posted on "Appearance and Personal- The certified driver will be used as is completed. Click...
User Manual (ENGLISH) - Page 33
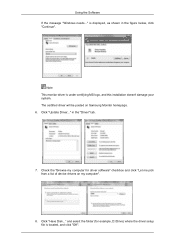
... example, D:\Drive) where the driver setup file is located, and click "OK". Note This monitor driver is displayed, as shown in the "Driver" tab.
7. and select the folder (for driver software" checkbox and click "Let me pick from a list of device drivers on Samsung Monitor homepage. 6. Using the Software If the message "Windows needs..." The certified driver will be posted on my...
User Manual (ENGLISH) - Page 35
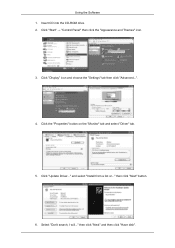
Click the "Properties" button on the "Monitor" tab and select "Driver" tab.
5. Click "Display" icon and choose the "Settings" tab then click "Advanced...".
4. and select "Install from a list or..." then click "Next" and then click "Have disk". Insert CD into the CD-ROM drive. 2. then click "Next" button.
6. Click "Update Driver..." Using the Software 1. Select "Don't search, I will...
User Manual (ENGLISH) - Page 37
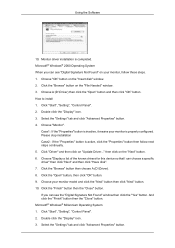
... button on the "Next" button. 6. Choose "OK" button on "Update Driver..." Click "Start", "Setting", "Control Panel". 2. Double click the "Display" icon. 3. Double click the "Display" icon. 3. Monitor driver installation is properly configured. Click "Driver" and then click on the "Insert disk" window. 2. If you can choose a specific driver" then click "Next" and then click "Have disk...
User Manual (ENGLISH) - Page 89
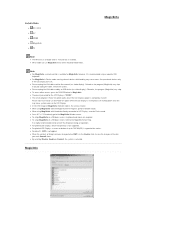
... installed. z For MagicInfo in MagicInfo. MagicInfo z To setup MagicInfo on a Windows screen, a keyboard and mouse are required. Available Modes z PC / DVI z AV z HDMI z MagicInfo z TV
MagicInfo
Note z The TV menu is available when a TV tuner box is restarted. z Do not unplug the LAN cable used by an USB device (ex: video display). Otherwise, the program (MagicInfo) may cause errors...
User Manual (ENGLISH) - Page 91

... can choose to Specifications > Preset Timing Modes for the resolutions or frequencies supported by yourself. Note Refer to change the screen resolution or stay in the Self-Test mode, the LED power indicator remains green and the figure moves around on both your LCD Display screen remains blank after disconnecting the power cord. Troubleshooting
Self-Test Feature...
User Manual (ENGLISH) - Page 92

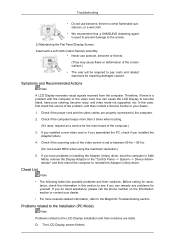
... recommend that a SAMSUNG cleansing agent is set to between 50 Hz ~ 85 Hz.
(Do not exceed 60Hz when using the maximum resolution.)
5. If you installed a new video card or if you assembled the PC, check if you have poor coloring, become noisy, and video mode not supported, etc.
Symptoms and Recommended Actions
Note
A LCD Display recreates visual...
User Manual (ENGLISH) - Page 104
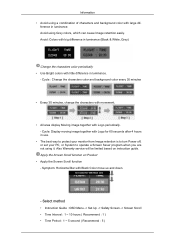
...: Display moving image together with Black Color move up and down.
- Select method
• Instruction Guide : OSD Menu -> Set Up -> Safety Screen -> Screen Scroll • Time Interval : 1 ~ 10 hours ( Recommend : 1 ) • Time Period : 1 ~ 5 second ( Recommend : 5 ) Symptom: Horizontal Bar with Logo for 60 seconds after 4 hours in use.
• The best way to protect your monitor...
User Manual (ENGLISH) - Page 105

... ( Recommend : 50 ) Note ( Please check CD's User Guide at "OSD Function", some model's will not available )
Apply the Screen Pixel function on Product • Apply the Screen Erasing function - Symptom: 2 Vertical blocks move up and down .
- Symptom: Dot with erasing the display Select method
• Instruction Guide : OSD Menu -> Set Up -> Safety Screen -> Pixel • Time Interval...
User Manual (ENGLISH) - Page 106
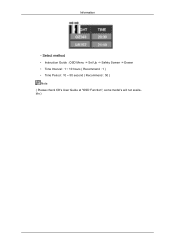
Information
- Select method
• Instruction Guide : OSD Menu -> Set Up -> Safety Screen -> Eraser • Time Interval : 1 ~ 10 hours ( Recommend : 1 ) • Time Period : 10 ~ 50 second ( Recommend : 50 ) Note ( Please check CD's User Guide at "OSD Function", some model's will not available )
Samsung 320MXn-2 Reviews
We have not received any reviews for Samsung yet.