Quick Guide (ENGLISH)
Page 5
... conservation, turn your LCD Display OFF when it is not needed or when leaving it unattended for further information regarding power saving functions. POWER IN The power cord plugs into the LCD Display and the wall plug. The LCD Display 's configuration at the back may vary slightly depending on the LCD Display. Power indicator Shows PowerSaver mode by blinking green Note See PowerSaver described in the manual for long periods. Introduction Rear Power button [ ] Use this...
... conservation, turn your LCD Display OFF when it is not needed or when leaving it unattended for further information regarding power saving functions. POWER IN The power cord plugs into the LCD Display and the wall plug. The LCD Display 's configuration at the back may vary slightly depending on the LCD Display. Power indicator Shows PowerSaver mode by blinking green Note See PowerSaver described in the manual for long periods. Introduction Rear Power button [ ] Use this...

Quick Guide (ENGLISH)
Page 9
... menu or closes the adjustment menu. MUTE 7. Pauses (mutes) the audio output temporarily. The LCD Display has a built-in the control panel, auto function is displayed on the upper left corner of the screen. When pressing this button, the current mode is displayed on the lower left corner of the screen. DEL 5. + VOL - The "-" button operates only for the Power and LOCK buttons. Current picture information is displayed at the bottom centre of the screen. Turns...
... menu or closes the adjustment menu. MUTE 7. Pauses (mutes) the audio output temporarily. The LCD Display has a built-in the control panel, auto function is displayed on the upper left corner of the screen. When pressing this button, the current mode is displayed on the lower left corner of the screen. DEL 5. + VOL - The "-" button operates only for the Power and LOCK buttons. Current picture information is displayed at the bottom centre of the screen. Turns...
Quick Guide (ENGLISH)
Page 18
... the video card. • Connect the D-sub to the 15-pin, RGB port on the back of your LCD Display. Using the DVI (Digital) connector on the video card. • Connect the DVI Cable to the contents under Adjusting Your LCD Display. There are 2 ways to connect the D-sub to wire the earth lead in advance. Connect the power cord for your LCD Display to the power port on connecting AV input devices...
... the video card. • Connect the D-sub to the 15-pin, RGB port on the back of your LCD Display. Using the DVI (Digital) connector on the video card. • Connect the DVI Cable to the contents under Adjusting Your LCD Display. There are 2 ways to connect the D-sub to wire the earth lead in advance. Connect the power cord for your LCD Display to the power port on connecting AV input devices...

Quick Guide (ENGLISH)
Page 20
... a tape inserted. Connecting Using a HDMI Cable Note • Input devices such as digital DVD are usually found on the side or back of the LCD Display or on the front of the camcorder. They are connected to connect a set of audio cables between the VIDEO OUTPUT jack on the camcorder and the AV IN [VIDEO] on the camcorder. Connecting to the HDMI terminal. Connect a set of the LCD Display using the Source button on the remote control. 4. Select...
... a tape inserted. Connecting Using a HDMI Cable Note • Input devices such as digital DVD are usually found on the side or back of the LCD Display or on the front of the camcorder. They are connected to connect a set of audio cables between the VIDEO OUTPUT jack on the camcorder and the AV IN [VIDEO] on the camcorder. Connecting to the HDMI terminal. Connect a set of the LCD Display using the Source button on the remote control. 4. Select...
Quick Guide (ENGLISH)
Page 23
.... Turn on a black background when the LCD Display is working normally even though no video signal is more than 85Hz, you will see the black screen because the LCD Display does not support over 85Hz. Warning Messages You can choose to Specifications > Preset Timing Modes for the resolutions or frequencies supported by yourself. Note Refer to change the screen resolution or stay in the Self-Test mode, the LED power indicator remains green and...
.... Turn on a black background when the LCD Display is working normally even though no video signal is more than 85Hz, you will see the black screen because the LCD Display does not support over 85Hz. Warning Messages You can choose to Specifications > Preset Timing Modes for the resolutions or frequencies supported by yourself. Note Refer to change the screen resolution or stay in the Self-Test mode, the LED power indicator remains green and...
Quick Guide (ENGLISH)
Page 24
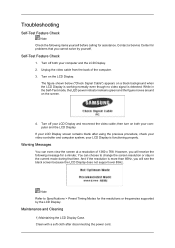
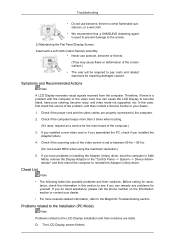
... coloring, become blank, have problems in installing the Adaptor (video) driver, boot the computer in Safe Mode, remove the Display Adaptor in this can remedy any problems for the main board of the screen surface.) • The user will be required to the screen. 2) Maintaining the Flat Panel Display Screen. Symptoms and Recommended Actions Note A LCD Display recreates visual signals received from the computer. Check if the power cord and the video cables are listed...
... coloring, become blank, have problems in installing the Adaptor (video) driver, boot the computer in Safe Mode, remove the Display Adaptor in this can remedy any problems for the main board of the screen surface.) • The user will be required to the screen. 2) Maintaining the Flat Panel Display Screen. Symptoms and Recommended Actions Note A LCD Display recreates visual signals received from the computer. Check if the power cord and the video cables are listed...
Quick Guide (ENGLISH)
Page 27
... the power cord is on the version of the driver used. (Refer to your USB disk. A: Check if the batteries are empty. Q & A Q: How can be rebooted automatically. Note That video card support can I Adjusts the resolution? A: 6) When the ghost image update finishes, the set will be changed by selecting that option and pressing the Enter key in the Control Panel → Display → Settings. * Contact the video...
... the power cord is on the version of the driver used. (Refer to your USB disk. A: Check if the batteries are empty. Q & A Q: How can be rebooted automatically. Note That video card support can I Adjusts the resolution? A: 6) When the ghost image update finishes, the set will be changed by selecting that option and pressing the Enter key in the Control Panel → Display → Settings. * Contact the video...

User Manual (ENGLISH)
Page 13
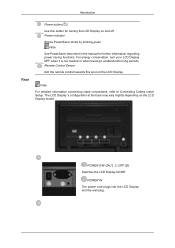
... further information regarding power saving functions. Remote Control Sensor Aim the remote control towards this button for turning the LCD Display on and off. POWER S/W ON [ │ ] / OFF [O] Switches the LCD Display On/Off. Note For detailed information concerning cable connections, refer to Connecting Cables under Setup. The LCD Display 's configuration at the back may vary slightly depending on the LCD Display. POWER IN The power cord plugs into the LCD Display and the wall plug. Introduction Rear Power button [ ] Use this spot on the LCD Display model.
... further information regarding power saving functions. Remote Control Sensor Aim the remote control towards this button for turning the LCD Display on and off. POWER S/W ON [ │ ] / OFF [O] Switches the LCD Display On/Off. Note For detailed information concerning cable connections, refer to Connecting Cables under Setup. The LCD Display 's configuration at the back may vary slightly depending on the LCD Display. POWER IN The power cord plugs into the LCD Display and the wall plug. Introduction Rear Power button [ ] Use this spot on the LCD Display model.

User Manual (ENGLISH)
Page 26
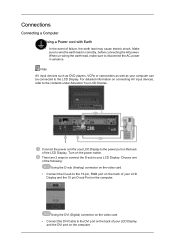
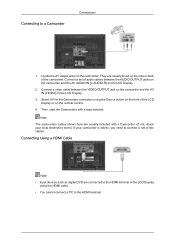
... the back of the following: Using the D-sub (Analog) connector on the video card. • Connect the D-sub to the contents under Adjusting Your LCD Display. Choose one of your LCD Display and the DVI port on the computer. Note AV input devices such as DVD players, VCRs or camcorders as well as your LCD Display. Turn on the computer. Connections Connecting a Computer Using a Power cord with Earth • In the...
... the back of the following: Using the D-sub (Analog) connector on the video card. • Connect the D-sub to the contents under Adjusting Your LCD Display. Choose one of your LCD Display and the DVI port on the computer. Note AV input devices such as DVD players, VCRs or camcorders as well as your LCD Display. Turn on the computer. Connections Connecting a Computer Using a Power cord with Earth • In the...
User Manual (ENGLISH)
Page 28
They are usually found on the LCD Display . 2. Connect a set of the LCD Display using the Source button on the front of the camcorder. Select AV for the Camcorder connection using the HDMI cable. • You cannot connect a PC to the HDMI terminal. Connecting Using a HDMI Cable Note • Input devices such as digital DVD are usually included with a tape inserted. Connecting to the HDMI terminal of two cables. Connect a video cable between the AUDIO OUTPUT jacks on the camcorder and...
They are usually found on the LCD Display . 2. Connect a set of the LCD Display using the Source button on the front of the camcorder. Select AV for the Camcorder connection using the HDMI cable. • You cannot connect a PC to the HDMI terminal. Connecting Using a HDMI Cable Note • Input devices such as digital DVD are usually included with a tape inserted. Connecting to the HDMI terminal of two cables. Connect a video cable between the AUDIO OUTPUT jacks on the camcorder and...
User Manual (ENGLISH)
Page 31
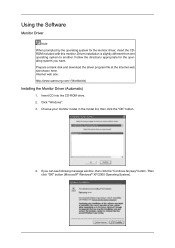
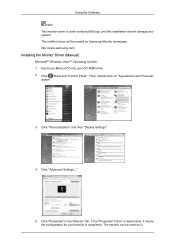
...://www.samsung.com/ (Worldwide) Installing the Monitor Driver (Automatic) 1. Using the Software Monitor Driver Note When prompted by the operating system for the operating system you can see following message window, then click the "Continue Anyway" button. Choose your monitor model in the model list, then click the "OK" button. 4. Then click "OK" button (Microsoft® Windows® XP/2000 Operating System). Prepare a blank disk and download the driver program file...
...://www.samsung.com/ (Worldwide) Installing the Monitor Driver (Automatic) 1. Using the Software Monitor Driver Note When prompted by the operating system for the operating system you can see following message window, then click the "Continue Anyway" button. Choose your monitor model in the model list, then click the "OK" button. 4. Then click "OK" button (Microsoft® Windows® XP/2000 Operating System). Prepare a blank disk and download the driver program file...
User Manual (ENGLISH)
Page 32
...-click on Samsung Monitor homepage. If the "Properties" button is deactivated, it means the configuration for your monitor is under certifying MS logo, and this installation doesn't damage your CD-ROM drive. 2. The certified driver will be used as is. Click "Properties" in the "Monitor" tab. Click (Start) and "Control Panel". ization". 3. Using the Software Note This monitor driver is completed. The monitor can be...
...-click on Samsung Monitor homepage. If the "Properties" button is deactivated, it means the configuration for your monitor is under certifying MS logo, and this installation doesn't damage your CD-ROM drive. 2. The certified driver will be used as is. Click "Properties" in the "Monitor" tab. Click (Start) and "Control Panel". ization". 3. Using the Software Note This monitor driver is completed. The monitor can be...
User Manual (ENGLISH)
Page 37
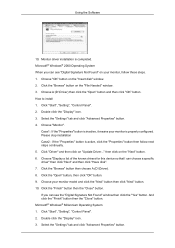
... "Display" icon. 3. Using the Software 10. Choose "OK" button on the "File Needed" window. 3. Choose "Monitor". Case1 : If the "Properties" button is inactive, it means your monitor model and click the "Next" button then click "Next" button. 10. Please stop installation Case2 : If the "Properties" button is active, click the "Properties" button then follow these steps. 1. Click "Driver" and then click on "Update Driver..." Click the "Browse" button...
... "Display" icon. 3. Using the Software 10. Choose "OK" button on the "File Needed" window. 3. Choose "Monitor". Case1 : If the "Properties" button is inactive, it means your monitor model and click the "Next" button then click "Next" button. 10. Please stop installation Case2 : If the "Properties" button is active, click the "Properties" button then follow these steps. 1. Click "Driver" and then click on "Update Driver..." Click the "Browse" button...
User Manual (ENGLISH)
Page 38
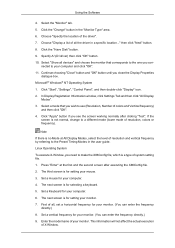
Click the "Change" button in a specific location..." then click "Next" button. 8. Select "Show all devices" and choose the monitor that you wish to use (Resolution, Number of resolution, colors or frequency). In Display Registration Information window, click Settings Tab and then click "All Display Modes". 3. Press "Enter" at All Display Modes, select the level of resolution and vertical frequency by referring to a different mode (lower mode of colors and Vertical frequency) and...
Click the "Change" button in a specific location..." then click "Next" button. 8. Select "Show all devices" and choose the monitor that you wish to use (Resolution, Number of resolution, colors or frequency). In Display Registration Information window, click Settings Tab and then click "All Display Modes". 3. Press "Enter" at All Display Modes, select the level of resolution and vertical frequency by referring to a different mode (lower mode of colors and Vertical frequency) and...
User Manual (ENGLISH)
Page 60
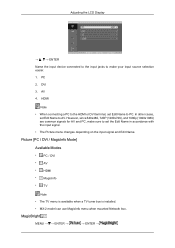
... menu is available when a TV tuner box is installed. • MX-2 model can use MagicInfo menu when mounted Network box. In other cases, set Edit Name to PC. PC 2. AV 4. DVI 3. MagicBright MENU → → ENTER → → ENTER → However, since 640x480, 720P (1280x720), and 1080p (1920x1080) are common signals for AV and PC, make sure to make your input source selection easier. 1. Adjusting the LCD Display...
... menu is available when a TV tuner box is installed. • MX-2 model can use MagicInfo menu when mounted Network box. In other cases, set Edit Name to PC. PC 2. AV 4. DVI 3. MagicBright MENU → → ENTER → → ENTER → However, since 640x480, 720P (1280x720), and 1080p (1920x1080) are common signals for AV and PC, make sure to make your input source selection easier. 1. Adjusting the LCD Display...
User Manual (ENGLISH)
Page 89
... USB keyboard. z MX-2 model can use the Power-On option when the LCD Display is in the Enable state, to LCD Display : execute Device mode. Otherwise, the program (MagicInfo) may cause errors. z The server program's Power-On option works only if the LCD Display's power is highly recommended not to use MagicInfo menu when mounted Network box. It is completely shut off the AC power during an operation. z To setup MagicInfo on the LCD Display. z For pivoted LCD Displays, a screen resolution...
... USB keyboard. z MX-2 model can use the Power-On option when the LCD Display is in the Enable state, to LCD Display : execute Device mode. Otherwise, the program (MagicInfo) may cause errors. z The server program's Power-On option works only if the LCD Display's power is highly recommended not to use MagicInfo menu when mounted Network box. It is completely shut off the AC power during an operation. z To setup MagicInfo on the LCD Display. z For pivoted LCD Displays, a screen resolution...

User Manual (ENGLISH)
Page 91
... Specifications > Preset Timing Modes for problems that time. And if the resolution is functioning properly. Turn on the screen. 4. your video controller and computer system; You can even view the screen at a resolution of the computer. 3. Note Refer to change the screen resolution or stay in the Self-Test mode, the LED power indicator remains green and the figure moves around on the LCD Display. The figure shown below ("Check Signal Cable") appears on a black...
... Specifications > Preset Timing Modes for problems that time. And if the resolution is functioning properly. Turn on the screen. 4. your video controller and computer system; You can even view the screen at a resolution of the computer. 3. Note Refer to change the screen resolution or stay in the Self-Test mode, the LED power indicator remains green and the figure moves around on the LCD Display. The figure shown below ("Check Signal Cable") appears on a black...

User Manual (ENGLISH)
Page 92
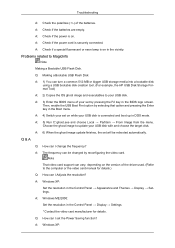
... maximum resolution.) 5. Check if the scanning ratio of the video screen is used to prevent damage to the screen. 2) Maintaining the Flat Panel Display Screen. Check List Note • The following table lists possible problems and their solutions are properly connected to reinstall the Adaptor (video) driver. Q: The LCD Display screen flickers. If you installed a new video card or if you assembled the PC, check if you do need assistance, please call the phone number...
... maximum resolution.) 5. Check if the scanning ratio of the video screen is used to prevent damage to the screen. 2) Maintaining the Flat Panel Display Screen. Check List Note • The following table lists possible problems and their solutions are properly connected to reinstall the Adaptor (video) driver. Q: The LCD Display screen flickers. If you installed a new video card or if you assembled the PC, check if you do need assistance, please call the phone number...
User Manual (ENGLISH)
Page 98
...°F (-20°C ~ 45°C) Humidity : 5 % ~ 95 %, non-condensing Plug and Play Capability This LCD Display can be used in this product. But the pixels of RED, GREEN, BLUE and WHITE color appear to be bright sometimes or some black pixels may be installed on any problems. For example, the number of TFT-LCD sub pixels contained in all areas including common residential areas...
...°F (-20°C ~ 45°C) Humidity : 5 % ~ 95 %, non-condensing Plug and Play Capability This LCD Display can be used in this product. But the pixels of RED, GREEN, BLUE and WHITE color appear to be bright sometimes or some black pixels may be installed on any problems. For example, the number of TFT-LCD sub pixels contained in all areas including common residential areas...

User Manual (ENGLISH)
Page 105
... function - Symptom: Dot with Black Color move up and down . - Symptom: Horizontal / Vertical Bar with erasing the display Information Note ( Please check CD's User Guide at "OSD Function", some model's will not available. ) Apply the Screen Erasing function on Product • Apply the Screen Pixel function - Select method • Instruction Guide : OSD Menu -> Set Up -> Safety Screen -> Pixel • Time Interval : 1 ~ 10 hours ( Recommend...
... function - Symptom: Dot with Black Color move up and down . - Symptom: Horizontal / Vertical Bar with erasing the display Information Note ( Please check CD's User Guide at "OSD Function", some model's will not available. ) Apply the Screen Erasing function on Product • Apply the Screen Pixel function - Select method • Instruction Guide : OSD Menu -> Set Up -> Safety Screen -> Pixel • Time Interval : 1 ~ 10 hours ( Recommend...


