User Manual (ENGLISH)
Page 19
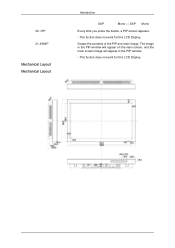
PIP 31.SWAP Mechanical Layout Mechanical Layout Introduction SAP Mono ↔ SAP Mono Every time you press the button, a PIP screen appears. - The image in the PIP window will appear on the main screen, and the main screen image will appear in the PIP window. - This fuction does not work for this LCD Display. This fuction does not work for this LCD Display. 30. Swaps the contents of the PIP and main image.
PIP 31.SWAP Mechanical Layout Mechanical Layout Introduction SAP Mono ↔ SAP Mono Every time you press the button, a PIP screen appears. - The image in the PIP window will appear on the main screen, and the main screen image will appear in the PIP window. - This fuction does not work for this LCD Display. This fuction does not work for this LCD Display. 30. Swaps the contents of the PIP and main image.
User Manual (ENGLISH)
Page 31
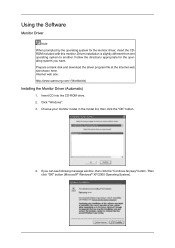
...samsung.com/ (Worldwide) Installing the Monitor Driver (Automatic) 1. Click "Windows". 3. If you have. Choose your monitor model in the model list, then click the "OK" button. 4. Using the Software Monitor Driver Note When prompted by the operating system for the operating system you can see following message window...blank disk and download the driver program file at the Internet web site shown here. Then click "OK" button (Microsoft® Windows® XP/2000 Operating System). Driver installation is slightly different from one operating system to another. Insert CD into the CD-...
...samsung.com/ (Worldwide) Installing the Monitor Driver (Automatic) 1. Click "Windows". 3. If you have. Choose your monitor model in the model list, then click the "OK" button. 4. Using the Software Monitor Driver Note When prompted by the operating system for the operating system you can see following message window...blank disk and download the driver program file at the Internet web site shown here. Then click "OK" button (Microsoft® Windows® XP/2000 Operating System). Driver installation is slightly different from one operating system to another. Insert CD into the CD-...
User Manual (ENGLISH)
Page 32
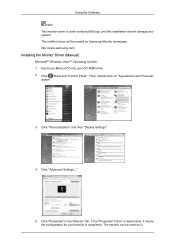
Click (Start) and "Control Panel". Click "Advanced Settings...". 5. If the "Properties" button is deactivated, it means the configuration for your system. Then, double-click on Samsung Monitor homepage. The monitor can be posted on "Appearance and Personal- Using the ... into your CD-ROM drive. 2. ization". 3. Click "Personalization" and then "Display Settings". 4. Click "Properties" in the "Monitor" tab. The certified driver will be used as is. http://www.samsung.com/ Installing the Monitor Driver (Manual) Microsoft® Windows Vista™, Operating System 1.
Click (Start) and "Control Panel". Click "Advanced Settings...". 5. If the "Properties" button is deactivated, it means the configuration for your system. Then, double-click on Samsung Monitor homepage. The monitor can be posted on "Appearance and Personal- Using the ... into your CD-ROM drive. 2. ization". 3. Click "Personalization" and then "Display Settings". 4. Click "Properties" in the "Monitor" tab. The certified driver will be used as is. http://www.samsung.com/ Installing the Monitor Driver (Manual) Microsoft® Windows Vista™, Operating System 1.
User Manual (ENGLISH)
Page 33
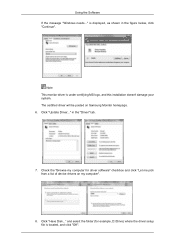
... the driver setup file is under certifying MS logo, and this installation doesn't damage your system. Click "Have Disk..." Using the Software If the message "Windows needs..." in the figure below, click "Continue". The certified driver will be posted on my computer". 8. Note This monitor driver is located, and click "OK...". and select the folder (for driver software" checkbox and click "Let me pick from a list of device drivers on Samsung Monitor homepage. 6. is displayed, as shown in the "Driver" tab. 7.
... the driver setup file is under certifying MS logo, and this installation doesn't damage your system. Click "Have Disk..." Using the Software If the message "Windows needs..." in the figure below, click "Continue". The certified driver will be posted on my computer". 8. Note This monitor driver is located, and click "OK...". and select the folder (for driver software" checkbox and click "Let me pick from a list of device drivers on Samsung Monitor homepage. 6. is displayed, as shown in the "Driver" tab. 7.
User Manual (ENGLISH)
Page 34
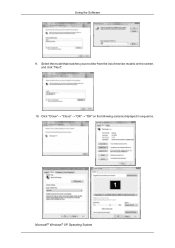
Using the Software 9. Select the model that matches your monitor from the list of monitor models on the following screens displayed in sequence. Click "Close" → "Close" → "OK" → "OK" on the screen, and click "Next". 10. Microsoft® Windows® XP Operating System
Using the Software 9. Select the model that matches your monitor from the list of monitor models on the following screens displayed in sequence. Click "Close" → "Close" → "OK" → "OK" on the screen, and click "Next". 10. Microsoft® Windows® XP Operating System
User Manual (ENGLISH)
Page 36
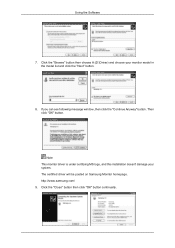
If you can see following message window, then click the "Continue Anyway" button. Click the "Close" button then click "OK" button continually. Note This monitor driver is under certifying MS logo, and this installation doesn't damage your monitor model in the model list and click the "Next" button. 8. http://www.samsung.com/ 9. The certified driver will be posted on Samsung Monitor homepage. Using the Software 7. Then click "OK" button. Click the "Browse" button then choose A:(D:\Driver) and choose your system.
If you can see following message window, then click the "Continue Anyway" button. Click the "Close" button then click "OK" button continually. Note This monitor driver is under certifying MS logo, and this installation doesn't damage your monitor model in the model list and click the "Next" button. 8. http://www.samsung.com/ 9. The certified driver will be posted on Samsung Monitor homepage. Using the Software 7. Then click "OK" button. Click the "Browse" button then choose A:(D:\Driver) and choose your system.
User Manual (ENGLISH)
Page 37
...button on "Update Driver..." Double click the "Display" icon. 3. Click "Driver" and then click on the "File Needed" window. 3. Click the "Open" button, then click "OK" button. 9. If you can see the "Digital Signature Not Found" window then click the "Yes" button. Choose ..."Monitor". Choose A:(D:\Driver) then click the "Open" button and then click "OK" button. Click "Start", "Setting", "Control Panel". 2. Case1 : If the "Properties" button is properly ...
...button on "Update Driver..." Double click the "Display" icon. 3. Click "Driver" and then click on the "File Needed" window. 3. Click the "Open" button, then click "OK" button. 9. If you can see the "Digital Signature Not Found" window then click the "Yes" button. Choose ..."Monitor". Choose A:(D:\Driver) then click the "Open" button and then click "OK" button. Click "Start", "Setting", "Control Panel". 2. Case1 : If the "Properties" button is properly ...
User Manual (ENGLISH)
Page 38
... nected to make the X86Config file, which is for your mouse. 3. Click "Start", "Settings", "Control Panel", and then double-click "Display" icon. 2. Linux Operating System To execute X-Window, you con- Press "Enter" at All Display Modes, select the level of resolution and vertical frequency by referring to use (Resolution, Number of system... you see the screen working normally after executing the X86Config file. 2. Using the Software 4. Specify A:\(D:\driver) then click "OK" button. 10. In Display Registration Information window, click Settings Tab and then click "All...
... nected to make the X86Config file, which is for your mouse. 3. Click "Start", "Settings", "Control Panel", and then double-click "Display" icon. 2. Linux Operating System To execute X-Window, you con- Press "Enter" at All Display Modes, select the level of resolution and vertical frequency by referring to use (Resolution, Number of system... you see the screen working normally after executing the X86Config file. 2. Using the Software 4. Specify A:\(D:\driver) then click "OK" button. 10. In Display Registration Information window, click Settings Tab and then click "All...

User Manual (ENGLISH)
Page 39
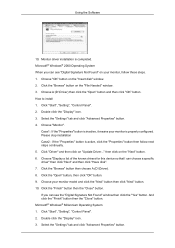
Using the Software 10. Execute X-Window after setting other requested hardware. You have finished setting up your monitor.
Using the Software 10. Execute X-Window after setting other requested hardware. You have finished setting up your monitor.
User Manual (ENGLISH)
Page 89
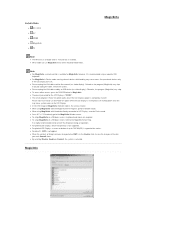
...mode. z To setup MagicInfo on the LCD Display. MagicInfo z In the OSD image of up external devices only if the LCD Display turns on a Windows screen, a keyboard and mouse are required. z To setup MagicInfo on . z For pivoted LCD Displays, a screen resolution of MagicInfo, Network ... the system is not applied. Otherwise, the program (MagicInfo) may cause system errors on a Windows screen, refer to LCD Display : execute Device mode. Set up to the MagicInfo Window screen. Otherwise, the program (MagicInfo) may cause errors. However, it is supported for the ...
...mode. z To setup MagicInfo on the LCD Display. MagicInfo z In the OSD image of up external devices only if the LCD Display turns on a Windows screen, a keyboard and mouse are required. z To setup MagicInfo on . z For pivoted LCD Displays, a screen resolution of MagicInfo, Network ... the system is not applied. Otherwise, the program (MagicInfo) may cause system errors on a Windows screen, refer to LCD Display : execute Device mode. Set up to the MagicInfo Window screen. Otherwise, the program (MagicInfo) may cause errors. However, it is supported for the ...

User Manual (ENGLISH)
Page 90
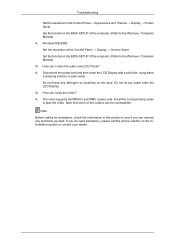
...icon will be inserted) appears. Press the Install button. The Windows Desktop is displayed after rebooting. 4. Connect your keyboard. 5. Select the language you select Do not show again and click the Install button, the Scheduler screen is displayed and the MagicInfo icon (the image will appear. If you ...want to use. 3. Note If the MagicInfo icon is not displayed on the notification area, double click the MagicInfo icon on your keyboard ...
...icon will be inserted) appears. Press the Install button. The Windows Desktop is displayed after rebooting. 4. Connect your keyboard. 5. Select the language you select Do not show again and click the Install button, the Scheduler screen is displayed and the MagicInfo icon (the image will appear. If you ...want to use. 3. Note If the MagicInfo icon is not displayed on the notification area, double click the MagicInfo icon on your keyboard ...
User Manual (ENGLISH)
Page 95
... computer or the video card manual for details. A: Windows XP: Set the resolution in the Control Panel → Display → Settings. * Contact the video card manufacturer for details.) Q: How can I Adjusts the resolution? A: Windows ME/2000: Set the resolution in the Control Panel → Appearance and Themes → Display → Settings. A: Check if the power cord... lamp is on the version of the batteries. Note That video card support can I change the frequency? Q: How can vary, depending on in the vicinity. A: Windows XP:
... computer or the video card manual for details. A: Windows XP: Set the resolution in the Control Panel → Display → Settings. * Contact the video card manufacturer for details.) Q: How can I Adjusts the resolution? A: Windows ME/2000: Set the resolution in the Control Panel → Appearance and Themes → Display → Settings. A: Check if the power cord... lamp is on the version of the batteries. Note That video card support can I change the frequency? Q: How can vary, depending on in the vicinity. A: Windows XP:
User Manual (ENGLISH)
Page 96
... and WMV codecs only. Install the corresponding codec to the Windows / Computer Manual). If you can I clean the outer case/LCD Panel? A: Windows ME/2000: Set the resolution at the Control Panel → Display → Screen Saver. Troubleshooting Set the resolution in this section to the Windows / Computer Manual). Set the function in the BIOS-SETUP of...
... and WMV codecs only. Install the corresponding codec to the Windows / Computer Manual). If you can I clean the outer case/LCD Panel? A: Windows ME/2000: Set the resolution at the Control Panel → Display → Screen Saver. Troubleshooting Set the resolution in this section to the Windows / Computer Manual). Set the function in the BIOS-SETUP of...
User Manual (ENGLISH)
Page 102
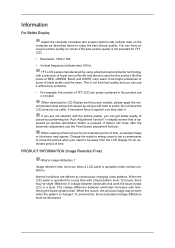
...(LC) in this , the accumulated voltage difference must be decreased. If excessive force is pressed. When cleaning the LCD Display and the panel outside, please apply the recommended small amount of cleaner by using a soft cloth to polish. PRODUCT INFORMATION (Image Retention...and above is not from the LCD Display for TFTLCD. • Resolution: 1360 x 768 • Vertical frequency (refresh rate): 60 Hz TFT-LCD panels manufactured by using advanced semiconductor technology with the picture quality, you are defined as window termination button is applied, you need...
...(LC) in this , the accumulated voltage difference must be decreased. If excessive force is pressed. When cleaning the LCD Display and the panel outside, please apply the recommended small amount of cleaner by using a soft cloth to polish. PRODUCT INFORMATION (Image Retention...and above is not from the LCD Display for TFTLCD. • Resolution: 1360 x 768 • Vertical frequency (refresh rate): 60 Hz TFT-LCD panels manufactured by using advanced semiconductor technology with the picture quality, you are defined as window termination button is applied, you need...
User Manual (ENGLISH)
Page 111
... this document is subject to human health or the environment. If batteries are registered trademarks of the U.S. Microsoft, Windows and Windows NT are registered trademarks of Video Electronics Standard Association; is the registered trademark of Samsung Electronics Co., Ltd. VESA, DPM and DDC are not properly disposed of, these substances can cause harm...
... this document is subject to human health or the environment. If batteries are registered trademarks of the U.S. Microsoft, Windows and Windows NT are registered trademarks of Video Electronics Standard Association; is the registered trademark of Samsung Electronics Co., Ltd. VESA, DPM and DDC are not properly disposed of, these substances can cause harm...


