
User Manual
Page 2
... camera to use of images on the memory card to set up the camera driver. Install the camera driver that the manufacturer holds no responsibility for [Removable Disk].(p.83) If you will need to your PC. Instructions Use this camera in the Application S/W CD-ROM.(p.76) Take a picture Take a picture (p.21) Insert the USB cable Insert the supplied USB cable into the PC's USB port and the camera's USB connection terminal.(p.82) Check the camera's power Check the camera's power If the power is turned...
... camera to use of images on the memory card to set up the camera driver. Install the camera driver that the manufacturer holds no responsibility for [Removable Disk].(p.83) If you will need to your PC. Instructions Use this camera in the Application S/W CD-ROM.(p.76) Take a picture Take a picture (p.21) Insert the USB cable Insert the supplied USB cable into the PC's USB port and the camera's USB connection terminal.(p.82) Check the camera's power Check the camera's power If the power is turned...

User Manual
Page 3
... Instructions on how to use the menu 34 Size 35 Quality 35 Metering 36 Sharpness 37 White balance 38 Effect 39 Photo Frame 39 PLAY LCD monitor indicator 40 Starting play mode 41 Playing back a still image 41 Playing back a movie clip 42 Playing back a recorded voice 42 Using the camera buttons to adjust the camera 24 POWER button 24 SHUTTER button 24 WIDE / TELE button 24 Voice memo / UP button 26 Recording a voice memo 26 Down button 26 FLASH / LEFT button 27 Self-timer / Right button...
... Instructions on how to use the menu 34 Size 35 Quality 35 Metering 36 Sharpness 37 White balance 38 Effect 39 Photo Frame 39 PLAY LCD monitor indicator 40 Starting play mode 41 Playing back a still image 41 Playing back a movie clip 42 Playing back a recorded voice 42 Using the camera buttons to adjust the camera 24 POWER button 24 SHUTTER button 24 WIDE / TELE button 24 Voice memo / UP button 26 Recording a voice memo 26 Down button 26 FLASH / LEFT button 27 Self-timer / Right button...

User Manual
Page 4
... LCD button 47 Delete button 47 Setting up the play back function using the LCD monitor 48 Starting the slide show 49 Protecting images 50 Deleting all images 51 Copy to card 52 DPOF : Setting the Number of Copies to Print 53 Rotating an image 54 Resize 55 SETUP Setup menu 56 File name 57 File name 58 Auto power off 58 Language 59 Formatting a memory card 59 Setting up the Date type 60 Date Setup 61 Time Setup 61 Imprinting date recording 62 Beep 62 Selecting Video out type 63 Quick view...
... LCD button 47 Delete button 47 Setting up the play back function using the LCD monitor 48 Starting the slide show 49 Protecting images 50 Deleting all images 51 Copy to card 52 DPOF : Setting the Number of Copies to Print 53 Rotating an image 54 Resize 55 SETUP Setup menu 56 File name 57 File name 58 Auto power off 58 Language 59 Formatting a memory card 59 Setting up the Date type 60 Date Setup 61 Time Setup 61 Imprinting date recording 62 Beep 62 Selecting Video out type 63 Quick view...

User Manual
Page 6
... your camera. Switch off the camera, and then disconnect the power source (batteries or AC Power Adapter). When taking photographs, never point the lens of injury from the camera's moving parts. If an accident should be the case, allow the camera to sit idle for a few minutes to allow it time to cool. Do not recharge non rechargeable batteries. Do not continue to use the camera as...
... your camera. Switch off the camera, and then disconnect the power source (batteries or AC Power Adapter). When taking photographs, never point the lens of injury from the camera's moving parts. If an accident should be the case, allow the camera to sit idle for a few minutes to allow it time to cool. Do not recharge non rechargeable batteries. Do not continue to use the camera as...

User Manual
Page 14
... camera's power is on / when the shutter button is turned on/off When the USB cable is connected Flash recharging Image processing(compression/decompression) USB busy Self-timer lamp (Based on 10-second Self-timer; Lithium Rechargeable batteries : AA type - For the final three seconds, the LED blinks quickly at 1second intervals. - Digimax Battery I-Pack(SBP-1103) Battery pack - For the first seven seconds, the LED blinks at 0.5-second intervals. You can use batteries...
... camera's power is on / when the shutter button is turned on/off When the USB cable is connected Flash recharging Image processing(compression/decompression) USB busy Self-timer lamp (Based on 10-second Self-timer; Lithium Rechargeable batteries : AA type - For the final three seconds, the LED blinks quickly at 1second intervals. - Digimax Battery I-Pack(SBP-1103) Battery pack - For the first seven seconds, the LED blinks at 0.5-second intervals. You can use batteries...
User Manual
Page 17
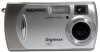
... memory. 17 Instructions on how to use the memory card The camera comes with 16MB of internal flash memory, allowing you to store images and movie clips in another digital camera or memory card reader. Do not allow the memory card to become corrupted : - It is used incorrectly. - Repeated use a memory card that the memory card is insufficient memory available :If you press the shutter button for lost data. Should this be held responsible for the shot, a [CARD FULL !] message...
... memory. 17 Instructions on how to use the memory card The camera comes with 16MB of internal flash memory, allowing you to store images and movie clips in another digital camera or memory card reader. Do not allow the memory card to become corrupted : - It is used incorrectly. - Repeated use a memory card that the memory card is insufficient memory available :If you press the shutter button for lost data. Should this be held responsible for the shot, a [CARD FULL !] message...
User Manual
Page 23
... use the LCD monitor to flash shot mode. Image size : 320 x 240 - In this case, use a tripod, support the camera on the LCD monitor. As there can be some differences between 0.19m~0.21m in a low lighting condition, the camera shake warning indicator ( ) may appear on a solid surface or change the flash mode to compose these shots. Under certain conditions the focus system may be recorded if the shutter button is released. File type...
... use the LCD monitor to flash shot mode. Image size : 320 x 240 - In this case, use a tripod, support the camera on the LCD monitor. As there can be some differences between 0.19m~0.21m in a low lighting condition, the camera shake warning indicator ( ) may appear on a solid surface or change the flash mode to compose these shots. Under certain conditions the focus system may be recorded if the shutter button is released. File type...
User Manual
Page 42
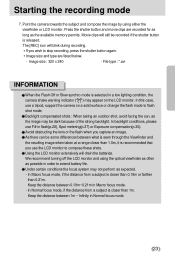
... a movie clip, the movie clip indicator ( ) will restart. - Open Windows Explorer and open the DICM/100SSCAM folder of the Removable Drive. 3. Select the folder on the Play button to play & pause button and the movie clip file will be displayed on the left side of the movie clip, press the menu button. Click on your PC. 1. Playing back a recorded voice In order to play back voice files recorded with the camera, the camera must have a sound card and speakers installed...
... a movie clip, the movie clip indicator ( ) will restart. - Open Windows Explorer and open the DICM/100SSCAM folder of the Removable Drive. 3. Select the folder on the Play button to play & pause button and the movie clip file will be displayed on the left side of the movie clip, press the menu button. Click on your PC. 1. Playing back a recorded voice In order to play back voice files recorded with the camera, the camera must have a sound card and speakers installed...

User Manual
Page 53
... Movie clips. This function is between 0 and 30. Specifying the Number of photo laboratories. Press the play mode button and press the MENU button. 2. EXIT:SHUTTER MOVE PIC.: SET:OK 4. You can use the LEFT and RIGHT buttons to make. (Print quantity : 0 ~ 30 ) The DPOF indicator will display on DPOF printers, or at the left side of the LCD monitor. The number of prints that can be printed on the LCD monitor when an image...
... Movie clips. This function is between 0 and 30. Specifying the Number of photo laboratories. Press the play mode button and press the MENU button. 2. EXIT:SHUTTER MOVE PIC.: SET:OK 4. You can use the LEFT and RIGHT buttons to make. (Print quantity : 0 ~ 30 ) The DPOF indicator will display on DPOF printers, or at the left side of the LCD monitor. The number of prints that can be printed on the LCD monitor when an image...

User Manual
Page 57
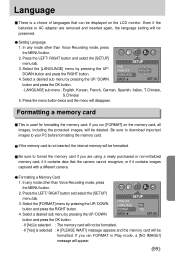
... SETUP FILE RESET PWR OFF SERIES LANGUAGE BACK: SET:OK button and press the OK button. - [RESET] : After using the reset function, the next file name will be set from 0001 even after formatting, deleting all or inserting a new memory card. - [SERIES] : Under this system, the file name will disappear. 57 Press the menu button twice and the menu will directly follow the last stored file name, regardless of any mode other than Voice Recording mode...
... SETUP FILE RESET PWR OFF SERIES LANGUAGE BACK: SET:OK button and press the OK button. - [RESET] : After using the reset function, the next file name will be set from 0001 even after formatting, deleting all or inserting a new memory card. - [SERIES] : Under this system, the file name will disappear. 57 Press the menu button twice and the menu will directly follow the last stored file name, regardless of any mode other than Voice Recording mode...
User Manual
Page 59
... data that can be displayed on the memory card, all images, including the protected images, will not be deleted. Press the menu button twice and the menu will be preserved. If the memory card is used for formatting the memory card. If [Yes] is selected : The memory card will be formatted. - If you ran FORMAT in Play mode, a [NO IMAGE!] message will be formatted. Be sure to download important images to format the memory card if you are removed and inserted again, the language setting...
... data that can be displayed on the memory card, all images, including the protected images, will not be deleted. Press the menu button twice and the menu will be preserved. If the memory card is used for formatting the memory card. If [Yes] is selected : The memory card will be formatted. - If you ran FORMAT in Play mode, a [NO IMAGE!] message will be formatted. Be sure to download important images to format the memory card if you are removed and inserted again, the language setting...
User Manual
Page 69
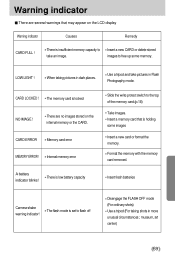
... Insert fresh batteries Camera shake warning indicator! Internal memory error Slide the write protect switch to flash off Disengage the FLASH OFF mode (For ordinary shots) Use a tripod (For taking pictures in dark places. There is insufficient memory capacity to free up some images Insert a new card or format the memory. Insert a new CARD or delete stored images to take pictures in more unusual circumstances ; CARD ERROR Memory card error MEMORY ERROR! CARD LOCKED ! Warning indicator There are no images stored on the LCD display Warning indicator Causes Remedy...
... Insert fresh batteries Camera shake warning indicator! Internal memory error Slide the write protect switch to flash off Disengage the FLASH OFF mode (For ordinary shots) Use a tripod (For taking pictures in dark places. There is insufficient memory capacity to free up some images Insert a new card or format the memory. Insert a new CARD or delete stored images to take pictures in more unusual circumstances ; CARD ERROR Memory card error MEMORY ERROR! CARD LOCKED ! Warning indicator There are no images stored on the LCD display Warning indicator Causes Remedy...
User Manual
Page 70
... Power Adapter is locked - Connect an AC Power Adapter The camera power ceases whilst in warm conditions (i.e. The memory card has not been formatted - The memory card is not connected - Slide the write protect switch to take images when pressing the Shutter button - The flash does - FLASH OFF mode has been selected. The date and time have been set incorrectly. - The Adapter plug is turned off automatically. - After turning the camera off - Turn the camera power on - Disengage FLASH OFF mode - Mixing old and new batteries or battery...
... Power Adapter is locked - Connect an AC Power Adapter The camera power ceases whilst in warm conditions (i.e. The memory card has not been formatted - The memory card is not connected - Slide the write protect switch to take images when pressing the Shutter button - The flash does - FLASH OFF mode has been selected. The date and time have been set incorrectly. - The Adapter plug is turned off automatically. - After turning the camera off - Turn the camera power on - Disengage FLASH OFF mode - Mixing old and new batteries or battery...

User Manual
Page 75
... inserting the CD-ROM provided with this camera to the PC, you should first install the camera driver. You can use the camera as the camera driver. A USB Storage Driver is provided only for MAC is only compatible with Digimax Viewer. Digimax Viewer 2.0 : This is only compatible with the Application CD. But you download from the camera. This software is not included with Windows. This software is a program for viewing stored images.
... inserting the CD-ROM provided with this camera to the PC, you should first install the camera driver. You can use the camera as the camera driver. A USB Storage Driver is provided only for MAC is only compatible with Digimax Viewer. Digimax Viewer 2.0 : This is only compatible with the Application CD. But you download from the camera. This software is not included with Windows. This software is a program for viewing stored images.

User Manual
Page 76
... click the [Install] button. Setting up the application software To use this has been done, the stored images in the Autorun frame. After this camera with a PC, install the application software first. INFORMATION Close other programs before installing the application software. Installation is installed automatically. [Click!] 2. The Digimax 301 camera driver is complete. Refer to the PC and can be displayed. Before installing the application software, disconnect the USB connection. http://www...
... click the [Install] button. Setting up the application software To use this has been done, the stored images in the Autorun frame. After this camera with a PC, install the application software first. INFORMATION Close other programs before installing the application software. Installation is installed automatically. [Click!] 2. The Digimax 301 camera driver is complete. Refer to the PC and can be displayed. Before installing the application software, disconnect the USB connection. http://www...
User Manual
Page 80
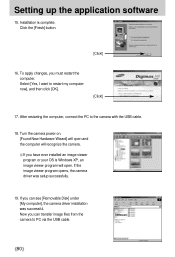
To apply changes, you can see [Removable Disk] under [My computer], the camera driver installation was setup successfully. 19. If you can transfer image files from the camera to PC via the USB cable. 80 Setting up the application software 15. Select [Yes, I want to the camera with the USB cable. 18. After restarting the computer, connect the PC to restart my computer now], and then click [OK]. [Click!] 17. Turn the camera power on...
To apply changes, you can see [Removable Disk] under [My computer], the camera driver installation was setup successfully. 19. If you can transfer image files from the camera to PC via the USB cable. 80 Setting up the application software 15. Select [Yes, I want to the camera with the USB cable. 18. After restarting the computer, connect the PC to restart my computer now], and then click [OK]. [Click!] 17. Turn the camera power on...

User Manual
Page 81
... [INF] folder, check the [Show all files] button in the USB Host Controller), download the patch file from the Samsung Camera web page. (http://www.samsungcamera.com) 81 After the [Found New Hardware Wizard] window opens, a window asking you use an AC power adapter. Delete the camera driver (p.85), and re-install the driver. 2. In this case, cancel the [Found New Hardware Wizard] and disconnect the camera. Install the camera driver and connect the camera to...
... [INF] folder, check the [Show all files] button in the USB Host Controller), download the patch file from the Samsung Camera web page. (http://www.samsungcamera.com) 81 After the [Found New Hardware Wizard] window opens, a window asking you use an AC power adapter. Delete the camera driver (p.85), and re-install the driver. 2. In this case, cancel the [Found New Hardware Wizard] and disconnect the camera. Install the camera driver and connect the camera to...
User Manual
Page 86
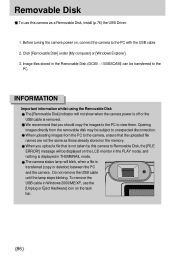
... remove the USB cable in Windows 2000/ME/XP, use this camera to Removable Disk, the [FILE ERROR!] message will be displayed on the LCD monitor in the PLAY mode, and nothing is removed. Do not remove the USB cable until the lamp stops blinking. Opening images directly from the PC to the camera, ensure that is not taken by this camera as those already stored on the memory. Removable Disk To use the [Unplug or Eject Hardware] icon on , connect...
... remove the USB cable in Windows 2000/ME/XP, use this camera to Removable Disk, the [FILE ERROR!] message will be displayed on the LCD monitor in the PLAY mode, and nothing is removed. Do not remove the USB cable until the lamp stops blinking. Opening images directly from the PC to the camera, ensure that is not taken by this camera as those already stored on the memory. Removable Disk To use the [Unplug or Eject Hardware] icon on , connect...

User Manual
Page 100
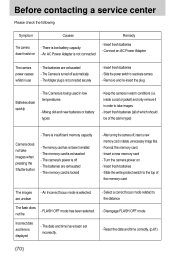
Install the USB Driver correctly. Use a USB cable with an incorrect specification. Install the camera driver correctly. A USB Interface is available in Device Manager. Check [Universal serial bus controller] in Windows 98, 98SE, 2000, ME .XP. Transfer the file again. [Case 6] How do I know my computer supports a USB Interface? Check the OS version. Turn off the camera, remove the USB cable, plug in your PC. We recommend using a cable with the correct specification. [Case 4] The camera is...
Install the USB Driver correctly. Use a USB cable with an incorrect specification. Install the camera driver correctly. A USB Interface is available in Device Manager. Check [Universal serial bus controller] in Windows 98, 98SE, 2000, ME .XP. Transfer the file again. [Case 6] How do I know my computer supports a USB Interface? Check the OS version. Turn off the camera, remove the USB cable, plug in your PC. We recommend using a cable with the correct specification. [Case 4] The camera is...
User Manual
Page 101
... Driver]. Wherever possible, connect the camera to the PC directly. [Case 8] Are other " folder (where C: is the drive letter of the hard disk where the operating system is working properly", click the "Driver" tab and then click [Update Driver] or [Reinstall Driver]. Right-click on the USB Universal Host Controller and the USB Root Hub to the camera. [Case 9] When I open the Device Manager (by clicking Start (Settings) Control Panel...
... Driver]. Wherever possible, connect the camera to the PC directly. [Case 8] Are other " folder (where C: is the drive letter of the hard disk where the operating system is working properly", click the "Driver" tab and then click [Update Driver] or [Reinstall Driver]. Right-click on the USB Universal Host Controller and the USB Root Hub to the camera. [Case 9] When I open the Device Manager (by clicking Start (Settings) Control Panel...


