User Manual (ENGLISH)
Page 2
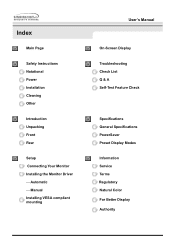
Manual Installing VESA compliant mounting User's Manual On-Screen Display Troubleshooting Check List Q & A Self-Test Feature Check Specifications General Specifications PowerSaver Preset Display Modes Information Service Terms Regulatory Natural Color For Better Display Authority Index Main Page Safety Instructions Notational Power Installation Cleaning Other Introduction Unpacking Front Rear Setup Connecting Your Monitor Installing the Monitor Driver - Automatic -
Manual Installing VESA compliant mounting User's Manual On-Screen Display Troubleshooting Check List Q & A Self-Test Feature Check Specifications General Specifications PowerSaver Preset Display Modes Information Service Terms Regulatory Natural Color For Better Display Authority Index Main Page Safety Instructions Notational Power Installation Cleaning Other Introduction Unpacking Front Rear Setup Connecting Your Monitor Installing the Monitor Driver - Automatic -

User Manual (ENGLISH)
Page 9
... should let your monitor does not operate normally - in particular, if there are any heavy objects on the monitor. • This may cause an electric shock or a fire. • Do not place any unusual sounds or smells coming from it immediately and contact an authorized deal- Safety Instructions User's Manual Other • Do not remove cover(or back...
... should let your monitor does not operate normally - in particular, if there are any heavy objects on the monitor. • This may cause an electric shock or a fire. • Do not place any unusual sounds or smells coming from it immediately and contact an authorized deal- Safety Instructions User's Manual Other • Do not remove cover(or back...

User Manual (ENGLISH)
Page 12
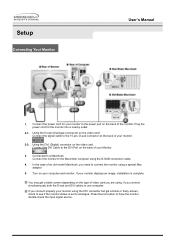
... conservation, turn your monitor to open the OSD and activate a highlighted menu item. Power button 6. Adjust buttons 4. These buttons allow you must connect your monitor OFF when it is turned on and off , the input source (analog/digital) is alternated. (When you push the Source button to highlight and adjust items in the center of the screen displaying the current mode -analog or digital input signal.) This light glows green during normal operation, and blinks green once as the monitor saves your adjustments. Auto button 2. Exit button Source button 3.
... conservation, turn your monitor to open the OSD and activate a highlighted menu item. Power button 6. Adjust buttons 4. These buttons allow you must connect your monitor OFF when it is turned on and off , the input source (analog/digital) is alternated. (When you push the Source button to highlight and adjust items in the center of the screen displaying the current mode -analog or digital input signal.) This light glows green during normal operation, and blinks green once as the monitor saves your adjustments. Auto button 2. Exit button Source button 3.
User Manual (ENGLISH)
Page 14
... monitor double-check the input signal source. Press Source button to a Macintosh. Connect the signal cable to the power port on the back of your computer and monitor. Turn on the type of an old model Macintosh, you connect properly your monitor displays an image, installation is set to the Macintosh computer using a special Mac adaptor. 5. If your monitor using , if you are using the DVI connector but get a blank screen depending on your Monitor. 3. In the case of video card you connect...
... monitor double-check the input signal source. Press Source button to a Macintosh. Connect the signal cable to the power port on the back of your computer and monitor. Turn on the type of an old model Macintosh, you connect properly your monitor displays an image, installation is set to the Macintosh computer using a special Mac adaptor. 5. If your monitor using , if you are using the DVI connector but get a blank screen depending on your Monitor. 3. In the case of video card you connect...
User Manual (ENGLISH)
Page 17
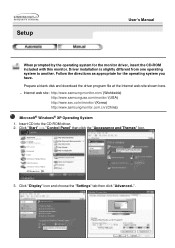
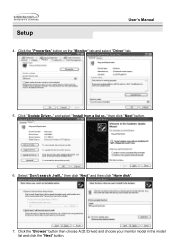
...://www.samsung-monitor.com/ (Worldwide) http://www.samsungusa.com/monitor/ (USA) http://www.sec.co.kr/monitor/ (Korea) http://www.samsungmonitor.com.cn/ (China) Microsoft® Windows® XP Operating System 1. Click "Display" icon and choose the "Settings" tab then click "Advanced..". Click "Start" -> "Control Panel" then click the "Appearance and Themes" Icon. 3. Insert CD into the CD-ROM driver. 2. Setup User's Manual When...
...://www.samsung-monitor.com/ (Worldwide) http://www.samsungusa.com/monitor/ (USA) http://www.sec.co.kr/monitor/ (Korea) http://www.samsungmonitor.com.cn/ (China) Microsoft® Windows® XP Operating System 1. Click "Display" icon and choose the "Settings" tab then click "Advanced..". Click "Start" -> "Control Panel" then click the "Appearance and Themes" Icon. 3. Insert CD into the CD-ROM driver. 2. Setup User's Manual When...
User Manual (ENGLISH)
Page 18
then click "Next" button. 6. Click the "Properties" button on the "Monitor" tab and select "Driver" tab. 5. Select "Don't search ,I will.." Click the "Browse" button then choose A:(D:\Driver) and choose your monitor model in the model list and click the "Next" button. then click "Next" and then click "Have disk". 7. Setup User's Manual 4. and select "Install from a list or.." Click "Update Driver.."
then click "Next" button. 6. Click the "Properties" button on the "Monitor" tab and select "Driver" tab. 5. Select "Don't search ,I will.." Click the "Browse" button then choose A:(D:\Driver) and choose your monitor model in the model list and click the "Next" button. then click "Next" and then click "Have disk". 7. Setup User's Manual 4. and select "Install from a list or.." Click "Update Driver.."
User Manual (ENGLISH)
Page 20
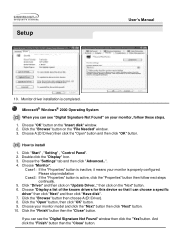
Monitor driver installation is properly configured. Click "Start" , "Setting" , "Control Panel". 2. Click the "Browse" button then choose A:(D:\Driver). 8. Setup User's Manual 10. Click the "Browse" button on the "Insert disk" window. 2. Choose "Monitor". Choose "Display a list of the known drivers for this device so that I can see "Digital Signature Not Found" on your monitor, follow next steps continually. 5. Choose "OK" button on the "File Needed" window. 3. Click the "Open" button, then click "OK" button. 9. If you...
Monitor driver installation is properly configured. Click "Start" , "Setting" , "Control Panel". 2. Click the "Browse" button then choose A:(D:\Driver). 8. Setup User's Manual 10. Click the "Browse" button on the "Insert disk" window. 2. Choose "Monitor". Choose "Display a list of the known drivers for this device so that I can see "Digital Signature Not Found" on your monitor, follow next steps continually. 5. Choose "OK" button on the "File Needed" window. 3. Click the "Open" button, then click "OK" button. 9. If you...

User Manual (ENGLISH)
Page 21
... "Display a list of colors and Vertical frequency) and then click OK. 4. Set a Keyboard for setting your monitor. The next screen is not normal, change to use (Resolution, Number of all devices" and choose the monitor that you see the screen working normally after executing the X86Config file. 2. This information will not affect the actual execution of the driver". 7. If the screen is for selecting a keyboard. 5. Select a mode that...
... "Display a list of colors and Vertical frequency) and then click OK. 4. Set a Keyboard for setting your monitor. The next screen is not normal, change to use (Resolution, Number of all devices" and choose the monitor that you see the screen working normally after executing the X86Config file. 2. This information will not affect the actual execution of the driver". 7. If the screen is for selecting a keyboard. 5. Select a mode that...

User Manual (ENGLISH)
Page 24
Adjust the OSD settings using [ - ] or [ + ] button and then push the Menu button. 3. Make a selection using [ - ] or [ + ] button. Activate the OSD menu by pushing the Menu button. 2. On Screen Display (OSD) Adjusting the OSD settings 1.
Adjust the OSD settings using [ - ] or [ + ] button and then push the Menu button. 3. Make a selection using [ - ] or [ + ] button. Activate the OSD menu by pushing the Menu button. 2. On Screen Display (OSD) Adjusting the OSD settings 1.

User Manual (ENGLISH)
Page 25
Push the Menu button. 2. Push the Menu button to open the Contrast adjustment screen. 4. Push the Menu button to open the Brightness adjustment screen. 3. How to decrease the brightness. Use the [ + ] button to increase the brightness or [ - ] button to adjust Contrast - Use the [ + ] button to increase the contrast or [ - ] button to adjust Brightness - Push the Menu button. 2. Adjust Contrast. 1. Brightness Menu Contrast Menu How to decrease the contrast. Adjust Brightness. 1. Push the [ - ] button or [ + ] button until the Contrast screen is displayed. 3.
Push the Menu button. 2. Push the Menu button to open the Contrast adjustment screen. 4. Push the Menu button to open the Brightness adjustment screen. 3. How to decrease the brightness. Use the [ + ] button to increase the brightness or [ - ] button to adjust Contrast - Use the [ + ] button to increase the contrast or [ - ] button to adjust Brightness - Push the Menu button. 2. Adjust Contrast. 1. Brightness Menu Contrast Menu How to decrease the contrast. Adjust Brightness. 1. Push the [ - ] button or [ + ] button until the Contrast screen is displayed. 3.
User Manual (ENGLISH)
Page 38
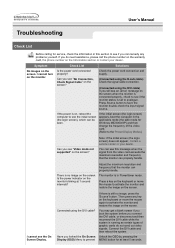
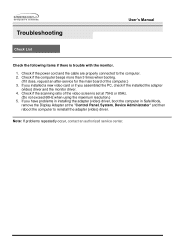
... screen. I cannot turn on the monitor blinking at least 5 seconds. Then press any problems yourself. Check the power cord connection and supply. Is the power indicator on the monitor. Symptom No images on the screen? (Connected using the D-sub cable) Check the signal cable connection. (Connected using the DVI cable? Have you locked the On Screen Display (OSD) Menu to prevent If there is running as certain types of the video card. (Refer to the Preset Display Modes) Can you do not send out video signals...
... screen. I cannot turn on the monitor blinking at least 5 seconds. Then press any problems yourself. Check the power cord connection and supply. Is the power indicator on the monitor. Symptom No images on the screen? (Connected using the D-sub cable) Check the signal cable connection. (Connected using the DVI cable? Have you locked the On Screen Display (OSD) Menu to prevent If there is running as certain types of the video card. (Refer to the Preset Display Modes) Can you do not send out video signals...
User Manual (ENGLISH)
Page 39
... Adjust the resolution and frequency of the video card signals. The screen can be adjusted. (Refer to the video card manual and the Preset Display Modes. Have you installed the monitor driver? Is the frequency properly adjusted when checking the Display Timing on the monitor? Have the screen colors become unbalanced. The screen shows strange colors or just black and white. Readjust Position by referring to the Preset Display Modes). function can be unbalanced due to the Driver Installation Instructions. Troubleshooting User's Manual Check List changes...
... Adjust the resolution and frequency of the video card signals. The screen can be adjusted. (Refer to the video card manual and the Preset Display Modes. Have you installed the monitor driver? Is the frequency properly adjusted when checking the Display Timing on the monitor? Have the screen colors become unbalanced. The screen shows strange colors or just black and white. Readjust Position by referring to the Preset Display Modes). function can be unbalanced due to the Driver Installation Instructions. Troubleshooting User's Manual Check List changes...
User Manual (ENGLISH)
Page 40
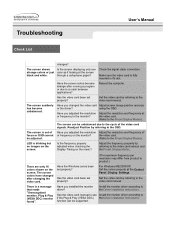
..., check if the installed the adapter (video) driver and the monitor driver. 4. If you installed a new video card or if you have problems in installing the adapter (video) driver, boot the computer in Safe Mode, remove the Display Adapter at 75Hz or 85Hz. (Do not exceed 60Hz when using the maximum resolution.) 5. Check if the power cord and the cable are properly connected to reinstall the adapter (video) driver. Troubleshooting User's Manual Check List Check the following items if there is set at the "Control Panel, System...
..., check if the installed the adapter (video) driver and the monitor driver. 4. If you installed a new video card or if you have problems in installing the adapter (video) driver, boot the computer in Safe Mode, remove the Display Adapter at 75Hz or 85Hz. (Do not exceed 60Hz when using the maximum resolution.) 5. Check if the power cord and the cable are properly connected to reinstall the adapter (video) driver. Troubleshooting User's Manual Check List Check the following items if there is set at the "Control Panel, System...

User Manual (ENGLISH)
Page 42
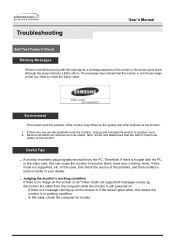
... the border are red, green and blue. then turn on the monitor. . Failure of any of the computer. 3. Self-Test Feature Check 1. Turn off your monitor and reconnect the video cable; If the monitor is functioning properly. Troubleshooting User's Manual Self-Test Feature Check Your monitor provides a self test feature that allows you will see a box with your monitor. If your monitor screen remains blank after using the previous procedure...
... the border are red, green and blue. then turn on the monitor. . Failure of any of the computer. 3. Self-Test Feature Check 1. Turn off your monitor and reconnect the video cable; If the monitor is functioning properly. Troubleshooting User's Manual Self-Test Feature Check Your monitor provides a self test feature that allows you will see a box with your monitor. If your monitor screen remains blank after using the previous procedure...
User Manual (ENGLISH)
Page 43
... PC or the video card, this case, first check the source of the monitor. Judging the monitor's working condition. . Useful Tips . In this means the monitor is in working condition If there is still on. Therefore, if there is trouble with the input signal, a message appears on the screen or the screen goes blank although the power indicator LED is no image on the screen or an "Video mode not supported" message comes...
... PC or the video card, this case, first check the source of the monitor. Judging the monitor's working condition. . Useful Tips . In this means the monitor is in working condition If there is still on. Therefore, if there is trouble with the input signal, a message appears on the screen or the screen goes blank although the power indicator LED is no image on the screen or an "Video mode not supported" message comes...
User Manual (ENGLISH)
Page 44
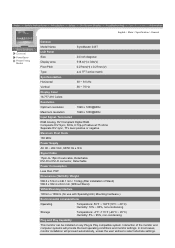
... Modes English > Main > Specification > General General Model Name SyncMaster 243T LCD Panel Size 24 inch diagonal Display area 518.4(H) x 324(V) Pixel Pitch 0.27mm(H) x 0.27mm(V) Type a-si TFT active matrix Synchronization Horizontal 30 ~ 81 kHz Vertical 56 ~ 75 Hz Display Color 16,777,216 Colors Resolution Optimum resolution 1920 x 1200@60Hz Maximum resolution 1920 x 1200@60Hz Input Signal, Terminated RGB Analog, DVI Compliant Digital RGB. In most cases, monitor installation will proceed automatically, unless the user wishes to DVI-D connector, Detachable...
... Modes English > Main > Specification > General General Model Name SyncMaster 243T LCD Panel Size 24 inch diagonal Display area 518.4(H) x 324(V) Pixel Pitch 0.27mm(H) x 0.27mm(V) Type a-si TFT active matrix Synchronization Horizontal 30 ~ 81 kHz Vertical 56 ~ 75 Hz Display Color 16,777,216 Colors Resolution Optimum resolution 1920 x 1200@60Hz Maximum resolution 1920 x 1200@60Hz Input Signal, Terminated RGB Analog, DVI Compliant Digital RGB. In most cases, monitor installation will proceed automatically, unless the user wishes to DVI-D connector, Detachable...

User Manual (ENGLISH)
Page 46
... Operation Power saving mode EPA/ENERGY 2000 Machanical Power Switch off Power Indicator Green Green, Blinking Black Power Consumption Less than 75W Less than 2W 0W This monitor is not needed, or when leaving it unattended for a certain amount of time. General PowerSaver Preset Timing Modes English > Main > Specification > PowerSaver This monitor has a built-in your monitor OFF when it has not been used with a computer equipped with VESA DPMS...
... Operation Power saving mode EPA/ENERGY 2000 Machanical Power Switch off Power Indicator Green Green, Blinking Black Power Consumption Less than 75W Less than 2W 0W This monitor is not needed, or when leaving it unattended for a certain amount of time. General PowerSaver Preset Timing Modes English > Main > Specification > PowerSaver This monitor has a built-in your monitor OFF when it has not been used with a computer equipped with VESA DPMS...

User Manual (ENGLISH)
Page 50
... dots of the Horizontal Cycle is called Horizontal Frequency. The inverse number of the same color is called the 'Dot Pitch'. The closer the dots, the higher the resolution. Unit: Hz Example: If the same light repeats itself 60 times per second, this problem, there is a Flicker-free Mode using a vertical frequency over 70 Hz. • Horizontal Frequency The time to scan one line connecting the right...
... dots of the Horizontal Cycle is called Horizontal Frequency. The inverse number of the same color is called the 'Dot Pitch'. The closer the dots, the higher the resolution. Unit: Hz Example: If the same light repeats itself 60 times per second, this problem, there is a Flicker-free Mode using a vertical frequency over 70 Hz. • Horizontal Frequency The time to scan one line connecting the right...
User Manual (ENGLISH)
Page 51
... a Class B product based on , the user is connected. Before making the connection, make sure the voltage rating of the computer convenience outlet is the same as the monitor and that interference will not occur in a residential installation. For 240 Volt applications use shielded signal interface cables to provide reasonable protection against harmful interference in a particular installation. You may be determined by turning the equipment...
... a Class B product based on , the user is connected. Before making the connection, make sure the voltage rating of the computer convenience outlet is the same as the monitor and that interference will not occur in a residential installation. For 240 Volt applications use shielded signal interface cables to provide reasonable protection against harmful interference in a particular installation. You may be determined by turning the equipment...

User Manual (ENGLISH)
Page 60
... save or set a screensaver to moving picture when you need to enjoy the best quality of black pixels could be scrubbed out softly. But the pixels of time, residual image or blurriness may appear. When you can get better quality of picture by executing "auto adjustment function" in display screen that is applied, you view a fixed screen for an extended period of RED, GREEN, BLUE and WHITE color seem to be seen. TFT LCD panel...
... save or set a screensaver to moving picture when you need to enjoy the best quality of black pixels could be scrubbed out softly. But the pixels of time, residual image or blurriness may appear. When you can get better quality of picture by executing "auto adjustment function" in display screen that is applied, you view a fixed screen for an extended period of RED, GREEN, BLUE and WHITE color seem to be seen. TFT LCD panel...


