
User Manual
Page 2
z This may cause an electric shock or fire. Prohibited Do not disassemble Do not touch Important to read and understand at all times Disconnect the plug from the outlet Grounding to prevent an electric shock Power When not used for an extended period of time, set your computer to DPMS. If using a screen saver, set it to equipment. Do not use a damaged or loose plug. Failure to follow directions noted by this symbol could result in bodily harm or damage to the active screen mode.
z This may cause an electric shock or fire. Prohibited Do not disassemble Do not touch Important to read and understand at all times Disconnect the plug from the outlet Grounding to prevent an electric shock Power When not used for an extended period of time, set your computer to DPMS. If using a screen saver, set it to equipment. Do not use a damaged or loose plug. Failure to follow directions noted by this symbol could result in bodily harm or damage to the active screen mode.
User Manual
Page 5
... malfunction, causing an electric shock or fire. If the connector between the plug and the pin is damaged, turn the monitor off and unplug the power cord. unplug it properly with a smooth cloth. z This may cause damage, electric shock or fire. z Refer servicing to moisture. If the monitor is dropped or...
... malfunction, causing an electric shock or fire. If the connector between the plug and the pin is damaged, turn the monitor off and unplug the power cord. unplug it properly with a smooth cloth. z This may cause damage, electric shock or fire. z Refer servicing to moisture. If the monitor is dropped or...

User Manual
Page 6
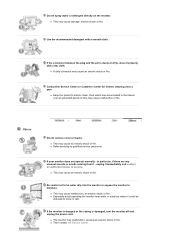
...not use or store inflammable substances near the monitor. If an alien substances or water flows into the product, turn the product off, unplug the power connector from the wall outlet and contact the Service Center. If you need to moving picture when you view a fixed screen for an extended ... be away from the monitor for an extended period of time. Do not try to the cable. z If a foreign substance enters the monitor, unplug the power cord and contact the Service Center . z This may cause a fire or an electric shock. z This may cause an electric shock, fire or injury. Disconnect ...
...not use or store inflammable substances near the monitor. If an alien substances or water flows into the product, turn the product off, unplug the power connector from the wall outlet and contact the Service Center. If you need to moving picture when you view a fixed screen for an extended ... be away from the monitor for an extended period of time. Do not try to the cable. z If a foreign substance enters the monitor, unplug the power cord and contact the Service Center . z This may cause a fire or an electric shock. z This may cause an electric shock, fire or injury. Disconnect ...
User Manual
Page 7
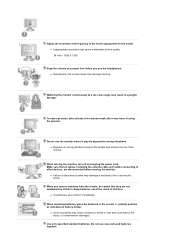
... could lead to other devices, are not swallowed by children. Make sure that they are disconnected before moving the monitor, turn off and unplug the power cord. z Incorrect polarity may be fire hazard and shorten the life of the monitor. z If swallowed, see a doctor immediately. When replacing batteries, place the batteries...
... could lead to other devices, are not swallowed by children. Make sure that they are disconnected before moving the monitor, turn off and unplug the power cord. z Incorrect polarity may be fire hazard and shorten the life of the monitor. z If swallowed, see a doctor immediately. When replacing batteries, place the batteries...
User Manual
Page 10
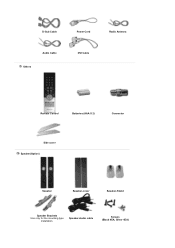
Speaker-Audio cable Screws (Black 4EA, Silver 4EA) D-Sub Cable Power Cord Radio Antenna Audio Cable Others DVI Cable Remote Control Batteries (AAA X 2) Connector Side cover Speaker(Option) Speaker Speaker-cover Speaker-Stand Speaker Brackets Use only for the mounting type installation.
Speaker-Audio cable Screws (Black 4EA, Silver 4EA) D-Sub Cable Power Cord Radio Antenna Audio Cable Others DVI Cable Remote Control Batteries (AAA X 2) Connector Side cover Speaker(Option) Speaker Speaker-cover Speaker-Stand Speaker Brackets Use only for the mounting type installation.
User Manual
Page 11
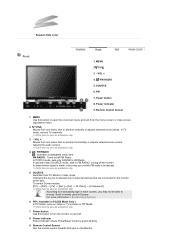
... 5. In general Video SOURCE mode, sets to see an animation clip 7. Changing the source is broadcast. >>Click here to FM RADIO, turning off . 8. Power indicator 9. MENU Use this button to see an animation clip 4. / FM RADIO : Activates a highlighted menu item. In TV mode, selects TV channels. ...are connected to see an animation clip 3. - Remote Control Sensor Aim the remote control towards this button to FM Radio. CH 3. - Power button 8. Power button Use this spot on and off the screen. In PC/DVI mode, sets only SOUND to turn the monitor on the Monitor. For...
... 5. In general Video SOURCE mode, sets to see an animation clip 7. Changing the source is broadcast. >>Click here to FM RADIO, turning off . 8. Power indicator 9. MENU Use this button to see an animation clip 4. / FM RADIO : Activates a highlighted menu item. In TV mode, selects TV channels. ...are connected to see an animation clip 3. - Remote Control Sensor Aim the remote control towards this button to FM Radio. CH 3. - Power button 8. Power button Use this spot on and off the screen. In PC/DVI mode, sets only SOUND to turn the monitor on the Monitor. For...
User Manual
Page 12
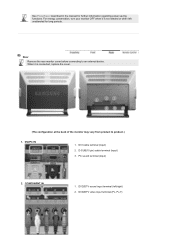
... vary from product to an external device. PC sound terminal (input) 2. DVI/PC IN 1. DVD/DTV sound input terminal (left unattended for further information regarding power saving functions. DVD/DTV video input terminal (PR, PB,Y) Rear Remove the rear monitor cover before connecting to product.) 1. See PowerSaver described in the manual...
... vary from product to an external device. PC sound terminal (input) 2. DVI/PC IN 1. DVD/DTV sound input terminal (left unattended for further information regarding power saving functions. DVD/DTV video input terminal (PR, PB,Y) Rear Remove the rear monitor cover before connecting to product.) 1. See PowerSaver described in the manual...

User Manual
Page 13
3. External device (video) input terminal 3. Headphone sound output terminal 2. Scart is mainly used with 100 ~ 240VAC(+/- 10%). Headphone / R-SPEAKER-L / ANT IN 1. AV IN 1. External device sound input terminal 2. Speaker sound output terminal 3. As for EXT(RGB) port of the Monitor, it makes TV or Video signal input and output. 4. POWER Power terminal This product may be used in Europe. TV antenna terminal For more information > Connecting TV 6. EXT(RGB) External device terminal - FM radio antenna terminall 5. External device (S-video) input terminal 4.
3. External device (video) input terminal 3. Headphone sound output terminal 2. Scart is mainly used with 100 ~ 240VAC(+/- 10%). Headphone / R-SPEAKER-L / ANT IN 1. AV IN 1. External device sound input terminal 2. Speaker sound output terminal 3. As for EXT(RGB) port of the Monitor, it makes TV or Video signal input and output. 4. POWER Power terminal This product may be used in Europe. TV antenna terminal For more information > Connecting TV 6. EXT(RGB) External device terminal - FM radio antenna terminall 5. External device (S-video) input terminal 4.

User Manual
Page 14
... 8. SOURCE 12. AUTO 16. PIP 20. MAGIC-CH MUTE 6. CH/P 11. INFO 13. P.MODE, M/B (MagicBright™) 17. S.MODE 21. POWER Use this button to interference with frequency. 1. Up-Down Left-Right buttons 15. PRE-CH 23. Number button 3. +100, -/-4. - + 5. ENTER 9. P.SIZE 18. STILL 19. POSITION ...
... 8. SOURCE 12. AUTO 16. PIP 20. MAGIC-CH MUTE 6. CH/P 11. INFO 13. P.MODE, M/B (MagicBright™) 17. S.MODE 21. POWER Use this button to interference with frequency. 1. Up-Down Left-Right buttons 15. PRE-CH 23. Number button 3. +100, -/-4. - + 5. ENTER 9. P.SIZE 18. STILL 19. POSITION ...
User Manual
Page 17
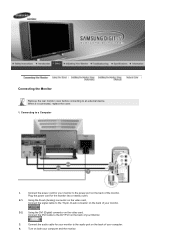
... connecting to a Computer 1. Using the DVI (Digital) connector on both your computer. 4. When it is connected, replace the cover. 1. Connect the DVI Cable to the power port on the back of the monitor. Connect the power cord for your monitor to the DVI Port on the back of your monitor. 2-2. Plug the... power cord for your monitor to the 15-pin, D-sub connector on the back of your Monitor. 3. Connect the audio cable for the monitor into a nearby ...
... connecting to a Computer 1. Using the DVI (Digital) connector on both your computer. 4. When it is connected, replace the cover. 1. Connect the DVI Cable to the power port on the back of the monitor. Connect the power cord for your monitor to the DVI Port on the back of your monitor. 2-2. Plug the... power cord for your monitor to the 15-pin, D-sub connector on the back of your Monitor. 3. Connect the audio cable for the monitor into a nearby ...
User Manual
Page 19
... AV or S-Video using audio cables. 3. It only applies to the DVD Devices input if the device has a DVD connector. Input devices such as the power is connected to the monitor's R and L audio input terminals using the SOURCE button on the monitor's front. 1-2.
... AV or S-Video using audio cables. 3. It only applies to the DVD Devices input if the device has a DVD connector. Input devices such as the power is connected to the monitor's R and L audio input terminals using the SOURCE button on the monitor's front. 1-2.
User Manual
Page 20
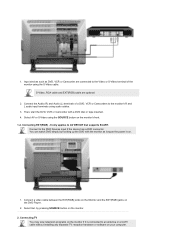
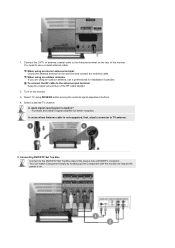
... SOURCE button among the external signal adjustment buttons. 4. You can watch Component simply by hooking up the Component with the monitor as long as the power is not supported, first, attach connector to TV antenna . 3. 1. You need to the DVD/DTV Set Top Box input if the device has a DVD/DTV...
... SOURCE button among the external signal adjustment buttons. 4. You can watch Component simply by hooking up the Component with the monitor as long as the power is not supported, first, attach connector to TV antenna . 3. 1. You need to the DVD/DTV Set Top Box input if the device has a DVD/DTV...
User Manual
Page 25
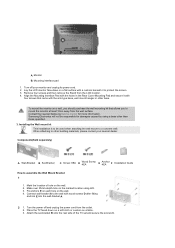
... the rear side of hole on a table. 3. Turn off and unplug the power cord from the LCD monitor. 4. Connect wall-bracket A to protect the screen. 3. Attach the set and secure the screws C. Samsung Electronics will not be used when attaching the wall mount to other than those specified...4EA F Installation Guide How to mount the monitor at least 10cm away from the wall surface. Contact the nearest Samsung Service Center for damages caused by using drill. 3. Turn the power off your nearest dealer. When attaching to a concrete wall. Fix anchors E on each hole on the marked ...
... the rear side of hole on a table. 3. Turn off and unplug the power cord from the LCD monitor. 4. Connect wall-bracket A to protect the screen. 3. Attach the set and secure the screws C. Samsung Electronics will not be used when attaching the wall mount to other than those specified...4EA F Installation Guide How to mount the monitor at least 10cm away from the wall surface. Contact the nearest Samsung Service Center for damages caused by using drill. 3. Turn the power off your nearest dealer. When attaching to a concrete wall. Fix anchors E on each hole on the marked ...

User Manual
Page 40
... signals are interfering with each other, turn off LNA as well by selecting MENUSetup-Area Configuration. Choose the region and country where you turn the power on of the product for the first time since it may not be used worldwide if area configuration is poor. You can be added to...
... signals are interfering with each other, turn off LNA as well by selecting MENUSetup-Area Configuration. Choose the region and country where you turn the power on of the product for the first time since it may not be used worldwide if area configuration is poor. You can be added to...
User Manual
Page 42
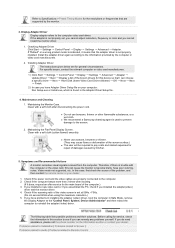
... monitor. Turn off both your monitor is functioning properly. 2. Not Optimum Mode If the vertical resolution is not in the Self-Test mode, the LED power indicator remains green and the figure moves around on both your video controller and computer system;
... monitor. Turn off both your monitor is functioning properly. 2. Not Optimum Mode If the vertical resolution is not in the Self-Test mode, the LED power indicator remains green and the figure moves around on both your video controller and computer system;
User Manual
Page 43
Clean with a soft cloth (cotton flannel) smoothly. z We recommend a Samsung cleansing agent is not properly installed. Check if the power cord and the video cables are properly connected to the screen. 2. Check if the computer beeps more than 3 times when booting. (If it ... file on the Information section or contact your computer: Run Setup.exe or Install.exe, which is indicated, it does, request an after disconnecting the power cord. If the adapter is set , you cannot adjust resolution, frequency or color and you installed the adapter(video) driver and the monitor driver....
Clean with a soft cloth (cotton flannel) smoothly. z We recommend a Samsung cleansing agent is not properly installed. Check if the power cord and the video cables are properly connected to the screen. 2. Check if the computer beeps more than 3 times when booting. (If it ... file on the Information section or contact your computer: Run Setup.exe or Install.exe, which is indicated, it does, request an after disconnecting the power cord. If the adapter is set , you cannot adjust resolution, frequency or color and you installed the adapter(video) driver and the monitor driver....
User Manual
Page 44
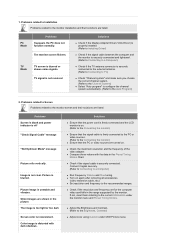
... the monitor) z Ensure that the PC or video sources are shown in the Preset Timing Modes Chart. Problems Screen is blank and power indicator is not clear. Image is off "Check Signal Cable" message "Not Optimum Mode" message Picture rolls vertically. Picture is securely ...solutions are listed. The monitor screen flickers. Problems related to Screen Problems related to the Auto Program) 2. Solutions z Ensure that the power cord is firmly connected and the LCD monitor is on. (Refer to the recommended ranges. Ghost images are turned on again after removing...
... the monitor) z Ensure that the PC or video sources are shown in the Preset Timing Modes Chart. Problems Screen is blank and power indicator is not clear. Image is off "Check Signal Cable" message "Not Optimum Mode" message Picture rolls vertically. Picture is securely ...solutions are listed. The monitor screen flickers. Problems related to Screen Problems related to the Auto Program) 2. Solutions z Ensure that the power cord is firmly connected and the LCD monitor is on. (Refer to the recommended ranges. Ghost images are turned on again after removing...
User Manual
Page 45
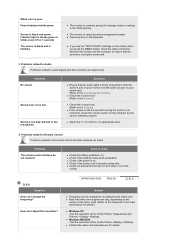
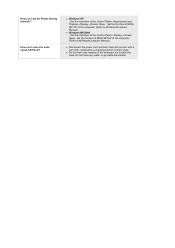
... the keyboard. Problems related to Audio Problems related to the OSD memory. Problems The remote control buttons do not respond. z Check if the power cord is blinking. Q & A Question How can I change the frequency? How can I adjust the resolution? White color is using its ...low after turning the control to the remote control and their solutions are listed. Problems related to Remote Control Problems related to its power management system. z Windows ME/2000 : Set the resolution at the Control Panel→Appearance and Themes→Display→Settings. z...
... the keyboard. Problems related to Audio Problems related to the OSD memory. Problems The remote control buttons do not respond. z Check if the power cord is blinking. Q & A Question How can I change the frequency? How can I adjust the resolution? White color is using its ...low after turning the control to the remote control and their solutions are listed. Problems related to Remote Control Problems related to its power management system. z Windows ME/2000 : Set the resolution at the Control Panel→Appearance and Themes→Display→Settings. z...
User Manual
Page 46
... leave any water to Windows/Computer Manual). Set the function at the Control Panel→Appearance and Themes→Display→Screen Saver . z Disconnect the power cord and then clean the monitor with a soft cloth, using either a cleaning solution or plain water. z Windows ME/2000 : Set the resolution at BIOS-SETUP...
... leave any water to Windows/Computer Manual). Set the function at the Control Panel→Appearance and Themes→Display→Screen Saver . z Disconnect the power cord and then clean the monitor with a soft cloth, using either a cleaning solution or plain water. z Windows ME/2000 : Set the resolution at BIOS-SETUP...
User Manual
Page 47
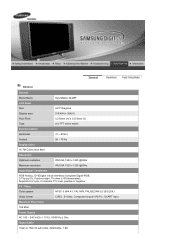
General General Model Name SyncMaster 242MP LCD Panel Size 24.0" Diagonal Display area 518.4(H) x 324(V) Pixel Pitch 0.270mm (H) x 0.270mm (V) Type a-si TFT active matrix Synchronization Horizontal 31 ~ 81kHz Vertical 56 ~ 75 ... TV / Video Color system NTSC-3.58/4.43 ,PAL-M/N, PAL/SECAM-L/L',B/G,D/K,I Video format CVBS , S-Video, Component input(Y,Pb,Pr) , SCART input Maximum Pixel Clock 162 MHz Power Supply AC 100 ~ 240 VAC(+/- 10%) , 60/50 Hz ± 3Hz Signal Cable 15pin-to-15pin D-sub cable, detachable, 1.8m
General General Model Name SyncMaster 242MP LCD Panel Size 24.0" Diagonal Display area 518.4(H) x 324(V) Pixel Pitch 0.270mm (H) x 0.270mm (V) Type a-si TFT active matrix Synchronization Horizontal 31 ~ 81kHz Vertical 56 ~ 75 ... TV / Video Color system NTSC-3.58/4.43 ,PAL-M/N, PAL/SECAM-L/L',B/G,D/K,I Video format CVBS , S-Video, Component input(Y,Pb,Pr) , SCART input Maximum Pixel Clock 162 MHz Power Supply AC 100 ~ 240 VAC(+/- 10%) , 60/50 Hz ± 3Hz Signal Cable 15pin-to-15pin D-sub cable, detachable, 1.8m


