
User Manual (ENGLISH)
Page 3
... OSD Lock/Unlock 10 On Screen Display (OSD 11 Accessing the Menu System 11 OSD functions and adjustment 12 By Remote-Control 19 Appendix 20 Power Saver 20 Troubleshooting 21 Specifications 23 Pin Assignments 24 Display Modes 25 Changing the Base 26 Removing the base 26 Attaching a base 27...
... OSD Lock/Unlock 10 On Screen Display (OSD 11 Accessing the Menu System 11 OSD functions and adjustment 12 By Remote-Control 19 Appendix 20 Power Saver 20 Troubleshooting 21 Specifications 23 Pin Assignments 24 Display Modes 25 Changing the Base 26 Removing the base 26 Attaching a base 27...
User Manual (ENGLISH)
Page 4
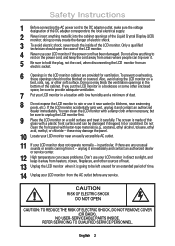
...should open the case of the LCD monitor. 4 Never use it and contact an authorized dealer immediately. Safety Instructions 1 Before connecting the AC power cord to the DC adapter outlet, make sure the voltage designation of the DC adapter corresponds to be damaged if dropped, hit or scratched. ...anything to provide adequate ventilation. 7 Put your LCD monitor from it is made of the cabinet. Also, avoid using the LCD monitor on the power cord, and keep it away from heaters, stoves, fireplaces, and other soft surface. You can be left unused for ventilation. doing ...
...should open the case of the LCD monitor. 4 Never use it and contact an authorized dealer immediately. Safety Instructions 1 Before connecting the AC power cord to the DC adapter outlet, make sure the voltage designation of the DC adapter corresponds to be damaged if dropped, hit or scratched. ...anything to provide adequate ventilation. 7 Put your LCD monitor from it is made of the cabinet. Also, avoid using the LCD monitor on the power cord, and keep it away from heaters, stoves, fireplaces, and other soft surface. You can be left unused for ventilation. doing ...

User Manual (ENGLISH)
Page 5
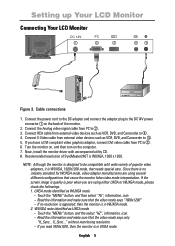
Portuguese Italiano Español Deutsch Français English Unpacking Your Monitor Please make sure the following items are missing, contact your monitor. Installation CD Power Cord Warranty Card (not available in all locations) Remote Controller Batteries (AAA x 2) DC Adapter 15-pin D-Sub Signal Cable V1 V2 SOURCE PIP AUTO EXIT MENU Monitor RCA Cable Manual Speaker (option) S-VHS Cable DVI-D signal cable English 3 If any items are included with your dealer.
Portuguese Italiano Español Deutsch Français English Unpacking Your Monitor Please make sure the following items are missing, contact your monitor. Installation CD Power Cord Warranty Card (not available in all locations) Remote Controller Batteries (AAA x 2) DC Adapter 15-pin D-Sub Signal Cable V1 V2 SOURCE PIP AUTO EXIT MENU Monitor RCA Cable Manual Speaker (option) S-VHS Cable DVI-D signal cable English 3 If any items are included with your dealer.
User Manual (ENGLISH)
Page 7
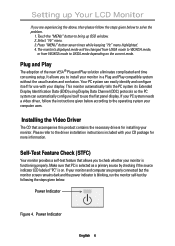
... the DC adaptor and connect the adaptor plug to 4 . 4. Connect RCA cable from external video devices such as VCR, DVD, and Camcorder to the DC14V power connector 1 on the computer. 7. Connect S-Video cable from external video devices such as VCR, DVD, and Camcorder to 3 . 6. If you have a DVI compliant video graphics...
... the DC adaptor and connect the adaptor plug to 4 . 4. Connect RCA cable from external video devices such as VCR, DVD, and Camcorder to the DC14V power connector 1 on the computer. 7. Connect S-Video cable from external video devices such as VCR, DVD, and Camcorder to 3 . 6. If you have a DVI compliant video graphics...
User Manual (ENGLISH)
Page 8
...be changed from UXGA mode to WUXGA mode, or from WUXGA mode to UXGA mode depending on . Please refer to use with your monitor. Power Indicator English 6 This monitor automatically tells the PC system its Extended Display Identification Data (EDID) using Display Data Channel (DDC) protocols so ...your monitor is on the current mode. It allows you to install your PC system needs a video driver, follow the steps given below : Power Indicator Figure 4. Make sure that allows you to check whether your display. If your monitor in a Plug and Play compatible system without the ...
...be changed from UXGA mode to WUXGA mode, or from WUXGA mode to UXGA mode depending on . Please refer to use with your monitor. Power Indicator English 6 This monitor automatically tells the PC system its Extended Display Identification Data (EDID) using Display Data Channel (DDC) protocols so ...your monitor is on the current mode. It allows you to install your PC system needs a video driver, follow the steps given below : Power Indicator Figure 4. Make sure that allows you to check whether your display. If your monitor in a Plug and Play compatible system without the ...
User Manual (ENGLISH)
Page 10
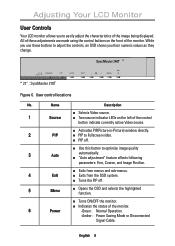
... the OSD system. n Turns the PIP off . Name Description n Selects Video source. 1 Source n Two source indicator LEDs on the front of the monitor. 6 Power -Green : Normal Operation. -Amber : Power Saving Mode or Disconnected Signal Cable. n Activates PIP(Picture-in-Picture) window directly. 2 PIP n PIP to optimize image quality 3 Auto automatically. n Turns ON... Your LCD Monitor User Controls Your LCD monitor allows you their numeric values as they change. * SOURCE PIP AUTO EXIT VIDEO PC MENU * 21" : SyncMaster 210T Figure 6.
... the OSD system. n Turns the PIP off . Name Description n Selects Video source. 1 Source n Two source indicator LEDs on the front of the monitor. 6 Power -Green : Normal Operation. -Amber : Power Saving Mode or Disconnected Signal Cable. n Activates PIP(Picture-in-Picture) window directly. 2 PIP n PIP to optimize image quality 3 Auto automatically. n Turns ON... Your LCD Monitor User Controls Your LCD monitor allows you their numeric values as they change. * SOURCE PIP AUTO EXIT VIDEO PC MENU * 21" : SyncMaster 210T Figure 6.
User Manual (ENGLISH)
Page 12
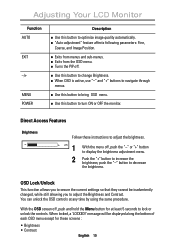
... and hold the Menu button for these instructions to adjust the brightness. 1 + 25 2 With the menu off . Adjusting Your LCD Monitor Function AUTO EXIT -/+ MENU POWER Description n Use this button to display the brightness adjustment menu. n Exits from menus and sub-menus. n Turns the PIP off , push the "-" or "+" button to...
... and hold the Menu button for these instructions to adjust the brightness. 1 + 25 2 With the menu off . Adjusting Your LCD Monitor Function AUTO EXIT -/+ MENU POWER Description n Use this button to display the brightness adjustment menu. n Exits from menus and sub-menus. n Turns the PIP off , push the "-" or "+" button to...
User Manual (ENGLISH)
Page 18
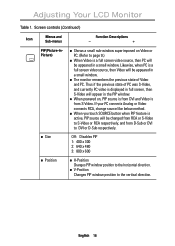
... the vertical direction. n When you touch SOURCE button when PIP feature is from D-Sub or DVI to S-Video or RCA respectively, and from S-Video. n When powered on Video or PC. (Refer to page 9.) n When Video is a full screen video source, then PC will appear in a small window.
... the vertical direction. n When you touch SOURCE button when PIP feature is from D-Sub or DVI to S-Video or RCA respectively, and from S-Video. n When powered on Video or PC. (Refer to page 9.) n When Video is a full screen video source, then PC will appear in a small window.

User Manual (ENGLISH)
Page 21
key Right Key : + key Up Key : Only Used In PIP, Pan Down Key : Only Used In PIP, Pan English 19 Menu Key Exit Key PIP Off PIP On, PIP Picture Swap PBP Enable (PBP disable: Exit) Change PIP Size Zoom In Zoom Out (Zoom Exit: Exit) Left Key : - Portuguese Italiano Español Deutsch Français English Adjusting Your LCD Monitor By Remote-Control Power On/Off Display Current State (Right Up Corner Message) Auto Adjustment Input Source Change.
key Right Key : + key Up Key : Only Used In PIP, Pan Down Key : Only Used In PIP, Pan English 19 Menu Key Exit Key PIP Off PIP On, PIP Picture Swap PBP Enable (PBP disable: Exit) Change PIP Size Zoom In Zoom Out (Zoom Exit: Exit) Left Key : - Portuguese Italiano Español Deutsch Français English Adjusting Your LCD Monitor By Remote-Control Power On/Off Display Current State (Right Up Corner Message) Auto Adjustment Input Source Change.

User Manual (ENGLISH)
Page 22
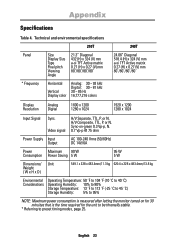
... the unit to be thermally stable. interval) Power Consumption 210T: 90W (Max.) 240T: 95W (Max.) Less than 5W Less than 5W Less than 5W NOTE: This monitor automatically returns to set up this feature. NOTE: Maximum power consumption is measured after letting the monitor turned ... Deep Sleep Mode Position A2 Horizontal Sync Active Vertical Sync Active Video Active Inactive Active Blanked Active Inactive Blanked Inactive Inactive Blanked Power Indicator Green Amber Amber Blinking Amber Blinking (0.5 sec interval) (1 sec. For energy conservation, turn your monitor OFF when you...
... the unit to be thermally stable. interval) Power Consumption 210T: 90W (Max.) 240T: 95W (Max.) Less than 5W Less than 5W Less than 5W NOTE: This monitor automatically returns to set up this feature. NOTE: Maximum power consumption is measured after letting the monitor turned ... Deep Sleep Mode Position A2 Horizontal Sync Active Vertical Sync Active Video Active Inactive Active Blanked Active Inactive Blanked Inactive Inactive Blanked Power Indicator Green Amber Amber Blinking Amber Blinking (0.5 sec interval) (1 sec. For energy conservation, turn your monitor OFF when you...
User Manual (ENGLISH)
Page 23
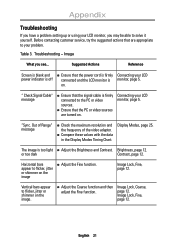
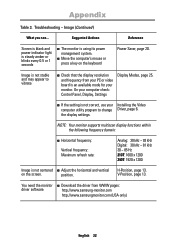
... Image What you may be able to solve it yourself. " Check Signal Cable" message n Ensure that are turned on . Connecting your LCD power indicator is off connected and the LCD monitor is firmly Connecting your LCD monitor, page 5. Out of Range" message n Check the maximum... resolution and the frequency of the video adaptor. Brightness, page 12. n Ensure that the power cord is monitor, page 5. The image is firmly connected to flicker, jitter or shimmer on the image n Adjust the Fine function...
... Image What you may be able to solve it yourself. " Check Signal Cable" message n Ensure that are turned on . Connecting your LCD power indicator is off connected and the LCD monitor is firmly Connecting your LCD monitor, page 5. Out of Range" message n Check the maximum... resolution and the frequency of the video adaptor. Brightness, page 12. n Ensure that the power cord is monitor, page 5. The image is firmly connected to flicker, jitter or shimmer on the image n Adjust the Fine function...
User Manual (ENGLISH)
Page 24
...Installing the Video computer utility program to vibrate s Check that the display resolution and frequency from WWW pages: driver software http://www.samsung-monitor.com http://www.samsungmonitor.com (USA only) English 22 H-Position, page 13. Appendix Table 3. NOTE: Your monitor supports ...93 kHz Digital: 30 kHz ~ 81 kHz 30 ~ 85 Hz 210T: 1600 x 1200 240T: 1920 x 1200 Image is using its power management system. On your monitor. V-Position, page 13. Suggested Actions Reference Screen is blank and power indicator light is steady amber or blinks every 0.5 or 1 seconds ...
...Installing the Video computer utility program to vibrate s Check that the display resolution and frequency from WWW pages: driver software http://www.samsung-monitor.com http://www.samsungmonitor.com (USA only) English 22 H-Position, page 13. Appendix Table 3. NOTE: Your monitor supports ...93 kHz Digital: 30 kHz ~ 81 kHz 30 ~ 85 Hz 210T: 1600 x 1200 240T: 1920 x 1200 Image is using its power management system. On your monitor. V-Position, page 13. Suggested Actions Reference Screen is blank and power indicator light is steady amber or blinks every 0.5 or 1 seconds ...
User Manual (ENGLISH)
Page 25
...to 80% Storage Temperature: 13 ˚F to 113 ˚F (-25 ˚C to 45 ˚C) Storage Humidity: 5% to 95% NOTE: Maximum power consumption is measured after letting the monitor turned on for 30 minuites that is the time required for the unit to be thremally stable. * Referring... 25. Portuguese Italiano Español Deutsch Français English Appendix Specifications Table 4. Technical and environmental specifications Panel * Frequency 210T Size Display Size Type Pixel pitch Viewing Angle 21.3" Diagonal 432 (H) x 324 (V) mm a-si TFT Active matrix 0.27 (H) x 0.27 (V)...
...to 80% Storage Temperature: 13 ˚F to 113 ˚F (-25 ˚C to 45 ˚C) Storage Humidity: 5% to 95% NOTE: Maximum power consumption is measured after letting the monitor turned on for 30 minuites that is the time required for the unit to be thremally stable. * Referring... 25. Portuguese Italiano Español Deutsch Français English Appendix Specifications Table 4. Technical and environmental specifications Panel * Frequency 210T Size Display Size Type Pixel pitch Viewing Angle 21.3" Diagonal 432 (H) x 324 (V) mm a-si TFT Active matrix 0.27 (H) x 0.27 (V)...

User Manual (ENGLISH)
Page 26
... GND-Blue Not used GND-Sync/Self Test GND DDC _SDA Not used Not used DDC _SCL Pin Signal Assigneut 13 No Connect 14 15V Power 15 Ground (for 15V) 16 Hot Plug Detect 17 T.M.D.S Data 0- 18 T.M.D.S Data 0+ 19 T.M.D.S Data 0 Shield 20 No Connect 21 No Connect 22 T.M.D.S Clock Shield 23...
... GND-Blue Not used GND-Sync/Self Test GND DDC _SDA Not used Not used DDC _SCL Pin Signal Assigneut 13 No Connect 14 15V Power 15 Ground (for 15V) 16 Hot Plug Detect 17 T.M.D.S Data 0- 18 T.M.D.S Data 0+ 19 T.M.D.S Data 0 Shield 20 No Connect 21 No Connect 22 T.M.D.S Clock Shield 23...

User Manual (ENGLISH)
Page 27
...'t equal to the standard signal mode, adjust the mode with referring to the Videocard user guide because the screen might not display or only the power LED might be on the Monitor front. 2. Then, the mode change funcion operates 5. Press "menu" button on . If the signal from the system equals to...
...'t equal to the standard signal mode, adjust the mode with referring to the Videocard user guide because the screen might not display or only the power LED might be on the Monitor front. 2. Then, the mode change funcion operates 5. Press "menu" button on . If the signal from the system equals to...

User Manual (ENGLISH)
Page 28
English 26 Appendix Changing the Base Removing the base 1 Turn off your monitor and unplug its power cord. 2 Lay the LCD monitor face-down on a flat surface with a cushion beneath it to protect the screen. 3 Remove the four screws and then remove the Stand from the LCD monitor.
English 26 Appendix Changing the Base Removing the base 1 Turn off your monitor and unplug its power cord. 2 Lay the LCD monitor face-down on a flat surface with a cushion beneath it to protect the screen. 3 Remove the four screws and then remove the Stand from the LCD monitor.

User Manual (ENGLISH)
Page 29
Users cannot service the monitor. User maintenance is restricted to the cable connectors as explained below: Unplug the monitor from the power outlet before cleaning. n Never use flammable cleaning material to clean your LCD screen, lightly dampen a soft, clean cloth with water or mild detergent. n To ...
Users cannot service the monitor. User maintenance is restricted to the cable connectors as explained below: Unplug the monitor from the power outlet before cleaning. n Never use flammable cleaning material to clean your LCD screen, lightly dampen a soft, clean cloth with water or mild detergent. n To ...

User Manual (ENGLISH)
Page 30
... 4 M Menu 8 Menu control 17 Monitor self-test screen 7 Index O OSD Lock/Unlock 10 On Screen Display 11 P Pan 15 PBP 17 PIP 8, 16 Position 16 Power 8 Power Indicator 6 Power Saver 20 R Remote Controller 3 Recall 14 S Safety Instructions 2 Self-Test Feature Check 6 Size 16 Source 8, 9 Speaker 3 S-VHS Cable 3 T Tilt the screen 4 Troubleshooting 21 U User...
... 4 M Menu 8 Menu control 17 Monitor self-test screen 7 Index O OSD Lock/Unlock 10 On Screen Display 11 P Pan 15 PBP 17 PIP 8, 16 Position 16 Power 8 Power Indicator 6 Power Saver 20 R Remote Controller 3 Recall 14 S Safety Instructions 2 Self-Test Feature Check 6 Size 16 Source 8, 9 Speaker 3 S-VHS Cable 3 T Tilt the screen 4 Troubleshooting 21 U User...
User Manual (ENGLISH)
Page 31
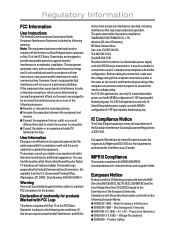
...to Identify and Resolve Radio/ TV Interference Problems helpful. User Information Changes or modifications not expressly approved by the Commission of Samsung 85 West Tasman Drive San Jose, CA 95134 USA Tel) 408-544-5124 Fax) 408-544-5191 Provided with this device must...for the product. For 120 Volt applications, use shielded signal interface cables to maintain FCC compliance for product compliance: SAMSUNG ELECTRONICS CO., LTD America QA Lab of the European Community. Power Line Harmonics n EN61000-3-3:1995 - n Connect the equipment into an outlet on , the user is the same ...
...to Identify and Resolve Radio/ TV Interference Problems helpful. User Information Changes or modifications not expressly approved by the Commission of Samsung 85 West Tasman Drive San Jose, CA 95134 USA Tel) 408-544-5124 Fax) 408-544-5191 Provided with this device must...for the product. For 120 Volt applications, use shielded signal interface cables to maintain FCC compliance for product compliance: SAMSUNG ELECTRONICS CO., LTD America QA Lab of the European Community. Power Line Harmonics n EN61000-3-3:1995 - n Connect the equipment into an outlet on , the user is the same ...


