
Operating Instructions
Page 1
Operating Instructions Hardware Guide 1 Guide to read the Safety Information before you use this machine and keep it handy for future reference. For safe and correct use, be sure to the Printer 2 Installing Options 3 Connecting the Printer 4 Configuration 5 Paper and Other Media 6 Replacing Consumables and Maintenance Kit 7 Cleaning the Printer 8 Adjusting the Printer 9 Troubleshooting 10 Removing Misfed Paper 11 Appendix Read this manual carefully before using the machine.
Operating Instructions Hardware Guide 1 Guide to read the Safety Information before you use this machine and keep it handy for future reference. For safe and correct use, be sure to the Printer 2 Installing Options 3 Connecting the Printer 4 Configuration 5 Paper and Other Media 6 Replacing Consumables and Maintenance Kit 7 Cleaning the Printer 8 Adjusting the Printer 9 Troubleshooting 10 Removing Misfed Paper 11 Appendix Read this manual carefully before using the machine.
Operating Instructions
Page 2
... reference. and other countries. Other product names used herein are employed in this manual are registered trademarks of Microsoft Corporation in some countries. IPS-PRINT Printer Language Emulation Copyright© 1999-2000 Oak Technology, Inc., All rights reserved. Keep this manual carefully before using the machine. PCL® is not inclusive...
... reference. and other countries. Other product names used herein are employed in this manual are registered trademarks of Microsoft Corporation in some countries. IPS-PRINT Printer Language Emulation Copyright© 1999-2000 Oak Technology, Inc., All rights reserved. Keep this manual carefully before using the machine. PCL® is not inclusive...
Operating Instructions
Page 3
Connecting the Printer Network Connection...47 Reading the LED Lamps...49 USB Connection...50 Parallel Connection...52 4. Configuration Ethernet Configuration...53 Using DHCP - Detecting the Network Address Automatically ... Ethernet Board Type A...37 Attaching Optional Cards...40 Attaching AD1000 (Duplex Unit)...42 3. TABLE OF CONTENTS Positions of WARNING and CAUTION labels 5 Manuals for This Printer...7 How to the Printer Exterior...11 Inside...13 Control Panel...14 2. Guide to Read This Manual...8 Symbols...8 Description for Using NetWare 57 1
Connecting the Printer Network Connection...47 Reading the LED Lamps...49 USB Connection...50 Parallel Connection...52 4. Configuration Ethernet Configuration...53 Using DHCP - Detecting the Network Address Automatically ... Ethernet Board Type A...37 Attaching Optional Cards...40 Attaching AD1000 (Duplex Unit)...42 3. TABLE OF CONTENTS Positions of WARNING and CAUTION labels 5 Manuals for This Printer...7 How to the Printer Exterior...11 Inside...13 Control Panel...14 2. Guide to Read This Manual...8 Symbols...8 Description for Using NetWare 57 1

Operating Instructions
Page 4
... to Take When Cleaning...129 2 Paper and Other Media Paper and Other Media Supported by this Printer...82 Print Area...83 Loading Paper...85 Loading Paper in Tray 1 and the Optional Paper Feed Unit 85 Loading Paper in the Bypass Tray...94 ... WPA (802.1X)...70 Installing a Site Certificate...70 Installing Device Certificate...71 Setting Items of Paper and Other Media...78 Paper Not Supported by This Printer 75 Paper Recommendations...78 Loading Paper...78 Storing Paper...78 Types of WPA...72 5.
... to Take When Cleaning...129 2 Paper and Other Media Paper and Other Media Supported by this Printer...82 Print Area...83 Loading Paper...85 Loading Paper in Tray 1 and the Optional Paper Feed Unit 85 Loading Paper in the Bypass Tray...94 ... WPA (802.1X)...70 Installing a Site Certificate...70 Installing Device Certificate...71 Setting Items of Paper and Other Media...78 Paper Not Supported by This Printer 75 Paper Recommendations...78 Loading Paper...78 Storing Paper...78 Types of WPA...72 5.
Operating Instructions
Page 5
... Adjusting Tray Registration...141 Reducing Paper Curl...144 9. Troubleshooting Error & Status Messages on the Control Panel 145 Panel Tone...152 Printer Does Not Print...153 Checking the Port Connection...154 Other Printing Problems...156 When You Cannot Print Properly...156 Paper Misfeeds Occur ...Frequently...158 The printed image is different from the image on the computer 159 When Printer is Not Functioning Properly 161 Additional Troubleshooting...162 Using the Envelope Lever...164 10. Cleaning the Friction Pad...130 Cleaning the Paper...
... Adjusting Tray Registration...141 Reducing Paper Curl...144 9. Troubleshooting Error & Status Messages on the Control Panel 145 Panel Tone...152 Printer Does Not Print...153 Checking the Port Connection...154 Other Printing Problems...156 When You Cannot Print Properly...156 Paper Misfeeds Occur ...Frequently...158 The printed image is different from the image on the computer 159 When Printer is Not Functioning Properly 161 Additional Troubleshooting...162 Using the Envelope Lever...164 10. Cleaning the Friction Pad...130 Cleaning the Paper...

Operating Instructions
Page 7
... this label (indicating a hot surface). Touching these parts will result in burns. AUB050S Do not incinerate toner or toner containers. The inside of this printer becomes very hot. Touching these parts will result in burns. 5 The inside of WARNING and CAUTION labels This machine has labels for WARNING and CAUTION... at the positions shown below. Do not touch parts with this label (indicating a hot surface). Positions of this printer becomes very hot. For safety, please follow the instructions and handle the machine as indicated.
... this label (indicating a hot surface). Touching these parts will result in burns. AUB050S Do not incinerate toner or toner containers. The inside of this printer becomes very hot. Touching these parts will result in burns. 5 The inside of WARNING and CAUTION labels This machine has labels for WARNING and CAUTION... at the positions shown below. Do not touch parts with this label (indicating a hot surface). Positions of this printer becomes very hot. For safety, please follow the instructions and handle the machine as indicated.

Operating Instructions
Page 8
Touching these parts will result in burns. 6 Do not touch parts with this printer becomes very hot. The inside of this label (indicating a hot surface).
Touching these parts will result in burns. 6 Do not touch parts with this printer becomes very hot. The inside of this label (indicating a hot surface).
Operating Instructions
Page 9
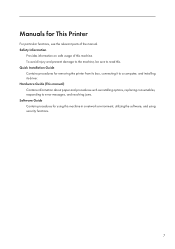
...injury and prevent damage to the machine, be sure to read this machine. Quick Installation Guide Contains procedures for removing the printer from its driver. Safety Information Provides information on safe usage of the manual. Hardware Guide (This manual) Contains information ..., responding to a computer, and installing its box, connecting it to error messages, and resolving jams. Software Guide Contain procedures for This Printer For particular functions, see the relevant parts of this . Manuals for using this machine in a network environment, utilizing the software, and using ...
...injury and prevent damage to the machine, be sure to read this machine. Quick Installation Guide Contains procedures for removing the printer from its driver. Safety Information Provides information on safe usage of the manual. Hardware Guide (This manual) Contains information ..., responding to a computer, and installing its box, connecting it to error messages, and resolving jams. Software Guide Contain procedures for This Printer For particular functions, see the relevant parts of this . Manuals for using this machine in a network environment, utilizing the software, and using ...
Operating Instructions
Page 11
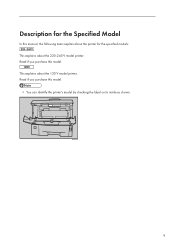
Read if you purchase this model. Description for the Specified Model In this manual, the following items explain about the printer for the specified models: This explains about the 120 V model printer. This explains about the 220-240 V model printer. AUB067S 9 Read if you purchase this model. • You can identify the printer's model by checking the label on its inside as shown.
Read if you purchase this model. Description for the Specified Model In this manual, the following items explain about the printer for the specified models: This explains about the 120 V model printer. This explains about the 220-240 V model printer. AUB067S 9 Read if you purchase this model. • You can identify the printer's model by checking the label on its inside as shown.
Operating Instructions
Page 12
... the folder "MANUAL_HTML\LANG\ (language)\(manual name) \unv\" on the "Manuals" CD-ROM, and then double-click on the CD-ROM root directory to your printer driver, and then click [uninstall]. Quit all data on "index.htm". 10 The installer starts. 3. Installing the Operating Instructions Follow the instructions in the [Start...
... the folder "MANUAL_HTML\LANG\ (language)\(manual name) \unv\" on the "Manuals" CD-ROM, and then double-click on the CD-ROM root directory to your printer driver, and then click [uninstall]. Quit all data on "index.htm". 10 The installer starts. 3. Installing the Operating Instructions Follow the instructions in the [Start...

Operating Instructions
Page 13
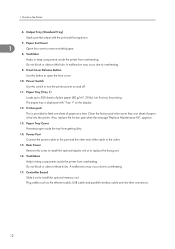
Guide to print onto thick paper, OHP transparencies, adhesive labels, envelopes as well as plain paper. When printing on custom paper size, printer driver settings are required. Tray Extension Pull out this extension to load paper into the Bypass Tray when its length is longer than B5 . 3. Bypass ... match the size and feed direction of plain paper (80 g/m2, 20 lb.) can be loaded. See p.75 "Paper and Other Media Supported by This Printer" and p.85 "Loading Paper". 4. Paper Size Dial Adjust this tray to the...
Guide to print onto thick paper, OHP transparencies, adhesive labels, envelopes as well as plain paper. When printing on custom paper size, printer driver settings are required. Tray Extension Pull out this extension to load paper into the Bypass Tray when its length is longer than B5 . 3. Bypass ... match the size and feed direction of plain paper (80 g/m2, 20 lb.) can be loaded. See p.75 "Paper and Other Media Supported by This Printer" and p.85 "Loading Paper". 4. Paper Size Dial Adjust this tray to the...
Operating Instructions
Page 14
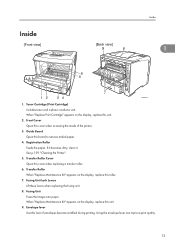
...of plain paper (80 g/m2, 20 lb.) into this hole. Ventilator Helps to overheating. 9. Power Switch Use this cover to turn the printer power on the display. 12. The paper tray is fed into their connectors. 12 Paper Exit Cover 1 Open this switch to remove misfed paper.... 8. Paper Tray (Tray 1) Loads up to keep components inside the printer from getting dirty. 14. Ventilators Help to 500 sheets of paper at a time. Also, replace the friction pad when the message "Replace Maintenance...
...of plain paper (80 g/m2, 20 lb.) into this hole. Ventilator Helps to overheating. 9. Power Switch Use this cover to turn the printer power on the display. 12. The paper tray is fed into their connectors. 12 Paper Exit Cover 1 Open this switch to remove misfed paper.... 8. Paper Tray (Tray 1) Loads up to keep components inside the printer from getting dirty. 14. Ventilators Help to 500 sheets of paper at a time. Also, replace the friction pad when the message "Replace Maintenance...
Operating Instructions
Page 15
...on the display, replace this roller. 7. Front Cover Open this lever if envelopes become wrinkled during printing. See p.129 "Cleaning the Printer". 5. Fusing Unit Fuses the image onto paper. Transfer Roller When "Replace Maintenance Kit" appears on the display, replace this unit. 2.... Envelope lever Use this cover when accessing the inside of the printer. 3. Toner Cartridge (Print Cartridge) Includes toner and a photo conductor unit. Fusing Unit Lock Levers Lift these levers when replacing the fusing...
...on the display, replace this roller. 7. Front Cover Open this lever if envelopes become wrinkled during printing. See p.129 "Cleaning the Printer". 5. Fusing Unit Fuses the image onto paper. Transfer Roller When "Replace Maintenance Kit" appears on the display, replace this unit. 2.... Envelope lever Use this cover when accessing the inside of the printer. 3. Toner Cartridge (Print Cartridge) Includes toner and a photo conductor unit. Fusing Unit Lock Levers Lift these levers when replacing the fusing...

Operating Instructions
Page 16
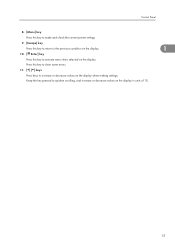
.... 5. [Online] key Press this key to switch the printer between online and offline. 6. [Job Reset] key When the printer is in the printer's input buffer. See "Canceling a Print job", Software Guide. 7. [Form Feed] key If the printer is on the display. 4. Power indicator Is on while ...the printer power is offline, press this key to cancel any printer error occur. Data In indicator Blinks while the printer is online. 14 A message describing the cause of the printer and error messages. 2. 1. ...
.... 5. [Online] key Press this key to switch the printer between online and offline. 6. [Job Reset] key When the printer is in the printer's input buffer. See "Canceling a Print job", Software Guide. 7. [Form Feed] key If the printer is on the display. 4. Power indicator Is on while ...the printer power is offline, press this key to cancel any printer error occur. Data In indicator Blinks while the printer is online. 14 A message describing the cause of the printer and error messages. 2. 1. ...
Operating Instructions
Page 17
Press this key to quicken scrolling, and increase or decrease values on the display when making settings. Keep the key pressed to execute menu items selected on the display. Control Panel 8. [Menu] key Press this key to make and check the current printer settings. 9. [Escape] key Press this key to return to the previous condition on the display. 1 10. [ Enter] key Press this key to clear some errors. 11. [ ] [ ] keys Press keys to increase or decrease values on the display in units of 10. 15
Press this key to quicken scrolling, and increase or decrease values on the display when making settings. Keep the key pressed to execute menu items selected on the display. Control Panel 8. [Menu] key Press this key to make and check the current printer settings. 9. [Escape] key Press this key to return to the previous condition on the display. 1 10. [ Enter] key Press this key to clear some errors. 11. [ ] [ ] keys Press keys to increase or decrease values on the display in units of 10. 15

Operating Instructions
Page 18
Guide to the Printer 1 16 1.
Guide to the Printer 1 16 1.

Operating Instructions
Page 19
Components inside the machine become damaged. Option List The following is a list of options for this printer. • Paper Feed Unit TK1030 • Envelope Feeder Type 400 • AD1000 (Duplex Unit) • Memory Unit Type C 128MB/ 256MB • IEEE 802.11b Interface ... installing options, the machine should be turned off and unplugged for options is recommended: 17 The machine could become very hot, and can improve the printer performance and have an expanded variety of the connector for at least an hour. If the cable is unplugged abruptly, it could break or cause...
Components inside the machine become damaged. Option List The following is a list of options for this printer. • Paper Feed Unit TK1030 • Envelope Feeder Type 400 • AD1000 (Duplex Unit) • Memory Unit Type C 128MB/ 256MB • IEEE 802.11b Interface ... installing options, the machine should be turned off and unplugged for options is recommended: 17 The machine could become very hot, and can improve the printer performance and have an expanded variety of the connector for at least an hour. If the cable is unplugged abruptly, it could break or cause...
Operating Instructions
Page 20
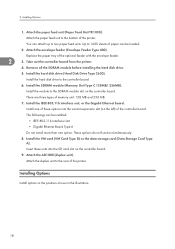
... Type A Do not install more than one of these units into the vacant expansion slot (on the left) of the printer. Up to 1600 sheets of the printer. Install the hard disk drive to the rear of paper can attach up to two paper feed units. Install the SDRAM...the controller board. 9. Replace the paper tray of memory unit: 128 MB and 256 MB. 7. Installing Options 1. Take out the controller board from the printer. 4. Install the VM card (VM Card Type D) or the data storage card (Data Storage Card Type A). Install one option. Install the hard disk drive...
... Type A Do not install more than one of these units into the vacant expansion slot (on the left) of the printer. Up to 1600 sheets of the printer. Install the hard disk drive to the rear of paper can attach up to two paper feed units. Install the SDRAM...the controller board. 9. Replace the paper tray of memory unit: 128 MB and 256 MB. 7. Installing Options 1. Take out the controller board from the printer. 4. Install the VM card (VM Card Type D) or the data storage card (Data Storage Card Type A). Install one option. Install the hard disk drive...
Operating Instructions
Page 21
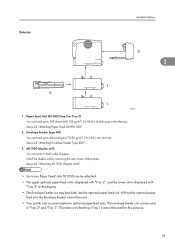
... can load up to 60 envelopes (72-90 g/m2, 19-24 lb.) into the tray. Envelope Feeder Type 400 You can be used . • Your printer can accommodate two optional paper feed units. Install the duplex unit by removing the rear cover of plain paper into the tray. See p.22 "Attaching... slides into the optional paper feed unit. AD1000 (duplex unit) You can load up to 500 sheets (60-130 g/m2, 16-34 lb.) of the printer. Exterior Available Options 2 AUB053S 1.
... can load up to 60 envelopes (72-90 g/m2, 19-24 lb.) into the tray. Envelope Feeder Type 400 You can be used . • Your printer can accommodate two optional paper feed units. Install the duplex unit by removing the rear cover of plain paper into the tray. See p.22 "Attaching... slides into the optional paper feed unit. AD1000 (duplex unit) You can load up to 500 sheets (60-130 g/m2, 16-34 lb.) of the printer. Exterior Available Options 2 AUB053S 1.

Operating Instructions
Page 24
... to confirm the model code. • Before using the new paper feed unit, you must make settings in the printer driver. 1. Check the package contains the following: Paper Feed Unit (including a paper tray) ZKDX210J 2. 2. Lifting it carelessly or dropping it slowly. Turn off... the power of it, and then lift it may cause an injury. • The printer weighs about 17 kg (37.5 lb.). Installing Options Attaching Paper Feed Unit TK1030 When installing multiple options, install the paper feed unit first. • Before...
... to confirm the model code. • Before using the new paper feed unit, you must make settings in the printer driver. 1. Check the package contains the following: Paper Feed Unit (including a paper tray) ZKDX210J 2. 2. Lifting it carelessly or dropping it slowly. Turn off... the power of it, and then lift it may cause an injury. • The printer weighs about 17 kg (37.5 lb.). Installing Options Attaching Paper Feed Unit TK1030 When installing multiple options, install the paper feed unit first. • Before...


