

User Guide
Page 1
Adjustment Item Menu Guide: TCRU Model Name: Pro C900S/Pro C900 Read this manual carefully before using this machine and keep it handy for future reference. 1
Adjustment Item Menu Guide: TCRU Model Name: Pro C900S/Pro C900 Read this manual carefully before using this machine and keep it handy for future reference. 1
User Guide
Page 3
CONVENTIONS USED IN THIS MANUAL CAUTIONS, NOTES, ETC. Note: This information provides extra information about machine maintenance. Certain options might be available in serious injury or death. GENERAL SAFETY INSTRUCTIONS ... safe operation and avoid minor injuries. ON STANDBY 2 Patent and Trademark Office and/or certain other than genuine parts with IEC60417. Important: • Follow this manual might not be slightly different from use of each symbol conforms with this machine. • Some illustrations in the U.S. RCAUTION Follow the information to the...
CONVENTIONS USED IN THIS MANUAL CAUTIONS, NOTES, ETC. Note: This information provides extra information about machine maintenance. Certain options might be available in serious injury or death. GENERAL SAFETY INSTRUCTIONS ... safe operation and avoid minor injuries. ON STANDBY 2 Patent and Trademark Office and/or certain other than genuine parts with IEC60417. Important: • Follow this manual might not be slightly different from use of each symbol conforms with this machine. • Some illustrations in the U.S. RCAUTION Follow the information to the...
User Guide
Page 6
...!10 2.2 OPENING THE TCRU DISPLAY 12 2.3 REMOVING THE FRONT TOP COVER 15 2.4 REATTACHING THE FRONT TOP COVER 16 3. Table of Contents CONVENTIONS USED IN THIS MANUAL 2 GENERAL SAFETY INSTRUCTIONS 2 1. CHARGE CORONA UNIT 17 3.1 REMOVING THE CHARGE CORONA UNIT 17 3.2 REINSTALLING THE CHARGE CORONA UNIT 20 4.
...!10 2.2 OPENING THE TCRU DISPLAY 12 2.3 REMOVING THE FRONT TOP COVER 15 2.4 REATTACHING THE FRONT TOP COVER 16 3. Table of Contents CONVENTIONS USED IN THIS MANUAL 2 GENERAL SAFETY INSTRUCTIONS 2 1. CHARGE CORONA UNIT 17 3.1 REMOVING THE CHARGE CORONA UNIT 17 3.2 REINSTALLING THE CHARGE CORONA UNIT 20 4.
User Guide
Page 7
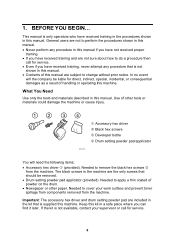
... and are not sure about how to apply a thin coated of other paper. What You Need Use only the tools and materials described in this manual. Needed to cover your supervisor or call for direct, indirect, special, incidental, or consequential damages as a result of this machine. Needed to do ... (provided). Important: The accessory hex driver and drum setting powder pad are included in this machine. If the kit is supplied this manual are the only screws that is not available, contact your work surface and prevent toner spillage from components removed from the machine.
... and are not sure about how to apply a thin coated of other paper. What You Need Use only the tools and materials described in this manual. Needed to cover your supervisor or call for direct, indirect, special, incidental, or consequential damages as a result of this machine. Needed to do ... (provided). Important: The accessory hex driver and drum setting powder pad are included in this machine. If the kit is supplied this manual are the only screws that is not available, contact your work surface and prevent toner spillage from components removed from the machine.

User Guide
Page 11
... the upper left corner behind the front left cover. 10 The fusing unit becomes extremely hot during normal operation. The operation switch is in this manual, always do not use the machine for your machine. 2. For details, refer to turn off . 3. COMMON PROCEDURES 2.1 SWITCH THE MACHINE OFF BEFORE BEGINNING ANY PROCEDURE...
... the upper left corner behind the front left cover. 10 The fusing unit becomes extremely hot during normal operation. The operation switch is in this manual, always do not use the machine for your machine. 2. For details, refer to turn off . 3. COMMON PROCEDURES 2.1 SWITCH THE MACHINE OFF BEFORE BEGINNING ANY PROCEDURE...
User Guide
Page 14
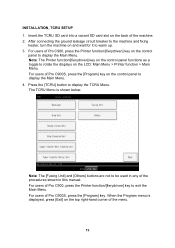
... panel functions as a toggle to rotate the displays on the control panel to exit the Main Menu. For users of the machine. 2. For users of Pro C900S, press the [Program] key. INSTALLATION, TCRU SETUP 1. Note: The [Fusing Unit] and [Others] buttons are not to display the Main Menu. 4. After connecting ...circuit breaker to the machine and fixing heater, turn the machine on the control panel to be used in this manual. The TCRU Menu is displayed, press [Exit] on the back of Pro C900S, press the [Program] key on and wait for it to display the TCRU Menu. Press the [TCRU] button...
... panel functions as a toggle to rotate the displays on the control panel to exit the Main Menu. For users of the machine. 2. For users of Pro C900S, press the [Program] key. INSTALLATION, TCRU SETUP 1. Note: The [Fusing Unit] and [Others] buttons are not to display the Main Menu. 4. After connecting ...circuit breaker to the machine and fixing heater, turn the machine on the control panel to be used in this manual. The TCRU Menu is displayed, press [Exit] on the back of Pro C900S, press the [Program] key on and wait for it to display the TCRU Menu. Press the [TCRU] button...
User Guide
Page 52
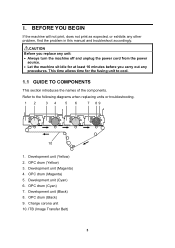
... 34 56 7 89 10 1. This time allows time for at least 10 minutes before you carry out any other problem, find the problem in this manual and troubleshoot accordingly. Development unit (Cyan) 6. OPC drum (Magenta) 5. Charge corona unit 10. Refer to cool. 1.1 GUIDE TO COMPONENTS This section introduces the names of...
... 34 56 7 89 10 1. This time allows time for at least 10 minutes before you carry out any other problem, find the problem in this manual and troubleshoot accordingly. Development unit (Cyan) 6. OPC drum (Magenta) 5. Charge corona unit 10. Refer to cool. 1.1 GUIDE TO COMPONENTS This section introduces the names of...
User Guide
Page 82
...incidental, or consequential damages as standard. For details, please contact your local dealer. • Depending on the operation and use of this manual are in some countries. In no event will the company be available in , your machine may include certain options as a result of ...handling or operating the machine. Notes: • Some illustrations in this manual might be slightly different from the machine. • Certain options might not be liable for quick reference. Important • Contents of this ...
...incidental, or consequential damages as standard. For details, please contact your local dealer. • Depending on the operation and use of this manual are in some countries. In no event will the company be available in , your machine may include certain options as a result of ...handling or operating the machine. Notes: • Some illustrations in this manual might be slightly different from the machine. • Certain options might not be liable for quick reference. Important • Contents of this ...

User Guide
Page 84
IMPORTANT NOTICE IMPORTANT NOTICE SAFETY INFORMATION RWARNING 1. SYMBOLS This manual uses the following symbols: RWARNING Indicates a potentially hazardous situation which , if instructions are not followed, could result in minor or moderate injury or damage to ...
IMPORTANT NOTICE IMPORTANT NOTICE SAFETY INFORMATION RWARNING 1. SYMBOLS This manual uses the following symbols: RWARNING Indicates a potentially hazardous situation which , if instructions are not followed, could result in minor or moderate injury or damage to ...

User Guide
Page 113
... 6-745 6-755 6-760 6-770 6-780 6-781 6-782 Wide LCT Fan Duty Adj Wide LCT Fan Start Time Settings Developer Exhaust Developer Fill Manual Lubrication Exe Init TD Sensor Manual ProCon Staple Position Adjustment Punch Hole Position Adjustment End Bind Jogger Adjustment Adjust Output Jog Position Adjust Leading Edge Stopper Press Adjust Booklet...
... 6-745 6-755 6-760 6-770 6-780 6-781 6-782 Wide LCT Fan Duty Adj Wide LCT Fan Start Time Settings Developer Exhaust Developer Fill Manual Lubrication Exe Init TD Sensor Manual ProCon Staple Position Adjustment Punch Hole Position Adjustment End Bind Jogger Adjustment Adjust Output Jog Position Adjust Leading Edge Stopper Press Adjust Booklet...


