
User Guide
Page 1
Adjustment Item Menu Guide: TCRU Model Name: Pro C900S/Pro C900 Read this manual carefully before using this machine and keep it handy for future reference. 1
Adjustment Item Menu Guide: TCRU Model Name: Pro C900S/Pro C900 Read this manual carefully before using this machine and keep it handy for future reference. 1

User Guide
Page 9
Printer function/[fierydriven] 4. ./* key 5. Operation Switch 9. User Tools 2. Enter key 6. Number keys 56 8 Clear key 7. Counter 3. CONTROL PANEL (Pro C900) 7 8 1 9 2 3 4 1. On indicator 8.
Printer function/[fierydriven] 4. ./* key 5. Operation Switch 9. User Tools 2. Enter key 6. Number keys 56 8 Clear key 7. Counter 3. CONTROL PANEL (Pro C900) 7 8 1 9 2 3 4 1. On indicator 8.

User Guide
Page 10
Clear key 6. Enter key 5. On indicator 7. Number keys 9. Program 3 45 9 CONTROL PANEL (Pro C900S) 6 7 1 8 9 2 1. User Tools 2. Counter 3. ./* key 4. Operation Switch 8.
Clear key 6. Enter key 5. On indicator 7. Number keys 9. Program 3 45 9 CONTROL PANEL (Pro C900S) 6 7 1 8 9 2 1. User Tools 2. Counter 3. ./* key 4. Operation Switch 8.
User Guide
Page 14
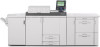
.../[fierydriven] key to display the Main Menu. For users of the procedures shown in any of Pro C900, press the Printer function/[fierydriven] key on the LCD: Main Menu > Printer function > Main...on the control panel to exit the Main Menu. Note: The Printer function/[fierydriven] key on the back of Pro C900S, press the [Program] key. Press the [TCRU] button to warm up. 3. Insert the TCRU SD ...Menu. 4. The TCRU Menu is displayed, press [Exit] on the top right-hand corner of Pro C900S, press the [Program] key on and wait for it to display the TCRU Menu. INSTALLATION, TCRU SETUP 1. ...
.../[fierydriven] key to display the Main Menu. For users of the procedures shown in any of Pro C900, press the Printer function/[fierydriven] key on the LCD: Main Menu > Printer function > Main...on the control panel to exit the Main Menu. Note: The Printer function/[fierydriven] key on the back of Pro C900S, press the [Program] key. Press the [TCRU] button to warm up. 3. Insert the TCRU SD ...Menu. 4. The TCRU Menu is displayed, press [Exit] on the top right-hand corner of Pro C900S, press the [Program] key on and wait for it to display the TCRU Menu. INSTALLATION, TCRU SETUP 1. ...
User Guide
Page 53
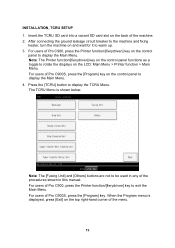
...After the machine has started up, press the Printer function/[fierydriven] key on the back of Pro C900. The [Adjustment] menu appears. PTR (Paper Transfer Roller) unit 3. For users of Pro C900, each time you press the Printer function/[fierydriven] key, the control panel display switches between ... and the printer function screen. • After you to the machine's SP adjustment item values when troubleshooting. NOTE: • For users of Pro C900S, press the [Program] key to do this. 4 To change to change these values, display the [Adjustment] menu using the [Adjustment] menu...
...After the machine has started up, press the Printer function/[fierydriven] key on the back of Pro C900. The [Adjustment] menu appears. PTR (Paper Transfer Roller) unit 3. For users of Pro C900, each time you press the Printer function/[fierydriven] key, the control panel display switches between ... and the printer function screen. • After you to the machine's SP adjustment item values when troubleshooting. NOTE: • For users of Pro C900S, press the [Program] key to do this. 4 To change to change these values, display the [Adjustment] menu using the [Adjustment] menu...
User Guide
Page 77
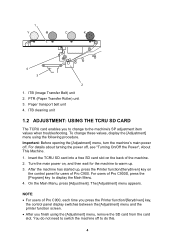
... blue color is displayed. 28 When the machine has finished printing, "Completed" is for test printing. For users of Pro C900, press the Printer function/[fierydriven] key on both sides of the paper. For Pro C900S, press the [Program] key. Then, 3 sheets will be printed in the other colors. CAUSE: This is a difference in...
... blue color is displayed. 28 When the machine has finished printing, "Completed" is for test printing. For users of Pro C900, press the Printer function/[fierydriven] key on both sides of the paper. For Pro C900S, press the [Program] key. Then, 3 sheets will be printed in the other colors. CAUSE: This is a difference in...
User Guide
Page 85
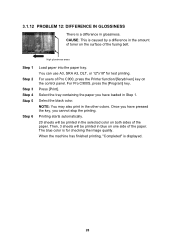
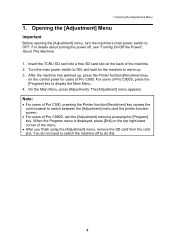
... press the Printer function/[fierydriven] key on the control panel for the machine to ON, and wait for users of Pro C900. For users of Pro C900S, press the [Program] key to switch between the [Adjustment] menu and the printer function screen. • For users of... Pro C900, pressing the Printer function/[fierydriven] key causes the control panel to display the Main Menu. 4. Note: • For users of Pro C900S, exit the [Adjustment] menu by pressing the [Program] key. Opening the [Adjustment]...
... press the Printer function/[fierydriven] key on the control panel for the machine to ON, and wait for users of Pro C900. For users of Pro C900S, press the [Program] key to switch between the [Adjustment] menu and the printer function screen. • For users of... Pro C900, pressing the Printer function/[fierydriven] key causes the control panel to display the Main Menu. 4. Note: • For users of Pro C900S, exit the [Adjustment] menu by pressing the [Program] key. Opening the [Adjustment]...

User Guide
Page 92
... Upper Tray 009 A3/DLT LCT1 Lower Tray 010 A3/DLT LCT2 Upper Tray 011 A3/DLT LCT2 Lower Tray Note: Settings for Settings on Pro C900. 12
... Upper Tray 009 A3/DLT LCT1 Lower Tray 010 A3/DLT LCT2 Upper Tray 011 A3/DLT LCT2 Lower Tray Note: Settings for Settings on Pro C900. 12

User Guide
Page 98
SP Item 1-730 Detect Skew No. Setting Selection 001 Main Upper Tray 002 Main Lower Tray 004 A4/LT LCT Upper Tray 005 A4/LT LCT Middle Tray 006 A4/LT LCT Lower Tray 007 Main Bypass Tray 008 A3/DLT LCT1 Upper Tray 009 A3/DLT LCT1 Lower Tray 010 A3/DLT LCT2 Upper Tray 011 A3/DLT LCT2 Lower Tray Enable Disable Note: Settings for Settings on Pro C900. Values for A4/LT LCT are available only on the [Adjustment] Menu 1. Press the selection you require for the setting. Default Value Enable 18 3.2.4 Other Adjustment Settings 1 Detect Skew 3.
SP Item 1-730 Detect Skew No. Setting Selection 001 Main Upper Tray 002 Main Lower Tray 004 A4/LT LCT Upper Tray 005 A4/LT LCT Middle Tray 006 A4/LT LCT Lower Tray 007 Main Bypass Tray 008 A3/DLT LCT1 Upper Tray 009 A3/DLT LCT1 Lower Tray 010 A3/DLT LCT2 Upper Tray 011 A3/DLT LCT2 Lower Tray Enable Disable Note: Settings for Settings on Pro C900. Values for A4/LT LCT are available only on the [Adjustment] Menu 1. Press the selection you require for the setting. Default Value Enable 18 3.2.4 Other Adjustment Settings 1 Detect Skew 3.
User Guide
Page 99
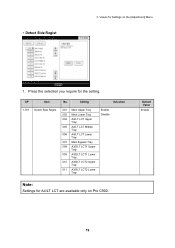
Values for Settings on Pro C900. Press the selection you require for A4/LT LCT are available only on the [Adjustment] Menu 1. Default Value Enable 19 SP Item No. 1 Detect Side Regist 3. Setting Selection 1-761 Detect Side Regist 001 Main Upper Tray 002 Main Lower Tray 004 A4/LT LCT Upper Tray 005 A4/LT LCT Middle Tray 006 A4/LT LCT Lower Tray 007 Main Bypass Tray 008 A3/DLT LCT1 Upper Tray 009 A3/DLT LCT1 Lower Tray 010 A3/DLT LCT2 Upper Tray 011 A3/DLT LCT2 Lower Tray Enable Disable Note: Settings for the setting.
Values for Settings on Pro C900. Press the selection you require for A4/LT LCT are available only on the [Adjustment] Menu 1. Default Value Enable 19 SP Item No. 1 Detect Side Regist 3. Setting Selection 1-761 Detect Side Regist 001 Main Upper Tray 002 Main Lower Tray 004 A4/LT LCT Upper Tray 005 A4/LT LCT Middle Tray 006 A4/LT LCT Lower Tray 007 Main Bypass Tray 008 A3/DLT LCT1 Upper Tray 009 A3/DLT LCT1 Lower Tray 010 A3/DLT LCT2 Upper Tray 011 A3/DLT LCT2 Lower Tray Enable Disable Note: Settings for the setting.

User Guide
Page 103
SP 1-910 Item Detect Multi Feed No. Setting 001 Main Upper Tray 002 Main Lower Tray 004 A4/LT LCT Upper Tray 005 A4/LT LCT Middle Tray 006 A4/LT LCT Lower Tray 007 Main Bypass Tray 008 A3/DLT LCT1 Upper Tray 009 A3/DLT LCT1 Lower Tray 010 A3/DLT LCT2 Upper Tray 011 A3/DLT LCT2 Lower Tray Selection Enable Disable Note: Settings for Settings on Pro C900. Values for A4/LT LCT are available only on the [Adjustment] Menu 1. Press the selection you require for the setting. Default Value Enable 23 1 Detect Multi Feed 3.
SP 1-910 Item Detect Multi Feed No. Setting 001 Main Upper Tray 002 Main Lower Tray 004 A4/LT LCT Upper Tray 005 A4/LT LCT Middle Tray 006 A4/LT LCT Lower Tray 007 Main Bypass Tray 008 A3/DLT LCT1 Upper Tray 009 A3/DLT LCT1 Lower Tray 010 A3/DLT LCT2 Upper Tray 011 A3/DLT LCT2 Lower Tray Selection Enable Disable Note: Settings for Settings on Pro C900. Values for A4/LT LCT are available only on the [Adjustment] Menu 1. Press the selection you require for the setting. Default Value Enable 23 1 Detect Multi Feed 3.


