
User Guide
Page 1
Adjustment Item Menu Guide: TCRU Model Name: Pro C900S/Pro C900 Read this manual carefully before using this machine and keep it handy for future reference. 1
Adjustment Item Menu Guide: TCRU Model Name: Pro C900S/Pro C900 Read this manual carefully before using this machine and keep it handy for future reference. 1

User Guide
Page 9
On indicator 8. CONTROL PANEL (Pro C900) 7 8 1 9 2 3 4 1. Clear key 7. Operation Switch 9. Counter 3. Printer function/[fierydriven] 4. ./* key 5. Enter key 6. User Tools 2. Number keys 56 8
On indicator 8. CONTROL PANEL (Pro C900) 7 8 1 9 2 3 4 1. Clear key 7. Operation Switch 9. Counter 3. Printer function/[fierydriven] 4. ./* key 5. Enter key 6. User Tools 2. Number keys 56 8

User Guide
Page 10
CONTROL PANEL (Pro C900S) 6 7 1 8 9 2 1. On indicator 7. Number keys 9. Enter key 5. Counter 3. ./* key 4. Clear key 6. Program 3 45 9 User Tools 2. Operation Switch 8.
CONTROL PANEL (Pro C900S) 6 7 1 8 9 2 1. On indicator 7. Number keys 9. Enter key 5. Counter 3. ./* key 4. Clear key 6. Program 3 45 9 User Tools 2. Operation Switch 8.
User Guide
Page 14
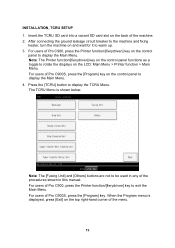
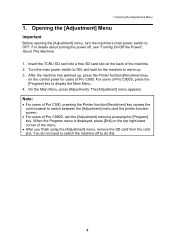
...Note: The [Fusing Unit] and [Others] buttons are not to be used in this manual. For users of Pro C900, press the Printer function/[fierydriven] key to display the Main Menu. For users of Pro C900S, press the [Program] key. When the Program menu is shown below. Insert the TCRU SD card into a ...vacant SD card slot on the back of Pro C900, press the Printer function/[fierydriven] key on the control panel to...
...Note: The [Fusing Unit] and [Others] buttons are not to be used in this manual. For users of Pro C900, press the Printer function/[fierydriven] key to display the Main Menu. For users of Pro C900S, press the [Program] key. When the Program menu is shown below. Insert the TCRU SD card into a ...vacant SD card slot on the back of Pro C900, press the Printer function/[fierydriven] key on the control panel to...
User Guide
Page 53
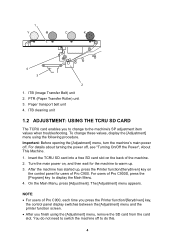
...Adjustment] menu, remove the SD card from the card slot. The [Adjustment] menu appears. After the machine has started up . 3. NOTE: • For users of Pro C900. 1 Y M C K 4 3 2 1. On the Main Manu, press [Adjustment]. For details about turning the power off . ITB cleaning unit 1.2 ADJUSTMENT: USING... CARD The TCRU card enables you finish using the following procedure. Turn the main power on, and then wait for users of Pro C900, each time you press the Printer function/[fierydriven] key, the control panel display switches between the [Adjustment] menu and the printer...
...Adjustment] menu, remove the SD card from the card slot. The [Adjustment] menu appears. After the machine has started up . 3. NOTE: • For users of Pro C900. 1 Y M C K 4 3 2 1. On the Main Manu, press [Adjustment]. For details about turning the power off . ITB cleaning unit 1.2 ADJUSTMENT: USING... CARD The TCRU card enables you finish using the following procedure. Turn the main power on, and then wait for users of Pro C900, each time you press the Printer function/[fierydriven] key, the control panel display switches between the [Adjustment] menu and the printer...
User Guide
Page 77
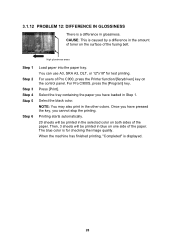
...also print in the amount of toner on the surface of the fusing belt. Printing starts automatically. 20 sheets will be printed in glossiness. For Pro C900S, press the [Program] key. Select the black color. 3.1.12 PROBLEM 12: DIFFERENCE IN GLOSSINESS There is a difference in the selected color ...on both sides of the paper. For users of Pro C900, press the Printer function/[fierydriven] key on the control panel. Select the tray containing the paper you have pressed the key, you have ...
...also print in the amount of toner on the surface of the fusing belt. Printing starts automatically. 20 sheets will be printed in glossiness. For Pro C900S, press the [Program] key. Select the black color. 3.1.12 PROBLEM 12: DIFFERENCE IN GLOSSINESS There is a difference in the selected color ...on both sides of the paper. For users of Pro C900, press the Printer function/[fierydriven] key on the control panel. Select the tray containing the paper you have pressed the key, you have ...
User Guide
Page 85
...finish using the [Adjustment] menu, remove the SD card from the card slot. When the Program menu is displayed, press [Exit] on the back of Pro C900S, press the [Program] key to switch the machine off , see "Turning On/Off the Power", About This Machine. 1. Opening the [Adjustment] Menu ... the [Adjustment] menu, turn the machine's main power switch to switch between the [Adjustment] menu and the printer function screen. • For users of Pro C900S, exit the [Adjustment] menu by pressing the [Program] key. Turn the main power switch to warm up. 3. For users of the machine. 2. Insert...
...finish using the [Adjustment] menu, remove the SD card from the card slot. When the Program menu is displayed, press [Exit] on the back of Pro C900S, press the [Program] key to switch the machine off , see "Turning On/Off the Power", About This Machine. 1. Opening the [Adjustment] Menu ... the [Adjustment] menu, turn the machine's main power switch to switch between the [Adjustment] menu and the printer function screen. • For users of Pro C900S, exit the [Adjustment] menu by pressing the [Program] key. Turn the main power switch to warm up. 3. For users of the machine. 2. Insert...

User Guide
Page 92
... Upper Tray 009 A3/DLT LCT1 Lower Tray 010 A3/DLT LCT2 Upper Tray 011 A3/DLT LCT2 Lower Tray Note: Settings for Settings on Pro C900. 12
... Upper Tray 009 A3/DLT LCT1 Lower Tray 010 A3/DLT LCT2 Upper Tray 011 A3/DLT LCT2 Lower Tray Note: Settings for Settings on Pro C900. 12

User Guide
Page 98
Setting Selection 001 Main Upper Tray 002 Main Lower Tray 004 A4/LT LCT Upper Tray 005 A4/LT LCT Middle Tray 006 A4/LT LCT Lower Tray 007 Main Bypass Tray 008 A3/DLT LCT1 Upper Tray 009 A3/DLT LCT1 Lower Tray 010 A3/DLT LCT2 Upper Tray 011 A3/DLT LCT2 Lower Tray Enable Disable Note: Settings for A4/LT LCT are available only on the [Adjustment] Menu 1. Default Value Enable 18 3.2.4 Other Adjustment Settings 1 Detect Skew 3. Press the selection you require for Settings on Pro C900. SP Item 1-730 Detect Skew No. Values for the setting.
Setting Selection 001 Main Upper Tray 002 Main Lower Tray 004 A4/LT LCT Upper Tray 005 A4/LT LCT Middle Tray 006 A4/LT LCT Lower Tray 007 Main Bypass Tray 008 A3/DLT LCT1 Upper Tray 009 A3/DLT LCT1 Lower Tray 010 A3/DLT LCT2 Upper Tray 011 A3/DLT LCT2 Lower Tray Enable Disable Note: Settings for A4/LT LCT are available only on the [Adjustment] Menu 1. Default Value Enable 18 3.2.4 Other Adjustment Settings 1 Detect Skew 3. Press the selection you require for Settings on Pro C900. SP Item 1-730 Detect Skew No. Values for the setting.
User Guide
Page 99
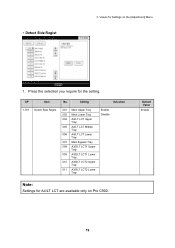
Press the selection you require for A4/LT LCT are available only on the [Adjustment] Menu 1. 1 Detect Side Regist 3. Setting Selection 1-761 Detect Side Regist 001 Main Upper Tray 002 Main Lower Tray 004 A4/LT LCT Upper Tray 005 A4/LT LCT Middle Tray 006 A4/LT LCT Lower Tray 007 Main Bypass Tray 008 A3/DLT LCT1 Upper Tray 009 A3/DLT LCT1 Lower Tray 010 A3/DLT LCT2 Upper Tray 011 A3/DLT LCT2 Lower Tray Enable Disable Note: Settings for the setting. Default Value Enable 19 SP Item No. Values for Settings on Pro C900.
Press the selection you require for A4/LT LCT are available only on the [Adjustment] Menu 1. 1 Detect Side Regist 3. Setting Selection 1-761 Detect Side Regist 001 Main Upper Tray 002 Main Lower Tray 004 A4/LT LCT Upper Tray 005 A4/LT LCT Middle Tray 006 A4/LT LCT Lower Tray 007 Main Bypass Tray 008 A3/DLT LCT1 Upper Tray 009 A3/DLT LCT1 Lower Tray 010 A3/DLT LCT2 Upper Tray 011 A3/DLT LCT2 Lower Tray Enable Disable Note: Settings for the setting. Default Value Enable 19 SP Item No. Values for Settings on Pro C900.

User Guide
Page 103
Setting 001 Main Upper Tray 002 Main Lower Tray 004 A4/LT LCT Upper Tray 005 A4/LT LCT Middle Tray 006 A4/LT LCT Lower Tray 007 Main Bypass Tray 008 A3/DLT LCT1 Upper Tray 009 A3/DLT LCT1 Lower Tray 010 A3/DLT LCT2 Upper Tray 011 A3/DLT LCT2 Lower Tray Selection Enable Disable Note: Settings for the setting. Press the selection you require for A4/LT LCT are available only on the [Adjustment] Menu 1. Default Value Enable 23 1 Detect Multi Feed 3. Values for Settings on Pro C900. SP 1-910 Item Detect Multi Feed No.
Setting 001 Main Upper Tray 002 Main Lower Tray 004 A4/LT LCT Upper Tray 005 A4/LT LCT Middle Tray 006 A4/LT LCT Lower Tray 007 Main Bypass Tray 008 A3/DLT LCT1 Upper Tray 009 A3/DLT LCT1 Lower Tray 010 A3/DLT LCT2 Upper Tray 011 A3/DLT LCT2 Lower Tray Selection Enable Disable Note: Settings for the setting. Press the selection you require for A4/LT LCT are available only on the [Adjustment] Menu 1. Default Value Enable 23 1 Detect Multi Feed 3. Values for Settings on Pro C900. SP 1-910 Item Detect Multi Feed No.


