Quick Reference Guide
Page 2
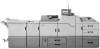
... -- Dash indicates where the set will be stapled. 5. F. [Text/Photo] -- All rights reserved. - 4/07 Press the green [Start] button. If copying from photos or pictures. Duplex options -- 1-sided originals to 2-sided... is reproduced from the glass, press [#] after placing last original. Delicate tones and gray scale is the default. Version 2.0 (26376) Company Confidential ©2007 Ricoh Americas Corporation. Copies color originals in Black & White. Originals contain a combination of the control panel. 2. Paper Trays -- [Auto Paper Select] automatically selects paper...
... -- Dash indicates where the set will be stapled. 5. F. [Text/Photo] -- All rights reserved. - 4/07 Press the green [Start] button. If copying from photos or pictures. Duplex options -- 1-sided originals to 2-sided... is reproduced from the glass, press [#] after placing last original. Delicate tones and gray scale is the default. Version 2.0 (26376) Company Confidential ©2007 Ricoh Americas Corporation. Copies color originals in Black & White. Originals contain a combination of the control panel. 2. Paper Trays -- [Auto Paper Select] automatically selects paper...
Quick Reference Guide
Page 6
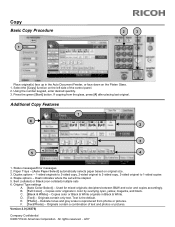
... requires no password to be called Preferences or Options) 1. Version 2.0 (68236) Company Confidential ©2007 Ricoh Americas Corporation. Choose a Custom Setting (Duplex, Staple etc...) 2. [Add/Change Custom Settings] Add a new or edit a current Custom Setting Configure Stapling, Hole Punching, Duplex and other options 3. Document Server: Users can print and save their job on...
... requires no password to be called Preferences or Options) 1. Version 2.0 (68236) Company Confidential ©2007 Ricoh Americas Corporation. Choose a Custom Setting (Duplex, Staple etc...) 2. [Add/Change Custom Settings] Add a new or edit a current Custom Setting Configure Stapling, Hole Punching, Duplex and other options 3. Document Server: Users can print and save their job on...
Quick Reference Guide
Page 16
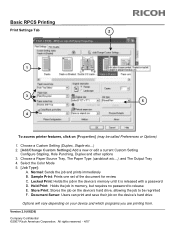
Hold both sides of the cartridge. Pull up the upper unit of the cartridge. Open the front cover of the finisher, and then pull out the staple unit. 2. Hold the green levers while gently pulling out the cartridge. 3. Adding Staples 1.
Hold both sides of the cartridge. Pull up the upper unit of the cartridge. Open the front cover of the finisher, and then pull out the staple unit. 2. Hold the green levers while gently pulling out the cartridge. 3. Adding Staples 1.
Quick Reference Guide
Page 17
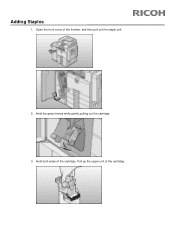
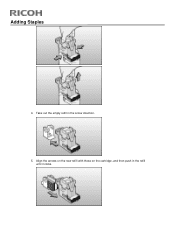
Adding Staples 4. Take out the empty refill in the refill until it clicks. Align the arrows on the new refill with those on the cartridge, and then push in the arrow direction. 5.
Adding Staples 4. Take out the empty refill in the refill until it clicks. Align the arrows on the new refill with those on the cartridge, and then push in the arrow direction. 5.
Quick Reference Guide
Page 18
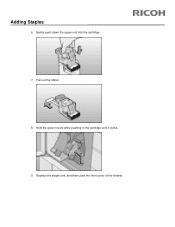
Adding Staples 6. Pull out the ribbon. 8. Replace the staple unit, and then close the front cover of the finisher. Hold the green levers while pushing in the cartridge until it clicks. 9. Gently push down the upper unit into the cartridge. 7.
Adding Staples 6. Pull out the ribbon. 8. Replace the staple unit, and then close the front cover of the finisher. Hold the green levers while pushing in the cartridge until it clicks. 9. Gently push down the upper unit into the cartridge. 7.

