Quick Installation Guide
Page 1
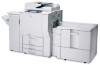
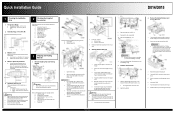
...Shipping Tape and Packing Material 5. Remove tape and connect the cord F. Block and tape B. Shipping Retainer Removal 8. This will be as the copier is removed. 1. Prepare an open space on the reinforced ring of the PCUs. The rod is removed AFTER the faceplate is ...Do not pull out the drawer unit until it . Page 1 of the hopper cover [A] (3). 3. Minimum Space Requirements Put the copier near the machine and that the support leg is disconnected from the wall outlet during this procedure Remove the following shipping and packing material: A. Accessories...
...Shipping Tape and Packing Material 5. Remove tape and connect the cord F. Block and tape B. Shipping Retainer Removal 8. This will be as the copier is removed. 1. Prepare an open space on the reinforced ring of the PCUs. The rod is removed AFTER the faceplate is ...Do not pull out the drawer unit until it . Page 1 of the hopper cover [A] (3). 3. Minimum Space Requirements Put the copier near the machine and that the support leg is disconnected from the wall outlet during this procedure Remove the following shipping and packing material: A. Accessories...
Quick Installation Guide
Page 3
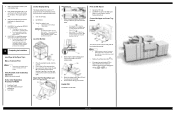
.... 'Front set' means that the paper should be face down in the Paper Trays Make a Test Color Print Use the same type of the copier. 'Back set' means that the paper should be face up and enter standby mode. 5. Attach the paper-installation decals to print a full SMC report. These...
.... 'Front set' means that the paper should be face down in the Paper Trays Make a Test Color Print Use the same type of the copier. 'Back set' means that the paper should be face up and enter standby mode. 5. Attach the paper-installation decals to print a full SMC report. These...


