
User Guide
Page 1
For safe and correct use, be sure to read the Safety Information in this manual, refer to the HTML/PDF files on the supplied CD-ROM. User Guide What You Can Do with This Machine Getting Started Copy Print Scan Document Server Web Image Monitor Adding Paper and Toner Troubleshooting For information not in "Read This First" before using the machine.
For safe and correct use, be sure to read the Safety Information in this manual, refer to the HTML/PDF files on the supplied CD-ROM. User Guide What You Can Do with This Machine Getting Started Copy Print Scan Document Server Web Image Monitor Adding Paper and Toner Troubleshooting For information not in "Read This First" before using the machine.

User Guide
Page 2
... to order expendable supplies and where to call when a malfunction occurs. See Paper Settings . The icon on . See "Checking Inquiry Using the User Tools", Maintenance and Specifications . 999[Paper Setting] key Specify settings for the initial display when modes are cleared or reset, or immediately after the... Energy", Getting Started . See "How to Use the Screens on when it was manufactured. 777[Login/Logout] key Press to log in this manual may be different from Low Power mode or Sleep mode. Guide to the Names and Functions of the Initial Screen", Convenient Functions . 444[Interrupt]...
... to order expendable supplies and where to call when a malfunction occurs. See Paper Settings . The icon on . See "Checking Inquiry Using the User Tools", Maintenance and Specifications . 999[Paper Setting] key Specify settings for the initial display when modes are cleared or reset, or immediately after the... Energy", Getting Started . See "How to Use the Screens on when it was manufactured. 777[Login/Logout] key Press to log in this manual may be different from Low Power mode or Sleep mode. Guide to the Names and Functions of the Initial Screen", Convenient Functions . 444[Interrupt]...

User Guide
Page 14
... further relevant information. [ ] Indicates the names of keys on resolving user errors. Indicates instructions stored in a file on a provided CD-ROM. (mainly Europe and Asia) (mainly North America) Differences in the Manuals This manual uses the following symbols: Indicates points to pay attention to when using the...instructions on the machine's display or control panels. Be sure to the region of the model you are using . How to Read the Manuals Symbols Used in the functions of Region A and Region B models are indicated by the symbol that corresponds to read these explanations. For...
... further relevant information. [ ] Indicates the names of keys on resolving user errors. Indicates instructions stored in a file on a provided CD-ROM. (mainly Europe and Asia) (mainly North America) Differences in the Manuals This manual uses the following symbols: Indicates points to pay attention to when using the...instructions on the machine's display or control panels. Be sure to the region of the model you are using . How to Read the Manuals Symbols Used in the functions of Region A and Region B models are indicated by the symbol that corresponds to read these explanations. For...

User Guide
Page 79
... The software license agreement appears in this manual.) 2. When you are using a computer that appear. 12. Log on the supplied CD-ROM. After reading the agreement, click [I accept the agreement.], and then click [Next]. 6. Configure the user code, default printer, and shared printer ...as an Administrators group member. 1. If the [User Account Control] dialog box appears, and then click [Yes] or [Continue]. 11. Using Quick Install...
... The software license agreement appears in this manual.) 2. When you are using a computer that appear. 12. Log on the supplied CD-ROM. After reading the agreement, click [I accept the agreement.], and then click [Next]. 6. Configure the user code, default printer, and shared printer ...as an Administrators group member. 1. If the [User Account Control] dialog box appears, and then click [Yes] or [Continue]. 11. Using Quick Install...
User Guide
Page 93
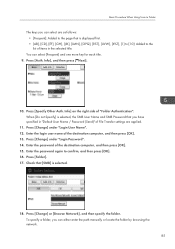
... 17. Press [Change] or [Browse Network], and then specify the folder. Press [Change] under "Login Password". 14. You can either enter the path manually or locate the folder by browsing the network. 85 To specify a folder, you have specified in the selected title. Info] on the right side of... Authentication". Enter the password again to the list of the destination computer, and then press [OK]. 13. When [Do not Specify] is selected, the SMB User Name and SMB Password that [SMB] is displayed first. • [AB], [CD], [EF], [GH], [IJK], [LMN], [OPQ], [RST], [UVW], [XYZ], [1] to [...
... 17. Press [Change] or [Browse Network], and then specify the folder. Press [Change] under "Login Password". 14. You can either enter the path manually or locate the folder by browsing the network. 85 To specify a folder, you have specified in the selected title. Info] on the right side of... Authentication". Enter the password again to the list of the destination computer, and then press [OK]. 13. When [Do not Specify] is selected, the SMB User Name and SMB Password that [SMB] is displayed first. • [AB], [CD], [EF], [GH], [IJK], [LMN], [OPQ], [RST], [UVW], [XYZ], [1] to [...
User Guide
Page 94
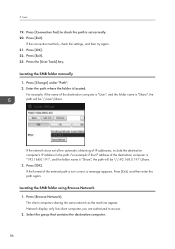
.... Press [OK]. Press [Exit], and then enter the path again. Locating the SMB folder manually 1. Press [Change] under "Path". 2. Press [OK]. 22. Press the [User Tools] key. If the format of the destination computer is "192.168.0.191", and the folder name is not correct, a message appears. For example: if ...
.... Press [OK]. Press [Exit], and then enter the path again. Locating the SMB folder manually 1. Press [Change] under "Path". 2. Press [OK]. 22. Press the [User Tools] key. If the format of the destination computer is "192.168.0.191", and the folder name is not correct, a message appears. For example: if ...

User Guide
Page 96
... path, the shared folder name is "user" and the computer name is performed to the Destination Manually 1. Press [Manual Entry] on the destination setting, enter the user name for logging in to the computer. Press [OK]. 88 Press [Manual Entry] for the folder. Press [Connection Test]. Press [Manual Entry]. 2. Press [Manual Entry] to display the soft keyboard...
... path, the shared folder name is "user" and the computer name is performed to the Destination Manually 1. Press [Manual Entry] on the destination setting, enter the user name for logging in to the computer. Press [OK]. 88 Press [Manual Entry] for the folder. Press [Connection Test]. Press [Manual Entry]. 2. Press [Manual Entry] to display the soft keyboard...
User Guide
Page 100
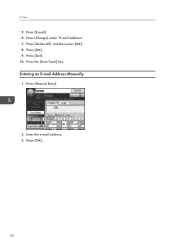
Press [Change] under "E-mail Address". 7. Press the [User Tools] key. Entering an E-mail Address Manually 1. Press [OK]. 9. Press [OK]. 92 Press [Exit]. 10. Scan 5. Press [Delete All], and then press [OK]. 8. Press [E-mail]. 6. Enter the e-mail address. 3. Press [Manual Entry]. 2. 5.
Press [Change] under "E-mail Address". 7. Press the [User Tools] key. Entering an E-mail Address Manually 1. Press [OK]. 9. Press [OK]. 92 Press [Exit]. 10. Scan 5. Press [Delete All], and then press [OK]. 8. Press [E-mail]. 6. Enter the e-mail address. 3. Press [Manual Entry]. 2. 5.

User Guide
Page 102
Press the [Start] key. After specifying a user name, press [OK]. • File Name Press [File Name], enter a file name, and then press [OK]. • Password Press [Password], enter a password, and then press [..., select the file you want to specify scanner settings such as resolution and scan size. 9. From the list of stored files. 1. To specify an unregistered user name, press [Manual Entry], and then enter the name. If necessary, press [Scan Settings] to check. Scan Press...
Press the [Start] key. After specifying a user name, press [OK]. • File Name Press [File Name], enter a file name, and then press [OK]. • Password Press [Password], enter a password, and then press [..., select the file you want to specify scanner settings such as resolution and scan size. 9. From the list of stored files. 1. To specify an unregistered user name, press [Manual Entry], and then enter the name. If necessary, press [Scan Settings] to check. Scan Press...

User Guide
Page 106
...document, and then press [OK]. 5. Press [File Name]. 8. Specify the original scanning conditions. 14. Specify a folder in the screen, press [Manual Entry], and then enter a user name. 7. The document is scanned. CUV108 2. Enter a file name, and then press [OK]. 9. After scanning, a list of the control panel.... If the list does not appear, press [Finish Scanning]. 98 Press [Target Fldr. to eight digits for the password. 11. The user names shown are names that were registered in the Document Server. Enter a password with the number keys, and then press [OK]. Press ...
...document, and then press [OK]. 5. Press [File Name]. 8. Specify the original scanning conditions. 14. Specify a folder in the screen, press [Manual Entry], and then enter a user name. 7. The document is scanned. CUV108 2. Enter a file name, and then press [OK]. 9. After scanning, a list of the control panel.... If the list does not appear, press [Finish Scanning]. 98 Press [Target Fldr. to eight digits for the password. 11. The user names shown are names that were registered in the Document Server. Enter a password with the number keys, and then press [OK]. Press ...

User Guide
Page 180
Select another tray from the following paper in the printer driver. Paper size and type can also be changed in User Tools." (A tray name is placed at n.) The printer driver settings are correct, and then load paper of the size or type selected in the ... 1284 interface board. Open cover and remove paper." Select another tray from the following and press [Continue]. For details about how to select the tray manually, or cancel a print job, see "Changing the Paper Size", Paper Specifications and Adding Paper . To cancel job, press [Job Reset]. Select a tray containing...
Select another tray from the following paper in the printer driver. Paper size and type can also be changed in User Tools." (A tray name is placed at n.) The printer driver settings are correct, and then load paper of the size or type selected in the ... 1284 interface board. Open cover and remove paper." Select another tray from the following and press [Continue]. For details about how to select the tray manually, or cancel a print job, see "Changing the Paper Size", Paper Specifications and Adding Paper . To cancel job, press [Job Reset]. Select a tray containing...

