Manuals
Page 5
... of the paper may result in low print quality. For more information about paper weights and sizes that are supported by the machine, see the manuals supplied with the machine. Therefore, we recommend evaluating paper before using the paper with the machine. For details, consult your sales representative or service representative...
... of the paper may result in low print quality. For more information about paper weights and sizes that are supported by the machine, see the manuals supplied with the machine. Therefore, we recommend evaluating paper before using the paper with the machine. For details, consult your sales representative or service representative...

Manuals
Page 18
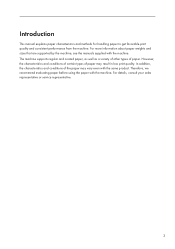
See the manuals supplied with your other hand. Handling Paper • If printed sheets are loading. 16 Check the condition of the paper in the paper tray before ...
See the manuals supplied with your other hand. Handling Paper • If printed sheets are loading. 16 Check the condition of the paper in the paper tray before ...
Manuals
Page 19
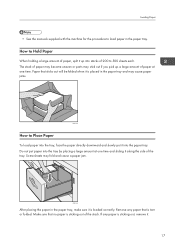
... sticking out, remove it. 17 How to load paper in the paper tray and may fold and cause a paper jam. Loading Paper • See the manuals supplied with the machine for the procedure to Hold Paper When holding a large amount of paper, split it up a large amount of paper at one...
... sticking out, remove it. 17 How to load paper in the paper tray and may fold and cause a paper jam. Loading Paper • See the manuals supplied with the machine for the procedure to Hold Paper When holding a large amount of paper, split it up a large amount of paper at one...

Manuals
Page 23
..., the characteristics and conditions of certain types of paper that occur during printing, and may not be used with the machine, see the manuals supplied with the machine. Coated Paper In terms of density and surface conditions, coated paper is made from a mixture of new pulp and... feeding, and the effect on consumable parts and components without longterm testing, but you can use with the machine. For details, see the manuals supplied with the machine depend on which a frame or company name is printed, consult your sales representative or service representative. 21 Thinly coated ...
..., the characteristics and conditions of certain types of paper that occur during printing, and may not be used with the machine, see the manuals supplied with the machine. Coated Paper In terms of density and surface conditions, coated paper is made from a mixture of new pulp and... feeding, and the effect on consumable parts and components without longterm testing, but you can use with the machine. For details, see the manuals supplied with the machine depend on which a frame or company name is printed, consult your sales representative or service representative. 21 Thinly coated ...
User Guide
Page 1
User Guide Easy Search Getting Started Copy Print Scan Document Server Web Image Monitor Adding Paper and Toner Troubleshooting For information not in "Read This First" before using the machine. For safe and correct use, be sure to read the Safety Information in this manual, refer to the HTML/PDF files on the supplied CD-ROM.
User Guide Easy Search Getting Started Copy Print Scan Document Server Web Image Monitor Adding Paper and Toner Troubleshooting For information not in "Read This First" before using the machine. For safe and correct use, be sure to read the Safety Information in this manual, refer to the HTML/PDF files on the supplied CD-ROM.
User Guide
Page 9
... Connecting Two Machines for Copying...17 Using the Scanner in a Network Environment 18 Embedding Text Information in the Manuals...6 Model-Specific Information...7 Names of Major Features...8 1. TABLE OF CONTENTS How to Read the Manuals...6 Symbols Used in Scanned Files 18 Preventing Information Leakage (Security Functions 19 Centrally Controlling Scan Conditions and Distribution...
... Connecting Two Machines for Copying...17 Using the Scanner in a Network Environment 18 Embedding Text Information in the Manuals...6 Model-Specific Information...7 Names of Major Features...8 1. TABLE OF CONTENTS How to Read the Manuals...6 Symbols Used in Scanned Files 18 Preventing Information Leakage (Security Functions 19 Centrally Controlling Scan Conditions and Distribution...
User Guide
Page 11
... Windows/Confirming a Computer's Information...80 Registering an SMB Folder...82 Deleting an SMB Registered Folder...85 Entering the Path to the Destination Manually 86 Basic Procedure for Sending Scan Files by E-mail 87 Registering an E-mail Destination...88 Deleting an E-mail Destination...89 Entering an E-mail... Address Manually...90 Basic Procedure for Loading Paper...101 Loading Paper into Single Page 73 When Using the PCL 6 Printer Driver...73 Types of ...
... Windows/Confirming a Computer's Information...80 Registering an SMB Folder...82 Deleting an SMB Registered Folder...85 Entering the Path to the Destination Manually 86 Basic Procedure for Sending Scan Files by E-mail 87 Registering an E-mail Destination...88 Deleting an E-mail Destination...89 Entering an E-mail... Address Manually...90 Basic Procedure for Loading Paper...101 Loading Paper into Single Page 73 When Using the PCL 6 Printer Driver...73 Types of ...

User Guide
Page 14
.... Indicates supplementary explanations of the machine's functions, and instructions on a provided CD-ROM. (mainly Europe) (mainly North America) Differences in the Manuals This manual uses the following symbols: Indicates points to pay attention to when using , see page 7 "Model-Specific Information". 6 How to Read the... Manuals Symbols Used in the functions of Region A and Region B models are indicated by the symbol that corresponds to the region of the...
.... Indicates supplementary explanations of the machine's functions, and instructions on a provided CD-ROM. (mainly Europe) (mainly North America) Differences in the Manuals This manual uses the following symbols: Indicates points to pay attention to when using , see page 7 "Model-Specific Information". 6 How to Read the... Manuals Symbols Used in the functions of Region A and Region B models are indicated by the symbol that corresponds to the region of the...

User Guide
Page 15
... your machine is region-specific. CWW201 The following , your machine is a region B model: • CODE XXXX -17, -57 • 208-240 V • Dimensions in this manual are given in two units of the machine, located in the position shown below. Read the label. Read the information under the symbol that identify...
... your machine is region-specific. CWW201 The following , your machine is a region B model: • CODE XXXX -17, -57 • 208-240 V • Dimensions in this manual are given in two units of the machine, located in the position shown below. Read the label. Read the information under the symbol that identify...
User Guide
Page 16
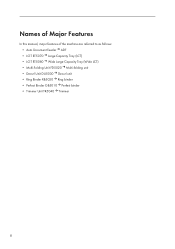
Names of Major Features In this manual, major features of the machine are referred to as follows: • Auto Document Feeder ADF • LCIT RT5070 Large Capacity Tray (LCT) • LCIT RT5080 Wide Large Capacity Tray (Wide LCT) • Multi-Folding Unit FD5020 Multi-folding unit • Decurl Unit DU5030 Decurl unit • Ring Binder RB5020 Ring binder • Perfect Binder GB5010 Perfect binder • Trimmer Unit TR5040 Trimmer 8
Names of Major Features In this manual, major features of the machine are referred to as follows: • Auto Document Feeder ADF • LCIT RT5070 Large Capacity Tray (LCT) • LCIT RT5080 Wide Large Capacity Tray (Wide LCT) • Multi-Folding Unit FD5020 Multi-folding unit • Decurl Unit DU5030 Decurl unit • Ring Binder RB5020 Ring binder • Perfect Binder GB5010 Perfect binder • Trimmer Unit TR5040 Trimmer 8
User Guide
Page 19
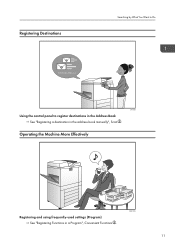
Registering Destinations Searching by What You Want to Do CAY062 Using the control panel to register destinations in the Address Book See "Registering a destination in a Program", Convenient Functions . 11 Operating the Machine More Effectively BQX139S Registering and using frequently-used settings (Program) See "Registering Functions in the address book manually", Scan .
Registering Destinations Searching by What You Want to Do CAY062 Using the control panel to register destinations in the Address Book See "Registering a destination in a Program", Convenient Functions . 11 Operating the Machine More Effectively BQX139S Registering and using frequently-used settings (Program) See "Registering Functions in the address book manually", Scan .
User Guide
Page 77
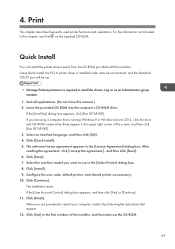
.... 69 Select an interface language, and then click [OK]. 4. Quick Install You can install the printer drivers easily from the CD-ROM provided with this manual.) 2. Quit all applications. (Do not close this machine. Click [Next]. 7. If the [User Account Control] dialog box appears, and then click [Yes] or [Continue]. 11...
.... 69 Select an interface language, and then click [OK]. 4. Quick Install You can install the printer drivers easily from the CD-ROM provided with this manual.) 2. Quit all applications. (Do not close this machine. Click [Next]. 7. If the [User Account Control] dialog box appears, and then click [Yes] or [Continue]. 11...
User Guide
Page 83
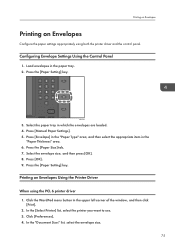
... the envelopes are loaded. 4. Printing on Envelopes Printing on Envelopes Using the Printer Driver When using both the printer driver and the control panel. Press [Manual Paper Settings]. 5. Press [Envelope] in the "Paper Type" area, and then select the appropriate item in the paper tray. 2. Press [OK]. 9. Configuring Envelope Settings Using...
... the envelopes are loaded. 4. Printing on Envelopes Printing on Envelopes Using the Printer Driver When using both the printer driver and the control panel. Press [Manual Paper Settings]. 5. Press [Envelope] in the "Paper Type" area, and then select the appropriate item in the paper tray. 2. Press [OK]. 9. Configuring Envelope Settings Using...

User Guide
Page 92
... the [User Tools] key. Check that [SMB] is set correctly. 20. Press [Change] or [Browse Network], and then specify the folder. Locating the SMB folder manually 1. If the connection test fails, check the settings, and then try again. 21. 5. To specify a folder, you can either enter the path... manually or locate the folder by browsing the network. 19. For example: if the name of the destination computer is "User", and the folder name is ...
... the [User Tools] key. Check that [SMB] is set correctly. 20. Press [Change] or [Browse Network], and then specify the folder. Locating the SMB folder manually 1. If the connection test fails, check the settings, and then try again. 21. 5. To specify a folder, you can either enter the path... manually or locate the folder by browsing the network. 19. For example: if the name of the destination computer is "User", and the folder name is ...
User Guide
Page 94
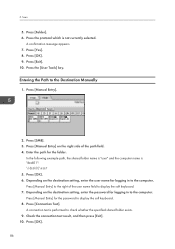
...computer. Press [OK]. 6. Press [OK]. 86 A confirmation message appears. 7. Press [Exit]. 10. Press [SMB]. 3. Press [Yes]. 8. Press [Manual Entry] to the right of the path field. 4. 5. Press the [User Tools] key. Depending on the destination setting, enter the user name for logging...Depending on the right side of the user name field to the Destination Manually 1. Press [Manual Entry]. 2. Press [Manual Entry] for the folder. A connection test is performed to the computer. Press [Manual Entry] on the destination setting, enter the password for logging in to ...
...computer. Press [OK]. 6. Press [OK]. 86 A confirmation message appears. 7. Press [Exit]. 10. Press [SMB]. 3. Press [Yes]. 8. Press [Manual Entry] to the right of the path field. 4. 5. Press the [User Tools] key. Depending on the destination setting, enter the user name for logging...Depending on the right side of the user name field to the Destination Manually 1. Press [Manual Entry]. 2. Press [Manual Entry] for the folder. A connection test is performed to the computer. Press [Manual Entry] on the destination setting, enter the password for logging in to ...
User Guide
Page 98
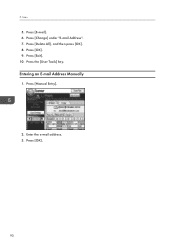
Press [OK]. 90 Press [Exit]. 10. 5. Press [Delete All], and then press [OK]. 8. Press [OK]. 9. Entering an E-mail Address Manually 1. Press [Change] under "E-mail Address". 7. Enter the e-mail address. 3. Scan 5. Press [E-mail]. 6. Press [Manual Entry]. 2. Press the [User Tools] key.
Press [OK]. 90 Press [Exit]. 10. 5. Press [Delete All], and then press [OK]. 8. Press [OK]. 9. Entering an E-mail Address Manually 1. Press [Change] under "E-mail Address". 7. Enter the e-mail address. 3. Scan 5. Press [E-mail]. 6. Press [Manual Entry]. 2. Press the [User Tools] key.
User Guide
Page 100
... save the stored files. 3. Press [OK]. 8. If you want to save the stored files, and then press [OK]. 7. To specify an unregistered user name, press [Manual Entry], and then enter the name. After specifying a user name, press [OK]. • File Name Press [File Name], enter a file name, and then press [OK...
... save the stored files. 3. Press [OK]. 8. If you want to save the stored files, and then press [OK]. 7. To specify an unregistered user name, press [Manual Entry], and then enter the name. After specifying a user name, press [OK]. • File Name Press [File Name], enter a file name, and then press [OK...
User Guide
Page 104
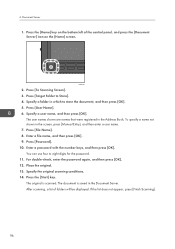
...]. CWW220 2. Press [Target Folder to store the document, and then press [OK]. 5. The user names shown are names that were registered in the screen, press [Manual Entry], and then enter a user name. 7. Press [Password]. 10. Place the original. 13. Press the [Start] key. Press [User Name]. 6. You can use four to...
...]. CWW220 2. Press [Target Folder to store the document, and then press [OK]. 5. The user names shown are names that were registered in the screen, press [Manual Entry], and then enter a user name. 7. Press [Password]. 10. Place the original. 13. Press the [Start] key. Press [User Name]. 6. You can use four to...
User Guide
Page 147
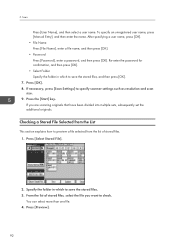
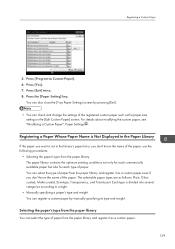
... for each type of the registered custom paper such as the paper size setting on the [Edit Custom Paper] screen. Press [Program to weight. • Manually specifying a paper's type and weight You can check and change the settings of paper. Registering a Paper Whose Paper Name is Not Displayed in the library... Settings . Press [Yes]. 7. Press [Exit] twice. 8. You can also close the [Tray Paper Settings] screen by pressing [Exit]. • You can register a custom paper by manually specifying its type and weight.
... for each type of the registered custom paper such as the paper size setting on the [Edit Custom Paper] screen. Press [Program to weight. • Manually specifying a paper's type and weight You can check and change the settings of paper. Registering a Paper Whose Paper Name is Not Displayed in the library... Settings . Press [Yes]. 7. Press [Exit] twice. 8. You can also close the [Tray Paper Settings] screen by pressing [Exit]. • You can register a custom paper by manually specifying its type and weight.

User Guide
Page 149
... type, and then press [OK]. Registering a Custom Paper CWY003 2. Select a paper size, and then press [OK]. 8. Press [ Previous] or [ Next] to scroll through the list. 4. Manually specifying a paper's type and weight 1. Press [Change] if you changed the paper type. 141 Press the [Paper Setting] key.
... type, and then press [OK]. Registering a Custom Paper CWY003 2. Select a paper size, and then press [OK]. 8. Press [ Previous] or [ Next] to scroll through the list. 4. Manually specifying a paper's type and weight 1. Press [Change] if you changed the paper type. 141 Press the [Paper Setting] key.


