
Users Guide
Page 9
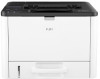
... Format) Operating manuals can find support information about operating the machine and troubleshooting in the Operating Manual (printed), Operating Manual (digital format), and Help (online). Safety Information This manual explains the safety precautions that the computer or the machine is connected to the network. Download the operating manuals from Ricoh's website. Operating Manual (Printed) The following manuals are provided with this manual before using the machine. It also explains how to remove the machine from a web browser. Viewing from a web browser Access the...
... Format) Operating manuals can find support information about operating the machine and troubleshooting in the Operating Manual (printed), Operating Manual (digital format), and Help (online). Safety Information This manual explains the safety precautions that the computer or the machine is connected to the network. Download the operating manuals from Ricoh's website. Operating Manual (Printed) The following manuals are provided with this manual before using the machine. It also explains how to remove the machine from a web browser. Viewing from a web browser Access the...
Users Guide
Page 22
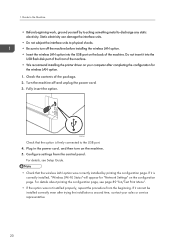
... recommend installing the printer driver on the machine. 5. Check the contents of the machine. Do not insert it into the USB port on the configuration page. DYG340 Check that the wireless LAN option was not installed properly, repeat the procedure from the control panel. If it is firmly connected to discharge any static electricity. Configure settings from the beginning. Guide to the Machine • Before beginning work, ground yourself by printing the configuration page. If...
... recommend installing the printer driver on the machine. 5. Check the contents of the machine. Do not insert it into the USB port on the configuration page. DYG340 Check that the wireless LAN option was not installed properly, repeat the procedure from the control panel. If it is firmly connected to discharge any static electricity. Configure settings from the beginning. Guide to the Machine • Before beginning work, ground yourself by printing the configuration page. If...
Users Guide
Page 36
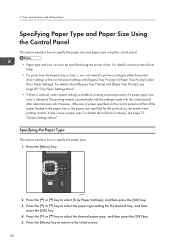
... the printer driver Help. • For prints from the bypass tray or Tray 1, you can also be specified using the control panel. • Paper type and size can select to print according to specify the paper type. 1. For details about [Auto Continue], see page 82 "Tray Paper Settings Menu". • If [Auto Continue] under [Tray Paper Settings]. Specifying the Paper Type This section explains how to either the printer driver settings or the control panel settings with the control panel after about [Bypass Tray Priority] and [Paper Tray...
... the printer driver Help. • For prints from the bypass tray or Tray 1, you can also be specified using the control panel. • Paper type and size can select to print according to specify the paper type. 1. For details about [Auto Continue], see page 82 "Tray Paper Settings Menu". • If [Auto Continue] under [Tray Paper Settings]. Specifying the Paper Type This section explains how to either the printer driver settings or the control panel settings with the control panel after about [Bypass Tray Priority] and [Paper Tray...
Users Guide
Page 59
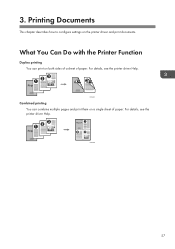
DSG261 Combined printing You can print on the printer driver and print documents. For details, see the printer driver Help. 1 23 DSG262 57 What You Can Do with the Printer Function Duplex printing You can combine multiple pages and print them on a single sheet of paper. For details, see the printer driver Help. Printing Documents This chapter describes how to configure settings on both sides of a sheet of paper. 3.
DSG261 Combined printing You can print on the printer driver and print documents. For details, see the printer driver Help. 1 23 DSG262 57 What You Can Do with the Printer Function Duplex printing You can combine multiple pages and print them on a single sheet of paper. For details, see the printer driver Help. Printing Documents This chapter describes how to configure settings on both sides of a sheet of paper. 3.
Users Guide
Page 60
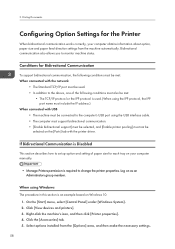
..., paper size and paper feed direction settings from the [Options] area, and then make the necessary settings. 58 Click [View devices and printers]. 3. Log on Windows 10. 1. When using the USB interface cable. • The computer must support bidirectional communication. • [Enable bidirectional support] must be selected, and [Enable printer pooling] must also be met: • The TCP/IP protocol or the IPP protocol is required to monitor machine status...
..., paper size and paper feed direction settings from the [Options] area, and then make the necessary settings. 58 Click [View devices and printers]. 3. Log on Windows 10. 1. When using the USB interface cable. • The computer must support bidirectional communication. • [Enable bidirectional support] must be selected, and [Enable printer pooling] must also be met: • The TCP/IP protocol or the IPP protocol is required to monitor machine status...
Users Guide
Page 77
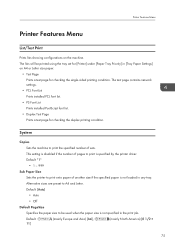
...machine. The test page contains network settings. • PCL Font List Prints installed PCL font list. • PS Font List Prints installed PostScript font list. • Duplex Test Page Prints a test page for [Printer] under [Paper Tray Priority] in the print job. Printer Features Menu Printer Features Menu List/Test Print Prints lists showing configurations on A4 or Letter size paper. • Test Page Prints a test page for checking the single-sided printing condition. Default: [Auto] • Auto • Off Default PageSize Specifies the paper size to be printed using the tray...
...machine. The test page contains network settings. • PCL Font List Prints installed PCL font list. • PS Font List Prints installed PostScript font list. • Duplex Test Page Prints a test page for [Printer] under [Paper Tray Priority] in the print job. Printer Features Menu Printer Features Menu List/Test Print Prints lists showing configurations on A4 or Letter size paper. • Test Page Prints a test page for checking the single-sided printing condition. Default: [Auto] • Auto • Off Default PageSize Specifies the paper size to be printed using the tray...
Users Guide
Page 81
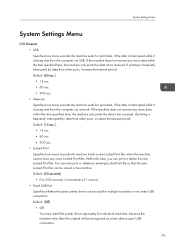
... machine. Default: [Off] • Off You must install the printer driver separately for individual machines, because the machine other than the original will be stored in increments of 1 second • Fixed USB Port Specifies whether the same printer driver can print or delete the new Locked Print file. If printing is frequently interrupted by data from the computer via USB. System Settings Menu System Settings Menu I/O Timeout • USB Specifies how many seconds the machine...
... machine. Default: [Off] • Off You must install the printer driver separately for individual machines, because the machine other than the original will be stored in increments of 1 second • Fixed USB Port Specifies whether the same printer driver can print or delete the new Locked Print file. If printing is frequently interrupted by data from the computer via USB. System Settings Menu System Settings Menu I/O Timeout • USB Specifies how many seconds the machine...
Users Guide
Page 102
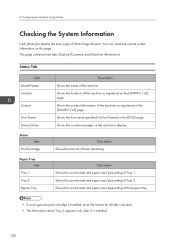
... current state and paper size/type setting of the machine. You can check the current system information on the [DNS] page. Status Tab Item Model Name Location Contact Host Name Device Status Status Item Print Cartridge Paper Tray Item Tray 1 Tray 2 Bypass Tray Description Shows the name of Tray 1. Shows the current state and paper size/type setting of Web Image Monitor. Configuring the Machine Using Utilities Checking the System Information Click [Home] to display the main page of Tray 2. Shows the host...
... current state and paper size/type setting of the machine. You can check the current system information on the [DNS] page. Status Tab Item Model Name Location Contact Host Name Device Status Status Item Print Cartridge Paper Tray Item Tray 1 Tray 2 Bypass Tray Description Shows the name of Tray 1. Shows the current state and paper size/type setting of Web Image Monitor. Configuring the Machine Using Utilities Checking the System Information Click [Home] to display the main page of Tray 2. Shows the host...
Users Guide
Page 107
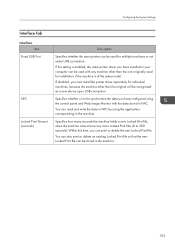
... Item Fixed USB Port NFC Locked Print Timeout (seconds) Description Specifies whether the same printer can be recognized as a new device upon USB connection. If this time, you have installed in NFC by using the control panel and Web Image Monitor with any more Locked Print files (0 to synchronize the data you can read and write the data in your computer can be used for installation, if the machine is enabled, the same printer driver...
... Item Fixed USB Port NFC Locked Print Timeout (seconds) Description Specifies whether the same printer can be recognized as a new device upon USB connection. If this time, you have installed in NFC by using the control panel and Web Image Monitor with any more Locked Print files (0 to synchronize the data you can read and write the data in your computer can be used for installation, if the machine is enabled, the same printer driver...
Users Guide
Page 133
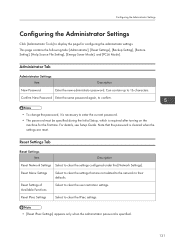
... required after turning on the machine for configuring the administrator settings. Confirm New Password Enter the same password again, to confirm. • To change the password, it is necessary to 16 characters. Reset Menu Settings Select to clear the settings that the password is cleared when the settings are not related to the network to their defaults. Reset Settings of Available Functions Select to clear the settings configured under the [Network Settings]. Note that are reset. This page contains...
... required after turning on the machine for configuring the administrator settings. Confirm New Password Enter the same password again, to confirm. • To change the password, it is necessary to 16 characters. Reset Menu Settings Select to clear the settings that the password is cleared when the settings are not related to the network to their defaults. Reset Settings of Available Functions Select to clear the settings configured under the [Network Settings]. Note that are reset. This page contains...
Users Guide
Page 138
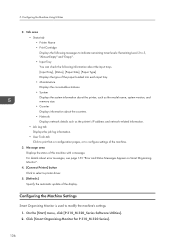
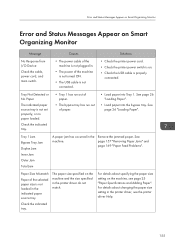
... the [Start] menu, click [P 310_M 320_Series Software Utilities]. 2. For details about the counters. • Network Displays network details such as the model name, system version, and memory size. • Counter Displays information about error messages, see page 155 "Error and Status Messages Appear on Smart Organizing Monitor". 4. [Connect Printer] button Click to modify the machine's settings. 1. Configuring the Machine Using Utilities 2. Configuring the Machine Settings Smart Organizing Monitor is used to select a printer driver. 5. [Refresh:] Specify the automatic update of the...
... the [Start] menu, click [P 310_M 320_Series Software Utilities]. 2. For details about the counters. • Network Displays network details such as the model name, system version, and memory size. • Counter Displays information about error messages, see page 155 "Error and Status Messages Appear on Smart Organizing Monitor". 4. [Connect Printer] button Click to modify the machine's settings. 1. Configuring the Machine Using Utilities 2. Configuring the Machine Settings Smart Organizing Monitor is used to select a printer driver. 5. [Refresh:] Specify the automatic update of the...
Users Guide
Page 139
If the machine you enter. • Administrator All tabs in the [Printer Configuration] dialog box are using Smart Organizing Monitor. Enter the access code, and then click [OK]. Click [OK]. 9. Click [Close]. On the [User Tools] tab, click [Printer Configuration]. 6. The default access code is available. Change the settings if necessary. 8. Maintenance tab • You can set configurations about network connection and communication. 137 IPv6, Network 1, Network 2 and Network 3 tabs • You can adjust print starting...
If the machine you enter. • Administrator All tabs in the [Printer Configuration] dialog box are using Smart Organizing Monitor. Enter the access code, and then click [OK]. Click [OK]. 9. Click [Close]. On the [User Tools] tab, click [Printer Configuration]. 6. The default access code is available. Change the settings if necessary. 8. Maintenance tab • You can set configurations about network connection and communication. 137 IPv6, Network 1, Network 2 and Network 3 tabs • You can adjust print starting...
Users Guide
Page 157
... the paper size setting on the machine, see the printer driver Help. 155 Tray Not Detected or No Paper The indicated paper source tray is not loaded in the indicated paper source tray. The paper size specified on . • Check the USB cable is properly connected. Error and Status Messages Appear on Smart Organizing Monitor Error and Status Messages Appear on Smart Organizing Monitor Message Causes Solutions No Response from I/O Device Check the cable, power cord, and main switch. • The power cable...
... the paper size setting on the machine, see the printer driver Help. 155 Tray Not Detected or No Paper The indicated paper source tray is not loaded in the indicated paper source tray. The paper size specified on . • Check the USB cable is properly connected. Error and Status Messages Appear on Smart Organizing Monitor Error and Status Messages Appear on Smart Organizing Monitor Message Causes Solutions No Response from I/O Device Check the cable, power cord, and main switch. • The power cable...
Users Guide
Page 158
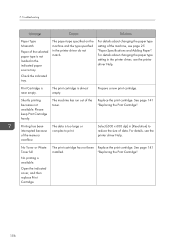
...tray. Check the indicated tray. See page 141 "Replacing the Print Cartridge". "Replacing the Print Cartridge". 156 The paper type specified on the machine and the type specified in the printer driver, see the printer driver Help. Print Cartridge is not loaded in [Resolution] to print. Please keep Print Cartridge handy. The machine has run out of the memory overflow. Printing has been interrupted because of the toner. Troubleshooting Message Causes Solutions Paper Type Mismatch Paper of data. For details about changing the paper type setting in the printer driver...
...tray. Check the indicated tray. See page 141 "Replacing the Print Cartridge". "Replacing the Print Cartridge". 156 The paper type specified on the machine and the type specified in the printer driver, see the printer driver Help. Print Cartridge is not loaded in [Resolution] to print. Please keep Print Cartridge handy. The machine has run out of the memory overflow. Printing has been interrupted because of the toner. Troubleshooting Message Causes Solutions Paper Type Mismatch Paper of data. For details about changing the paper type setting in the printer driver...
Users Guide
Page 180
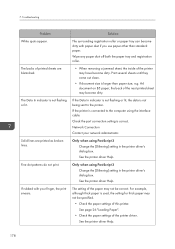
.... Check the port connection setting is not flashing or lit. See the printer driver Help. Only when using PostScript 3 Change the [Dithering] setting in the printer driver's dialog box. See page 26 "Loading Paper". • Check the paper settings of the next printed sheet may have become dirty with your network administrator. See the printer driver Help. 178 Solid lines are blemished. Only when using PostScript 3 Change the [Dithering] setting in the printer driver's dialog box. The setting of printed sheets are printed as broken lines. For...
.... Check the port connection setting is not flashing or lit. See the printer driver Help. Only when using PostScript 3 Change the [Dithering] setting in the printer driver's dialog box. See page 26 "Loading Paper". • Check the paper settings of the next printed sheet may have become dirty with your network administrator. See the printer driver Help. 178 Solid lines are blemished. Only when using PostScript 3 Change the [Dithering] setting in the printer driver's dialog box. The setting of printed sheets are printed as broken lines. For...
Firmware Update Guide
Page 6
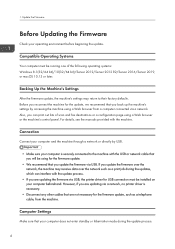
... data over the network, the machine may return to the machine with the USB or network cable that you update the firmware over the network such as a telephone cable, from a computer connected via USB, the printer driver for USB connection must be running one of scan and fax destinations or a configuration page using a Web browser from the machine. Compatible Operating Systems Your computer must be using for the update, we recommend that are updating the firmware via a network. 1. Update the Firmware Before Updating the Firmware Check...
... data over the network, the machine may return to the machine with the USB or network cable that you update the firmware over the network such as a telephone cable, from a computer connected via USB, the printer driver for USB connection must be running one of scan and fax destinations or a configuration page using a Web browser from the machine. Compatible Operating Systems Your computer must be using for the update, we recommend that are updating the firmware via a network. 1. Update the Firmware Before Updating the Firmware Check...
Setup Guide
Page 1
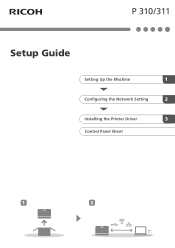
Setup Guide Setting Up the Machine 1 Configuring the Network Setting 2 Installing the Printer Driver 3 Control Panel Sheet 1 2
Setup Guide Setting Up the Machine 1 Configuring the Network Setting 2 Installing the Printer Driver 3 Control Panel Sheet 1 2
Setup Guide
Page 11
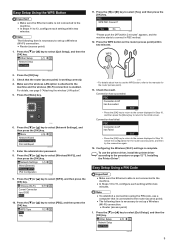
... Setup Using a PIN Code ● Make sure the Ethernet cable is not connected to the machine. ● In Steps 13 to 15, configure each setting within two minutes. Menu 68 Network Wizard Network Settings Print List/Report M0ESIC0023 7. WPS CHV607 • For details about how to use the WPS button, refer to the manuals for the router (access point), and then try the connection again. 14. Check the result. Configuring the Wireless (Wi-Fi) settings...
... Setup Using a PIN Code ● Make sure the Ethernet cable is not connected to the machine. ● In Steps 13 to 15, configure each setting within two minutes. Menu 68 Network Wizard Network Settings Print List/Report M0ESIC0023 7. WPS CHV607 • For details about how to use the WPS button, refer to the manuals for the router (access point), and then try the connection again. 14. Check the result. Configuring the Wireless (Wi-Fi) settings...
Setup Guide
Page 13
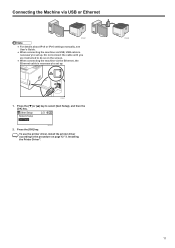
... use the printer driver, install the printer driver according to the procedure on the screen. ● When connecting the machine via USB, USB cable is necessary to set up . Connecting the Machine via USB or Ethernet DYG047 DYG048 ● For details about IPv4 or IPv6 settings manually, see User's Guide. ● When connecting the machine via the Ethernet, the Ethernet cable is necessary to set up . Other Setup 22 Network Setup Quit Setup M0ESIC0011 2. Do not connect the cable...
... use the printer driver, install the printer driver according to the procedure on the screen. ● When connecting the machine via USB, USB cable is necessary to set up . Connecting the Machine via USB or Ethernet DYG047 DYG048 ● For details about IPv4 or IPv6 settings manually, see User's Guide. ● When connecting the machine via the Ethernet, the Ethernet cable is necessary to set up . Other Setup 22 Network Setup Quit Setup M0ESIC0011 2. Do not connect the cable...
Setup Guide
Page 14
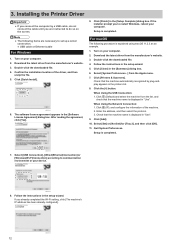
... "Use". 9. Click [Quick Install]. M0ESPC0015 6. Turn on your device. Download the latest driver from the manufacturer's website. 3. Click [Printers & Scanners]. Select [Set] or [Not Set] for [Tray 2], and then click [OK]. 11. Setup is displayed in the [Software License Agreement] dialog box. 3. Download the latest driver from the manufacturer's website. 3. Double-click the downloaded file. 4. Confirm the installation location of the machine. 2. For macOS The following items are instructed to do not connect the cable...
... "Use". 9. Click [Quick Install]. M0ESPC0015 6. Turn on your device. Download the latest driver from the manufacturer's website. 3. Click [Printers & Scanners]. Select [Set] or [Not Set] for [Tray 2], and then click [OK]. 11. Setup is displayed in the [Software License Agreement] dialog box. 3. Download the latest driver from the manufacturer's website. 3. Double-click the downloaded file. 4. Confirm the installation location of the machine. 2. For macOS The following items are instructed to do not connect the cable...


