Operating Instructions
Page 28
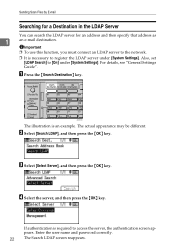
...]. The actual appearance may be different. If authentication is an example. D Select the server, and then press the {OK} key. Enter the user name and password correctly. 22 The Search LDAP screen reappears. A Press the {Search Destination} key. Important ❒ To use this function, you must connect an LDAP server to...
...]. The actual appearance may be different. If authentication is an example. D Select the server, and then press the {OK} key. Enter the user name and password correctly. 22 The Search LDAP screen reappears. A Press the {Search Destination} key. Important ❒ To use this function, you must connect an LDAP server to...

Operating Instructions
Page 60
..." and the computer name is "desk01": \\desk01\user. Sending Scan Files by Scan to the destination folder, and then press the {OK} key. F Enter the password used to log on to the client computer, and then press the {OK} key. D Enter the path to Folder B Select [SMB], and then press the...
..." and the computer name is "desk01": \\desk01\user. Sending Scan Files by Scan to the destination folder, and then press the {OK} key. F Enter the password used to log on to the client computer, and then press the {OK} key. D Enter the path to Folder B Select [SMB], and then press the...
Operating Instructions
Page 61
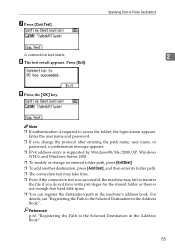
... Address Book". Note ❒ If authentication is required to transfer the file if you change the protocol after entering the path name, user name, or password, a confirmation message appears. ❒ IPv4 address entry is not enough free hard disk space. ❒ You can register the destination path in the ...Address Book" 55 Enter the user name and password. ❒ If you do not have write privileges for the shared folder or there is supported by Windows98/Me/2000/XP, Windows NT4.0, and...
... Address Book". Note ❒ If authentication is required to transfer the file if you change the protocol after entering the path name, user name, or password, a confirmation message appears. ❒ IPv4 address entry is not enough free hard disk space. ❒ You can register the destination path in the ...Address Book" 55 Enter the user name and password. ❒ If you do not have write privileges for the shared folder or there is supported by Windows98/Me/2000/XP, Windows NT4.0, and...
Operating Instructions
Page 63
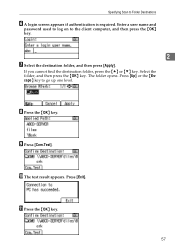
H Press the {OK} key. The folder opens. Press [Up] or the {Escape} key to Folder Destinations F A login screen appears if authentication is required. Press [Exit]. K Press the {OK} key. 57 If you cannot find the destination folder, press the {U} or {T} key. Select the folder, and then press the {OK} key. I Press [Com.Test]. J The test result appears. Specifying Scan to go up one level. Enter a user name and password used to log on to the client computer, and then press the {OK} key. 2 G Select the destination folder, and then press [Apply].
H Press the {OK} key. The folder opens. Press [Up] or the {Escape} key to Folder Destinations F A login screen appears if authentication is required. Press [Exit]. K Press the {OK} key. 57 If you cannot find the destination folder, press the {U} or {T} key. Select the folder, and then press the {OK} key. I Press [Com.Test]. J The test result appears. Specifying Scan to go up one level. Enter a user name and password used to log on to the client computer, and then press the {OK} key. 2 G Select the destination folder, and then press [Apply].
Operating Instructions
Page 64
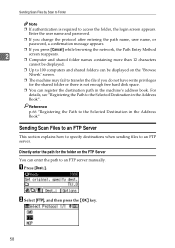
... login screen appears. For details, see "Registering the Path to an FTP server. Enter the user name and password. ❒ If you change the protocol after entering the path name, user name, or password, a confirmation message appears. ❒ If you press [Cancel] while browsing the network, the Path Entry Method 2 screen reappears...
... login screen appears. For details, see "Registering the Path to an FTP server. Enter the user name and password. ❒ If you change the protocol after entering the path name, user name, or password, a confirmation message appears. ❒ If you press [Cancel] while browsing the network, the Path Entry Method 2 screen reappears...

Operating Instructions
Page 65
...\lib. G Enter the path to Folder Destinations C Enter the FTP server name, and then press the {OK} key. A destination confirmation screen appears. 59 F Enter the password, and then press the {OK} key. The following is an example of specifying the destination using its server name, you can also use its IPv4...
...\lib. G Enter the path to Folder Destinations C Enter the FTP server name, and then press the {OK} key. A destination confirmation screen appears. 59 F Enter the password, and then press the {OK} key. The following is an example of specifying the destination using its server name, you can also use its IPv4...

Operating Instructions
Page 66
Press [Exit]. Note ❒ If you change the protocol after entering the path name, user name, or password, a confirmation message appears. ❒ The connection test may take time. ❒ You can register the destination path in the Address Book". Sending Scan Files by Scan to the Selected Destination in the Address Book" 60 Reference p.66 "Registering the Path to Folder H Press [Com.Test]. 2 A connection test starts. J Press the {OK} key. For details, see "Registering the Path to the Selected Destination in the machine's address book. I The test result appears.
Press [Exit]. Note ❒ If you change the protocol after entering the path name, user name, or password, a confirmation message appears. ❒ The connection test may take time. ❒ You can register the destination path in the Address Book". Sending Scan Files by Scan to the Selected Destination in the Address Book" 60 Reference p.66 "Registering the Path to Folder H Press [Com.Test]. 2 A connection test starts. J Press the {OK} key. For details, see "Registering the Path to the Selected Destination in the machine's address book. I The test result appears.

Operating Instructions
Page 68
If the user name is "user" and the name of the Context is "folder", the path will be "user.context". G If a password is specified for connection type, enter the user name, and then enter the name of the context including the volume is "context", the volume name ...
If the user name is "user" and the name of the Context is "folder", the path will be "user.context". G If a password is specified for connection type, enter the user name, and then enter the name of the context including the volume is "context", the volume name ...

Operating Instructions
Page 69
... [Exit]. Specifying Scan to Folder Destinations J Press the {OK} key. 2 Note ❒ If you change the protocol after entering the path name, user name, or password, a confirmation message appears. ❒ You can connect only to folders that you have the read privileges for. ❒ The connection test may take time. ❒...
... [Exit]. Specifying Scan to Folder Destinations J Press the {OK} key. 2 Note ❒ If you change the protocol after entering the path name, user name, or password, a confirmation message appears. ❒ You can connect only to folders that you have the read privileges for. ❒ The connection test may take time. ❒...
Operating Instructions
Page 71
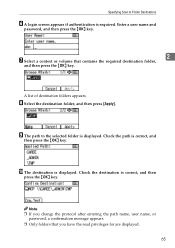
Enter a user name and password, and then press the {OK} key. A list of destination folders appears. J The destination is displayed. H Select the destination folder, and then press [Apply]. I The path .... Specifying Scan to the selected folder is displayed. G Select a context or volume that you change the protocol after entering the path name, user name, or password, a confirmation message appears. ❒ Only folders that contains the required destination folder, 2 and then press the {OK} key. Check the destination is correct, and then...
Enter a user name and password, and then press the {OK} key. A list of destination folders appears. J The destination is displayed. H Select the destination folder, and then press [Apply]. I The path .... Specifying Scan to the selected folder is displayed. G Select a context or volume that you change the protocol after entering the path name, user name, or password, a confirmation message appears. ❒ Only folders that contains the required destination folder, 2 and then press the {OK} key. Check the destination is correct, and then...
Operating Instructions
Page 72
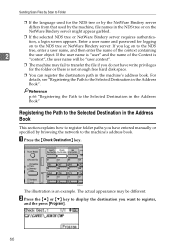
... book. B Press the {U} or {T} key to display the destination you have write privileges for the folder or there is an example. Enter a user name and password for logging on the NetWare Bindery server might appear garbled. ❒ If the selected NDS tree or NetWare Bindery server requires authentica- A Press the {Check...
... book. B Press the {U} or {T} key to display the destination you have write privileges for the folder or there is an example. Enter a user name and password for logging on the NetWare Bindery server might appear garbled. ❒ If the selected NDS tree or NetWare Bindery server requires authentica- A Press the {Check...

Operating Instructions
Page 93
... Scanning Files Using TWAIN Scanner Basic Procedure for Scanning Files Using TWAIN Scanner This section describes the basic operation for entering the user name and password may appear. E Click [OK]. ning, and orientation of example. 4 A On the [Start] menu, point to [All Programss], point to be scanned, click [Complete]. Depending on...
... Scanning Files Using TWAIN Scanner Basic Procedure for Scanning Files Using TWAIN Scanner This section describes the basic operation for entering the user name and password may appear. E Click [OK]. ning, and orientation of example. 4 A On the [Start] menu, point to [All Programss], point to be scanned, click [Complete]. Depending on...

Operating Instructions
Page 104
...only for scan files sent by e-mail or Scan to Folder. ❒ You cannot open the PDF file. Only users who have the password can be made for PDF files. D Press the {Escape} key. PDF Security Encryption This section explains security settings for PDF files only.... Make sure you do not forget a file's password. Use security settings to prevent unauthorized access to protect a PDF file. Encrypting PDF file Set a password to PDF files. 5 Important ❒ Security settings can open an encrypted file without...
...only for scan files sent by e-mail or Scan to Folder. ❒ You cannot open the PDF file. Only users who have the password can be made for PDF files. D Press the {Escape} key. PDF Security Encryption This section explains security settings for PDF files only.... Make sure you do not forget a file's password. Use security settings to prevent unauthorized access to protect a PDF file. Encrypting PDF file Set a password to PDF files. 5 Important ❒ Security settings can open an encrypted file without...

Operating Instructions
Page 105
... screen reappears. Note ❒ The Encryption Password must be required to 32 alphanumeric characters for a document password. 99 Specifying Send Options C Select [Encrypt Document], and then press the {OK} key. E Enter a password, and then press the {OK} key. 5 The password entered here will be different from the Master Password (which is used for changing PDF...
... screen reappears. Note ❒ The Encryption Password must be required to 32 alphanumeric characters for a document password. 99 Specifying Send Options C Select [Encrypt Document], and then press the {OK} key. E Enter a password, and then press the {OK} key. 5 The password entered here will be different from the Master Password (which is used for changing PDF...

Operating Instructions
Page 107
... the {OK} key. D Select [On], and then press the {OK} key. Make sure you do not forget the Master Password. Only users who have the Master Password can reset or change a file's restriction setting without the Master Pass- A Press [Options]. 5 B Press the {U} or {T}... key to Folder. ❒ You cannot reset or change these restrictions. The password entry screen appears. 101 Specifying Send Options PDF Security Permissions Set a Master Password to restrict unauthorized printing, changing, copying, or extracting of a PDF file's content. C Select [Master...
... the {OK} key. D Select [On], and then press the {OK} key. Make sure you do not forget the Master Password. Only users who have the Master Password can reset or change a file's restriction setting without the Master Pass- A Press [Options]. 5 B Press the {U} or {T}... key to Folder. ❒ You cannot reset or change these restrictions. The password entry screen appears. 101 Specifying Send Options PDF Security Permissions Set a Master Password to restrict unauthorized printing, changing, copying, or extracting of a PDF file's content. C Select [Master...

Operating Instructions
Page 108
... Only]. • Editing permission: [Prohibit] or [Permit]. • Copying or extracting content permission: [Prohibit] or [Permit]. F Enter the password again, and then press the {OK} key. 5 "Programmed" appears, and then the PDF Security Permissions screen reappears. Various Scan Settings E Enter... a password, and then press the {OK} key. The password entered here will be required to prohibit printing of the PDF file. G Select [Permissions], and then press the {OK} ...
... Only]. • Editing permission: [Prohibit] or [Permit]. • Copying or extracting content permission: [Prohibit] or [Permit]. F Enter the password again, and then press the {OK} key. 5 "Programmed" appears, and then the PDF Security Permissions screen reappears. Various Scan Settings E Enter... a password, and then press the {OK} key. The password entered here will be required to prohibit printing of the PDF file. G Select [Permissions], and then press the {OK} ...

Operating Instructions
Page 109
The Send Options screen reappears. Note ❒ The Master Password must be different from the Encryption Password. ❒ You can apply multiple security settings to 32 alphanumeric characters for a Master Password. ❒ If [40 bit] is selected as the PDF encryption level, you cannot select [Permit Low Resolution Only] as the print permission. 5 103 You can enter up to a PDF file. J Select [Prohibit], and then press the {OK} key. K Press the {Escape} key three times. Specifying Send Options "Programmed" appears, and then the Permissions screen reappears.
The Send Options screen reappears. Note ❒ The Master Password must be different from the Encryption Password. ❒ You can apply multiple security settings to 32 alphanumeric characters for a Master Password. ❒ If [40 bit] is selected as the PDF encryption level, you cannot select [Permit Low Resolution Only] as the print permission. 5 103 You can enter up to a PDF file. J Select [Prohibit], and then press the {OK} key. K Press the {Escape} key three times. Specifying Send Options "Programmed" appears, and then the Permissions screen reappears.

Operating Instructions
Page 122
...entered destinations. You can specify a maximum of 50 directly entered destinations, including LDAP search-retrieved destinations. - ters on FTP ters Number of password charac- 64 alphanumeric charac- - Sendable file size 31.875 MB per file - ters on NCP ters Number of user name charac- 64 ...alphanumeric charac- - ters on FTP ters Number of password charac- 64 alphanumeric charac- - 6 ters on SMB ters Number of settings for sending by Scan to Folder functions simultaneously. Item Maximum...
...entered destinations. You can specify a maximum of 50 directly entered destinations, including LDAP search-retrieved destinations. - ters on FTP ters Number of password charac- 64 alphanumeric charac- - Sendable file size 31.875 MB per file - ters on NCP ters Number of user name charac- 64 ...alphanumeric charac- - ters on FTP ters Number of password charac- 64 alphanumeric charac- - 6 ters on SMB ters Number of settings for sending by Scan to Folder functions simultaneously. Item Maximum...

General Settings Guide
Page 16
... a Web browser. B Enter "http://(machine's address)/" in the address bar of Web Image Monitor appears. E Click [Configuration]. For details about the login user name and password, consult your Web browser. Changing Default Settings Using Web Image Monitor This section describes how to use Web Image Monitor, see "Using Web Image Monitor...
... a Web browser. B Enter "http://(machine's address)/" in the address bar of Web Image Monitor appears. E Click [Configuration]. For details about the login user name and password, consult your Web browser. Changing Default Settings Using Web Image Monitor This section describes how to use Web Image Monitor, see "Using Web Image Monitor...

General Settings Guide
Page 61
Set the encrypted communication of SNMPv3. If you set an encryption password for the machine. ❖ Permit SSL/TLS Comm. Enter the machine name using up to the net- work. • Check if the same IPv4 address ...
Set the encrypted communication of SNMPv3. If you set an encryption password for the machine. ❖ Permit SSL/TLS Comm. Enter the machine name using up to the net- work. • Check if the same IPv4 address ...


