
Configuration Guide
Page 1
...Ricoh web site: http://www.ricoh-usa.com. Ricoh GX5050N is a Trademark of these forms. Click OK on the form to the left, or click Software Downloads on the form to the right, to signify agreement, in order to the Drivers & Software section and click on the dropdown menu, and find the Aficio GX5050N printer... until you see inset). Click the printer title to set it in the Printers subheading, locate the choice that includes Color and/or Gel (B & W/Color/Gel). 3. Under Printers, having located the key word Gel, click on the line option Download Ricoh Drivers & Software. 5. In the...
...Ricoh web site: http://www.ricoh-usa.com. Ricoh GX5050N is a Trademark of these forms. Click OK on the form to the left, or click Software Downloads on the form to the right, to signify agreement, in order to the Drivers & Software section and click on the dropdown menu, and find the Aficio GX5050N printer... until you see inset). Click the printer title to set it in the Printers subheading, locate the choice that includes Color and/or Gel (B & W/Color/Gel). 3. Under Printers, having located the key word Gel, click on the line option Download Ricoh Drivers & Software. 5. In the...

Configuration Guide
Page 3
... port) and click Next. 15. Choose the appropriate radio button (see the applicable 17. Download the ICM color profile from the Sawgrass web site at this screen appears. link: http://www.sawgrassink.com. continued Page 3 of... Next to treat the installation. The following screen indicates that you are connecting the printer. Your printer driver installation is loading. Back in the Install Printer Driver window, select a radio button (in the two choices, graphically, if you... how you require and click Next to your computer. 16. configuration instructions: Ricoh Aficio gx5050n -
... port) and click Next. 15. Choose the appropriate radio button (see the applicable 17. Download the ICM color profile from the Sawgrass web site at this screen appears. link: http://www.sawgrassink.com. continued Page 3 of... Next to treat the installation. The following screen indicates that you are connecting the printer. Your printer driver installation is loading. Back in the Install Printer Driver window, select a radio button (in the two choices, graphically, if you... how you require and click Next to your computer. 16. configuration instructions: Ricoh Aficio gx5050n -
Configuration Guide
Page 4
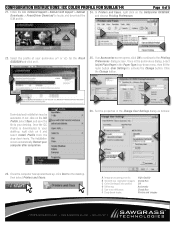
... select Printers and Faxes. The installation occurs automatically. Restart your desktop, right click on it . 25. Once the computer has spooled back up, click Start on the GelSprinter GX5050N, and choose Printing Preferences. 22. CONFIGURATION INSTRUCTIONS: ICC COLOR PROFILE FOR SUBLIJET-R Page 4 of your preference (v1 or v2) for the Ricoh GX5050N and click...ICM profile. 24. Click the Change button. Once the ICC Profile is downloaded to activate the Change button. Once in the preferences dialog, select Inkjet Plain Paper in the Change User Settings dialog as follows: 23.
... select Printers and Faxes. The installation occurs automatically. Restart your desktop, right click on it . 25. Once the computer has spooled back up, click Start on the GelSprinter GX5050N, and choose Printing Preferences. 22. CONFIGURATION INSTRUCTIONS: ICC COLOR PROFILE FOR SUBLIJET-R Page 4 of your preference (v1 or v2) for the Ricoh GX5050N and click...ICM profile. 24. Click the Change button. Once the ICC Profile is downloaded to activate the Change button. Once in the preferences dialog, select Inkjet Plain Paper in the Change User Settings dialog as follows: 23.

Configuration Guide
Page 5
...top, click on this setup (we've chosen the ink and the printer, for example). Please Note: Custom Settings does not save and exit the..." option on the Page Settings tab, and then the Save button to the printing preferences dialog. SubliJet R GX5050N 29. Click OK to apply and save the settings just created. In the Save New Custom Setting dialog, ...in identifiers for later use. [email protected] | WWW.SAWGRASSINK.COM | 866.290.3812 CONFIGURATION INSTRUCTIONS: ICC COLOR PROFILE FOR SUBLIJET-R CONTINUED Page 5 of the image needs to be re-visited each time the paper size...
...top, click on this setup (we've chosen the ink and the printer, for example). Please Note: Custom Settings does not save and exit the..." option on the Page Settings tab, and then the Save button to the printing preferences dialog. SubliJet R GX5050N 29. Click OK to apply and save the settings just created. In the Save New Custom Setting dialog, ...in identifiers for later use. [email protected] | WWW.SAWGRASSINK.COM | 866.290.3812 CONFIGURATION INSTRUCTIONS: ICC COLOR PROFILE FOR SUBLIJET-R CONTINUED Page 5 of the image needs to be re-visited each time the paper size...

User Guide
Page 59
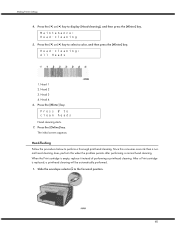
Perform a head cleaning when a particular color cannot be automatically performed. 1. Slide the envelope selector to display [Maintenance], and then press the [#Enter] key. When the Print cartridge is replaced, a print-head ... print-head cleaning. After a Print cartridge is empty, replace it instead of performing a print-head cleaning. Press the [ ] or [ ] key to the forward position. 2. Making Printer Settings When print-heads are blurred. Press the [Menu] key. 3. Menu: Maintenance 59 Head cleaning consumes ink.
Perform a head cleaning when a particular color cannot be automatically performed. 1. Slide the envelope selector to display [Maintenance], and then press the [#Enter] key. When the Print cartridge is replaced, a print-head ... print-head cleaning. After a Print cartridge is empty, replace it instead of performing a print-head cleaning. Press the [ ] or [ ] key to the forward position. 2. Making Printer Settings When print-heads are blurred. Press the [Menu] key. 3. Menu: Maintenance 59 Head cleaning consumes ink.
User Guide
Page 60
...Heads 1. Head 3 4. When the Print cartridge is replaced, a print-head cleaning will be automatically performed. 1. Press # to select a color, and then press the [#Enter] key. Since this consumes more ink than a normal head cleaning does, perform this when the problem persists... 4 6. Maintenance: Head-cleaning 5. Slide the envelope selector to display [Head-cleaning], and then press the [#Enter] key. Press the [Online] key. Making Printer Settings 4. Press the [ ] or [ ] key to the forward position. 60 Head 1 2. Press the [#Enter] key. The initial screen appears. Head-...
...Heads 1. Head 3 4. When the Print cartridge is replaced, a print-head cleaning will be automatically performed. 1. Press # to select a color, and then press the [#Enter] key. Since this consumes more ink than a normal head cleaning does, perform this when the problem persists... 4 6. Maintenance: Head-cleaning 5. Slide the envelope selector to display [Head-cleaning], and then press the [#Enter] key. Press the [Online] key. Making Printer Settings 4. Press the [ ] or [ ] key to the forward position. 60 Head 1 2. Press the [#Enter] key. The initial screen appears. Head-...

User Guide
Page 61
Head 2 3. Press # to display [Head-flushing], and then press the [#Enter] key. Making Printer Settings 2. Press the [Online] key. z p.168 "Two Types of Printer Properties Dialog Box" 61 Press the [ ] or [ ] key to flush heads Head flushing starts. 7. Press the [#Enter] key. The initial screen appears. Head-...or [ ] key to display [Maintenance], and then press the [#Enter] key. Head 4 6. Maintenance: Head-flushing 5. Press the [Menu] key. 3. Press the [ ] or [ ] key to select a color, and then press the [#Enter] key. Menu: Maintenance 4. Head 1 2. Head 3 4.
Head 2 3. Press # to display [Head-flushing], and then press the [#Enter] key. Making Printer Settings 2. Press the [Online] key. z p.168 "Two Types of Printer Properties Dialog Box" 61 Press the [ ] or [ ] key to flush heads Head flushing starts. 7. Press the [#Enter] key. The initial screen appears. Head-...or [ ] key to display [Maintenance], and then press the [#Enter] key. Head 4 6. Maintenance: Head-flushing 5. Press the [Menu] key. 3. Press the [ ] or [ ] key to select a color, and then press the [#Enter] key. Menu: Maintenance 4. Head 1 2. Head 3 4.

User Guide
Page 62
.... 2. Press the [ ] or [ ] key to display [Maintenance], and then press the [#Enter] key. Check the optimal adjustment values on the printed test pattern. 62 Making Printer Settings Head Position Follow the procedure below to select a test pattern, and then press the [#Enter] key. Maintenance: Head Position 4. Press the [ ] or [ ] key to...
.... 2. Press the [ ] or [ ] key to display [Maintenance], and then press the [#Enter] key. Check the optimal adjustment values on the printed test pattern. 62 Making Printer Settings Head Position Follow the procedure below to select a test pattern, and then press the [#Enter] key. Maintenance: Head Position 4. Press the [ ] or [ ] key to...

User Guide
Page 105
... [Spool format:] to extract TrueType fonts] check box. See p.193 "Printing a Whole Page as bitmap] check box. On the [Printer Configuration] tab, set [Adjust Color Density] to [RAW] or [EMF]. Printing is slow and takes time, which delays release of Extracting TrueType Fonts". See p.112 "...Status Monitor Errors". To print text in black, in the [Printer Configuration] tab. In the [Change User Settings] dialog box, on the [Color Settings] tab, select the [K (Black) for applications] check box. 105 In the printer properties dialog box, on the [Misc.] tab, select the [Print...
... [Spool format:] to extract TrueType fonts] check box. See p.193 "Printing a Whole Page as bitmap] check box. On the [Printer Configuration] tab, set [Adjust Color Density] to [RAW] or [EMF]. Printing is slow and takes time, which delays release of Extracting TrueType Fonts". See p.112 "...Status Monitor Errors". To print text in black, in the [Printer Configuration] tab. In the [Change User Settings] dialog box, on the [Color Settings] tab, select the [K (Black) for applications] check box. 105 In the printer properties dialog box, on the [Misc.] tab, select the [Print...

User Guide
Page 185
..., and then click [OK]. Since black and white printing is faster than that do not have to print from the application, and then open the printer properties dialog box. 2. On the [Print Settings] tab, click [Black and White] in the [Print Quality] area. z Depending on the [Setup]... about [Print Quality], see the printer driver Help. The printer properties dialog box closes. 4. Make the necessary settings, and then click [OK]. Open the file you want to make print quality settings every time you specified black and white printing in the [Color/Black and White] area on the...
..., and then click [OK]. Since black and white printing is faster than that do not have to print from the application, and then open the printer properties dialog box. 2. On the [Print Settings] tab, click [Black and White] in the [Print Quality] area. z Depending on the [Setup]... about [Print Quality], see the printer driver Help. The printer properties dialog box closes. 4. Make the necessary settings, and then click [OK]. Open the file you want to make print quality settings every time you specified black and white printing in the [Color/Black and White] area on the...

User Guide
Page 186
... [Print Settings] tab, click [User settings] in the [Color/Black and White] area. On the [Print Settings] tab, click [Color] in the [Print Quality] area. Follow the procedure below to print from the application, and then open the printer properties dialog box. 2. On the [Image Adjustments] tab, ... and White] area on the [Setup] tab. 3. Select the [Level Color] check box. 4. Printing Saving Colour Ink When Printing Follow the procedure below to print from the application, and then open the printer properties dialog box. 2. If the dialog box type is Multi-tab, click [User ...
... [Print Settings] tab, click [User settings] in the [Color/Black and White] area. On the [Print Settings] tab, click [Color] in the [Print Quality] area. Follow the procedure below to print from the application, and then open the printer properties dialog box. 2. On the [Image Adjustments] tab, ... and White] area on the [Setup] tab. 3. Select the [Level Color] check box. 4. Printing Saving Colour Ink When Printing Follow the procedure below to print from the application, and then open the printer properties dialog box. 2. If the dialog box type is Multi-tab, click [User ...

User Guide
Page 189
...[Print Settings] tab, click [User settings] in the [Print Quality] area on the computer screen are composed of Printer Properties Dialog Box" z For details about [Color profile:], see the printer driver Help. Colours on the [Setup] tab. 3. z p.168 "Two Types of the four CMYK colours. The... tone of colours for printing are expressed using black or CMYK. 1. Select the error diffusion target from the application, and then open the printer properties dialog box. 2. Printing The [Change User Settings] dialog box appears. 4. On the [Image Adjustments] tab, select the [Use ...
...[Print Settings] tab, click [User settings] in the [Print Quality] area on the computer screen are composed of Printer Properties Dialog Box" z For details about [Color profile:], see the printer driver Help. Colours on the [Setup] tab. 3. z p.168 "Two Types of the four CMYK colours. The... tone of colours for printing are expressed using black or CMYK. 1. Select the error diffusion target from the application, and then open the printer properties dialog box. 2. Printing The [Change User Settings] dialog box appears. 4. On the [Image Adjustments] tab, select the [Use ...

User Guide
Page 191
... Brightness, Contrast, and Saturation Follow the procedure below to print from the application, and then open the printer properties dialog box. 2. Click the [Balance Adjustments] tab. 5. If the dialog box type is selected, the [Color profile:] list on the computer screen. If the dialog box type is unavailable. 5. In the [ICM method...
... Brightness, Contrast, and Saturation Follow the procedure below to print from the application, and then open the printer properties dialog box. 2. Click the [Balance Adjustments] tab. 5. If the dialog box type is selected, the [Color profile:] list on the computer screen. If the dialog box type is unavailable. 5. In the [ICM method...

User Guide
Page 193
...Printing For example, to make a bright image dull. The more data has to be performed correctly with the four CMYK colours regardless of Printer Properties Dialog Box" z p.207 "Printing Images or Text Superimposed on Prints" Changing the Image Data Process Depending on the application, there ... the [Print as an Image This section explains how to convert a print job to adjust the colour of Printer Properties Dialog Box" z For details about [Color balance:], see the printer driver Help. Follow the procedure below to be processed, printing will be cases where printing takes a long time...
...Printing For example, to make a bright image dull. The more data has to be performed correctly with the four CMYK colours regardless of Printer Properties Dialog Box" z p.207 "Printing Images or Text Superimposed on Prints" Changing the Image Data Process Depending on the application, there ... the [Print as an Image This section explains how to convert a print job to adjust the colour of Printer Properties Dialog Box" z For details about [Color balance:], see the printer driver Help. Follow the procedure below to be processed, printing will be cases where printing takes a long time...

User Guide
Page 194
...Box" Printing with Particular CMYK Colours Normally full colour (CMYK) is specified. 1. On the [Print Settings] tab, click [User settings] in designated color only] area, select colours. Select the [Change data processing] check box. 6. On the [Print Settings] tab, click [User settings] in the... [Print Quality] area on the [Setup] tab. 3. Click [OK]. The [Change User Settings] dialog box appears. 4. z p.168 "Two Types of Printer Properties Dialog Box" 194 These settings are unavailable when black and white printing is used for colour printing. Click [OK]. If the dialog box type...
...Box" Printing with Particular CMYK Colours Normally full colour (CMYK) is specified. 1. On the [Print Settings] tab, click [User settings] in designated color only] area, select colours. Select the [Change data processing] check box. 6. On the [Print Settings] tab, click [User settings] in the... [Print Quality] area on the [Setup] tab. 3. Click [OK]. The [Change User Settings] dialog box appears. 4. z p.168 "Two Types of Printer Properties Dialog Box" 194 These settings are unavailable when black and white printing is used for colour printing. Click [OK]. If the dialog box type...


