
Configuration Guide
Page 1
... Gel (B & W/Color/Gel). 3. INSET [email protected] | WWW.SAWGRASSINK.COM | 866.290.3812 SubliJet-R is a Registered Trademark, and Sawgrass is a Trademark of these forms. Click OK on the form to the left, or click Software Downloads on the dropdown menu, and find the Aficio GX5050N printer as shown. SubliJet®-R For Ricoh aficio GX5050N configuration instructions: Ricoh Aficio gx5050n Page...
... Gel (B & W/Color/Gel). 3. INSET [email protected] | WWW.SAWGRASSINK.COM | 866.290.3812 SubliJet-R is a Registered Trademark, and Sawgrass is a Trademark of these forms. Click OK on the form to the left, or click Software Downloads on the dropdown menu, and find the Aficio GX5050N printer as shown. SubliJet®-R For Ricoh aficio GX5050N configuration instructions: Ricoh Aficio gx5050n Page...

Configuration Guide
Page 2
... that follow steps 12 through 19. 9. Once you will then show the extracted files. configuration instructions: Ricoh Aficio gx5050n - continued 7. Double illustrative purposes. Security Warning screen, click Run. The WinRAR screen will see Step 9). 11. The Install Printer Driver window opens. Page 2 of icons. 8. clicking on your operating system, click on the Download arrow...
... that follow steps 12 through 19. 9. Once you will then show the extracted files. configuration instructions: Ricoh Aficio gx5050n - continued 7. Double illustrative purposes. Security Warning screen, click Run. The WinRAR screen will see Step 9). 11. The Install Printer Driver window opens. Page 2 of icons. 8. clicking on your operating system, click on the Download arrow...

Configuration Guide
Page 3
...approach, and click OK. The program then asks you click Hint. 18. Download the ICM color profile from the Sawgrass web site at this screen appears. Back in the Install Printer Driver window, select a radio button (in the two choices, graphically, if you how to ...WWW.SAWGRASSINK.COM | 866.290.3812 Now choose the various characteristics that the software is complete when this and click Continue. configuration instructions: Ricoh Aficio gx5050n - differences in the illustration, we connect through a usb port) and click Next. 15. Choose the appropriate radio button (see the ...
...approach, and click OK. The program then asks you click Hint. 18. Download the ICM color profile from the Sawgrass web site at this screen appears. Back in the Install Printer Driver window, select a radio button (in the two choices, graphically, if you how to ...WWW.SAWGRASSINK.COM | 866.290.3812 Now choose the various characteristics that the software is complete when this and click Continue. configuration instructions: Ricoh Aficio gx5050n - differences in the illustration, we connect through a usb port) and click Next. 15. Choose the appropriate radio button (see the ...
Configuration Guide
Page 4
...Inkjet Plain Paper in the Change User Settings dialog as follows: 23. If not, click on it . 25. Download and installation may be automatic. The installation occurs automatically. Once the computer has spooled back up, click Start on the GelSprinter GX5050N... User Settings to your preference (v1 or v2) for the Ricoh GX5050N and click on it and select Install Profile from the drop-...Color Settings/Color profile: Off D Dithering: Automatic E Use error diffusion: Check Box F Drop down menu. In Printers and Faxes, right click on the desktop, then select Printers ...
...Inkjet Plain Paper in the Change User Settings dialog as follows: 23. If not, click on it . 25. Download and installation may be automatic. The installation occurs automatically. Once the computer has spooled back up, click Start on the GelSprinter GX5050N... User Settings to your preference (v1 or v2) for the Ricoh GX5050N and click on it and select Install Profile from the drop-...Color Settings/Color profile: Off D Dithering: Automatic E Use error diffusion: Check Box F Drop down menu. In Printers and Faxes, right click on the desktop, then select Printers ...

Configuration Guide
Page 5
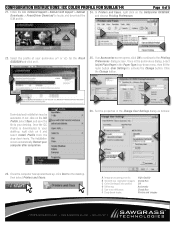
CONFIGURATION INSTRUCTIONS: ICC COLOR PROFILE FOR SUBLIJET-R CONTINUED Page 5 of the image needs to be re-...later use. In the Save New Custom Setting dialog, under Custom Setting name, type in identifiers for example). SubliJet R GX5050N 29. Please Note: There is changed. 28. Then click Apply to apply and save and exit the printing preferences ... Therefore the paper settings must be performed in the Drop-Down menu below Custom Settings. Make sure "Sublijet-R GX5050N" is selected in the Graphics program prior to save the settings just created. At the top, click on this...
CONFIGURATION INSTRUCTIONS: ICC COLOR PROFILE FOR SUBLIJET-R CONTINUED Page 5 of the image needs to be re-...later use. In the Save New Custom Setting dialog, under Custom Setting name, type in identifiers for example). SubliJet R GX5050N 29. Please Note: There is changed. 28. Then click Apply to apply and save and exit the printing preferences ... Therefore the paper settings must be performed in the Drop-Down menu below Custom Settings. Make sure "Sublijet-R GX5050N" is selected in the Graphics program prior to save the settings just created. At the top, click on this...

User Guide
Page 1
... How to Read This Manual ...14 Screen Navigation ...14 Useful Functions...15 Symbols ...16 Removing the User Guide ...17 Guide to Components...18 Printer Body...18 Printer Rear ...19 Control Panel ...20 Option ...21 Paper Feed Unit Type TK1000...21 Multi Bypass Tray Type BY1000 ...22 Detaching and Reattaching the Multi Bypass...
... How to Read This Manual ...14 Screen Navigation ...14 Useful Functions...15 Symbols ...16 Removing the User Guide ...17 Guide to Components...18 Printer Body...18 Printer Rear ...19 Control Panel ...20 Option ...21 Paper Feed Unit Type TK1000...21 Multi Bypass Tray Type BY1000 ...22 Detaching and Reattaching the Multi Bypass...

User Guide
Page 2
... Bypass Tray (optional) ...43 Replacing Consumables Replacing a Print Cartridge ...45 Checking the Remaining Ink ...45 Replacing a Print Cartridge ...47 Handling Print Cartridges...49 Making Printer Settings Making Printer Settings Using the Control Panel ...52 Paper Input Menu...54 Changing the Paper Input Menu ...54 List/Test Print Menu ...55 Printing a Configuration Page...
... Bypass Tray (optional) ...43 Replacing Consumables Replacing a Print Cartridge ...45 Checking the Remaining Ink ...45 Replacing a Print Cartridge ...47 Handling Print Cartridges...49 Making Printer Settings Making Printer Settings Using the Control Panel ...52 Paper Input Menu...54 Changing the Paper Input Menu ...54 List/Test Print Menu ...55 Printing a Configuration Page...

User Guide
Page 3
... Cannot Be Turned On ...89 Paper Will Not Feed Even When the Power Is On ...89 An Error Occurs ...89 Points to Remember when Printer Sharing under Windows 98/Me 90 Paper Is Not Fed or Delivered Normally...91 Paper Jam ...92 Removing Paper Jammed in the Paper Tray (Tray... Tray ...102 Print Results Are Not Satisfactory...103 Checking the Condition of the Printer ...103 Printing Is Uneven, Too Heavy, or Too Light ...103 Dirty or Blotted Prints ...104 Checking the Printer Driver Setting ...104 Changing the Printer Driver Setting ...104 Colours Do Not Match the Displayed Image...106 Positions Do ...
... Cannot Be Turned On ...89 Paper Will Not Feed Even When the Power Is On ...89 An Error Occurs ...89 Points to Remember when Printer Sharing under Windows 98/Me 90 Paper Is Not Fed or Delivered Normally...91 Paper Jam ...92 Removing Paper Jammed in the Paper Tray (Tray... Tray ...102 Print Results Are Not Satisfactory...103 Checking the Condition of the Printer ...103 Printing Is Uneven, Too Heavy, or Too Light ...103 Dirty or Blotted Prints ...104 Checking the Printer Driver Setting ...104 Changing the Printer Driver Setting ...104 Colours Do Not Match the Displayed Image...106 Positions Do ...
User Guide
Page 4
Status Monitor Does Not Open ...112 No Response from Printer...112 No Paper/Tray Not Detected (Tray 1)...112 Printing by Form Feed ...113 Canceling the Print Job...114 No Paper/Tray Not Detected (Tray 2)...114 ... Tank Empty...129 When the Ink Collector Unit is Almost Full/Full...130 Ink Collector Unit Not Detected ...130 Out of Printable Temperature Range...131 Printer Error...131 Network Interface Board Error ...131 Adjusting the Printer ...133 Inquiries and Consumables Where to Inquire ...135 Recommended Consumables...136 Option and Consumables...137 4
Status Monitor Does Not Open ...112 No Response from Printer...112 No Paper/Tray Not Detected (Tray 1)...112 Printing by Form Feed ...113 Canceling the Print Job...114 No Paper/Tray Not Detected (Tray 2)...114 ... Tank Empty...129 When the Ink Collector Unit is Almost Full/Full...130 Ink Collector Unit Not Detected ...130 Out of Printable Temperature Range...131 Printer Error...131 Network Interface Board Error ...131 Adjusting the Printer ...133 Inquiries and Consumables Where to Inquire ...135 Recommended Consumables...136 Option and Consumables...137 4
User Guide
Page 5
... the Connection Method...145 Local Connection...145 Network Connection ...145 Using this Printer as the Windows Printing Port ...145 Using as a Network Printer ...146 Installing the Printer Driver (USB)...147 Sharing the Printer...149 Setting Up a Server...149 Setting Up a Client Computer ...149 ... SmartDeviceMonitor for Client Port...151 Installing SmartDeviceMonitor for Client ...151 Installing the PCL or RPCS Raster Printer Driver (TCP/IP 151 Installing the PCL or RPCS Raster Printer Driver (IPP)...152 Changing the Port Settings for SmartDeviceMonitor for Client 154 Windows 98: ...154 ...
... the Connection Method...145 Local Connection...145 Network Connection ...145 Using this Printer as the Windows Printing Port ...145 Using as a Network Printer ...146 Installing the Printer Driver (USB)...147 Sharing the Printer...149 Setting Up a Server...149 Setting Up a Client Computer ...149 ... SmartDeviceMonitor for Client Port...151 Installing SmartDeviceMonitor for Client ...151 Installing the PCL or RPCS Raster Printer Driver (TCP/IP 151 Installing the PCL or RPCS Raster Printer Driver (IPP)...152 Changing the Port Settings for SmartDeviceMonitor for Client 154 Windows 98: ...154 ...

User Guide
Page 6
... Paper...173 Printing on Inkjet Transparency ...174 Printing on Glossy Paper ...176 Printing on Envelopes ...179 Printing on Thick Paper...181 Canceling Printing ...183 Canceling Printing from the Status Monitor...183 Canceling Printing Using the [Job Reset] Key of the Printer 183 Canceling Printing from the Taskbar...184 Adjusting Print Quality...185...
... Paper...173 Printing on Inkjet Transparency ...174 Printing on Glossy Paper ...176 Printing on Envelopes ...179 Printing on Thick Paper...181 Canceling Printing ...183 Canceling Printing from the Status Monitor...183 Canceling Printing Using the [Job Reset] Key of the Printer 183 Canceling Printing from the Taskbar...184 Adjusting Print Quality...185...

User Guide
Page 8
... Custom Setting Using a Custom Setting File 218 Updating Custom Settings According to the Current Printer Configuration 218 Supporting Multi-Languages ...220 Monitoring and Configuring the Printer Using the Status Monitor ...222 Receiving Notification of Print Job Status via the Status Monitor ...227 Using Web Browser...228 Displaying Top Page...228 Menu...229 Checking the Printer Status ...230 Changing the Printer Settings ...230 Notifying the Printer Status by E-mail ...230 Specifying Notification the Printer Status by E-mail 231 E-mail Transmission Function Group 1-4...233 Recipient Setup ...
... Custom Setting Using a Custom Setting File 218 Updating Custom Settings According to the Current Printer Configuration 218 Supporting Multi-Languages ...220 Monitoring and Configuring the Printer Using the Status Monitor ...222 Receiving Notification of Print Job Status via the Status Monitor ...227 Using Web Browser...228 Displaying Top Page...228 Menu...229 Checking the Printer Status ...230 Changing the Printer Settings ...230 Notifying the Printer Status by E-mail ...230 Specifying Notification the Printer Status by E-mail 231 E-mail Transmission Function Group 1-4...233 Recipient Setup ...

User Guide
Page 9
...6.5 Pure IP Environment 245 Using as a Remote Printer (NetWare 5.1, NetWare 6.5 247 Additional Information Checking the Current Printer Driver Version...251 Software on the CD-ROM...252 Files...252 RPCS Raster Printer Drivers ...252 PCL Printer Drivers ...253 SmartDeviceMonitor for Client ...254 Manuals (... ...257 User Settings for SSL (Secure Sockets Layer)...257 Installing the Certificate Using SmartDeviceMonitor for Client 258 Specifications...259 Printer Body...259 Option (Paper Feed Unit) ...261 Option (Bypass tray) ...261 Electromagnetic Interference...263 Information about Installed ...
...6.5 Pure IP Environment 245 Using as a Remote Printer (NetWare 5.1, NetWare 6.5 247 Additional Information Checking the Current Printer Driver Version...251 Software on the CD-ROM...252 Files...252 RPCS Raster Printer Drivers ...252 PCL Printer Drivers ...253 SmartDeviceMonitor for Client ...254 Manuals (... ...257 User Settings for SSL (Secure Sockets Layer)...257 Installing the Certificate Using SmartDeviceMonitor for Client 258 Specifications...259 Printer Body...259 Option (Paper Feed Unit) ...261 Option (Bypass tray) ...261 Electromagnetic Interference...263 Information about Installed ...

User Guide
Page 11
Read This First Read This First About This Product ...12 Introduction ...12 Trademarks ...12 Disclaimer ...13 Manuals for This Printer ...13 How to Read This Manual ...14 Screen Navigation ...14 Useful Functions...15 Symbols ...16 Removing the User Guide ...17 Guide to Components...18 Printer Body...18 Printer Rear ...19 Control Panel ...20 Option ...21 Paper Feed Unit Type TK1000...21 Multi Bypass Tray Type BY1000 ...22 Detaching and Reattaching the Multi Bypass Tray (Optional 22 Recommended Functions...24 J0116601_1.01 Copyright © 2005, 2006 All rights reserved. 11
Read This First Read This First About This Product ...12 Introduction ...12 Trademarks ...12 Disclaimer ...13 Manuals for This Printer ...13 How to Read This Manual ...14 Screen Navigation ...14 Useful Functions...15 Symbols ...16 Removing the User Guide ...17 Guide to Components...18 Printer Body...18 Printer Rear ...19 Control Panel ...20 Option ...21 Paper Feed Unit Type TK1000...21 Multi Bypass Tray Type BY1000 ...22 Detaching and Reattaching the Multi Bypass Tray (Optional 22 Recommended Functions...24 J0116601_1.01 Copyright © 2005, 2006 All rights reserved. 11
User Guide
Page 12
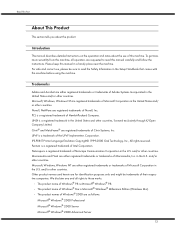
..., Windows, Windows NT are either registered trademarks or trademarks of Adobe Systems Incorporated in the U.S. in the United States and/or other countries. IPS-PRINT Printer Language Emulation Copyright© 1999-2000 Oak Technology, Inc., All rights reserved. and/or other countries. z The product name of Windows® Me is Microsoft...
..., Windows, Windows NT are either registered trademarks or trademarks of Adobe Systems Incorporated in the U.S. in the United States and/or other countries. IPS-PRINT Printer Language Emulation Copyright© 1999-2000 Oak Technology, Inc., All rights reserved. and/or other countries. z The product name of Windows® Me is Microsoft...

User Guide
Page 13
... it easily. 13 We recommend you install this manual are as those related to install and use the printer. It also contains troubleshooting procedures to make and check printer settings using a Web browser and other utilities. The guide also contains troubleshooting procedures, such as follows: Microsoft®... printing and paper jams, and important information about types of paper and replaceing consumables. The guide explains how to make network and printer driver settings, and how to follow if the installation fails. User Guide (HTML) This guide, which is on your computer so...
... it easily. 13 We recommend you install this manual are as those related to install and use the printer. It also contains troubleshooting procedures to make and check printer settings using a Web browser and other utilities. The guide also contains troubleshooting procedures, such as follows: Microsoft®... printing and paper jams, and important information about types of paper and replaceing consumables. The guide explains how to make network and printer driver settings, and how to follow if the installation fails. User Guide (HTML) This guide, which is on your computer so...

User Guide
Page 18
...pull out the output tray extension. 18 When using paper larger than A4/Letter to keep the printed paper from the top of the printer body, control panel, and options are delivered to the forward position . 3. Top cover Keep this cover closed during printing. Print cartridge ...(cyan) 6. Output tray Prints are explained. Print cartridge (magenta) 5. Printer Body This is a front view of the printer. 1. Tray 1 Load paper here. 9. Output tray extension Pull out when using paper larger than A4/Letter, pull out the...
...pull out the output tray extension. 18 When using paper larger than A4/Letter to keep the printed paper from the top of the printer body, control panel, and options are delivered to the forward position . 3. Top cover Keep this cover closed during printing. Print cartridge ...(cyan) 6. Output tray Prints are explained. Print cartridge (magenta) 5. Printer Body This is a front view of the printer. 1. Tray 1 Load paper here. 9. Output tray extension Pull out when using paper larger than A4/Letter, pull out the...

User Guide
Page 19
... grounding wire attached to the power plug directly to open the duplex unit cover. 2. Duplex unit cover Open to remove paper jammed inside of the printer gets too warm, a breakdown could occur. 3. Do not lean anything against the vent or block it . 9. Power cord Plug the power cord into a ... Guide board Open to lock or unlock the duplex unit when attaching or detaching it in any way. Vent Air is a rear view of the printer from the computer here. 19 Duplex unit Turns the paper over when performing duplex printing. 6. Duplex unit locks Use to remove paper jammed inside of...
... grounding wire attached to the power plug directly to open the duplex unit cover. 2. Duplex unit cover Open to remove paper jammed inside of the printer gets too warm, a breakdown could occur. 3. Do not lean anything against the vent or block it . 9. Power cord Plug the power cord into a ... Guide board Open to lock or unlock the duplex unit when attaching or detaching it in any way. Vent Air is a rear view of the printer from the computer here. 19 Duplex unit Turns the paper over when performing duplex printing. 6. Duplex unit locks Use to remove paper jammed inside of...
User Guide
Page 20
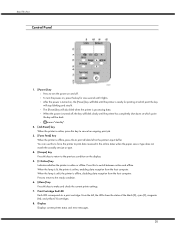
... Each LED corresponds to print all data left , the LEDs show the status of the black (K), cyan (C), magenta (M), and yellow (Y) cartridges. 8. Display Displays current printer status and error messages. 20 From the left in the online status when the paper size or type does not match the actually set size... or type. 4. [Escape] key Press this key to cancel an ongoing print job. 3. [Form Feed] key When the printer is offline, disabling data reception from the host computer. z After the power is turned on , press the key for printing at which point the key...
... Each LED corresponds to print all data left , the LEDs show the status of the black (K), cyan (C), magenta (M), and yellow (Y) cartridges. 8. Display Displays current printer status and error messages. 20 From the left in the online status when the paper size or type does not match the actually set size... or type. 4. [Escape] key Press this key to cancel an ongoing print job. 3. [Form Feed] key When the printer is offline, disabling data reception from the host computer. z After the power is turned on , press the key for printing at which point the key...

User Guide
Page 21
... to be printed. 12. [#Enter] key Press this tray. 2. Option Paper Feed Unit Type TK1000 This optional tray can load plain paper and inkjet plain paper in units of 10. 11. If the red light is attached to increase or decrease values on the display in this key to... quicken scrolling, and increase or decrease values on the display when making settings. Data In indicator Blinks when the printer is data to Energy Saver mode, see p.68 "System Menu". Read This First 9. the yellow light indicates a potential error during printing. Alert indicator ...
... to be printed. 12. [#Enter] key Press this tray. 2. Option Paper Feed Unit Type TK1000 This optional tray can load plain paper and inkjet plain paper in units of 10. 11. If the red light is attached to increase or decrease values on the display in this key to... quicken scrolling, and increase or decrease values on the display when making settings. Data In indicator Blinks when the printer is data to Energy Saver mode, see p.68 "System Menu". Read This First 9. the yellow light indicates a potential error during printing. Alert indicator ...


