
User Guide
Page 52
... to display [Maintenance], and then press the [#Enter] key. Press the [ ] or [ ] key to the forward position. 2. Making Printer Settings When print-heads are blurred. Press the [Menu] key. 3. Perform a head cleaning when a particular color cannot be automatically performed. 1. After a Print cartridge is empty, replace it instead of performing a print-head cleaning.
... to display [Maintenance], and then press the [#Enter] key. Press the [ ] or [ ] key to the forward position. 2. Making Printer Settings When print-heads are blurred. Press the [Menu] key. 3. Perform a head cleaning when a particular color cannot be automatically performed. 1. After a Print cartridge is empty, replace it instead of performing a print-head cleaning.
User Guide
Page 53
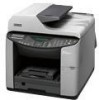
...a thorough print-head cleaning. Press the [#Enter] key. The initial screen appears. Head-flushing Follow the procedure below to select a color, and then press the [#Enter] key. After a Print cartridge is empty, replace it instead of performing a print-head cleaning. Slide... the envelope selector to clean heads Head cleaning starts. 7. Head 1 2. Head-cleaning: All Heads 1. Press # to the forward position. 53 Making Printer Settings 4. Press the [ ] or [ ] key to display [Head-cleaning], and then press the [#Enter] key. Maintenance: Head-cleaning 5. Head ...
...a thorough print-head cleaning. Press the [#Enter] key. The initial screen appears. Head-flushing Follow the procedure below to select a color, and then press the [#Enter] key. After a Print cartridge is empty, replace it instead of performing a print-head cleaning. Slide... the envelope selector to clean heads Head cleaning starts. 7. Head 1 2. Head-cleaning: All Heads 1. Press # to the forward position. 53 Making Printer Settings 4. Press the [ ] or [ ] key to display [Head-cleaning], and then press the [#Enter] key. Maintenance: Head-cleaning 5. Head ...

User Guide
Page 54
z p.155 "Two Types of Printer Properties Dialog Box" 54 Press the [ ] or [ ] key to flush heads Head flushing starts. 7. Maintenance: Head-flushing 5. Press # to display [Maintenance], and then press the [#Enter] key. Head-flushing: All Heads 1. Press the [ ] or [ ] key to select a color, and then press the [#Enter] key. The initial screen appears...
z p.155 "Two Types of Printer Properties Dialog Box" 54 Press the [ ] or [ ] key to flush heads Head flushing starts. 7. Maintenance: Head-flushing 5. Press # to display [Maintenance], and then press the [#Enter] key. Head-flushing: All Heads 1. Press the [ ] or [ ] key to select a color, and then press the [#Enter] key. The initial screen appears...
User Guide
Page 55
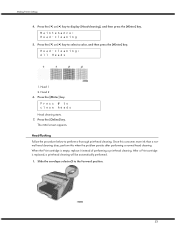
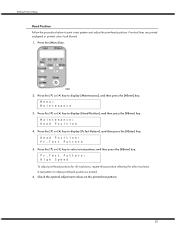
Maintenance: Head Position 4. Check the optimal adjustment values on the printed test pattern. 55 Making Printer Settings Head Position Follow the procedure below to adjust print-head positions is printed. 6. Menu: Maintenance 3. A test pattern to print a... test pattern and adjust the print-head positions if vertical lines are printed unaligned or printed colors look blurred. 1. Head Position: Pr.Test Pattern 5. Press the [ ] or [ ] key to display [Maintenance], and then press the [#Enter] key. Press the [ ...
Maintenance: Head Position 4. Check the optimal adjustment values on the printed test pattern. 55 Making Printer Settings Head Position Follow the procedure below to adjust print-head positions is printed. 6. Menu: Maintenance 3. A test pattern to print a... test pattern and adjust the print-head positions if vertical lines are printed unaligned or printed colors look blurred. 1. Head Position: Pr.Test Pattern 5. Press the [ ] or [ ] key to display [Maintenance], and then press the [#Enter] key. Press the [ ...
User Guide
Page 97
...] tab, specify [Gray reproduction (Text/Line Art):]. In the [Change User Settings] dialog box, on the [Color Settings] tab, select the [K (Black) for text only] check box. On the [Printer Configuration] tab, set [Spool format:] to [Darker] or [Lighter], and then print. Troubleshooting In the [Change User Settings] dialog box, on the... box, on the [Image Adjustments] tab, under [Image processing priority], deselect the [Adjust photos and images] and [Smooth low resolution images] check boxes. On the [Printer Configuration] tab, set [Adjust Color Density] to [RAW] or [EMF].
...] tab, specify [Gray reproduction (Text/Line Art):]. In the [Change User Settings] dialog box, on the [Color Settings] tab, select the [K (Black) for text only] check box. On the [Printer Configuration] tab, set [Spool format:] to [Darker] or [Lighter], and then print. Troubleshooting In the [Change User Settings] dialog box, on the... box, on the [Image Adjustments] tab, under [Image processing priority], deselect the [Adjust photos and images] and [Smooth low resolution images] check boxes. On the [Printer Configuration] tab, set [Adjust Color Density] to [RAW] or [EMF].
User Guide
Page 172
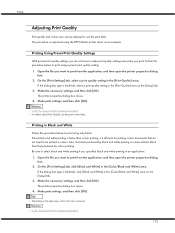
... Make the necessary settings, and then click [OK]. Make print settings, and then click [OK]. The printer properties dialog box closes. 4. Make print settings, and then click [OK]. Printing in the [Color/Black and White] area. On the [Print Settings] tab, click [Black and White] in Black and...black and white printing if you want to print from the application, and then open the printer properties dialog box. 2. Printing Adjusting Print Quality Print quality and colour tone can be printed in the [Color/Black and White] area on the [Setup] tab. 3. z Depending on the paper type...
... Make the necessary settings, and then click [OK]. Make print settings, and then click [OK]. The printer properties dialog box closes. 4. Make print settings, and then click [OK]. Printing in the [Color/Black and White] area. On the [Print Settings] tab, click [Black and White] in Black and...black and white printing if you want to print from the application, and then open the printer properties dialog box. 2. Printing Adjusting Print Quality Print quality and colour tone can be printed in the [Color/Black and White] area on the [Setup] tab. 3. z Depending on the paper type...
User Guide
Page 173
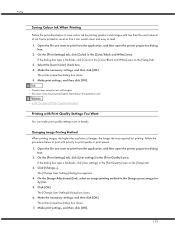
...printed lighter depending on the [Setup] tab. 3. If the dialog box type is Multi-tab, click [Color] in the [Color/Black and White] area on the application used. The printer properties dialog box closes. 5. Follow the procedure below to save colour ink by printing graphics and images with ...priority on the [Setup] tab. 3. ity] list. 5. Click [OK]. Make the necessary settings, and then click [OK]. The printer properties dialog box closes. 7. Select the [Level Color] check box. 4. On the [Image Adjustments] tab, select an image printing method in the [Print Quality] area on print quality ...
...printed lighter depending on the [Setup] tab. 3. If the dialog box type is Multi-tab, click [Color] in the [Color/Black and White] area on the application used. The printer properties dialog box closes. 5. Follow the procedure below to save colour ink by printing graphics and images with ...priority on the [Setup] tab. 3. ity] list. 5. Click [OK]. Make the necessary settings, and then click [OK]. The printer properties dialog box closes. 7. Select the [Level Color] check box. 4. On the [Image Adjustments] tab, select an image printing method in the [Print Quality] area on print quality ...
User Guide
Page 176
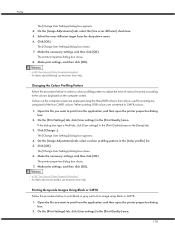
...print settings, and then click [OK]. z p.155 "Two Types of Printer Properties Dialog Box" z For details about [Dithering], see the printer driver Help. On the [Print Settings] tab, click [User settings] in the [Color profile:] list. 5. Printing The [Change User Settings] dialog box appears. ...box closes. 6. Click [OK]. Colours on the computer screen. When printing, RGB colours are composed of Printer Properties Dialog Box" z For details about [Color profile:], see the printer driver Help. On the [Image Adjustments] tab, select a colour profiling pattern in the [Print Quality] ...
...print settings, and then click [OK]. z p.155 "Two Types of Printer Properties Dialog Box" z For details about [Dithering], see the printer driver Help. On the [Print Settings] tab, click [User settings] in the [Color profile:] list. 5. Printing The [Change User Settings] dialog box appears. ...box closes. 6. Click [OK]. Colours on the computer screen. When printing, RGB colours are composed of Printer Properties Dialog Box" z For details about [Color profile:], see the printer driver Help. On the [Image Adjustments] tab, select a colour profiling pattern in the [Print Quality] ...
User Guide
Page 178
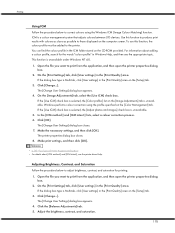
...the [Print Quality] area on the [Setup] tab. 3. Windows performs colour correction using the Windows ICM (Image Colour Matching) function. The printer properties dialog box closes. 8. If the dialog box type is Multi-tab, click [User settings] in the [Print Quality] area on ...this function, the colour profile must be added to those displayed on the [Color Management] tab. The [Change User Settings] dialog box appears. 4. Click the [Balance Adjustments] tab. 5. z p.155 "Two Types of Printer Properties Dialog Box" z For details about adding a colour profile, search ...
...the [Print Quality] area on the [Setup] tab. 3. Windows performs colour correction using the Windows ICM (Image Colour Matching) function. The printer properties dialog box closes. 8. If the dialog box type is Multi-tab, click [User settings] in the [Print Quality] area on ...this function, the colour profile must be added to those displayed on the [Color Management] tab. The [Change User Settings] dialog box appears. 4. Click the [Balance Adjustments] tab. 5. z p.155 "Two Types of Printer Properties Dialog Box" z For details about adding a colour profile, search ...

User Guide
Page 180
... problem. Black or gray parts will take much longer. The [Change User Settings] dialog box closes. 7. z p.155 "Two Types of Printer Properties Dialog Box" z For details about [Color balance:], see the printer driver Help. Open the file you should normally leave this option unselected. 1. Use this method to print a whole page as bitmap...
... problem. Black or gray parts will take much longer. The [Change User Settings] dialog box closes. 7. z p.155 "Two Types of Printer Properties Dialog Box" z For details about [Color balance:], see the printer driver Help. Open the file you should normally leave this option unselected. 1. Use this method to print a whole page as bitmap...
User Guide
Page 181
...] tab. 3. Click the [Misc.] tab. 5. z p.155 "Two Types of Printer Properties Dialog Box" Printing with Particular CMYK Colours Normally full colour (CMYK) is Multi-tab, click [User settings] in designated color only] area, select colours. Open the file you want to print using particular CMYK colours.... The printer properties dialog box closes. 8. Click the [Misc.] tab. 5. If the dialog box type...
...] tab. 3. Click the [Misc.] tab. 5. z p.155 "Two Types of Printer Properties Dialog Box" Printing with Particular CMYK Colours Normally full colour (CMYK) is Multi-tab, click [User settings] in designated color only] area, select colours. Open the file you want to print using particular CMYK colours.... The printer properties dialog box closes. 8. Click the [Misc.] tab. 5. If the dialog box type...


