User Guide
Page 3
Nozzle Check ...71 Head-cleaning ...72 Head-flushing...73 Adjust Print-head Positions...73 Registration ...75 Adjust Paper Feed ...76 Restore Defaults/Other Settings ...78 Restoring the Settings to Their ...
Nozzle Check ...71 Head-cleaning ...72 Head-flushing...73 Adjust Print-head Positions...73 Registration ...75 Adjust Paper Feed ...76 Restore Defaults/Other Settings ...78 Restoring the Settings to Their ...
User Guide
Page 4
......118 Network Interface Board Error ...119 Adjusting the Printer ...120 Inquiries and Consumables Where to Inquire ...122 Recommended Consumables...123 Option and Consumables...124 Maintaining Cleaning ...126 Moving ...127 Moving a Short Distance...127 Moving a Long Distance ...127 Disposing ...129 When Not Using for a Long Period of Time...130 Preparing for Printing...
......118 Network Interface Board Error ...119 Adjusting the Printer ...120 Inquiries and Consumables Where to Inquire ...122 Recommended Consumables...123 Option and Consumables...124 Maintaining Cleaning ...126 Moving ...127 Moving a Short Distance...127 Moving a Long Distance ...127 Disposing ...129 When Not Using for a Long Period of Time...130 Preparing for Printing...
User Guide
Page 43
Printing will stop. z The amount of the print cartridges becomes empty. z Printing stops if one of ink consumed during cleaning depends on , head cleaning is being performed. Ink consumption z In addition to printing, ink is consumed when the power is turned on the cartridge size. 43 Replacing Consumables z Do ...
Printing will stop. z The amount of the print cartridges becomes empty. z Printing stops if one of ink consumed during cleaning depends on , head cleaning is being performed. Ink consumption z In addition to printing, ink is consumed when the power is turned on the cartridge size. 43 Replacing Consumables z Do ...
User Guide
Page 44
... Menu ...67 Changing the PCL Menu...69 Language Menu ...70 Changing the Language Menu...70 Maintaining the Printer Using Utilities ...71 Nozzle Check ...71 Head-cleaning ...72 Head-flushing...73 Adjust Print-head Positions...73 Registration ...75 Adjust Paper Feed ...76 Restore Defaults/Other Settings ...78 Restoring the Settings to Their...
... Menu ...67 Changing the PCL Menu...69 Language Menu ...70 Changing the Language Menu...70 Maintaining the Printer Using Utilities ...71 Nozzle Check ...71 Head-cleaning ...72 Head-flushing...73 Adjust Print-head Positions...73 Registration ...75 Adjust Paper Feed ...76 Restore Defaults/Other Settings ...78 Restoring the Settings to Their...
User Guide
Page 45
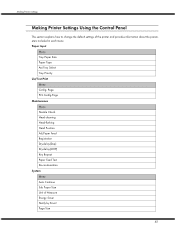
... Menu Tray Paper Size Paper Type Aut.Tray Select Tray Priority List/Test Print Menu Config. Page PCL Config.Page Maintenance Menu Nozzle Check Head-cleaning Head-flushing Head Position Adj.Paper Feed Registration Dry-delay(Dup) Dry-delay(OHP) Key Repeat Paper Feed Test De-condensation System Menu Auto Continue...
... Menu Tray Paper Size Paper Type Aut.Tray Select Tray Priority List/Test Print Menu Config. Page PCL Config.Page Maintenance Menu Nozzle Check Head-cleaning Head-flushing Head Position Adj.Paper Feed Registration Dry-delay(Dup) Dry-delay(OHP) Key Repeat Paper Feed Test De-condensation System Menu Auto Continue...
User Guide
Page 50
...the paper feed setting. Dry-delay(OHP) To prevent inkjet-printed transparencies sticking together, select a print delivery interval to allow them to dry. Nozzle Check You can clean the print head more ink than head cleaning, do it . Clean the head if certain colours are not printed or are ...of an operation if a key on control panel is pressed continuously. The interval must be long enough to allow an inkjet-printed transparency to dry. Head cleaning consumes ink. Adj.Paper Feed If printed lines are horizontally misaligned or if images are being correctly ejected from the ...
...the paper feed setting. Dry-delay(OHP) To prevent inkjet-printed transparencies sticking together, select a print delivery interval to allow them to dry. Nozzle Check You can clean the print head more ink than head cleaning, do it . Clean the head if certain colours are not printed or are ...of an operation if a key on control panel is pressed continuously. The interval must be long enough to allow an inkjet-printed transparency to dry. Head cleaning consumes ink. Adj.Paper Feed If printed lines are horizontally misaligned or if images are being correctly ejected from the ...

User Guide
Page 52
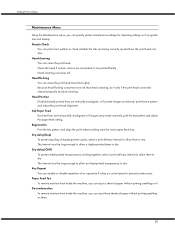
Press the [ ] or [ ] key to the forward position. 2. Perform a head cleaning when a particular color cannot be automatically performed. 1. Slide the envelope selector to display [Maintenance], and then press the [#Enter] key. Menu: Maintenance 52 When the Print cartridge is replaced, a print-head cleaning will be printed or print images are clogged Head-clearning Follow...
Press the [ ] or [ ] key to the forward position. 2. Perform a head cleaning when a particular color cannot be automatically performed. 1. Slide the envelope selector to display [Maintenance], and then press the [#Enter] key. Menu: Maintenance 52 When the Print cartridge is replaced, a print-head cleaning will be printed or print images are clogged Head-clearning Follow...
User Guide
Page 53
... [ ] key to the forward position. 53 Head 2 6. Since this consumes more ink than a normal head cleaning does, perform this when the problem persists after performing a normal head cleaning. Head-cleaning: All Heads 1. Slide the envelope selector to select a color, and then press the [#Enter] key. Press the [Online] key. Press # to perform a thorough print...
... [ ] key to the forward position. 53 Head 2 6. Since this consumes more ink than a normal head cleaning does, perform this when the problem persists after performing a normal head cleaning. Head-cleaning: All Heads 1. Slide the envelope selector to select a color, and then press the [#Enter] key. Press the [Online] key. Press # to perform a thorough print...
User Guide
Page 71
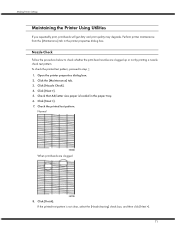
.... 3. Open the printer properties dialog box. 2. Click [Nozzle Check]. 4. Click [Next >]. 5. Click [Next >]. 7. Check that A4/Letter size paper is not clear, select the [Head-cleaning] check box, and then click [Next >]. 71 Check the printed test pattern. Click [Finish]. If the printed test pattern is loaded in the printer properties...
.... 3. Open the printer properties dialog box. 2. Click [Nozzle Check]. 4. Click [Next >]. 5. Click [Next >]. 7. Check that A4/Letter size paper is not clear, select the [Head-cleaning] check box, and then click [Next >]. 71 Check the printed test pattern. Click [Finish]. If the printed test pattern is loaded in the printer properties...
User Guide
Page 72
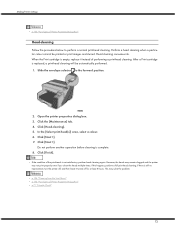
... box. 3. However, the heads may remain clogged and the printer may solve the problem. If there is replaced, a print-head cleaning will be printed or print images are blurred. Perform a head cleaning when a particular colour cannot be automatically performed. 1. After a Print cartridge is still no improvement, turn the printer off, and then...
... box. 3. However, the heads may remain clogged and the printer may solve the problem. If there is replaced, a print-head cleaning will be printed or print images are blurred. Perform a head cleaning when a particular colour cannot be automatically performed. 1. After a Print cartridge is still no improvement, turn the printer off, and then...
User Guide
Page 73
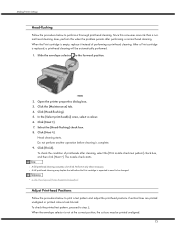
... before the Print cartridge is empty, replace it only when necessary. z A full print-head cleaning consumes a lot of print-heads after performing a normal head cleaning. Perform it instead of Printer Properties Dialog Box" Adjust Print-head Positions Follow the procedure below to... perform a thorough print-head cleaning. z p.155 "Two Types of performing a print-head cleaning. Click [Head-flushing]. 5. The nozzle check starts. After a Print cartridge is complete. 9. Select the ...
... before the Print cartridge is empty, replace it only when necessary. z A full print-head cleaning consumes a lot of print-heads after performing a normal head cleaning. Perform it instead of Printer Properties Dialog Box" Adjust Print-head Positions Follow the procedure below to... perform a thorough print-head cleaning. z p.155 "Two Types of performing a print-head cleaning. Click [Head-flushing]. 5. The nozzle check starts. After a Print cartridge is complete. 9. Select the ...
User Guide
Page 87
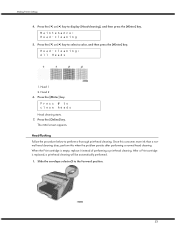
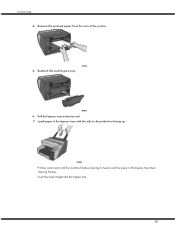
Remove any paper in . 3. If it . 1. Detach the multi bypass tray. 87 Push the bypass tray extension in the bypass tray. 2. Insert the sheet straight into the bypass tray. Troubleshooting 3. Load the paper in the bypass tray with the side to remove it is difficult to remove jammed paper, follow the procedure below to be printed on facing up. Printing cannot start until the machine finishes cleaning its head. Load paper in the bypass tray when cleaning finishes.
Remove any paper in . 3. If it . 1. Detach the multi bypass tray. 87 Push the bypass tray extension in the bypass tray. 2. Insert the sheet straight into the bypass tray. Troubleshooting 3. Load the paper in the bypass tray with the side to remove it is difficult to remove jammed paper, follow the procedure below to be printed on facing up. Printing cannot start until the machine finishes cleaning its head. Load paper in the bypass tray when cleaning finishes.
User Guide
Page 88
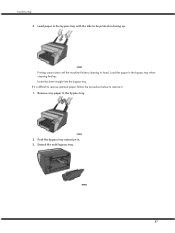
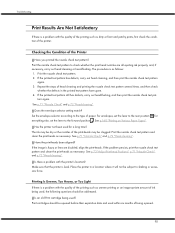
Troubleshooting 4. Pull the bypass tray extension out. 7. Printing cannot start until the machine finishes cleaning its head. Reattach the multi bypass tray. 6. Load paper in the bypass tray when cleaning finishes. Insert the sheet straight into the bypass tray. 88 Remove the jammed paper from the rear of the printer. 5. Load the paper in the bypass tray with the side to be printed on facing up.
Troubleshooting 4. Pull the bypass tray extension out. 7. Printing cannot start until the machine finishes cleaning its head. Reattach the multi bypass tray. 6. Load paper in the bypass tray when cleaning finishes. Insert the sheet straight into the bypass tray. 88 Remove the jammed paper from the rear of the printer. 5. Load the paper in the bypass tray with the side to be printed on facing up.
User Guide
Page 95
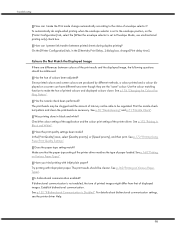
... 4. Have the print-heads been aligned? If the image is fuzzy or lines are all ejecting ink properly, and, if necessary, carry out head cleaning or head-flushing. Repeat the steps of the printing such as follows: 1. Has the printer not been used , the following questions should be clogged.... Printing Is Uneven, Too Heavy, or Too Light If there is a problem with the quality of head cleaning and printing the nozzle check test pattern several times, and then check whether the defects in a location where it will not be addressed. Does the...
... 4. Have the print-heads been aligned? If the image is fuzzy or lines are all ejecting ink properly, and, if necessary, carry out head cleaning or head-flushing. Repeat the steps of the printing such as follows: 1. Has the printer not been used , the following questions should be clogged.... Printing Is Uneven, Too Heavy, or Too Light If there is a problem with the quality of head cleaning and printing the nozzle check test pattern several times, and then check whether the defects in a location where it will not be addressed. Does the...
User Guide
Page 98
...Profiling Pattern". Has the nozzle check been performed? See p.72 "Head-cleaning" and p.71 "Nozzle Check". Was printing done in Black and White". See p.172 "Printing in black and white? Try printing with inkjet plain paper? The print results should be clearer. In the [Print Quality...] area, select [Quality priority], or [Speed priority], and then print. Have you tried printing with inkjet plain paper. See p.152 "If Bidirectional Communication is set to Envelope Mode, use uni-directional printing only] check box. How can I...
...Profiling Pattern". Has the nozzle check been performed? See p.72 "Head-cleaning" and p.71 "Nozzle Check". Was printing done in Black and White". See p.172 "Printing in black and white? Try printing with inkjet plain paper? The print results should be clearer. In the [Print Quality...] area, select [Quality priority], or [Speed priority], and then print. Have you tried printing with inkjet plain paper. See p.152 "If Bidirectional Communication is set to Envelope Mode, use uni-directional printing only] check box. How can I...
User Guide
Page 99
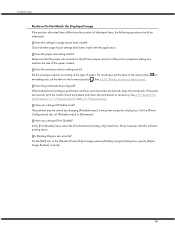
... printing down. Set the envelope selector according to the rear position ; If the problem persists, print the nozzle check test pattern and clean the print-heads as necessary. Have you changed Printable area? On the [Printer Configuration] tab, set the lever to the type of...solved by changing [Printable area:] in the printer properties dialog box. See p.73 "Adjust Printhead Positions", p.71 "Nozzle Check", and p.72 "Head-cleaning". Does the envelope selector setting match? On the [Edit] tab, in the [Header/Footer/Adjust image position/Binding margins] dialog box, specify [Adjust...
... printing down. Set the envelope selector according to the rear position ; If the problem persists, print the nozzle check test pattern and clean the print-heads as necessary. Have you changed Printable area? On the [Printer Configuration] tab, set the lever to the type of...solved by changing [Printable area:] in the printer properties dialog box. See p.73 "Adjust Printhead Positions", p.71 "Nozzle Check", and p.72 "Head-cleaning". Does the envelope selector setting match? On the [Edit] tab, in the [Header/Footer/Adjust image position/Binding margins] dialog box, specify [Adjust...
User Guide
Page 102
... Mismatch (Tray 1)", p.108 "Paper Size Mismatch/Paper Type Mismatch (Bypass Tray)". Right Front Cover is open/Close Right Front Cover The right front cover is cleaning or flushing its print head. Close the print cartridge cover. See p.113 "Cover Open / Print Cartridge(s) Not Detected". Clear the jam. See p.85 "Removing Paper...
... Mismatch (Tray 1)", p.108 "Paper Size Mismatch/Paper Type Mismatch (Bypass Tray)". Right Front Cover is open/Close Right Front Cover The right front cover is cleaning or flushing its print head. Close the print cartridge cover. See p.113 "Cover Open / Print Cartridge(s) Not Detected". Clear the jam. See p.85 "Removing Paper...
User Guide
Page 120
z p.72 "Head-cleaning" z p.73 "Head-flushing" z p.73 "Adjust Print-head Positions" z p.75 "Registration" z p.76 "Adjust Paper Feed" 120 Troubleshooting Adjusting the Printer Adjust the printer from the [Maintenance] tab in the printer properties dialog box.
z p.72 "Head-cleaning" z p.73 "Head-flushing" z p.73 "Adjust Print-head Positions" z p.75 "Registration" z p.76 "Adjust Paper Feed" 120 Troubleshooting Adjusting the Printer Adjust the printer from the [Maintenance] tab in the printer properties dialog box.
User Guide
Page 126
... your service representative. There is a risk of fire, electric shock, explosion or loss of the printer, wipe it with a soft, dry or damp cloth. To clean the exterior of sight. z Do not use volatile chemicals like benzene or thinner, or insecticides on the printer. z To avoid hazardous electric shock, do not... remove any modifications to this manual. Using these chemicals could deform, crack, or change the colour of the printer. Maintaining Cleaning Clean the outside of the printer regularly to maintain the condition of the printer.
... your service representative. There is a risk of fire, electric shock, explosion or loss of the printer, wipe it with a soft, dry or damp cloth. To clean the exterior of sight. z Do not use volatile chemicals like benzene or thinner, or insecticides on the printer. z To avoid hazardous electric shock, do not... remove any modifications to this manual. Using these chemicals could deform, crack, or change the colour of the printer. Maintaining Cleaning Clean the outside of the printer regularly to maintain the condition of the printer.
User Guide
Page 130
... do not print anything, turn the power off , disconnect the USB cable and Ethernet cable, and then unplug the power cable from the wall outlet. Clean the print-heads as necessary, and then begin printing. Then, turn its power off and leave the printer alone for a while. z p.122 "Where to ...Inquire" z p.71 "Nozzle Check" z p.72 "Head-cleaning" 130 Be careful of the following: z The nozzles of the print-heads may not be used for a long time, turn the power on for a few...
... do not print anything, turn the power off , disconnect the USB cable and Ethernet cable, and then unplug the power cable from the wall outlet. Clean the print-heads as necessary, and then begin printing. Then, turn its power off and leave the printer alone for a while. z p.122 "Where to ...Inquire" z p.71 "Nozzle Check" z p.72 "Head-cleaning" 130 Be careful of the following: z The nozzles of the print-heads may not be used for a long time, turn the power on for a few...


