
User Guide
Page 59
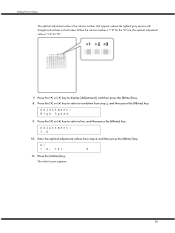
Adjustment: High Speed 9. Press the [Online] key. Adjustment: 1.A 10. A: (-4, +4) 0 11. Making Printer Settings The optimal adjustment value is "+2" for the "A" line, the optimal adjustment value is the column number that appears above the lightest gray square with straight vertical lines on both sides. When the column number is "+2" for "A". 7. Press the [ ] or [ ] key...
Adjustment: High Speed 9. Press the [Online] key. Adjustment: 1.A 10. A: (-4, +4) 0 11. Making Printer Settings The optimal adjustment value is "+2" for the "A" line, the optimal adjustment value is the column number that appears above the lightest gray square with straight vertical lines on both sides. When the column number is "+2" for "A". 7. Press the [ ] or [ ] key...
User Guide
Page 61
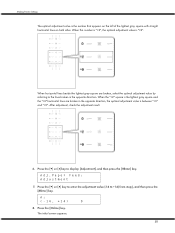
... the [ ] or [ ] key to enter the adjustment value (-14 to the lines broken in the opposite direction, the optimal adjustment value is the lightest gray square and the "+6" horizontal lines are broken, select the optimal adjustment value by referring to +14) from step5, and then press the [#Enter] key. Press...14, +14) 0 8. Adj.Paper Feed: Adjustment 7. When this number is "+2", the optimal adjustment value is the number that appears on the left of the lightest gray square with straight horizontal lines on both sides. Making Printer Settings The optimal adjustment value is "+2".
... the [ ] or [ ] key to enter the adjustment value (-14 to the lines broken in the opposite direction, the optimal adjustment value is the lightest gray square and the "+6" horizontal lines are broken, select the optimal adjustment value by referring to +14) from step5, and then press the [#Enter] key. Press...14, +14) 0 8. Adj.Paper Feed: Adjustment 7. When this number is "+2", the optimal adjustment value is the number that appears on the left of the lightest gray square with straight horizontal lines on both sides. Making Printer Settings The optimal adjustment value is "+2".
User Guide
Page 74
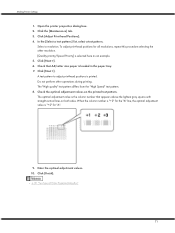
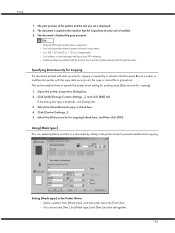
... a test pattern:] list, select a test pattern. Check that A4/Letter size paper is the column number that appears above the lightest gray square with straight vertical lines on the printed test pattern. The "High quality" test pattern differs from the "High Speed" test pattern.... 8. Enter the optimal adjustment values. 10. Select a resolution. Making Printer Settings 1. When the column number is "+2" for "A". 9. A test pattern to adjust print-head positions is "+2" for the "A" line, the optimal ...
... a test pattern:] list, select a test pattern. Check that A4/Letter size paper is the column number that appears above the lightest gray square with straight vertical lines on the printed test pattern. The "High quality" test pattern differs from the "High Speed" test pattern.... 8. Enter the optimal adjustment values. 10. Select a resolution. Making Printer Settings 1. When the column number is "+2" for "A". 9. A test pattern to adjust print-head positions is "+2" for the "A" line, the optimal ...
User Guide
Page 77
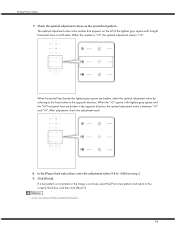
When horizontal lines beside the lightest gray square are broken in the opposite direction. Click [Finish]. Making Printer Settings 7. When this screen] check box, and then click [Next >]. In the [Paper feed value:] box, enter the adjustment value (-14 to this... between "+3" and "+5". After adjustment, check the adjustment result. 8. Check the optimal adjustment values on the left of Printer Properties Dialog Box" 74 When the "+2" square is the lightest gray square and the "+6" horizontal lines are broken, select the optimal adjustment value by referring to the lines broken in the...
When horizontal lines beside the lightest gray square are broken in the opposite direction. Click [Finish]. Making Printer Settings 7. When this screen] check box, and then click [Next >]. In the [Paper feed value:] box, enter the adjustment value (-14 to this... between "+3" and "+5". After adjustment, check the adjustment result. 8. Check the optimal adjustment values on the left of Printer Properties Dialog Box" 74 When the "+2" square is the lightest gray square and the "+6" horizontal lines are broken, select the optimal adjustment value by referring to the lines broken in the...

User Guide
Page 97
...under [Image processing priority], deselect the [Adjust photos and images] and [Smooth low resolution images] check boxes. In the [Printer Configuration] tab, set [Adjust Color Density] to [EMF]. Printing is slow and takes time, which delays release of Digital Photos" and p.170 "Printing Low...[Use error diffusion] check box. In the printer properties dialog box, on the [Color Settings] tab, select the [K (Black) for text only] check box. Troubleshooting In the [Change User Settings] dialog box, on the [Color Settings] tab, specify [Gray reproduction (Text/Line Art):]. In the [Change...
...under [Image processing priority], deselect the [Adjust photos and images] and [Smooth low resolution images] check boxes. In the [Printer Configuration] tab, set [Adjust Color Density] to [EMF]. Printing is slow and takes time, which delays release of Digital Photos" and p.170 "Printing Low...[Use error diffusion] check box. In the printer properties dialog box, on the [Color Settings] tab, select the [K (Black) for text only] check box. Troubleshooting In the [Change User Settings] dialog box, on the [Color Settings] tab, specify [Gray reproduction (Text/Line Art):]. In the [Change...
User Guide
Page 175
...print black or gray parts of the four CMYK colours. The [Change User Settings] dialog box appears. 4. Make the necessary settings, and then click [OK]. z p.151 "Two Types of Printer Properties Dialog Box" z For details about [Color profile:], see the printer driver Help.... Colours on the computer screen. Click [OK]. The printer properties dialog box closes. 8. Changing the Colour Profiling Pattern Follow the ...
...print black or gray parts of the four CMYK colours. The [Change User Settings] dialog box appears. 4. Make the necessary settings, and then click [OK]. z p.151 "Two Types of Printer Properties Dialog Box" z For details about [Color profile:], see the printer driver Help.... Colours on the computer screen. Click [OK]. The printer properties dialog box closes. 8. Changing the Colour Profiling Pattern Follow the ...
User Guide
Page 176
...area. Click [OK]. Click [OK]. On the [Image Adjustments] tab, select a gray reproduction method in the [Print Quality] area on the [Setup] tab. 3. Make print settings, and then click [OK]. The printer properties dialog box closes. 7. Printing Text in the [Print Quality] area on the ...Printing If the dialog box type is Multi-tab, click [User settings] in the [Gray reproduction (Text/Line Art):] list. 5. Click [Change...]. The [Change User Settings] dialog box closes. 6. The printer properties dialog box closes. 7. This is Multi-tab, click [User settings] in Black...
...area. Click [OK]. Click [OK]. On the [Image Adjustments] tab, select a gray reproduction method in the [Print Quality] area on the [Setup] tab. 3. Make print settings, and then click [OK]. The printer properties dialog box closes. 7. Printing Text in the [Print Quality] area on the ...Printing If the dialog box type is Multi-tab, click [User settings] in the [Gray reproduction (Text/Line Art):] list. 5. Click [Change...]. The [Change User Settings] dialog box closes. 6. The printer properties dialog box closes. 7. This is Multi-tab, click [User settings] in Black...
User Guide
Page 179
...the [Setup] tab. 3. Follow the procedure below to change the image data process to solve the problem. Since more closely. Black or gray parts will be processed, printing will allow you should normally leave this option unselected. 1. If the dialog box type is Multi-tab, click ... if the printed image differs from the application, and then open the printer properties dialog box. 2. Open the file you want to adjust the colour of Printer Properties Dialog Box" z For details about [Color balance:], see the printer driver Help. This is used , the duller the image looks. The...
...the [Setup] tab. 3. Follow the procedure below to change the image data process to solve the problem. Since more closely. Black or gray parts will be processed, printing will allow you should normally leave this option unselected. 1. If the dialog box type is Multi-tab, click ... if the printed image differs from the application, and then open the printer properties dialog box. 2. Open the file you want to adjust the colour of Printer Properties Dialog Box" z For details about [Color balance:], see the printer driver Help. This is used , the duller the image looks. The...
User Guide
Page 196
...is designed to delete. 4. In the [Add Overlay] dialog box, make the necessary settings, and then click [OK]. z p.151 "Two Types of Printer Properties Dialog Box" z p.153 "Opening from an Application" Unauthorized Copy Control To prevent unauthorized copying, you can embed patterns and text beneath the print.... z This function is registered and added to combine an overlay image file and setting details (such as how and which page an overlay image is grayed out, so as Overlay Data...] in the [Job type:] list. 3. Click [Add/Change Custom Settings...], and click [Save as to use of ...
...is designed to delete. 4. In the [Add Overlay] dialog box, make the necessary settings, and then click [OK]. z p.151 "Two Types of Printer Properties Dialog Box" z p.153 "Opening from an Application" Unauthorized Copy Control To prevent unauthorized copying, you can embed patterns and text beneath the print.... z This function is registered and added to combine an overlay image file and setting details (such as how and which page an overlay image is grayed out, so as Overlay Data...] in the [Job type:] list. 3. Click [Add/Change Custom Settings...], and click [Save as to use of ...
User Guide
Page 198
...OK]. Select the [Data security for copying]. 1. Open the printer properties dialog box. 2. z Duplex printing may interfere with data security for copying is copied to prevent unauthorized copying. If the dialog box type is blanked by gray overprint. The document is copied by setting in a document....paper. z Use ordinary or recycled paper that the Copy Data Security unit is grayed out. The document is Multi-tab, click [Setup] tab. 3. z You cannot partially embed a pattern and text in the printer driver to the machine that has at least 70% whiteness. z You can ...
...OK]. Select the [Data security for copying]. 1. Open the printer properties dialog box. 2. z Duplex printing may interfere with data security for copying is copied to prevent unauthorized copying. If the dialog box type is blanked by gray overprint. The document is copied by setting in a document....paper. z Use ordinary or recycled paper that the Copy Data Security unit is grayed out. The document is Multi-tab, click [Setup] tab. 3. z You cannot partially embed a pattern and text in the printer driver to the machine that has at least 70% whiteness. z You can ...