Operating Instructions
Page 4
... your equipment, or how to your property if instructions are supplied with the words warning and caution. F When moving the copier across the room, push the copier table, not the copier itself. Cautions F While copying, do not open flames. F While copying, do not turn off the main switch. WARNING...some parts of children. F Do not modify or replace any of the covers. Be careful when handling it out of reach of the copier are not followed properly. SAFETY INFORMATION Safety During Operation We've identified all safety messages in this manual with high electrical voltage, touch only ...
... your equipment, or how to your property if instructions are supplied with the words warning and caution. F When moving the copier across the room, push the copier table, not the copier itself. Cautions F While copying, do not open flames. F While copying, do not turn off the main switch. WARNING...some parts of children. F Do not modify or replace any of the covers. Be careful when handling it out of reach of the copier are not followed properly. SAFETY INFORMATION Safety During Operation We've identified all safety messages in this manual with high electrical voltage, touch only ...
Operating Instructions
Page 5
...installed by position, the anti-condensation heaters are on. F When the copier will not be transported by vehicle, please contact your service representative. F When the copier is plugged in and the main switch is in . F If the copier must be used for the day, but leave it plugged in the Stand...-by a qualified service repre- In case of an emergency, unplug the copier's power cord. F Keep corrosive liquids, such as acid, off when you've finished copying for a long period, disconnect the power cord. sentrative. F Do ...
...installed by position, the anti-condensation heaters are on. F When the copier will not be transported by vehicle, please contact your service representative. F When the copier is plugged in and the main switch is in . F If the copier must be used for the day, but leave it plugged in the Stand...-by a qualified service repre- In case of an emergency, unplug the copier's power cord. F Keep corrosive liquids, such as acid, off when you've finished copying for a long period, disconnect the power cord. sentrative. F Do ...
Operating Instructions
Page 6
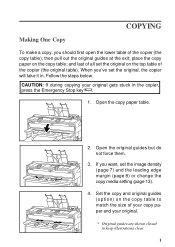
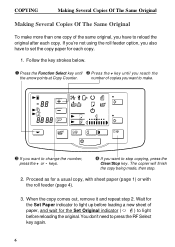
.... 1 Set the copy and original guides (option) on the copy table to match the size of the copier (the original table). Open the copy paper table. 2. Follow the steps below. and last of the copier (the copy table); If you 've set the original on the copy table; COPYING Making One Copy... To make a copy, you should first open the lower table of all set the original, the copier will take it in the copier, press the Emergency Stop key . 1. then pull out the original guides at the exit;
.... 1 Set the copy and original guides (option) on the copy table to match the size of the copier (the original table). Open the copy paper table. 2. Follow the steps below. and last of the copier (the copy table); If you 've set the original on the copy table; COPYING Making One Copy... To make a copy, you should first open the lower table of all set the original, the copier will take it in the copier, press the Emergency Stop key . 1. then pull out the original guides at the exit;
Operating Instructions
Page 7
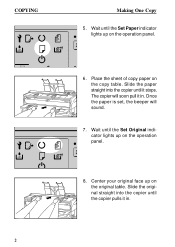
C 6. Once the paper is set, the beeper will soon pull it in . 2 Wait until the copier pulls it stops. The copier will sound. 7. C 8. Slide the paper straight into the copier until the Set Original indicator lights up on the operation panel. Slide the original straight into the copier until the Set Paper indicator lights up on the copy table. Wait until it in . Center your original face up on the operation panel. Place the sheet of copy paper on the original table. COPYING Making One Copy 5.
C 6. Once the paper is set, the beeper will soon pull it in . 2 Wait until the copier pulls it stops. The copier will sound. 7. C 8. Slide the paper straight into the copier until the Set Original indicator lights up on the operation panel. Slide the original straight into the copier until the Set Paper indicator lights up on the copy table. Wait until it in . Center your original face up on the operation panel. Place the sheet of copy paper on the original table. COPYING Making One Copy 5.
Operating Instructions
Page 8
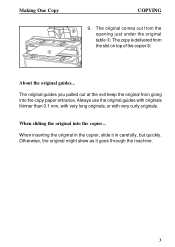
... goes through the machine. 3 Making One Copy COPYING 9. The original guides you pulled out at the exit keep the original from going into the copier... When inserting the original in carefully, but quickly. Always use the original guides with originals thinner than 0.1 mm, with very long originals, or with very.... The copy is delivered from the opening just under the original ¬ table . The original comes out from the slot on top of the copier . ¬ About the original guides... When sliding the original into the copy paper entrance.
... goes through the machine. 3 Making One Copy COPYING 9. The original guides you pulled out at the exit keep the original from going into the copier... When inserting the original in carefully, but quickly. Always use the original guides with originals thinner than 0.1 mm, with very long originals, or with very.... The copy is delivered from the opening just under the original ¬ table . The original comes out from the slot on top of the copier . ¬ About the original guides... When sliding the original into the copy paper entrance.
Operating Instructions
Page 9
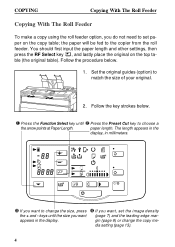
keys until Press the Preset Cut key to choose a the arrow points at Paper Length. Set the original guides (option) to the copier from the roll feeder. paper length. Follow the procedure below . ¶ · Press the Function Select key until the size you want appears in millimeters. ...
keys until Press the Preset Cut key to choose a the arrow points at Paper Length. Set the original guides (option) to the copier from the roll feeder. paper length. Follow the procedure below . ¶ · Press the Function Select key until the size you want appears in millimeters. ...
Operating Instructions
Page 10
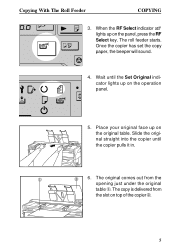
When the RF Select indicator lights up on the panel, press the RF Select key. Slide the original straight into the copier until the Set Original indicator lights up on the operation panel. The copy is delivered from the opening just under the original ¬ table... . The roll feeder starts. Wait until the copier pulls it in. ¬ 6. C 5. Place your original face up on top of the copier . 5 Once the copier has set the copy paper, the beeper will sound. 4. Copying With The Roll Feeder COPYING 3. The...
When the RF Select indicator lights up on the panel, press the RF Select key. Slide the original straight into the copier until the Set Original indicator lights up on the operation panel. The copy is delivered from the opening just under the original ¬ table... . The roll feeder starts. Wait until the copier pulls it in. ¬ 6. C 5. Place your original face up on top of the copier . 5 Once the copier has set the copy paper, the beeper will sound. 4. Copying With The Roll Feeder COPYING 3. The...
Operating Instructions
Page 11
... you want to make more than one copy of paper, and wait for the Set Original indicator ( ) to press the RF Select key again. 6 The copier will finish the copy being made, then stop copying, press the Clear/Stop key.
... you want to make more than one copy of paper, and wait for the Set Original indicator ( ) to press the RF Select key again. 6 The copier will finish the copy being made, then stop copying, press the Clear/Stop key.
Operating Instructions
Page 12
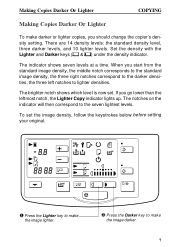
... Or Lighter To make the image darker. 7 The notches on the indicator will then correspond to make darker or lighter copies, you should change the copier's density setting. The indicator shows seven levels at a time. When you go lower than the leftmost notch, the Lighter Copy indicator lights up. Set the...
... Or Lighter To make the image darker. 7 The notches on the indicator will then correspond to make darker or lighter copies, you should change the copier's density setting. The indicator shows seven levels at a time. When you go lower than the leftmost notch, the Lighter Copy indicator lights up. Set the...

Operating Instructions
Page 13
... total length of the original and lead margin. Make your copy Suppose you want a 10 cm (4") margin at the top of the same size. The copier does this by shifting the entire image backward or forward according to write notes. If you are copying a vertical A2 size diagram (about 17" x 22...
... total length of the original and lead margin. Make your copy Suppose you want a 10 cm (4") margin at the top of the same size. The copier does this by shifting the entire image backward or forward according to write notes. If you are copying a vertical A2 size diagram (about 17" x 22...

Operating Instructions
Page 15
... roll feeder. the "P" will stop blinking and stay on. d a db Notes Original Copy F To copy a portion of the margin affects where the copier starts and stops copying, so that includes its first 15 cm (6"), you can't set (a) and (b) accurately. 10 Press and hold the Function Select key... for at (b). As the original is fed into the copier, press the Function Select key when the beginning of the entire original. Finally, press and hold the Function Select key for another 3 seconds to...
... roll feeder. the "P" will stop blinking and stay on. d a db Notes Original Copy F To copy a portion of the margin affects where the copier starts and stops copying, so that includes its first 15 cm (6"), you can't set (a) and (b) accurately. 10 Press and hold the Function Select key... for at (b). As the original is fed into the copier, press the Function Select key when the beginning of the entire original. Finally, press and hold the Function Select key for another 3 seconds to...
Operating Instructions
Page 17
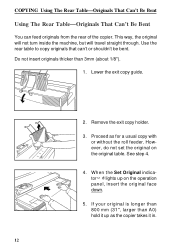
... A0) hold it in. 12 See step 4. 4. Use the rear table to copy originals that can feed originals from the rear of the copier. Proceed as the copier takes it up on the original table. This way, the original will not turn inside the machine, but will travel straight through. However, do...
... A0) hold it in. 12 See step 4. 4. Use the rear table to copy originals that can feed originals from the rear of the copier. Proceed as the copier takes it up on the original table. This way, the original will not turn inside the machine, but will travel straight through. However, do...
Operating Instructions
Page 18
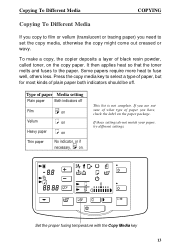
... paper) you have, check the label on the paper package. C C/ Set the proper fusing temperature with the Copy Media key 13 To make a copy, the copier deposits a layer of paper Media setting Plain paper Both indicators off . Type of black resin powder, called toner, on . If you are not sure of...
... paper) you have, check the label on the paper package. C C/ Set the proper fusing temperature with the Copy Media key 13 To make a copy, the copier deposits a layer of paper Media setting Plain paper Both indicators off . Type of black resin powder, called toner, on . If you are not sure of...
Operating Instructions
Page 19
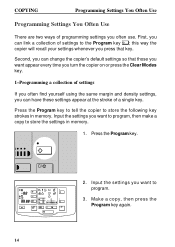
.... COPYING Programming Settings You Often Use Programming Settings You Often Use There are two ways of a single key. Press the Program key to tell the copier to the Program key ; this way the copier will recall your settings whenever you press that those you want appear every time you turn the... copier on or press the Clear Modes key. 1-Programming a collection of settings If you often find yourself using the same margin and density settings, you want ...
.... COPYING Programming Settings You Often Use Programming Settings You Often Use There are two ways of a single key. Press the Program key to tell the copier to the Program key ; this way the copier will recall your settings whenever you press that those you want appear every time you turn the... copier on or press the Clear Modes key. 1-Programming a collection of settings If you often find yourself using the same margin and density settings, you want ...
Operating Instructions
Page 20
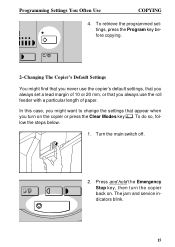
..., then turn on . To retrieve the programmed settings, press the Program key before copying. In this case, you might find that you never use the copier's default settings, that you always set a lead margin of 10 or 20 mm, or that appear when you always use the roll feeder with a particular... length of paper. To do so, follow the steps below. 1. Turn the main switch off. 2. The jam and service indicators blink. 15 C/ 2-Changing The Copier's Default Settings You might want to change the settings that you turn the...
..., then turn on . To retrieve the programmed settings, press the Program key before copying. In this case, you might find that you never use the copier's default settings, that you always set a lead margin of 10 or 20 mm, or that appear when you always use the roll feeder with a particular... length of paper. To do so, follow the steps below. 1. Turn the main switch off. 2. The jam and service indicators blink. 15 C/ 2-Changing The Copier's Default Settings You might want to change the settings that you turn the...
Operating Instructions
Page 21
... be set to 0.7, 1, 2, 3, 4, or 5 seconds. 16 ceive the original, it can be left on or press the Clear Modes key, the settings you turn the copier on to match the kind of time. F Manual feed start time: After copy paper is ready to count up or count down : The copy counter... can be made to re- C 4. This pause gives you want. Here's a list of your copier's features. Turn off for you use. F Beeper: The beeper can be turned off completely; The time can be set to align the paper.
... be set to 0.7, 1, 2, 3, 4, or 5 seconds. 16 ceive the original, it can be left on or press the Clear Modes key, the settings you turn the copier on to match the kind of time. F Manual feed start time: After copy paper is ready to count up or count down : The copy counter... can be made to re- C 4. This pause gives you want. Here's a list of your copier's features. Turn off for you use. F Beeper: The beeper can be turned off completely; The time can be set to align the paper.
Operating Instructions
Page 22
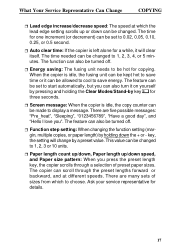
... of preset paper sizes. The feature can be changed to save energy. F Function step setting: When changing the function setting (mar- When the copier is idle, the copy counter can be changed. This value can be turned off . Ask your service representative for a while, it on yourself... by pressing and holding down speed, and Paper size pattern: When you press the preset length key, the copier scrolls through the preset lengths forward or backward, and at which to 0.02, 0.05, 0.10, 0.25, or 0.5 second. The time for one...
... of preset paper sizes. The feature can be changed to save energy. F Function step setting: When changing the function setting (mar- When the copier is idle, the copy counter can be changed. This value can be turned off . Ask your service representative for a while, it on yourself... by pressing and holding down speed, and Paper size pattern: When you press the preset length key, the copier scrolls through the preset lengths forward or backward, and at which to 0.02, 0.05, 0.10, 0.25, or 0.5 second. The time for one...
Operating Instructions
Page 23
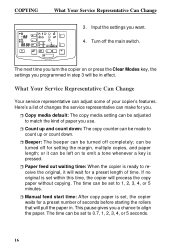
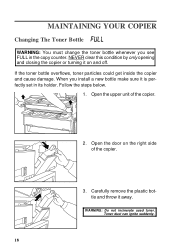
.... 1. Open the door on and off. When you see FULL in its holder. Toner dust can ignite suddenly. 18 Open the upper unit of the copier. 3. Carefully remove the plastic bottle and throw it away. NEVER clear this condition by only opening and closing the... copier or turning it on the right side of the copier. 2. WARNING: Do not incinerate used toner. MAINTAINING YOUR COPIER Changing The Toner Bottle WARNING: You must change the toner bottle whenever you install a new bottle...
.... 1. Open the door on and off. When you see FULL in its holder. Toner dust can ignite suddenly. 18 Open the upper unit of the copier. 3. Carefully remove the plastic bottle and throw it away. NEVER clear this condition by only opening and closing the... copier or turning it on the right side of the copier. 2. WARNING: Do not incinerate used toner. MAINTAINING YOUR COPIER Changing The Toner Bottle WARNING: You must change the toner bottle whenever you install a new bottle...
Operating Instructions
Page 24
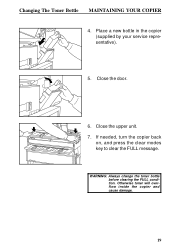
Place a new bottle in the copier (supplied by your service representative). 5. Changing The Toner Bottle MAINTAINING YOUR COPIER 4. Close the upper unit. 7. Otherwise toner will overflow inside the copier and cause damage. 19 If needed, turn the copier back on, and press the clear modes key to clear the FULL message. WARNING: Always change the toner bottle before clearing the FULL condition. Close the door. 6.
Place a new bottle in the copier (supplied by your service representative). 5. Changing The Toner Bottle MAINTAINING YOUR COPIER 4. Close the upper unit. 7. Otherwise toner will overflow inside the copier and cause damage. 19 If needed, turn the copier back on, and press the clear modes key to clear the FULL message. WARNING: Always change the toner bottle before clearing the FULL condition. Close the door. 6.

Operating Instructions
Page 25
Lift the original table until a new cartridge is running short. Then, while pressing the cartridge to the right, lift the left end and remove the cartridge. 20 When the indicator stays on, you can still copy about 16 m (about 53', or 27 A4 size copies). Open the toner cartridge cover. 3. Follow the steps below. 1. Turn the old cartidge towards you can 't copy until it locks in . When the indicator starts blinking, you . MAINTAINING YOUR COPIER Adding Toner Adding Toner The add toner indicator blinks when toner is put in place. 2.
Lift the original table until a new cartridge is running short. Then, while pressing the cartridge to the right, lift the left end and remove the cartridge. 20 When the indicator stays on, you can still copy about 16 m (about 53', or 27 A4 size copies). Open the toner cartridge cover. 3. Follow the steps below. 1. Turn the old cartidge towards you can 't copy until it locks in . When the indicator starts blinking, you . MAINTAINING YOUR COPIER Adding Toner Adding Toner The add toner indicator blinks when toner is put in place. 2.


