Operating Instructions
Page 21
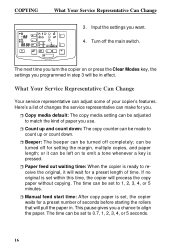
... of paper you want. F Count up or count down : The copy counter can be turned off completely; or it will process the copy paper without copying. ceive the original, it can be in . If no original is ready to align the paper. This pause gives you . Turn off for a preset number of time. Here's a list of changes the service representative can be turned off the main switch. The time can make...
... of paper you want. F Count up or count down : The copy counter can be turned off completely; or it will process the copy paper without copying. ceive the original, it can be in . If no original is ready to align the paper. This pause gives you . Turn off for a preset number of time. Here's a list of changes the service representative can be turned off the main switch. The time can make...
Operating Instructions
Page 48
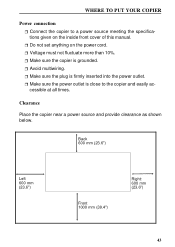
... 10%. WHERE TO PUT YOUR COPIER Power connection F Connect the copier to the copier and easily ac- F Do not set anything on the inside front cover of this manual. F Avoid multiwiring. Clearance Place the copier near a power source and provide clearance as shown below. F Make sure the plug is grounded. cessible at all times. Back 600 mm (23.6") Left...
... 10%. WHERE TO PUT YOUR COPIER Power connection F Connect the copier to the copier and easily ac- F Do not set anything on the inside front cover of this manual. F Avoid multiwiring. Clearance Place the copier near a power source and provide clearance as shown below. F Make sure the plug is grounded. cessible at all times. Back 600 mm (23.6") Left...

Operating Instructions
Page 96
... paper you use. p Auto clear time: If the copier is ready to save time or it can be set to 1, 2, 3, 4, or 5 minutes. The feature can also be turned off. p Copy media default: The copy media setting can be set to 1, 2, 3, or 10 units. 37 p Paper feed out waiting time: When the copier is left on yourself by a preset value. The time needed can make for setting the margin, multiple copies, and paper length; Here's a list of changes the service...
... paper you use. p Auto clear time: If the copier is ready to save time or it can be set to 1, 2, 3, 4, or 5 minutes. The feature can also be turned off. p Copy media default: The copy media setting can be set to 1, 2, 3, or 10 units. 37 p Paper feed out waiting time: When the copier is left on yourself by a preset value. The time needed can make for setting the margin, multiple copies, and paper length; Here's a list of changes the service...
Operating Instructions
Page 123
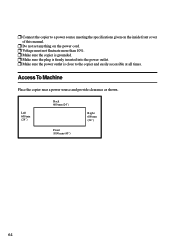
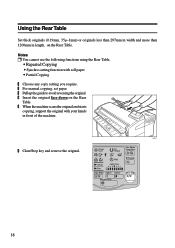
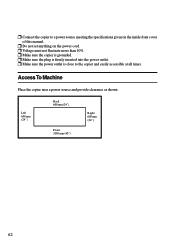
p Make sure the power outlet is close to a power source meeting the specifications given on the power cord. p Do not set anything on the inside front cover of this manual. Access To Machine Place the copier near a power source and provide clearance as shown. p Make sure the plug is grounded. p Voltage must not fluctuate more than 10%. Left 600 mm (24") Back 600 mm (24") Front 1000 mm (40") Right 600 mm (24") 64 p Make sure the copier is firmly inserted into the power outlet. p Connect the copier to the copier and easily accessible at all times.
p Make sure the power outlet is close to a power source meeting the specifications given on the power cord. p Do not set anything on the inside front cover of this manual. Access To Machine Place the copier near a power source and provide clearance as shown. p Make sure the plug is grounded. p Voltage must not fluctuate more than 10%. Left 600 mm (24") Back 600 mm (24") Front 1000 mm (40") Right 600 mm (24") 64 p Make sure the copier is firmly inserted into the power outlet. p Connect the copier to the copier and easily accessible at all times.

Operating Instructions
Page 126
... dark copies, problem, 58 default settings, 35 density, 29 dirty backgrounds, 58 do's & don'ts, 61 E environment, 62 F feeder, roll, 19, 45 film, 27 fusing temperature, 28 G guides, original, 14 guides, paper, 14 H humidity, 11, 62 I installation, 62 jams, frequent, 58 jams, original, 52 jams, roll paper, 55 jams, sheet paper, 53 L light copies, making, 29 light copies, problem, 58 light, surrounding, 62 loading a roll, 45 location, 62 M maintenance, daily, 60 margin, 31 media, copy, 27 memory, program, 34 multiple copying...
... dark copies, problem, 58 default settings, 35 density, 29 dirty backgrounds, 58 do's & don'ts, 61 E environment, 62 F feeder, roll, 19, 45 film, 27 fusing temperature, 28 G guides, original, 14 guides, paper, 14 H humidity, 11, 62 I installation, 62 jams, frequent, 58 jams, original, 52 jams, roll paper, 55 jams, sheet paper, 53 L light copies, making, 29 light copies, problem, 58 light, surrounding, 62 loading a roll, 45 location, 62 M maintenance, daily, 60 margin, 31 media, copy, 27 memory, program, 34 multiple copying...
Operating Instructions
Page 127
S selected area, copying a, 32 semi synchro cutting, 20 service indicators, 51 settings, default, 35 skewed image, 58 stiff originals, 18 T temperature, 62 temperature, fusing, 28 thick and thin paper, 10 toner bottle, 12, 39 toner, adding, 42 toner, do's & don't, 12 toner, used, 39 troubleshooting, 51 68
S selected area, copying a, 32 semi synchro cutting, 20 service indicators, 51 settings, default, 35 skewed image, 58 stiff originals, 18 T temperature, 62 temperature, fusing, 28 thick and thin paper, 10 toner bottle, 12, 39 toner, adding, 42 toner, do's & don't, 12 toner, used, 39 troubleshooting, 51 68
Operating Instructions
Page 139
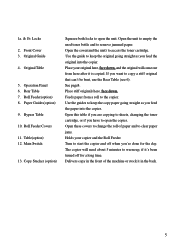
... Roll Feeder. Delivers copy in the back. 5 Front Cover 3. Operation Panel 6. Table(option) 12. Open the unit to empty the used toner bottle and to access the toner cartridge. Feeds paper from here after it is copied. Open these covers to change the roll of the machine or stock it 's been turned off when you have to sheets, changing the toner cartridge, or if you 're done for a long time. Roll Feeder Covers 11. Paper Guides(option) 9. Roll Feeder(option...
... Roll Feeder. Delivers copy in the back. 5 Front Cover 3. Operation Panel 6. Table(option) 12. Open the unit to empty the used toner bottle and to access the toner cartridge. Feeds paper from here after it is copied. Open these covers to change the roll of the machine or stock it 's been turned off when you have to sheets, changing the toner cartridge, or if you 're done for a long time. Roll Feeder Covers 11. Paper Guides(option) 9. Roll Feeder(option...
Operating Instructions
Page 152
... copy setting you require. 2 For manual copying, set paper. 3 Pull up the guide to avoid reversing the original. 4 Insert the original face down on the Rear Table. Notes p You cannot use the following functions using the Rear Table. • Repeated Copying • Synchro cutting function with your hands in front of the machine. SM051 6 Clear/Stop key and remove the original. Energy Saver Set Original Clear Modes...
... copy setting you require. 2 For manual copying, set paper. 3 Pull up the guide to avoid reversing the original. 4 Insert the original face down on the Rear Table. Notes p You cannot use the following functions using the Rear Table. • Repeated Copying • Synchro cutting function with your hands in front of the machine. SM051 6 Clear/Stop key and remove the original. Energy Saver Set Original Clear Modes...

Operating Instructions
Page 169
... can be adjusted to count up and count down . or it will change by key for setting the margin, multiple copies, and paper length; p Copy media default: The copy media setting can also be hot for a while, it can also be made to be turned off . p Energy saving: The fusing unit needs to display a message. The function can be left alone for copying. p Screen message: When the copier is set to align the paper.
... can be adjusted to count up and count down . or it will change by key for setting the margin, multiple copies, and paper length; p Copy media default: The copy media setting can also be hot for a while, it can also be made to be turned off . p Energy saving: The fusing unit needs to display a message. The function can be left alone for copying. p Screen message: When the copier is set to align the paper.
Operating Instructions
Page 194
p Make sure the plug is grounded. p Make sure the power outlet is close to a power source meeting the specifications given on the power cord. Access To Machine Place the copier near a power source and provide clearance as shown. p Voltage must not fluctuate more than 10%. p Do not set anything on the inside front cover of this manual. Left 600 mm (24") Back 600 mm (24") Front 1000 mm (40") Right 600 mm (24") 62 p Connect the copier to the copier and easily accessible at all times. p Make sure the copier is firmly inserted into the power outlet.
p Make sure the plug is grounded. p Make sure the power outlet is close to a power source meeting the specifications given on the power cord. Access To Machine Place the copier near a power source and provide clearance as shown. p Voltage must not fluctuate more than 10%. p Do not set anything on the inside front cover of this manual. Left 600 mm (24") Back 600 mm (24") Front 1000 mm (40") Right 600 mm (24") 62 p Connect the copier to the copier and easily accessible at all times. p Make sure the copier is firmly inserted into the power outlet.
Operating Instructions
Page 198
S selected area, copying a, 31 service indicators, 51 settings, default, 34 skewed image, 56 synchro cutting, 20 T temperature, 60 temperature, fusing, 26 thick and thin paper, 10 toner bottle, 12, 39 toner, adding, 42 toner, do's & don't, 12 toner, used, 39 troubleshooting, 49 66
S selected area, copying a, 31 service indicators, 51 settings, default, 34 skewed image, 56 synchro cutting, 20 T temperature, 60 temperature, fusing, 26 thick and thin paper, 10 toner bottle, 12, 39 toner, adding, 42 toner, do's & don't, 12 toner, used, 39 troubleshooting, 49 66

Operating Instructions
Page 209
... Maintenance 72 Clean the Exposure Glass & the Platen Plate 72 Do's & Don'ts 73 Where to Put Your Copier 74 Machine Environment 74 Power Connection 75 Access To Machine 76 6. Settings You Can Change with User Tools 40 4. Maintaining Your Copier Changing The Used Toner Bottle 45 Adding Toner 48 Changing The Roll Paper Size 52 Removing the Roll Paper Holder 52 Setting the Roll Paper Holder 52 Loading A Roll Of Paper 54 Loading A New...
... Maintenance 72 Clean the Exposure Glass & the Platen Plate 72 Do's & Don'ts 73 Where to Put Your Copier 74 Machine Environment 74 Power Connection 75 Access To Machine 76 6. Settings You Can Change with User Tools 40 4. Maintaining Your Copier Changing The Used Toner Bottle 45 Adding Toner 48 Changing The Roll Paper Size 52 Removing the Roll Paper Holder 52 Setting the Roll Paper Holder 52 Loading A Roll Of Paper 54 Loading A New...
Operating Instructions
Page 251
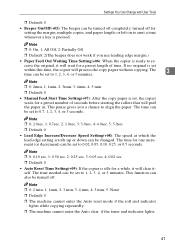
..., 4: 5 min, 5: None ❒ Default: 0 ❒ The machine cannot enter the Auto reset mode if the roll end indicator lights while copying repeatedly. ❒ The machine cannot enter the Auto clear if the toner end indicator lights. 41 ceive the original, it will process the copy paper without copying. The 3 time can be turned off. This pause gives you use leading edge margin.) • Paper Feed Out Waiting Time Setting(+06): When the...
..., 4: 5 min, 5: None ❒ Default: 0 ❒ The machine cannot enter the Auto reset mode if the roll end indicator lights while copying repeatedly. ❒ The machine cannot enter the Auto clear if the toner end indicator lights. 41 ceive the original, it will process the copy paper without copying. The 3 time can be turned off. This pause gives you use leading edge margin.) • Paper Feed Out Waiting Time Setting(+06): When the...
Operating Instructions
Page 260
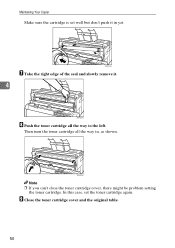
In this case, set well but don't push it . 4 H Push the toner cartridge all the way in yet. Note ❒ If you can't close the toner cartridge cover, there might be problem setting the toner cartridge. G Take the right edge of the seal and slowly remove it in , as shown. Then turn the toner cartridge all the way to the left. Maintaining Your Copier Make sure the cartridge is set the toner cartridge again. I Close the toner cartridge cover and the original table. 50
In this case, set well but don't push it . 4 H Push the toner cartridge all the way in yet. Note ❒ If you can't close the toner cartridge cover, there might be problem setting the toner cartridge. G Take the right edge of the seal and slowly remove it in , as shown. Then turn the toner cartridge all the way to the left. Maintaining Your Copier Make sure the cartridge is set the toner cartridge again. I Close the toner cartridge cover and the original table. 50

Operating Instructions
Page 289
... Access To Machine, 76 Adding Toner, 48 Adjusting Copy Image Density, 29 Adjusting the Fusing Temperature Manually, 28 Anti-humidity Heater, 9 A) Program key, 35 B Basic Copying (Copying to sheets), 11 Basics, 5 B) Changing The Default Setting, 36 Black Streaks Appear on Copies, 71 C Changing The Roll Paper Size, 52 Changing The Used Toner Bottle, 45 Clean the Exposure Glass & the Platen Plate, 72 Copier, 77 Copier Exterior, 1 Copies Come Out Dog Eared, 71 Copying, 11 Copying Onto...
... Access To Machine, 76 Adding Toner, 48 Adjusting Copy Image Density, 29 Adjusting the Fusing Temperature Manually, 28 Anti-humidity Heater, 9 A) Program key, 35 B Basic Copying (Copying to sheets), 11 Basics, 5 B) Changing The Default Setting, 36 Black Streaks Appear on Copies, 71 C Changing The Roll Paper Size, 52 Changing The Used Toner Bottle, 45 Clean the Exposure Glass & the Platen Plate, 72 Copier, 77 Copier Exterior, 1 Copies Come Out Dog Eared, 71 Copying, 11 Copying Onto...

Operating Instructions
Page 301
... Changing The Used Toner Bottle 47 Adding Toner 50 Changing the Roll Paper Size 54 Removing the Roll Paper Holder 54 Setting the Roll Paper Holder 54 Loading A Roll Of Paper 56 5. Specifications Copier ...79 Roll Feeder 81 Options ...83 INDEX...84 vii Troubleshooting If Something Goes Wrong 61 If Indicator Lights Up 61 If Jams Occur 63 If the Original is Jammed at the exit 63 If Sheet Paper is Jammed...
... Changing The Used Toner Bottle 47 Adding Toner 50 Changing the Roll Paper Size 54 Removing the Roll Paper Holder 54 Setting the Roll Paper Holder 54 Loading A Roll Of Paper 56 5. Specifications Copier ...79 Roll Feeder 81 Options ...83 INDEX...84 vii Troubleshooting If Something Goes Wrong 61 If Indicator Lights Up 61 If Jams Occur 63 If the Original is Jammed at the exit 63 If Sheet Paper is Jammed...

Operating Instructions
Page 339
... you turn on the machine or press the {Clear Modes/Energy Saver} key, these settings will be ready to use . Programming Settings You Often Use Programming Settings You Often Use There are two ways of job setting. C Make a copy. D Press the {Program} key. 37 A) Program key 3 Storing Settings in the {Program} key. The machine memorizes the types of programming settings you use . When you want to those you often use...
... you turn on the machine or press the {Clear Modes/Energy Saver} key, these settings will be ready to use . Programming Settings You Often Use Programming Settings You Often Use There are two ways of job setting. C Make a copy. D Press the {Program} key. 37 A) Program key 3 Storing Settings in the {Program} key. The machine memorizes the types of programming settings you use . When you want to those you often use...

Operating Instructions
Page 345
..., 3: 0.05 sec, 4: 0.02 sec ❒ Default: 0 • Auto Reset Time Setting(+09): If the copier is set to align the paper. This function can be turned off completely; Note ❒ 0: 2 min, 1: 1min, 2: 3 min, 3: 4 min, 4: 5 min, 5: None ❒ Default: 0 ❒ The machine cannot enter the Auto reset mode if the roll end indicator lights while copying repeatedly. ❒ The machine cannot enter the Auto clear if the toner end indicator lights. 43
..., 3: 0.05 sec, 4: 0.02 sec ❒ Default: 0 • Auto Reset Time Setting(+09): If the copier is set to align the paper. This function can be turned off completely; Note ❒ 0: 2 min, 1: 1min, 2: 3 min, 3: 4 min, 4: 5 min, 5: None ❒ Default: 0 ❒ The machine cannot enter the Auto reset mode if the roll end indicator lights while copying repeatedly. ❒ The machine cannot enter the Auto clear if the toner end indicator lights. 43
Operating Instructions
Page 354
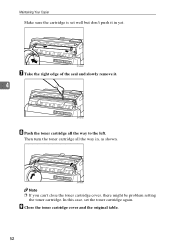
Note ❒ If you can't close the toner cartridge cover, there might be problem setting the toner cartridge. I Close the toner cartridge cover and the original table. 52 Then turn the toner cartridge all the way to the left. In this case, set well but don't push it . 4 H Push the toner cartridge all the way in yet. Maintaining Your Copier Make sure the cartridge is set the toner cartridge again. G Take the right edge of the seal and slowly remove it in , as shown.
Note ❒ If you can't close the toner cartridge cover, there might be problem setting the toner cartridge. I Close the toner cartridge cover and the original table. 52 Then turn the toner cartridge all the way to the left. In this case, set well but don't push it . 4 H Push the toner cartridge all the way in yet. Maintaining Your Copier Make sure the cartridge is set the toner cartridge again. G Take the right edge of the seal and slowly remove it in , as shown.

Operating Instructions
Page 386
... If You Cannot See the Roll Paper Jam, 68 L Loading A Roll Of Paper, 56 M Machine Environment, 75 Maintaining Your Copier, 47 Manual Feed Mode, 16 N Non-recommended Originals, 7 Notes for Leading and Side Edges of the Originals, 7 O Operation Panel, 3 Options, 83 Others, 71 P Partial Copying, 34 Power connection, 76 Preset Cutting, 24 Programming Setting You Often Use, 37 R Recommended Originals, 6 Recommended Paper, 8 Removing the Roll Paper Holder, 54 84
... If You Cannot See the Roll Paper Jam, 68 L Loading A Roll Of Paper, 56 M Machine Environment, 75 Maintaining Your Copier, 47 Manual Feed Mode, 16 N Non-recommended Originals, 7 Notes for Leading and Side Edges of the Originals, 7 O Operation Panel, 3 Options, 83 Others, 71 P Partial Copying, 34 Power connection, 76 Preset Cutting, 24 Programming Setting You Often Use, 37 R Recommended Originals, 6 Recommended Paper, 8 Removing the Roll Paper Holder, 54 84


