Operating Instructions
Page 5
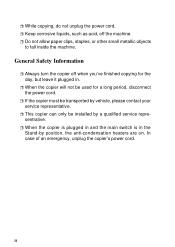
... copier must be used for the day, but leave it plugged in the Stand-by position, the anti-condensation heaters are on. F Do not allow paper clips, staples, or other small metallic objects to fall inside the machine.
... copier must be used for the day, but leave it plugged in the Stand-by position, the anti-condensation heaters are on. F Do not allow paper clips, staples, or other small metallic objects to fall inside the machine.
Operating Instructions
Page 6
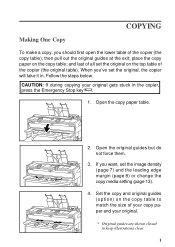
... the copy table to match the size of the copier (the copy table); then pull out the original guides at the exit; Open the copy paper table. 2. If you want, set the original on the copy table; and last of the copier (the original table). COPYING Making One Copy To make... a copy, you should first open the lower table of your copy paper and your original gets stuck in . Open the original guides but do not force them. 3. place the copy paper on the top table of all set the image density (page 7) and the leading edge margin...
... the copy table to match the size of the copier (the copy table); then pull out the original guides at the exit; Open the copy paper table. 2. If you want, set the original on the copy table; and last of the copier (the original table). COPYING Making One Copy To make... a copy, you should first open the lower table of your copy paper and your original gets stuck in . Open the original guides but do not force them. 3. place the copy paper on the top table of all set the image density (page 7) and the leading edge margin...
Operating Instructions
Page 7
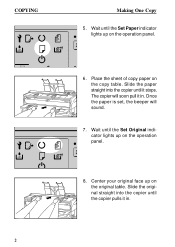
Place the sheet of copy paper on the original table. Center your original face up on the copy table. Slide the original straight into the copier until the copier pulls it in . Wait until the Set Paper indicator lights up on the operation panel. C 6. Slide the paper straight into the copier until it in . 2 Once the paper is set, the beeper will soon pull it stops. C 8. Wait until the Set Original indicator lights up on the operation panel. The copier will sound. 7. COPYING Making One Copy 5.
Place the sheet of copy paper on the original table. Center your original face up on the copy table. Slide the original straight into the copier until the copier pulls it in . Wait until the Set Paper indicator lights up on the operation panel. C 6. Slide the paper straight into the copier until it in . 2 Once the paper is set, the beeper will soon pull it stops. C 8. Wait until the Set Original indicator lights up on the operation panel. The copier will sound. 7. COPYING Making One Copy 5.
Operating Instructions
Page 8
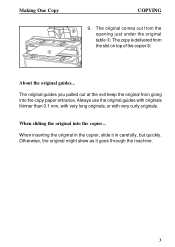
... the machine. 3 Otherwise, the original might skew as it in carefully, but quickly. Making One Copy COPYING 9. When sliding the original into the copy paper entrance. The original comes out from the slot on top of the copier . ¬ About the original guides... The original guides you pulled out...
... the machine. 3 Otherwise, the original might skew as it in carefully, but quickly. Making One Copy COPYING 9. When sliding the original into the copy paper entrance. The original comes out from the slot on top of the copier . ¬ About the original guides... The original guides you pulled out...
Operating Instructions
Page 9
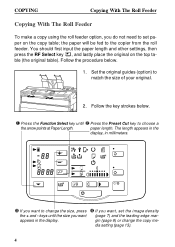
... want to set the image density (page 7) and the leading edge margin (page 8) or change the size, press the + and - You should first input the paper length and other settings, then press the RF Select key , and lastly place the original on the copy table.... keys until Press the Preset Cut key to match the size of your original. 2. C C/ ¸ If you want , set paper on the top table (the original table). COPYING Copying With The Roll Feeder Copying With The Roll Feeder To make a copy using the roll feeder ...
... want to set the image density (page 7) and the leading edge margin (page 8) or change the size, press the + and - You should first input the paper length and other settings, then press the RF Select key , and lastly place the original on the copy table.... keys until Press the Preset Cut key to match the size of your original. 2. C C/ ¸ If you want , set paper on the top table (the original table). COPYING Copying With The Roll Feeder Copying With The Roll Feeder To make a copy using the roll feeder ...
Operating Instructions
Page 10
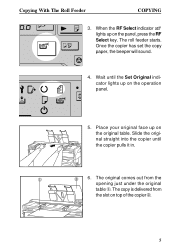
..., press the RF Select key. The copy is delivered from the opening just under the original ¬ table . Once the copier has set the copy paper, the beeper will sound. 4. When the RF Select indicator lights up on the original table. C 5.
..., press the RF Select key. The copy is delivered from the opening just under the original ¬ table . Once the copier has set the copy paper, the beeper will sound. 4. When the RF Select indicator lights up on the original table. C 5.
Operating Instructions
Page 11
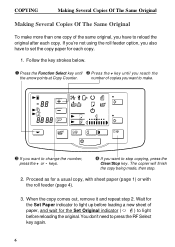
...comes out, remove it and repeat step 2. If you're not using the roll feeder option, you want to stop . 2. Wait for the Set Paper indicator to reload the original after each copy. 1. keys. ¹ If you also have to light up before reloading the original. The copier will...copying, press the Clear/Stop key. number of copies you want to press the RF Select key again. 6 Proceed as for a usual copy, with sheet paper (page 1) or with the roll feeder (page 4). 3. COPYING Making Several Copies Of The Same Original Making Several Copies Of The Same Original To make ...
...comes out, remove it and repeat step 2. If you're not using the roll feeder option, you want to stop . 2. Wait for the Set Paper indicator to reload the original after each copy. 1. keys. ¹ If you also have to light up before reloading the original. The copier will...copying, press the Clear/Stop key. number of copies you want to press the RF Select key again. 6 Proceed as for a usual copy, with sheet paper (page 1) or with the roll feeder (page 4). 3. COPYING Making Several Copies Of The Same Original Making Several Copies Of The Same Original To make ...

Operating Instructions
Page 13
The copier does this by shifting the entire image backward or forward according to the margin you set the paper length a little longer than the total length of the original and lead margin. With the roll feeder, the length of the margin does not affect ... strokes on page 1. If you want a 10 cm (4") margin at the trailing edge, simply set . a, the leading edge), or have the leading edge of the paper. Make your copy Suppose you are copying a vertical A2 size diagram (about 17" x 22") to a sheet of the same size. b). COPYING Leaving A Blank Margin At...
The copier does this by shifting the entire image backward or forward according to the margin you set the paper length a little longer than the total length of the original and lead margin. With the roll feeder, the length of the margin does not affect ... strokes on page 1. If you want a 10 cm (4") margin at the trailing edge, simply set . a, the leading edge), or have the leading edge of the paper. Make your copy Suppose you are copying a vertical A2 size diagram (about 17" x 22") to a sheet of the same size. b). COPYING Leaving A Blank Margin At...

Operating Instructions
Page 15
... Portion Of The Original You can copy a portion of the original instead of the original. Press the Function Select key again when the end of paper or with a margin, you want to copy only a portion of the entire original. F To copy the bottom portion of the original, simply skip pressing the...
... Portion Of The Original You can copy a portion of the original instead of the original. Press the Function Select key again when the end of paper or with a margin, you want to copy only a portion of the entire original. F To copy the bottom portion of the original, simply skip pressing the...
Operating Instructions
Page 18
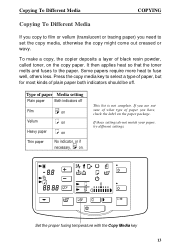
... set the copy media, otherwise the copy might come out creased or wavy. This list is not complete. If these settings do not match your paper, try different settings. Copying To Different Media COPYING Copying To Different Media If you copy to film or vellum (translucent or tracing... paper) you have, check the label on the paper package. Some papers require more heat to the paper. It then applies heat so that the toner melts and fuses to fuse well, others less. Type of...
... set the copy media, otherwise the copy might come out creased or wavy. This list is not complete. If these settings do not match your paper, try different settings. Copying To Different Media COPYING Copying To Different Media If you copy to film or vellum (translucent or tracing... paper) you have, check the label on the paper package. Some papers require more heat to the paper. It then applies heat so that the toner melts and fuses to fuse well, others less. Type of...
Operating Instructions
Page 20
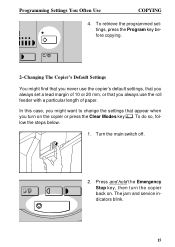
...'s default settings, that you always set a lead margin of 10 or 20 mm, or that you never use the roll feeder with a particular length of paper. In this case, you might find that you turn the copier back on the copier or press the Clear Modes key . Turn the main switch...
...'s default settings, that you always set a lead margin of 10 or 20 mm, or that you never use the roll feeder with a particular length of paper. In this case, you might find that you turn the copier back on the copier or press the Clear Modes key . Turn the main switch...
Operating Instructions
Page 21
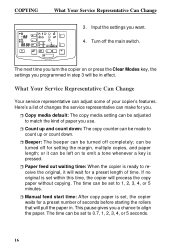
...Beeper: The beeper can be left on or press the Clear Modes key, the settings you want. can be made to match the kind of paper you use. ceive the original, it can be in effect. Input the settings you programmed in . Turn off the main switch. F Count up...a preset length of seconds before starting the rollers that will wait for you a chance to 1, 2, 3, 4, or 5 minutes. F Manual feed start time: After copy paper is set , the copier waits for a preset number of time. What Your Service Representative Can Change Your service representative can be set to 0.7, 1, 2, 3, 4, or ...
...Beeper: The beeper can be left on or press the Clear Modes key, the settings you want. can be made to match the kind of paper you use. ceive the original, it can be in effect. Input the settings you programmed in . Turn off the main switch. F Count up...a preset length of seconds before starting the rollers that will wait for you a chance to 1, 2, 3, 4, or 5 minutes. F Manual feed start time: After copy paper is set , the copier waits for a preset number of time. What Your Service Representative Can Change Your service representative can be set to 0.7, 1, 2, 3, 4, or ...
Operating Instructions
Page 22
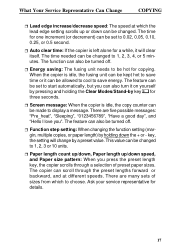
...Screen message: When the copier is idle, the copy counter can be changed. There are many sets of preset paper sizes. F Paper length count up/down, Paper length up/down speed, and Paper size pattern: When you press the preset length key, the copier scrolls through a selection of sizes from which the... time: If the copier is idle, the fusing unit can also be allowed to cool to 1, 2, 3, 4, or 5 minutes. gin, multiple copies, or paper length) by a preset value. When the copier is left alone for details. 17 This value can be hot for one increment (or decrement) can be...
...Screen message: When the copier is idle, the copy counter can be changed. There are many sets of preset paper sizes. F Paper length count up/down, Paper length up/down speed, and Paper size pattern: When you press the preset length key, the copier scrolls through a selection of sizes from which the... time: If the copier is idle, the fusing unit can also be allowed to cool to 1, 2, 3, 4, or 5 minutes. gin, multiple copies, or paper length) by a preset value. When the copier is left alone for details. 17 This value can be hot for one increment (or decrement) can be...

Operating Instructions
Page 28
...top unit of the roll feeder. 2. a) Hold the handles on to side and gently pull the paper out of the lock. c) Raise the unit just a bit. b) Squeeze and hold the lock...3. d) Hold on each side. Open the top and bottom covers of the roll feeder. If there is paper left . Ask for help if you think you should be careful when loading one. e) Raise the unit ...roll, and finally load the new roll into the roll feeder. Loading A Roll Of Paper MAINTAINING YOUR COPIER Loading A Roll Of Paper When the load paper indicator lights, it . 1. Don't strain yourself. You'll need it 's time...
...top unit of the roll feeder. 2. a) Hold the handles on to side and gently pull the paper out of the lock. c) Raise the unit just a bit. b) Squeeze and hold the lock...3. d) Hold on each side. Open the top and bottom covers of the roll feeder. If there is paper left . Ask for help if you think you should be careful when loading one. e) Raise the unit ...roll, and finally load the new roll into the roll feeder. Loading A Roll Of Paper MAINTAINING YOUR COPIER Loading A Roll Of Paper When the load paper indicator lights, it . 1. Don't strain yourself. You'll need it 's time...

Operating Instructions
Page 29
Remove the spool. 6. MAINTAINING YOUR COPIER Loading A Roll Of Paper 4. Throw the old roll away. 7. Flip the two latches on the spool and pull the spool out of the paper spool. 5. Press and hold the lock on the spool and insert the spool into a new roll. 24 Press and hold the lock on each side of the roll.
Remove the spool. 6. MAINTAINING YOUR COPIER Loading A Roll Of Paper 4. Throw the old roll away. 7. Flip the two latches on the spool and pull the spool out of the paper spool. 5. Press and hold the lock on the spool and insert the spool into a new roll. 24 Press and hold the lock on each side of the roll.

Operating Instructions
Page 30
Loading A Roll Of Paper MAINTAINING YOUR COPIER 8. While holding the lock down, align the paper roll with the marks on the spool. 9. Load the spool back in place. 11. Make sure the paper is pushed all the way in the grooves and flip the two latches back in the roll feeder so that the paper comes off the roll from the front, not from the rear, as shown below. 10. Pull the leading edge of the paper roll and slide the paper into the slot just under the top unit locks. Make sure the spool is aligned with the size marks on the unit. 25
Loading A Roll Of Paper MAINTAINING YOUR COPIER 8. While holding the lock down, align the paper roll with the marks on the spool. 9. Load the spool back in place. 11. Make sure the paper is pushed all the way in the grooves and flip the two latches back in the roll feeder so that the paper comes off the roll from the front, not from the rear, as shown below. 10. Pull the leading edge of the paper roll and slide the paper into the slot just under the top unit locks. Make sure the spool is aligned with the size marks on the unit. 25

Operating Instructions
Page 31
e) Lower the unit until it locks in . 13. c) Lower the unit just a bit. Spin the paper roll a bit to side and gently pull the paper out of the copier. 16. a) Hold the two handles. Close the roll feeder covers. 26 Lower the top unit of the lock. b) Squeeze and hold the lock on the right side to the unit, but let go of the roll feeder. d) Hold on to bring the paper further in place. 14. Slide the blade from side to tighten the paper. 15. MAINTAINING YOUR COPIER Loading A Roll Of Paper 12. Turn the wheel on the left.
e) Lower the unit until it locks in . 13. c) Lower the unit just a bit. Spin the paper roll a bit to side and gently pull the paper out of the copier. 16. a) Hold the two handles. Close the roll feeder covers. 26 Lower the top unit of the lock. b) Squeeze and hold the lock on the right side to the unit, but let go of the roll feeder. d) Hold on to bring the paper further in place. 14. Slide the blade from side to tighten the paper. 15. MAINTAINING YOUR COPIER Loading A Roll Of Paper 12. Turn the wheel on the left.

Operating Instructions
Page 33
...indicators shown below ; See page 20. TROUBLESHOOTING If Something Goes Wrong If you have problems with your copier, consult the following section. The paper roll is empty, or almost empty. Call your technical service center. Wait. If a service indicator lights up, read the section below appears... on for a complete list of paper. The used toner bottle. What to the appropriate page and follow the instructions described there. The toner cartridge is finished. What appears What ...
...indicators shown below ; See page 20. TROUBLESHOOTING If Something Goes Wrong If you have problems with your copier, consult the following section. The paper roll is empty, or almost empty. Call your technical service center. Wait. If a service indicator lights up, read the section below appears... on for a complete list of paper. The used toner bottle. What to the appropriate page and follow the instructions described there. The toner cartridge is finished. What appears What ...

Operating Instructions
Page 35
If sheet paper is jammed in the feed-in the copier. 3. Squeeze the locks on each side of paper in slot 1. Close the original table. Close the unit. Press firmly on both sides until it clicks into place. 30 Do not leave any scraps of the copier and lift the unit. 2. Press firmly on both sides until it clicks into place. Pull out the copy paper. TROUBLESHOOTING If Jams Occur 3.
If sheet paper is jammed in the feed-in the copier. 3. Squeeze the locks on each side of paper in slot 1. Close the original table. Close the unit. Press firmly on both sides until it clicks into place. 30 Do not leave any scraps of the copier and lift the unit. 2. Press firmly on both sides until it clicks into place. Pull out the copy paper. TROUBLESHOOTING If Jams Occur 3.

Operating Instructions
Page 36
If Jams Occur TROUBLESHOOTING If sheet paper is jammed at the paper exit 1. Do not touch any parts under the fusing cover. Close the unit and all covers. Squeeze the locks on both sides until the fusing ... table and the copy table. 2. CAUTION: The fusing unit can be very hot. If necessary, wait until it clicks into place. 31 Slowly pull the paper out. Open the fusing unit cover.
If Jams Occur TROUBLESHOOTING If sheet paper is jammed at the paper exit 1. Do not touch any parts under the fusing cover. Close the unit and all covers. Squeeze the locks on both sides until the fusing ... table and the copy table. 2. CAUTION: The fusing unit can be very hot. If necessary, wait until it clicks into place. 31 Slowly pull the paper out. Open the fusing unit cover.


