Manual
Page 2
...unit yet. Ì After you use with the following list. It contains important information related to install the color photo conductor unit. When lifting the printer, use the machine in a confined space, confirm that has an air turnover of the bag, quickly install ... Cartridge (Cyan) Toner Cartridge (Magenta) Photo Conductor Unit (Black) Photo Conductor Unit (Color) Ferrite Core (2) Additional Documents Remove the plastic bag. ZHBH680E Check the locations for Installing the Printer Leave enough space around Photo Conductor Unit by at least two people. ZHBH681E ZHBH370E Push ...
...unit yet. Ì After you use with the following list. It contains important information related to install the color photo conductor unit. When lifting the printer, use the machine in a confined space, confirm that has an air turnover of the bag, quickly install ... Cartridge (Cyan) Toner Cartridge (Magenta) Photo Conductor Unit (Black) Photo Conductor Unit (Color) Ferrite Core (2) Additional Documents Remove the plastic bag. ZHBH680E Check the locations for Installing the Printer Leave enough space around Photo Conductor Unit by at least two people. ZHBH681E ZHBH370E Push ...

Manual
Page 3
... you want to fasten the toner cartridge. "Menu" appears on the printer. Ready ZHBH910E ZHBY060E ZHBH030E Plug the other color toner cartridges. Important Ì Do not open . ZHBH470E Check the toner color and location are correct, and then insert the toner cartridge vertically and slowly...the Bypass Tray is not necessary for each toner cartridge by reading the labels on the panel display. "Ready" appears on the printer. ZHBH441E Hold the toner cartridge horizontally as an example. Push the toner cartridge in receiving an electric shock. Caution • When...
... you want to fasten the toner cartridge. "Menu" appears on the printer. Ready ZHBH910E ZHBY060E ZHBH030E Plug the other color toner cartridges. Important Ì Do not open . ZHBH470E Check the toner color and location are correct, and then insert the toner cartridge vertically and slowly...the Bypass Tray is not necessary for each toner cartridge by reading the labels on the panel display. "Ready" appears on the printer. ZHBH441E Hold the toner cartridge horizontally as an example. Push the toner cartridge in receiving an electric shock. Caution • When...

Manual
Page 4
... error messages, see if an error message appears on the panel display. ADJUSTING THE IMAGE DENSITY To use the printer in the Maintenance Guide. Compare the colors on the Image Density Adjusting Card. Important Ì The parallel cable is on, turn it is not provided ...you want to provide the interface cable appropriate for the computer that "Config.Page" is not on the printer if it is in the illustration. y Connecting the printer to select the color you are using a network interface cable. Note Ì Do not use a shielded cable. Max. ...
... error messages, see if an error message appears on the panel display. ADJUSTING THE IMAGE DENSITY To use the printer in the Maintenance Guide. Compare the colors on the Image Density Adjusting Card. Important Ì The parallel cable is on, turn it is not provided ...you want to provide the interface cable appropriate for the computer that "Config.Page" is not on the printer if it is in the illustration. y Connecting the printer to select the color you are using a network interface cable. Note Ì Do not use a shielded cable. Max. ...
Manual
Page 8
... 11 Network Standard Model Exterior: Rear View 12 Inside...13 Control Panel ...14 2. Getting Started Features of this Printer 9 Guide to Take When Cleaning 47 Adjusting the Color Registration 48 Adjusting the Image Density 49 Adjusting the Tray Registration 51 i Replacing Consumables and Maintenance Kit Toner Cartridge ...Unit Type 125 38 Intermediate Transfer Unit Type 125 42 4. Paper and Other Media Paper and Other Media Supported by This Printer 15 Paper Sizes...15 Paper Recommendations 18 Loading Paper ...22 Loading Paper in Tray 1/Optional Paper Feed Unit 22 Loading Paper ...
... 11 Network Standard Model Exterior: Rear View 12 Inside...13 Control Panel ...14 2. Getting Started Features of this Printer 9 Guide to Take When Cleaning 47 Adjusting the Color Registration 48 Adjusting the Image Density 49 Adjusting the Tray Registration 51 i Replacing Consumables and Maintenance Kit Toner Cartridge ...Unit Type 125 38 Intermediate Transfer Unit Type 125 42 4. Paper and Other Media Paper and Other Media Supported by This Printer 15 Paper Sizes...15 Paper Recommendations 18 Loading Paper ...22 Loading Paper in Tray 1/Optional Paper Feed Unit 22 Loading Paper ...

Manual
Page 18
Also, by using induction-heating technology in full color. Getting Started Features of 20 pages per minute (ppm) in black and white and 16 ppm in the fusing unit, a short warm-up minimum space. This printer is as compact as a USB 2.0 interface or wireless LAN ...; High Image Quality True 1200 x 1200 dpi resolution provides high resolution. The printer performs duplex printing at all times. ❖ High Performance By using induction-heating technology in automatic color registration function assures high image quality at the same speed as simplex printing with the single...
Also, by using induction-heating technology in full color. Getting Started Features of 20 pages per minute (ppm) in black and white and 16 ppm in the fusing unit, a short warm-up minimum space. This printer is as compact as a USB 2.0 interface or wireless LAN ...; High Image Quality True 1200 x 1200 dpi resolution provides high resolution. The printer performs duplex printing at all times. ❖ High Performance By using induction-heating technology in automatic color registration function assures high image quality at the same speed as simplex printing with the single...

Manual
Page 22
Photo Conductor Unit Color/Black When "Replace Color PCU" or "Replace Black PCU" appears on paper. Transfer Belt When "Replace Transfer Belt" appears on the panel display, replace this roller. 3. Waste Toner Bottle Collects waste toner. Duplex Unit (optional for Basic Model Printer) Use to the Printer 1 4 5 6 7 1. Transfer Roller When "Replace Fusing Unit" appears on...
Photo Conductor Unit Color/Black When "Replace Color PCU" or "Replace Black PCU" appears on paper. Transfer Belt When "Replace Transfer Belt" appears on the panel display, replace this roller. 3. Waste Toner Bottle Collects waste toner. Duplex Unit (optional for Basic Model Printer) Use to the Printer 1 4 5 6 7 1. Transfer Roller When "Replace Fusing Unit" appears on...

Manual
Page 32
... inside the tray. face 2 B Remove the paper. per size you want to the paper size you want to the pa- ZHBY060E E Load paper into the printer. F Slide the paper tray completely into the paper tray, with the print side up. A Pull the paper tray out of the... printer until it on a flat sur- cial Paper, Color Paper, Letterhead, Preprinted, Prepunched, Bond Paper, Cardstock 23 ZHBY010E ZHBY030E C Press "Push", and then adjust the rear guide to load. You can perform...
... inside the tray. face 2 B Remove the paper. per size you want to the paper size you want to the pa- ZHBY060E E Load paper into the printer. F Slide the paper tray completely into the paper tray, with the print side up. A Pull the paper tray out of the... printer until it on a flat sur- cial Paper, Color Paper, Letterhead, Preprinted, Prepunched, Bond Paper, Cardstock 23 ZHBY010E ZHBY030E C Press "Push", and then adjust the rear guide to load. You can perform...
Manual
Page 36
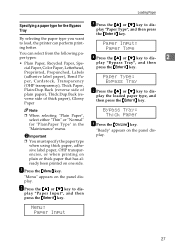
...", select either "Thin" or "Normal" for the Bypass Tray C Press the {U} or {T} key to dis- 2 • Plain Paper, Recycled Paper, Special Paper, Color Paper, Letterhead, play "Bypass Tray", and then press the {Enter #} key. play the loaded paper type, and then press the {Enter #} key. By selecting the... paper type you want to load, the printer can select from the following paper types: D Press the {U} or {T} key to dis- "Menu" appears on the panel display. play "Paper Type", and...
...", select either "Thin" or "Normal" for the Bypass Tray C Press the {U} or {T} key to dis- 2 • Plain Paper, Recycled Paper, Special Paper, Color Paper, Letterhead, play "Bypass Tray", and then press the {Enter #} key. play the loaded paper type, and then press the {Enter #} key. By selecting the... paper type you want to load, the printer can select from the following paper types: D Press the {U} or {T} key to dis- "Menu" appears on the panel display. play "Paper Type", and...
Manual
Page 38
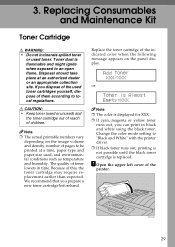
... and the toner cartridge out of reach of children. Toner dust is flammable and might ignite when exposed to "Black and White" with the printer driver. ❒ If black toner runs out, printing is not possible until the black toner cartridge is displayed for XXX. ❒ If ... collection site. Add Toner XXX/XXX or Toner is Almost Empty:XXX Note ❒ The color is replaced. If you prepare a new toner cartridge beforehand. Because of the printer. ZHBH440E 29 Change the color mode setting to an open flame. Note ❒ The actual printable numbers vary depending on...
... and the toner cartridge out of reach of children. Toner dust is flammable and might ignite when exposed to "Black and White" with the printer driver. ❒ If black toner runs out, printing is not possible until the black toner cartridge is displayed for XXX. ❒ If ... collection site. Add Toner XXX/XXX or Toner is Almost Empty:XXX Note ❒ The color is replaced. If you prepare a new toner cartridge beforehand. Because of the printer. ZHBH440E 29 Change the color mode setting to an open flame. Note ❒ The actual printable numbers vary depending on...
Manual
Page 45
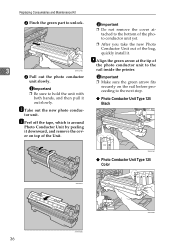
... unlock. Important ❒ Do not remove the cover attached to the 3 ZHBHa910E rail inside the printer. G Peel off the tape, which is around Photo Conductor Unit by peeling it . ZHBH370E ❖ Photo Conductor Unit Type 125 Color ZHBH681E 36 ZHBHA680E ZHBH380E H Align the green arrow at the tip of the Unit. both...
... unlock. Important ❒ Do not remove the cover attached to the 3 ZHBHa910E rail inside the printer. G Peel off the tape, which is around Photo Conductor Unit by peeling it . ZHBH370E ❖ Photo Conductor Unit Type 125 Color ZHBH681E 36 ZHBHA680E ZHBH380E H Align the green arrow at the tip of the Unit. both...

Manual
Page 57
.... 4 A Press the {Menu} key. Press # To Adjust D Press the {Enter #} key. Automatic color adjustment takes about two minutes. Cleaning and Adjusting the Printer Adjusting the Color Registration When the printer is moved, when the Fusing Unit is displayed. By performing color registration adjustment, you can maintain optimum print results. The following message appears. ZHBS010E "Menu...
.... 4 A Press the {Menu} key. Press # To Adjust D Press the {Enter #} key. Automatic color adjustment takes about two minutes. Cleaning and Adjusting the Printer Adjusting the Color Registration When the printer is moved, when the Fusing Unit is displayed. By performing color registration adjustment, you can maintain optimum print results. The following message appears. ZHBS010E "Menu...
Manual
Page 58
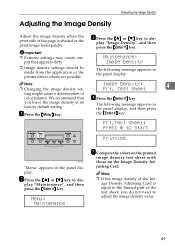
...; Changing the image density set- you do not need to adjust the image density value. 49 the {Enter #} key. Menu: Maintenance E Compare the colors on the printed image density test sheet with those on the panel display. put that D Press the {Enter #} key. Maintenance: Image Density The following ...; Extreme settings may create out- We recommend that appears dirty. ❒ Image density settings should be made from the application or the printer driver whenever possible. play "Image Density", and then press the {Enter #} key. Note ❒ If the image density of...
...; Changing the image density set- you do not need to adjust the image density value. 49 the {Enter #} key. Menu: Maintenance E Compare the colors on the printed image density test sheet with those on the panel display. put that D Press the {Enter #} key. Maintenance: Image Density The following ...; Extreme settings may create out- We recommend that appears dirty. ❒ Image density settings should be made from the application or the printer driver whenever possible. play "Image Density", and then press the {Enter #} key. Note ❒ If the image density of...
Manual
Page 59
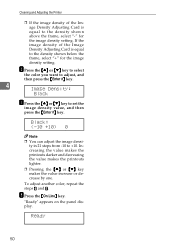
... in 21 steps from -10 to set the image density value, and then press the {Enter #} key. To adjust another color, repeat the steps F and G. F Press the {U} or {T} key to select the color you want to adjust, and then press the {Enter #} key. 4 Image Density: Black G Press the {U} or {T} ...; Pressing the {U} or {T} key makes the value increase or decrease by one. H Press the {On Line} key. Ready 50 Cleaning and Adjusting the Printer ❒ If the image density of the Image Density Adjusting Card is equal to the density shown above the frame, select "-" for the image density...
... in 21 steps from -10 to set the image density value, and then press the {Enter #} key. To adjust another color, repeat the steps F and G. F Press the {U} or {T} key to select the color you want to adjust, and then press the {Enter #} key. 4 Image Density: Black G Press the {U} or {T} ...; Pressing the {U} or {T} key makes the value increase or decrease by one. H Press the {On Line} key. Ready 50 Cleaning and Adjusting the Printer ❒ If the image density of the Image Density Adjusting Card is equal to the density shown above the frame, select "-" for the image density...
Manual
Page 62
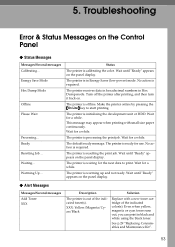
.... Wait for a while. The printer is waiting for a while. The printer is ready for a while. Ready Resetting Job... Warming Up... No action is calibrating the color. The printer is resetting the print job. The printer is processing the print job. The printer is initializing the development unit or ...magenta or cyan toner runs out, you can print in Hex Dump mode. The printer is required. No action is offline. The printer is out of the indicated color(s). Make the printer online by pressing the {On Line} key to print. Wait for the next data...
.... Wait for a while. The printer is waiting for a while. The printer is ready for a while. Ready Resetting Job... Warming Up... No action is calibrating the color. The printer is resetting the print job. The printer is processing the print job. The printer is initializing the development unit or ...magenta or cyan toner runs out, you can print in Hex Dump mode. The printer is required. No action is offline. The printer is out of the indicated color(s). Make the printer online by pressing the {On Line} key to print. Wait for the next data...
Manual
Page 63
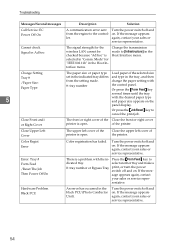
... on. Hardware Problem Black PCU An error has occurred in the Host Interface menu. Close the upper left cover of the printer is selected in "Comm. Color Regist Error Color registration has failed. Cannot check Signal in Ad hoc The signal strength for "IEEE 802.11b" in the Host Interface menu.... Close Front and/ or Right Cover The front or right cover of the Close the front or right cover printer is a problem ...
... on. Hardware Problem Black PCU An error has occurred in the Host Interface menu. Close the upper left cover of the printer is selected in "Comm. Color Regist Error Color registration has failed. Cannot check Signal in Ad hoc The signal strength for "IEEE 802.11b" in the Host Interface menu.... Close Front and/ or Right Cover The front or right cover of the Close the front or right cover printer is a problem ...
Manual
Page 64
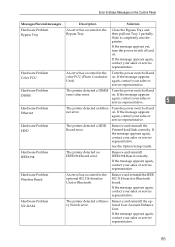
... representative. Remove and reinstall IEEE1394 Board correctly. If the message appears again, contact your sales or service representative. Hardware Problem Color PCU An error has occurred in the optional 802.11b Interface Unit or Bluetooth. If the message appears again, contact your ... HDD Board error. Remove and reinstall the Printer Hard Disk correctly. If the message appears again, contact your sales or service representative. See the Option Setup Guide. Hardware Problem Wireless Board An error has occurred in the color PCU (Photo Conductor Unit). If the message...
... representative. Remove and reinstall IEEE1394 Board correctly. If the message appears again, contact your sales or service representative. Hardware Problem Color PCU An error has occurred in the optional 802.11b Interface Unit or Bluetooth. If the message appears again, contact your ... HDD Board error. Remove and reinstall the Printer Hard Disk correctly. If the message appears again, contact your sales or service representative. See the Option Setup Guide. Hardware Problem Wireless Board An error has occurred in the color PCU (Photo Conductor Unit). If the message...
Manual
Page 66
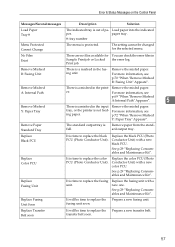
Print job. Remove Misfeed A: Internal Path There is a misfeed in the input tray, or the printer is not feeding paper. For more information, see p.70 "When "Remove Misfeed B: Fusing Unit" Appears". See p.29 "Replacing Consumables and Maintenance Kit". Replace...See p.29 "Replacing Consumables and Maintenance Kit". Replace Transfer Belt soon It will be time to replace the fusing unit. Remove the misfed paper. Replace Color PCU It is out of pa- transfer belt soon. 57 See p.29 "Replacing Consumables and Maintenance Kit". Error & Status Messages on the Control Panel...
Print job. Remove Misfeed A: Internal Path There is a misfeed in the input tray, or the printer is not feeding paper. For more information, see p.70 "When "Remove Misfeed B: Fusing Unit" Appears". See p.29 "Replacing Consumables and Maintenance Kit". Replace...See p.29 "Replacing Consumables and Maintenance Kit". Replace Transfer Belt soon It will be time to replace the fusing unit. Remove the misfed paper. Replace Color PCU It is out of pa- transfer belt soon. 57 See p.29 "Replacing Consumables and Maintenance Kit". Error & Status Messages on the Control Panel...
Manual
Page 74
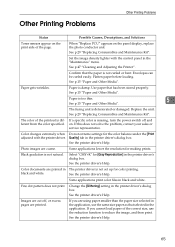
... the unit. If this does not solve the problem, contact your sales or service representative. Color documents are coarse. Some applications print color files in the printer driver's dialog box. Other Printing Problems Other Printing Problems Status Possible Causes, Descriptions, and Solutions...excess pages are using paper smaller than the paper size selected in The printer driver is different from the color specified. See the printer driver's Help. 65 Quality] tab in the printer driver's dialog box. Black gradation is deteriorated or damaged. Paper gets ...
... the unit. If this does not solve the problem, contact your sales or service representative. Color documents are coarse. Some applications print color files in the printer driver's dialog box. Other Printing Problems Other Printing Problems Status Possible Causes, Descriptions, and Solutions...excess pages are using paper smaller than the paper size selected in The printer driver is different from the color specified. See the printer driver's Help. 65 Quality] tab in the printer driver's dialog box. Black gradation is deteriorated or damaged. Paper gets ...
Manual
Page 76
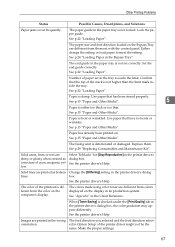
... unit is checked under the [Print Quality] tab in the printer driver's dialog box, the color gradation may appear differently. When [Toner Saving] is deteriorated or damaged. ed in the printer driver's dialog box. The paper guide in the printer driver's dialog lines. See p.22 "Loading Paper". See ... lines are different from them . The colors made using color toner are shiny or glossy when created as broken Change the [Dithering] setting in the paper tray is either too thick or too thin. Make the proper settings. 67 See the printer driver's Help. See p.22 "Loading ...
... unit is checked under the [Print Quality] tab in the printer driver's dialog box, the color gradation may appear differently. When [Toner Saving] is deteriorated or damaged. ed in the printer driver's dialog box. The paper guide in the printer driver's dialog lines. See p.22 "Loading Paper". See ... lines are different from them . The colors made using color toner are shiny or glossy when created as broken Change the [Dithering] setting in the paper tray is either too thick or too thin. Make the proper settings. 67 See the printer driver's Help. See p.22 "Loading ...
Manual
Page 86
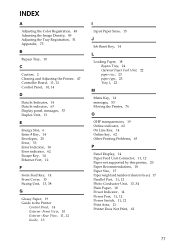
INDEX A Adjusting the Color Registration, 48 Adjusting the Image Density, 49 Adjusting the Tray Registration, 51 Appendix, 75 B Bypass Tray, 10 C Caution, 2 Clearing and Adjusting the Printer, 47 Controller Board, 11, 12 Control Panel, 10, 14 D Data In Indicator, 14 Data In indicator, 63 Display panel, messages, 53 Duplex ... Bypass Tray, 24 Optional Paper Feed Unit, 22 paper size, 23 paper type, 23 Tray 1, 22 M Menu Key, 14 messages, 53 Moving the Printer, 76 O OHP transparencies, 19 Online indicator, 62 On Line Key, 14 Online key, 62 Other Printing Problems, 65 P Panel Display, 14 Paper Feed...
INDEX A Adjusting the Color Registration, 48 Adjusting the Image Density, 49 Adjusting the Tray Registration, 51 Appendix, 75 B Bypass Tray, 10 C Caution, 2 Clearing and Adjusting the Printer, 47 Controller Board, 11, 12 Control Panel, 10, 14 D Data In Indicator, 14 Data In indicator, 63 Display panel, messages, 53 Duplex ... Bypass Tray, 24 Optional Paper Feed Unit, 22 paper size, 23 paper type, 23 Tray 1, 22 M Menu Key, 14 messages, 53 Moving the Printer, 76 O OHP transparencies, 19 Online indicator, 62 On Line Key, 14 Online key, 62 Other Printing Problems, 65 P Panel Display, 14 Paper Feed...


