Manual
Page 1
... the network interface cable. u Getting Started u Paper and Other Media u Replacing Consumables and Maintenace Kit u Cleaning and Adjusting the Printer u Troubleshooting G081-6500 Printed in the [General Preference] dialog box that appears. Windows / Macintosh [Language] option setup mainte Icons ... Configuration u NetWare Configuration u Using SmartNetMonitor for Admin u Using a Web Browser u Monitoring and Configuring the Printer u Making Printer Settings with the control panel. Windows MANUAL.EXE Macintosh manual Printed manuals are also included as a print server and making...
... the network interface cable. u Getting Started u Paper and Other Media u Replacing Consumables and Maintenace Kit u Cleaning and Adjusting the Printer u Troubleshooting G081-6500 Printed in the [General Preference] dialog box that appears. Windows / Macintosh [Language] option setup mainte Icons ... Configuration u NetWare Configuration u Using SmartNetMonitor for Admin u Using a Web Browser u Monitoring and Configuring the Printer u Making Printer Settings with the control panel. Windows MANUAL.EXE Macintosh manual Printed manuals are also included as a print server and making...
Manual
Page 2
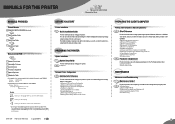
... CHECKING THE CONTENTS OF THE BOX Caution • To prevent an injury, this printer in a large well ventilated room that in event of the box according to install the color photo conductor unit. To avoid possible build-up . Check the contents of an emergency... Option Setup Guide CD-ROM "Printer Drivers and Utilities" CD-ROM "Operating Instructions" CD-ROM "DeskTopBinder V2 Lite" Power Cable Toner Cartridge (Black) Toner Cartridge (Yellow) Toner Cartridge (Cyan) Toner Cartridge (Magenta) Photo Conductor Unit (Black) Photo Conductor Unit (Color) Ferrite Core (2) Additional Documents...
... CHECKING THE CONTENTS OF THE BOX Caution • To prevent an injury, this printer in a large well ventilated room that in event of the box according to install the color photo conductor unit. To avoid possible build-up . Check the contents of an emergency... Option Setup Guide CD-ROM "Printer Drivers and Utilities" CD-ROM "Operating Instructions" CD-ROM "DeskTopBinder V2 Lite" Power Cable Toner Cartridge (Black) Toner Cartridge (Yellow) Toner Cartridge (Cyan) Toner Cartridge (Magenta) Photo Conductor Unit (Black) Photo Conductor Unit (Color) Ferrite Core (2) Additional Documents...

Manual
Page 3
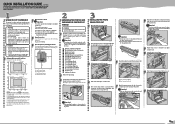
...upper left cover of this may spill. Menu: Paper Input Press the {v} or {w} key to select a language. "Ready" appears on the back of the printer. ZHBH470E Check the toner color and location are correct, and then insert the toner cartridge vertically and slowly. Pull the paper tray out of the... printer until it strongly. Remove the adhesive tape and packing material. Load paper into the paper tray with wet hands. Slide the paper tray ...
...upper left cover of this may spill. Menu: Paper Input Press the {v} or {w} key to select a language. "Ready" appears on the back of the printer. ZHBH470E Check the toner color and location are correct, and then insert the toner cartridge vertically and slowly. Pull the paper tray out of the... printer until it strongly. Remove the adhesive tape and packing material. Load paper into the paper tray with wet hands. Slide the paper tray ...

Manual
Page 4
... . Maintenance: Image Density The following massage appears on the Image Density Adjusting Card. Press the {v} or {w} key to select the color you cannot check the connection between the printer and the computer by printing the test page. To adjust another image density test sheet and check if the...display "Image Density", and then press the {Enter #} key. Black (-10 +10) 0 Note Ì You can check if the printer works properly by one. Print another color, repeat the steps to display "Maintenance", and then press the {Enter #} key. If they still do not match, adjust the image ...
... . Maintenance: Image Density The following massage appears on the Image Density Adjusting Card. Press the {v} or {w} key to select the color you cannot check the connection between the printer and the computer by printing the test page. To adjust another image density test sheet and check if the...display "Image Density", and then press the {Enter #} key. Black (-10 +10) 0 Note Ì You can check if the printer works properly by one. Print another color, repeat the steps to display "Maintenance", and then press the {Enter #} key. If they still do not match, adjust the image ...
Manual
Page 5
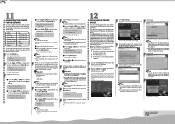
...environment, go to set the value for DHCP Off. ³ Press {v} or {w} to ]. Ì For parallel connection, select the printer whose printer port is English. Copyright © 2002 G081-6520 Printed in the [License Agreement] dialog box. DHCP IP Address Subnet Mask Gateway Address ...IP protocol is the items you use this case, restart your computer to install PCL5c and RPCS printer drivers.To install the PostScript 3 printer driver, click the [PostScript 3 printer driver] button. The software license agreement appears in The Netherlands EE GB When all of the setting...
...environment, go to set the value for DHCP Off. ³ Press {v} or {w} to ]. Ì For parallel connection, select the printer whose printer port is English. Copyright © 2002 G081-6520 Printed in the [License Agreement] dialog box. DHCP IP Address Subnet Mask Gateway Address ...IP protocol is the items you use this case, restart your computer to install PCL5c and RPCS printer drivers.To install the PostScript 3 printer driver, click the [PostScript 3 printer driver] button. The software license agreement appears in The Netherlands EE GB When all of the setting...

Manual
Page 6
Operating Instructions Maintenance Guide Getting Started Paper and Other Media Replacing Consumables and Maintenance Kit Cleaning and Adjusting the Printer Troubleshooting Appendix For safety, please read this manual carefully before you use this product and keep it handy for future reference.
Operating Instructions Maintenance Guide Getting Started Paper and Other Media Replacing Consumables and Maintenance Kit Cleaning and Adjusting the Printer Troubleshooting Appendix For safety, please read this manual carefully before you use this product and keep it handy for future reference.
Manual
Page 7
... in this manual. Direct (or indirect reflected) eye contact with your office products. The laser subsystem is required. This printer contains a laser beam generator and direct exposure to laser beams can only be sure to connect the power cable to the factory or service depot ...as a result of handling or operating the machine. Do not attempt any possible laser beam exposure to change without prior notice. Introduction This manual contains detailed instructions on the back of the printer. Caution: Use of controls or adjustment or performance of size notation are subject...
... in this manual. Direct (or indirect reflected) eye contact with your office products. The laser subsystem is required. This printer contains a laser beam generator and direct exposure to laser beams can only be sure to connect the power cable to the factory or service depot ...as a result of handling or operating the machine. Do not attempt any possible laser beam exposure to change without prior notice. Introduction This manual contains detailed instructions on the back of the printer. Caution: Use of controls or adjustment or performance of size notation are subject...
Manual
Page 8
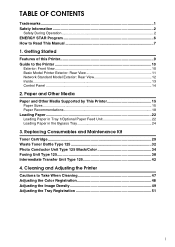
... Loading Paper ...22 Loading Paper in Tray 1/Optional Paper Feed Unit 22 Loading Paper in the Bypass Tray 24 3. Cleaning and Adjusting the Printer Cautions to Read This Manual 7 1. TABLE OF CONTENTS Trademarks...1 Safety Information 2 Safety During Operation 2 ENERGY STAR Program 6 How to Take...Type 125 32 Photo Conductor Unit Type 125 Black/Color 34 Fusing Unit Type 125 38 Intermediate Transfer Unit Type 125 42 4. Getting Started Features of this Printer 9 Guide to the Printer 10 Exterior: Front View 10 Basic Model Printer Exterior: Rear View 11 Network Standard Model Exterior...
... Loading Paper ...22 Loading Paper in Tray 1/Optional Paper Feed Unit 22 Loading Paper in the Bypass Tray 24 3. Cleaning and Adjusting the Printer Cautions to Read This Manual 7 1. TABLE OF CONTENTS Trademarks...1 Safety Information 2 Safety During Operation 2 ENERGY STAR Program 6 How to Take...Type 125 32 Photo Conductor Unit Type 125 Black/Color 34 Fusing Unit Type 125 38 Intermediate Transfer Unit Type 125 42 4. Getting Started Features of this Printer 9 Guide to the Printer 10 Exterior: Front View 10 Basic Model Printer Exterior: Rear View 11 Network Standard Model Exterior...
Manual
Page 9
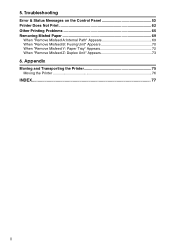
Troubleshooting Error & Status Messages on the Control Panel 53 Printer Does Not Print 62 Other Printing Problems 65 Removing Misfed Paper 69 When "Remove Misfeed A:Internal Path" Appears 69 When "Remove Misfeed B: Fusing Unit" Appears 70 When "Remove Misfeed Y: Paper Tray" Appears 72 When "Remove Misfeed Z: Duplex Unit" Appears 73 6. Appendix Moving and Transporting the Printer 75 Moving the Printer ...76 INDEX...77 ii 5.
Troubleshooting Error & Status Messages on the Control Panel 53 Printer Does Not Print 62 Other Printing Problems 65 Removing Misfed Paper 69 When "Remove Misfeed A:Internal Path" Appears 69 When "Remove Misfeed B: Fusing Unit" Appears 70 When "Remove Misfeed Y: Paper Tray" Appears 72 When "Remove Misfeed Z: Duplex Unit" Appears 73 6. Appendix Moving and Transporting the Printer 75 Moving the Printer ...76 INDEX...77 ii 5.

Manual
Page 10
... those marks. For details, please contact your local dealer. 1 We disclaim any and all rights in the United States and/or other countries. IPS-PRINT Printer Language Emulation Copyright© 1999-2000 Oak Technology, Inc., All rights reserved. Other product names used herein are as follows: Microsoft® Windows® XP...
... those marks. For details, please contact your local dealer. 1 We disclaim any and all rights in the United States and/or other countries. IPS-PRINT Printer Language Emulation Copyright© 1999-2000 Oak Technology, Inc., All rights reserved. Other product names used herein are as follows: Microsoft® Windows® XP...

Manual
Page 11
Safety Information When using your printer, the following important symbols are used: R WARNING: Indicates a potentially hazardous situation which , if instructions are not followed, could result in minor or moderate injury or damage to property. 2 R CAUTION: Indicates a potentially hazardous situation which , if instructions are not followed, may result in death or serious injury. Safety During Operation In this manual, the following safety precautions should always be followed.
Safety Information When using your printer, the following important symbols are used: R WARNING: Indicates a potentially hazardous situation which , if instructions are not followed, could result in minor or moderate injury or damage to property. 2 R CAUTION: Indicates a potentially hazardous situation which , if instructions are not followed, may result in death or serious injury. Safety During Operation In this manual, the following safety precautions should always be followed.
Manual
Page 13
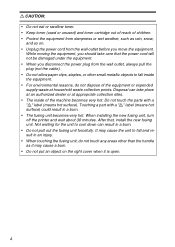
While moving the equipment, you move the equipment. Touching a part with a "v" label (means hot surface). When installing the new fusing unit, turn off the printer and wait about 30 minutes. Not waiting for the unit to fall inside the equipment. • For environmental reasons, do not dispose of the equipment ...
While moving the equipment, you move the equipment. Touching a part with a "v" label (means hot surface). When installing the new fusing unit, turn off the printer and wait about 30 minutes. Not waiting for the unit to fall inside the equipment. • For environmental reasons, do not dispose of the equipment ...

Manual
Page 14
... out, be careful not to sensitive medical implant devices. Lifting it carelessly or dropping it could be very hot. • To prevent an injury, this printer should hold the handles that are located on opposite sides, and then lift it slowly.
... out, be careful not to sensitive medical implant devices. Lifting it carelessly or dropping it could be very hot. • To prevent an injury, this printer should hold the handles that are located on opposite sides, and then lift it slowly.

Manual
Page 15
... office equipment to deal with environmental issues, such as Low-power mode. ❖ Low-power Mode (Energy Saver mode) This printer automatically lowers its power consumption 60 minutes after the last operation has been completed. The ENERGY STAR Guidelines intend to configure Energy Saver... mode, see "Making Printer Settings with Control Panel" in the Administrator Reference on the control panel. When a product meets the ENERGY STAR Guidelines for energy ...
... office equipment to deal with environmental issues, such as Low-power mode. ❖ Low-power Mode (Energy Saver mode) This printer automatically lowers its power consumption 60 minutes after the last operation has been completed. The ENERGY STAR Guidelines intend to configure Energy Saver... mode, see "Making Printer Settings with Control Panel" in the Administrator Reference on the control panel. When a product meets the ENERGY STAR Guidelines for energy ...

Manual
Page 18
... to spend time on the total printing time for fast printout when you don't need extra space or cover opening space. And, the printer can be installed in full color. Getting Started Features of 20 pages per minute (ppm) in black and white and 16 ppm in the..., we 've achieved short paper path architecture equivalent to the lowest level possible when idle. The printer also comes with the Interleave function installed. Also, by using induction-heating technology in automatic color registration function assures high image quality at the same speed as a USB 2.0 interface or wireless LAN...
... to spend time on the total printing time for fast printout when you don't need extra space or cover opening space. And, the printer can be installed in full color. Getting Started Features of 20 pages per minute (ppm) in black and white and 16 ppm in the..., we 've achieved short paper path architecture equivalent to the lowest level possible when idle. The printer also comes with the Interleave function installed. Also, by using induction-heating technology in automatic color registration function assures high image quality at the same speed as a USB 2.0 interface or wireless LAN...

Manual
Page 19
...3. Ventilator The ventilator helps to print onto thick paper, OHP transparencies, custom size paper, and envelopes as well as it may cause a printer malfunction due to 530 sheets of plain paper can be loaded. 10 Do not block the ventilator as plain paper. Tray 1 Up to overheating.... 4. Control Panel Contains keys for printer control and a panel display that shows the printer status. When printing on custom size paper , printer driver settings are required. 7. Standard Tray Output is stacked here with the print side down. 2....
...3. Ventilator The ventilator helps to print onto thick paper, OHP transparencies, custom size paper, and envelopes as well as it may cause a printer malfunction due to 530 sheets of plain paper can be loaded. 10 Do not block the ventilator as plain paper. Tray 1 Up to overheating.... 4. Control Panel Contains keys for printer control and a panel display that shows the printer status. When printing on custom size paper , printer driver settings are required. 7. Standard Tray Output is stacked here with the print side down. 2....
Manual
Page 20
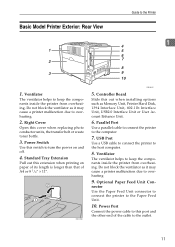
.... 11 Right Cover Open this switch to the Paper Feed Unit. 10. Do not block the ventilator as it may cause a printer malfunction due to keep the components inside the printer from overheating. Power Port Connect the power cable to this port and the other end of A4 or 8 1/2" × 11".... Use this cover when replacing photo conductor units, the transfer belt or waste toner bottle. 3. nector Use the Paper Feed Unit connector to connect the printer to turn the power on paper of its length is longer than that of the cable to the computer. 7. ZHBH700E ZHBH031E 5. USB Port Use a ...
.... 11 Right Cover Open this switch to the Paper Feed Unit. 10. Do not block the ventilator as it may cause a printer malfunction due to keep the components inside the printer from overheating. Power Port Connect the power cable to this port and the other end of A4 or 8 1/2" × 11".... Use this cover when replacing photo conductor units, the transfer belt or waste toner bottle. 3. nector Use the Paper Feed Unit connector to connect the printer to turn the power on paper of its length is longer than that of the cable to the computer. 7. ZHBH700E ZHBH031E 5. USB Port Use a ...
Manual
Page 21
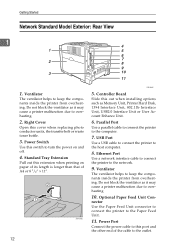
...1394 Interface Unit, 802.11b Interface Unit, USB2.0 Interface Unit or User Account Enhance Unit. 6. Parallel Port Use a parallel cable to connect the printer to the outlet. Optional Paper Feed Unit Con- Power Port Connect the power cable to this port and the other end of A4 or 8 ...and off. 4. Ventilator The ventilator helps to keep the components inside the printer from overheating. Getting Started Network Standard Model Exterior: Rear View 1 1 2 3 1. Do not block the ventilator as it may cause a printer malfunction due to turn the power on paper of its length is longer than...
...1394 Interface Unit, 802.11b Interface Unit, USB2.0 Interface Unit or User Account Enhance Unit. 6. Parallel Port Use a parallel cable to connect the printer to the outlet. Optional Paper Feed Unit Con- Power Port Connect the power cable to this port and the other end of A4 or 8 ...and off. 4. Ventilator The ventilator helps to keep the components inside the printer from overheating. Getting Started Network Standard Model Exterior: Rear View 1 1 2 3 1. Do not block the ventilator as it may cause a printer malfunction due to turn the power on paper of its length is longer than...

Manual
Page 22
... unit. 2. ZHBH040E 5. When "Replace Waste Toner" appears on the panel display, replace this bottle. 13 Duplex Unit (optional for Basic Model Printer) Use to the Printer 1 4 5 6 7 1. Toner Cartridges When "Add Toner (color)" appears on paper. Transfer Belt When "Replace Transfer Belt" appears on the panel display, replace this unit. 7. Inside 1 2 3 Guide to print...
... unit. 2. ZHBH040E 5. When "Replace Waste Toner" appears on the panel display, replace this bottle. 13 Duplex Unit (optional for Basic Model Printer) Use to the Printer 1 4 5 6 7 1. Toner Cartridges When "Add Toner (color)" appears on paper. Transfer Belt When "Replace Transfer Belt" appears on the panel display, replace this unit. 7. Inside 1 2 3 Guide to print...
Manual
Page 23
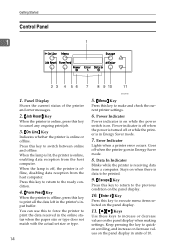
... in Energy Saver mode. 7. Panel Display Shows the current status of 10. When the lamp is off, the printer is in units of the printer and error messages. 2. {Job Reset} Key When the printer is online, press this key to quicken scrolling, and increase or decrease values on the panel display. 10. {Enter... #} Key Press this key to print all the data left in the printer's input buffer. Power indicator is off when the power is turned off when the printer goes in the online status when the paper size or type does not match with the actual set...
... in Energy Saver mode. 7. Panel Display Shows the current status of 10. When the lamp is off, the printer is in units of the printer and error messages. 2. {Job Reset} Key When the printer is online, press this key to quicken scrolling, and increase or decrease values on the panel display. 10. {Enter... #} Key Press this key to print all the data left in the printer's input buffer. Power indicator is off when the power is turned off when the printer goes in the online status when the paper size or type does not match with the actual set...


