User Guide
Page 3
... 3. Guide to the Machine How to Read This Manual...5 Introduction...5 Legal Prohibition...5 Disclaimer...5 Model-Specific Information...6 Guide to Components...7 Exterior...7 Interior...8 Control Panel...8 Installing the Driver and Software...11 Quick Install...11 Upgrading or Deleting the Printer Driver 11 Installing the Smart Organizing Monitor 12 What is Smart Organizing Monitor?...13 2.
... 3. Guide to the Machine How to Read This Manual...5 Introduction...5 Legal Prohibition...5 Disclaimer...5 Model-Specific Information...6 Guide to Components...7 Exterior...7 Interior...8 Control Panel...8 Installing the Driver and Software...11 Quick Install...11 Upgrading or Deleting the Printer Driver 11 Installing the Smart Organizing Monitor 12 What is Smart Organizing Monitor?...13 2.
User Guide
Page 7
..., special, incidental, or consequential damages as a guide only and is prohibited by local law: bank notes, revenue stamps, bonds, stock certificates, bank drafts, checks, passports, driver's licenses. Legal Prohibition Do not copy or print any questions concerning the legality of handling or operating the machine. If you use of size notation...
..., special, incidental, or consequential damages as a guide only and is prohibited by local law: bank notes, revenue stamps, bonds, stock certificates, bank drafts, checks, passports, driver's licenses. Legal Prohibition Do not copy or print any questions concerning the legality of handling or operating the machine. If you use of size notation...

User Guide
Page 12
It flashes when a print job is received and while printing or scanning is turned on. Alert Indicator This indicator lights up blue when the machine is in progress. 9. 1. Guide to the Machine 7. [Start] Key Use this button to start copying. 8. It flashes slowly when the machine is almost out of paper or consumables, when the paper settings do not match the settings specified by the driver, or when other abnormalities occur. Power Indicator This indicator lights up red when the machine runs out of toner. 10
It flashes when a print job is received and while printing or scanning is turned on. Alert Indicator This indicator lights up blue when the machine is in progress. 9. 1. Guide to the Machine 7. [Start] Key Use this button to start copying. 8. It flashes slowly when the machine is almost out of paper or consumables, when the paper settings do not match the settings specified by the driver, or when other abnormalities occur. Power Indicator This indicator lights up red when the machine runs out of toner. 10
User Guide
Page 13
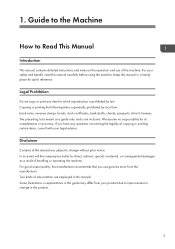
... the printer model. 8. Click [Next]. 9. Click [OK] to modify, and then click [Printer properties]. 3. The operating systems compatible with the drivers and software for this manual. 2. Quick Install Use Quick Install to disconnect the USB cable from the CD-ROM. 1. Insert the CD-ROM into the... Install]. 4. Click [Have Disk...]. 6. Close all applications except this machine using . • Be sure to install the printer driver, TWAIN driver, and WIA driver from the machine and turn the machine off before beginning the installation. Right-click the icon of the printer model you are : ...
... the printer model. 8. Click [Next]. 9. Click [OK] to modify, and then click [Printer properties]. 3. The operating systems compatible with the drivers and software for this manual. 2. Quick Install Use Quick Install to disconnect the USB cable from the CD-ROM. 1. Insert the CD-ROM into the... Install]. 4. Click [Have Disk...]. 6. Close all applications except this machine using . • Be sure to install the printer driver, TWAIN driver, and WIA driver from the machine and turn the machine off before beginning the installation. Right-click the icon of the printer model you are : ...
User Guide
Page 14
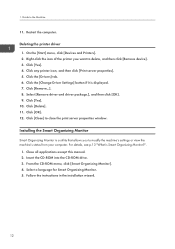
Click [Yes]. 4. Click the [Drivers] tab. 6. Click the [Change Driver Settings] button if it is Smart Organizing Monitor?". 1. Click [Delete]. 11. Click [Close] to delete, and then click [Remove device]. 3. From the CD-ROM menu, ...-ROM into the CD-ROM drive. 3. On the [Start] menu, click [Devices and Printers]. 2. Select [Remove driver and driver package.], and then click [OK]. 9. Click [OK]. 12. Close all applications except this manual. 2. Deleting the printer driver 1. For details, see p.13 "What is displayed. 7. Click any printer icon, and then click [Print server...
Click [Yes]. 4. Click the [Drivers] tab. 6. Click the [Change Driver Settings] button if it is Smart Organizing Monitor?". 1. Click [Delete]. 11. Click [Close] to delete, and then click [Remove device]. 3. From the CD-ROM menu, ...-ROM into the CD-ROM drive. 3. On the [Start] menu, click [Devices and Printers]. 2. Select [Remove driver and driver package.], and then click [OK]. 9. Click [OK]. 12. Close all applications except this manual. 2. Deleting the printer driver 1. For details, see p.13 "What is displayed. 7. Click any printer icon, and then click [Print server...
User Guide
Page 19
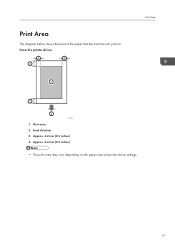
Print area 2. Approx. 4.2 mm (0.2 inches) • The print area may vary depending on . From the printer driver 4 4 3 1 Print Area 3 2 CHZ904 1. Feed direction 3. Approx. 4.2 mm (0.2 inches) 4. Print Area The diagram below shows the area of the paper that the machine can print on the paper size and printer driver settings. 17
Print area 2. Approx. 4.2 mm (0.2 inches) • The print area may vary depending on . From the printer driver 4 4 3 1 Print Area 3 2 CHZ904 1. Feed direction 3. Approx. 4.2 mm (0.2 inches) 4. Print Area The diagram below shows the area of the paper that the machine can print on the paper size and printer driver settings. 17
User Guide
Page 21
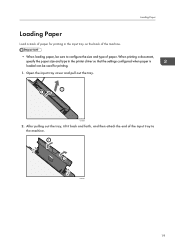
Loading Paper Loading Paper Load a stack of paper for printing in the printer driver so that the settings configured when paper is loaded can be sure to configure the size and type of the input tray to the machine. 1 2 CHZ006 19 After pulling out the tray, tilt it back and forth, and then attach the end of paper. Open the input tray cover and pull out the tray. 2 1 CHZ005 2. When printing a document, specify the paper size and type in the input tray on the back of the machine. • When loading paper, be used for printing. 1.
Loading Paper Loading Paper Load a stack of paper for printing in the printer driver so that the settings configured when paper is loaded can be sure to configure the size and type of the input tray to the machine. 1 2 CHZ006 19 After pulling out the tray, tilt it back and forth, and then attach the end of paper. Open the input tray cover and pull out the tray. 2 1 CHZ005 2. When printing a document, specify the paper size and type in the input tray on the back of the machine. • When loading paper, be used for printing. 1.
User Guide
Page 27
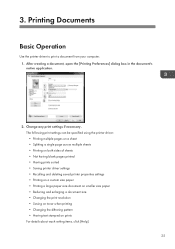
... 2. Change any print settings if necessary. 3. Printing Documents Basic Operation Use the printer driver to print a document from your computer. 1. The following print settings can be specified using the printer driver: • Printing multiple pages on a sheet • Splitting a single page across ...sheets • Printing on both sides of sheets • Not having blank pages printed • Having prints sorted • Saving printer driver settings • Recalling and deleting saved printer properties settings • Printing on a custom size paper • Printing a large paper ...
... 2. Change any print settings if necessary. 3. Printing Documents Basic Operation Use the printer driver to print a document from your computer. 1. The following print settings can be specified using the printer driver: • Printing multiple pages on a sheet • Splitting a single page across ...sheets • Printing on both sides of sheets • Not having blank pages printed • Having prints sorted • Saving printer driver settings • Recalling and deleting saved printer properties settings • Printing on a custom size paper • Printing a large paper ...
User Guide
Page 42
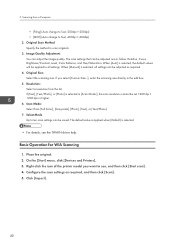
... be adjusted are as follow: Rotation, Curve, Brightness/Contrast, Level, Color Balance, and Hue/Saturation. When [Auto] is selected. • For details, see the TWAIN driver help. Original Scan Method Specify the method to use, and then click [Start scan]. 4. 5. Place the original. 2.
... be adjusted are as follow: Rotation, Curve, Brightness/Contrast, Level, Color Balance, and Hue/Saturation. When [Auto] is selected. • For details, see the TWAIN driver help. Original Scan Method Specify the method to use, and then click [Start scan]. 4. 5. Place the original. 2.
User Guide
Page 45
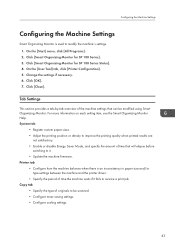
For more information on each setting item, see the Smart Organizing Monitor Help. Click [Smart Organizing Monitor for SP 100 Series]. 3. On the [User Tool] tab, click [Printer Configuration]. 5. Click [OK]. 7. Tab Settings This section provides a tab-by-tab overview of the ... Machine Settings Configuring the Machine Settings Smart Organizing Monitor is an inconsistency in paper size and/or type settings between the machine and the printer driver. • Specify the period of time the machine waits if it fails to it. • Update the machine firmware. Click [Close]. Click [Smart ...
For more information on each setting item, see the Smart Organizing Monitor Help. Click [Smart Organizing Monitor for SP 100 Series]. 3. On the [User Tool] tab, click [Printer Configuration]. 5. Click [OK]. 7. Tab Settings This section provides a tab-by-tab overview of the ... Machine Settings Configuring the Machine Settings Smart Organizing Monitor is an inconsistency in paper size and/or type settings between the machine and the printer driver. • Specify the period of time the machine waits if it fails to it. • Update the machine firmware. Click [Close]. Click [Smart ...
User Guide
Page 58
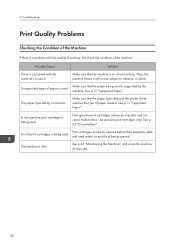
... Checking the Condition of paper is a problem with the machine's location. See p.15 "Supported Paper". Make sure that the paper type setting of the printer driver matches the type of the machine. Unsupported types of the Machine If there is used . Make sure that the machine is dirty. Print cartridges should...
... Checking the Condition of paper is a problem with the machine's location. See p.15 "Supported Paper". Make sure that the paper type setting of the printer driver matches the type of the machine. Unsupported types of the Machine If there is used . Make sure that the machine is dirty. Print cartridges should...
User Guide
Page 59
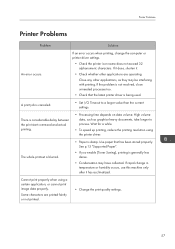
There is canceled. • Set I/O Timeout to process. Use paper that the latest printer driver is being used. Printer Problems Printer Problems Problem Solution An error occurs. A print job is considerable delay between the print start command and actual ..., take longer to a larger value than the current settings. If it does, shorten it has acclimatized. Cannot print properly when using the printer driver. Close any other applications are printed faintly or not printed. • Change the print quality settings. 57 If rapid change the computer or printer...
There is canceled. • Set I/O Timeout to process. Use paper that the latest printer driver is being used. Printer Problems Printer Problems Problem Solution An error occurs. A print job is considerable delay between the print start command and actual ..., take longer to a larger value than the current settings. If it does, shorten it has acclimatized. Cannot print properly when using the printer driver. Close any other applications are printed faintly or not printed. • Change the print quality settings. 57 If rapid change the computer or printer...
User Guide
Page 64
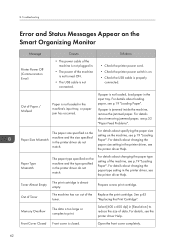
... Cartridge". Out of Paper / Misfeed Paper is jammed inside the machine, remove the jammed paper. If paper is not loaded in the printer driver, see p.19 "Loading Paper". For details about changing the paper size setting in the machine's input tray, or paper jam has occurred. ...power cable of the machine is not plugged in [Resolution:] to print. Paper Type Mismatch The paper type specified on the machine, see the printer driver Help. For details, see p.19 "Loading Paper". 8. For details about loading paper, see p.19 "Loading Paper". Prepare a new print cartridge....
... Cartridge". Out of Paper / Misfeed Paper is jammed inside the machine, remove the jammed paper. If paper is not loaded in the printer driver, see p.19 "Loading Paper". For details about changing the paper size setting in the machine's input tray, or paper jam has occurred. ...power cable of the machine is not plugged in [Resolution:] to print. Paper Type Mismatch The paper type specified on the machine, see the printer driver Help. For details, see p.19 "Loading Paper". 8. For details about loading paper, see p.19 "Loading Paper". Prepare a new print cartridge....
User Guide
Page 73
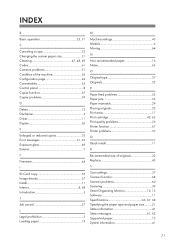
... 61 Common problems 51 Condition of the machine 56 Configuration page 42 Consumables 65 Control panel 8 Copier function 67 Copier problems 59 D Delete 12 Disclaimer 5 Driver 11 Duplex 26 E Enlarged or reduced copies 33 Error messages 61, 62 Exposure glass 49 Exterior 7 F Firmware 44 I ID Card copy 35 Image density 37...
... 61 Common problems 51 Condition of the machine 56 Configuration page 42 Consumables 65 Control panel 8 Copier function 67 Copier problems 59 D Delete 12 Disclaimer 5 Driver 11 Duplex 26 E Enlarged or reduced copies 33 Error messages 61, 62 Exposure glass 49 Exterior 7 F Firmware 44 I ID Card copy 35 Image density 37...
Product Guide
Page 1
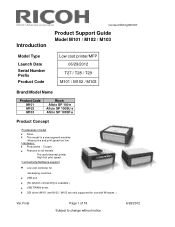
Hardware: Productivity : 13 ppm. GDI driver (M101 and M102 / M103 are low. High first print speed. Connectivity/Software support Low cost controller for all models: The world thinnest printer. Features ...available.) USB TWAIN driver. RICOH Americas Corporation Content ID# rfg053167 Introduction Product Support Guide Model M101 / M102 / M103 Model Type Launch Date Serial Number Prefix Product Code Low cost printer/MFP 06/29/2012 T27 / T28 / T29 M101 / M102 / M103 Brand/Model Name Product Code M101 M102 M103 Ricoh Aficio SP 100 e Aficio SP 100SU e Aficio SP 100SF e Product ...
Hardware: Productivity : 13 ppm. GDI driver (M101 and M102 / M103 are low. High first print speed. Connectivity/Software support Low cost controller for all models: The world thinnest printer. Features ...available.) USB TWAIN driver. RICOH Americas Corporation Content ID# rfg053167 Introduction Product Support Guide Model M101 / M102 / M103 Model Type Launch Date Serial Number Prefix Product Code Low cost printer/MFP 06/29/2012 T27 / T28 / T29 M101 / M102 / M103 Brand/Model Name Product Code M101 M102 M103 Ricoh Aficio SP 100 e Aficio SP 100SU e Aficio SP 100SF e Product ...
Product Guide
Page 10
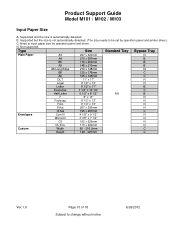
... 110 x 220mm N Custom Width 90 - 216.0mm C Height 148 - 297mm C Ver.1.0 Page 10 of 18 Subject to input paper size by operation panel and printer driver.) C: Need to change without notice 6/26/2012 B: Supported but the size is automatically detected. N: Not supported. Product Support Guide Model M101 / M102 / M103 Input Paper...
... 110 x 220mm N Custom Width 90 - 216.0mm C Height 148 - 297mm C Ver.1.0 Page 10 of 18 Subject to input paper size by operation panel and printer driver.) C: Need to change without notice 6/26/2012 B: Supported but the size is automatically detected. N: Not supported. Product Support Guide Model M101 / M102 / M103 Input Paper...
Product Guide
Page 13
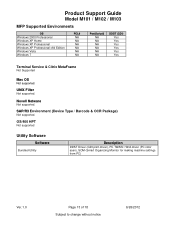
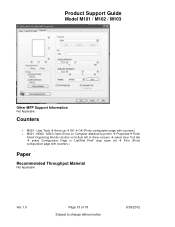
.... SAP/R3 Environment (Device Type / Barcode & OCR Package) Not supported. OS/400 HPT Not supported Utility Software Software Bundled Utility Description DDST Driver (GDI print driver), PC TWAIN / WIA driver (PC color scan), SOM (Smart Organizing Monitor for making machine settings from PC) Ver.1.0 Page 13 of 18 Subject to change without notice...
.... SAP/R3 Environment (Device Type / Barcode & OCR Package) Not supported. OS/400 HPT Not supported Utility Software Software Bundled Utility Description DDST Driver (GDI print driver), PC TWAIN / WIA driver (PC color scan), SOM (Smart Organizing Monitor for making machine settings from PC) Ver.1.0 Page 13 of 18 Subject to change without notice...

Product Guide
Page 14
Product Support Guide Model M101 / M102 / M103 Print Driver Information (Watermarks tab shown on next page) Ver.1.0 Page 14 of 18 Subject to change without notice 6/26/2012
Product Support Guide Model M101 / M102 / M103 Print Driver Information (Watermarks tab shown on next page) Ver.1.0 Page 14 of 18 Subject to change without notice 6/26/2012
Product Guide
Page 15
...; Arrow up OK OK (Prints configuration page with counters.) M001 / M002 / M003 Open Driver on Computer attached to printer Properties Enter Smart Organizing Monitor (button on bottom left of driver screen) select User Tool tab select Configuration Page in "List/Test Print" drop down list...
...; Arrow up OK OK (Prints configuration page with counters.) M001 / M002 / M003 Open Driver on Computer attached to printer Properties Enter Smart Organizing Monitor (button on bottom left of driver screen) select User Tool tab select Configuration Page in "List/Test Print" drop down list...


