User Guide
Page 3
... Originals...22 Placing Originals on Both Sides of Sheets...26 Canceling a Print Job...27 If a Paper Mismatch Occurs...29 Continuing Printing Using Mismatched Paper 29 Resetting the Print Job...29 4. Copying Originals Basic Operation...31 1 Guide to the Machine How to Read This Manual...5 Introduction...5 Legal Prohibition...5 Disclaimer...5 Model-Specific Information...6 Guide to Components...7 Exterior...7 Interior...8 Control Panel...8 Installing the Driver and Software...11 Quick Install...11 Upgrading or Deleting the Printer Driver 11 Installing the Smart Organizing Monitor 12 What...
... Originals...22 Placing Originals on Both Sides of Sheets...26 Canceling a Print Job...27 If a Paper Mismatch Occurs...29 Continuing Printing Using Mismatched Paper 29 Resetting the Print Job...29 4. Copying Originals Basic Operation...31 1 Guide to the Machine How to Read This Manual...5 Introduction...5 Legal Prohibition...5 Disclaimer...5 Model-Specific Information...6 Guide to Components...7 Exterior...7 Interior...8 Control Panel...8 Installing the Driver and Software...11 Quick Install...11 Upgrading or Deleting the Printer Driver 11 Installing the Smart Organizing Monitor 12 What...
User Guide
Page 4
... Display Positions 58 Copier Problems...59 2 Troubleshooting Common Problems...51 Paper Feed Problems...52 Removing Printing Jams...53 Print Quality Problems...56 Checking the Condition of the Machine...48 Cleaning the Exposure Glass...49 8. Canceling a Copy...32 Making Enlarged or Reduced Copies...33 Specifying Reduce/Enlarge...33 Copying Both Sides of an ID Card onto One Side of Paper 35 Copying an ID Card...35 Specifying the Scan Settings...37 Adjusting Image Density...37 Selecting the Document Type According to Original 37 5. Configuring the Machine Using...
... Display Positions 58 Copier Problems...59 2 Troubleshooting Common Problems...51 Paper Feed Problems...52 Removing Printing Jams...53 Print Quality Problems...56 Checking the Condition of the Machine...48 Cleaning the Exposure Glass...49 8. Canceling a Copy...32 Making Enlarged or Reduced Copies...33 Specifying Reduce/Enlarge...33 Copying Both Sides of an ID Card onto One Side of Paper 35 Copying an ID Card...35 Specifying the Scan Settings...37 Adjusting Image Density...37 Selecting the Document Type According to Original 37 5. Configuring the Machine Using...
User Guide
Page 7
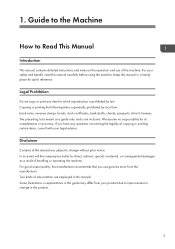
..., checks, passports, driver's licenses. Some illustrations or explanations in this manual. Guide to the Machine How to Read This Manual Introduction This manual contains detailed instructions and notes on the operation and use genuine toner from your product due to change in this guide may differ from the manufacturer. In no responsibility for quick reference. Keep this manual are employed in the product. 5 For good output...
..., checks, passports, driver's licenses. Some illustrations or explanations in this manual. Guide to the Machine How to Read This Manual Introduction This manual contains detailed instructions and notes on the operation and use genuine toner from your product due to change in this guide may differ from the manufacturer. In no responsibility for quick reference. Keep this manual are employed in the product. 5 For good output...
User Guide
Page 10
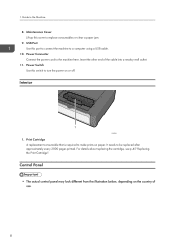
... connect the machine to a computer using a USB cable. 10. It needs to the machine here. USB Port Use this cover to turn the power on the country of the cable into a nearby wall outlet. 11. Interior 1 CHZ004 1. 1. Power Connector Connect the power cord to be replaced after approximately every 2000 pages printed. Insert the other end of use. 8 For details about replacing the cartridge, see p.45 "Replacing the Print Cartridge". Guide to make prints on paper. Control Panel • The actual control panel...
... connect the machine to a computer using a USB cable. 10. It needs to the machine here. USB Port Use this cover to turn the power on the country of the cable into a nearby wall outlet. 11. Interior 1 CHZ004 1. 1. Power Connector Connect the power cord to be replaced after approximately every 2000 pages printed. Insert the other end of use. 8 For details about replacing the cartridge, see p.45 "Replacing the Print Cartridge". Guide to make prints on paper. Control Panel • The actual control panel...

User Guide
Page 12
Power Indicator This indicator lights up red when the machine runs out of toner. 10 Alert Indicator This indicator lights up blue when the machine is turned on. 1. Guide to the Machine 7. [Start] Key Use this button to start copying. 8. It flashes when a print job is received and while printing or scanning is almost out of paper or consumables, when the paper settings do not match the settings specified by the driver, or when other abnormalities occur. It flashes slowly when the machine is in progress. 9.
Power Indicator This indicator lights up red when the machine runs out of toner. 10 Alert Indicator This indicator lights up blue when the machine is turned on. 1. Guide to the Machine 7. [Start] Key Use this button to start copying. 8. It flashes when a print job is received and while printing or scanning is almost out of paper or consumables, when the paper settings do not match the settings specified by the driver, or when other abnormalities occur. It flashes slowly when the machine is in progress. 9.
User Guide
Page 13
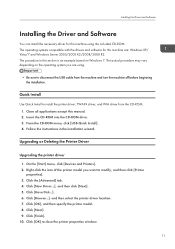
... [Printer properties]. 3. Installing the Driver and Software Installing the Driver and Software You can install the necessary driver for this machine are using the included CD-ROM. The procedure in the installation wizard. The actual procedure may vary depending on Windows 7. Insert the CD-ROM into the CD-ROM drive. 3. Follow the instructions in this manual. 2. Upgrading or Deleting the Printer Driver Upgrading the printer driver 1. Right-click the icon of the printer model you...
... [Printer properties]. 3. Installing the Driver and Software Installing the Driver and Software You can install the necessary driver for this machine are using the included CD-ROM. The procedure in the installation wizard. The actual procedure may vary depending on Windows 7. Insert the CD-ROM into the CD-ROM drive. 3. Follow the instructions in this manual. 2. Upgrading or Deleting the Printer Driver Upgrading the printer driver 1. Right-click the icon of the printer model you...
User Guide
Page 14
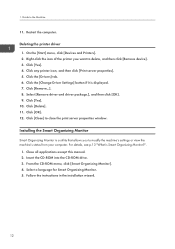
... CD-ROM drive. 3. Restart the computer. Click [Delete]. 11. Click any printer icon, and then click [Print server properties]. 5. Close all applications except this manual. 2. Follow the instructions in the installation wizard. 12 Guide to modify the machine's settings or view the machine's status from your computer. From the CD-ROM menu, click [Smart Organizing Monitor]. 4. On the [Start] menu, click [Devices and Printers]. 2. Select [Remove driver and driver package.], and...
... CD-ROM drive. 3. Restart the computer. Click [Delete]. 11. Click any printer icon, and then click [Print server properties]. 5. Close all applications except this manual. 2. Follow the instructions in the installation wizard. 12 Guide to modify the machine's settings or view the machine's status from your computer. From the CD-ROM menu, click [Smart Organizing Monitor]. 4. On the [Start] menu, click [Devices and Printers]. 2. Select [Remove driver and driver package.], and...
User Guide
Page 15
... the status of the machine Displays paper jam messages and other error messages. • Paper size and type settings Displays the settings for paper sizes or types available on this machine. • Print test and configuration pages Prints List/Report to check the list of settings for this machine and other information. • Modify the system settings Use to change custom paper size settings and other settings on this machine. • Modify the printer settings Use to change print settings such as [Error Skip:] and [I/O Time Out:] on this machine. • Modify the copy settings Use to...
... the status of the machine Displays paper jam messages and other error messages. • Paper size and type settings Displays the settings for paper sizes or types available on this machine. • Print test and configuration pages Prints List/Report to check the list of settings for this machine and other information. • Modify the system settings Use to change custom paper size settings and other settings on this machine. • Modify the printer settings Use to change print settings such as [Error Skip:] and [I/O Time Out:] on this machine. • Modify the copy settings Use to...
User Guide
Page 27
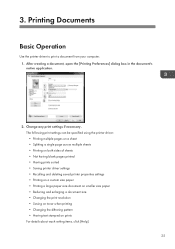
... multiple sheets • Printing on both sides of sheets • Not having blank pages printed • Having prints sorted • Saving printer driver settings • Recalling and deleting saved printer properties settings • Printing on a custom size paper • Printing a large paper size document on smaller size paper • Reducing and enlarging a document size • Changing the print resolution • Saving on toner when printing • Changing the dithering pattern • Having text stamped on prints For details about each setting items, click [Help]. 25 Change...
... multiple sheets • Printing on both sides of sheets • Not having blank pages printed • Having prints sorted • Saving printer driver settings • Recalling and deleting saved printer properties settings • Printing on a custom size paper • Printing a large paper size document on smaller size paper • Reducing and enlarging a document size • Changing the print resolution • Saving on toner when printing • Changing the dithering pattern • Having text stamped on prints For details about each setting items, click [Help]. 25 Change...
User Guide
Page 42
... selected. • For details, see the TWAIN driver help. Select Mode Up to all settings. On the [Start] menu, click [Devices and Printers]. 3. Scanning from a Computer • [Filing] (Auto change to Text, 200dpi × 200dpi) • [OCR] (Auto change to scan originals. 3. The scan settings that can adjust the image quality. Place the original. 2. Image Quality Adjustment You can be saved. Original Size: Select the scanning size. Original Scan Method Specify the method to Text, 400dpi ×...
... selected. • For details, see the TWAIN driver help. Select Mode Up to all settings. On the [Start] menu, click [Devices and Printers]. 3. Scanning from a Computer • [Filing] (Auto change to Text, 200dpi × 200dpi) • [OCR] (Auto change to scan originals. 3. The scan settings that can adjust the image quality. Place the original. 2. Image Quality Adjustment You can be saved. Original Size: Select the scanning size. Original Scan Method Specify the method to Text, 400dpi ×...
User Guide
Page 45
... for SP 100 Series Status]. 4. On the [User Tool] tab, click [Printer Configuration]. 5. Change the settings if necessary. 6. On the [Start] menu, click [All Programs]. 2. Copy tab • Specify the type of the machine settings that will elapse before switching to it fails to improve the printing quality when printed results are not satisfactory. • Enable or disable Energy Saver Mode, and specify the amount of time the machine waits if it . • Update the machine firmware...
... for SP 100 Series Status]. 4. On the [User Tool] tab, click [Printer Configuration]. 5. Change the settings if necessary. 6. On the [Start] menu, click [All Programs]. 2. Copy tab • Specify the type of the machine settings that will elapse before switching to it fails to improve the printing quality when printed results are not satisfactory. • Enable or disable Energy Saver Mode, and specify the amount of time the machine waits if it . • Update the machine firmware...
User Guide
Page 46
... enter standby or sleep mode when during a firmware update. • Disconnect any unnecessary cables from Windows. 1. On the [User Tool] tab, click [Printer Configuration]. 5. On the [System] tab, click [Printer Firmware Update...]. 6. To update the firmware, use of the DWN file, and then click [Open]. 8. Specify the location of this software. • To make sure that a firmware update has successfully completed, print the configuration page before and after the update. • Never disconnect the USB cable during a firmware update. • Download...
... enter standby or sleep mode when during a firmware update. • Disconnect any unnecessary cables from Windows. 1. On the [User Tool] tab, click [Printer Configuration]. 5. On the [System] tab, click [Printer Firmware Update...]. 6. To update the firmware, use of the DWN file, and then click [Open]. 8. Specify the location of this software. • To make sure that a firmware update has successfully completed, print the configuration page before and after the update. • Never disconnect the USB cable during a firmware update. • Download...
User Guide
Page 54
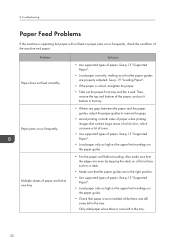
... a desk. • Make sure that the paper guides are in the tray. • If there are gaps between the paper and the paper guides, adjust the paper guides to remove the gaps. • Avoid printing on both sides of paper when printing images that contain large areas of solid color, which consume a lot of toner. • Use supported types of the paper, and put it well. Paper jams occur frequently. See p.19 "Loading Paper". • If...
... a desk. • Make sure that the paper guides are in the tray. • If there are gaps between the paper and the paper guides, adjust the paper guides to remove the gaps. • Avoid printing on both sides of paper when printing images that contain large areas of solid color, which consume a lot of toner. • Use supported types of the paper, and put it well. Paper jams occur frequently. See p.19 "Loading Paper". • If...
User Guide
Page 55
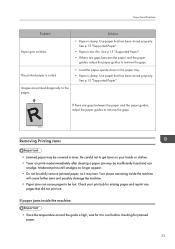
Solution • Paper is damp. Use paper that did not print out. Make test prints until smudges no longer appear. • Do not forcefully remove jammed paper, as it to remove the gaps. • Load the paper upside down in toner. Images are printed diagonally to remove the gaps. See p.15 "Supported Paper". • If there are gaps between the paper and the paper guides, adjust the paper guides to cool before checking for missing pages and reprint...
Solution • Paper is damp. Use paper that did not print out. Make test prints until smudges no longer appear. • Do not forcefully remove jammed paper, as it to remove the gaps. • Load the paper upside down in toner. Images are printed diagonally to remove the gaps. See p.15 "Supported Paper". • If there are gaps between the paper and the paper guides, adjust the paper guides to cool before checking for missing pages and reprint...
User Guide
Page 63
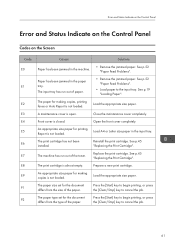
See p.52 "Paper Feed Problems". • Load paper to cancel the job. 61 See p.45 "Replacing the Print Cartridge". Prepare a new print cartridge. The paper size set for the document differs from the size of the paper. The paper type set for making copies, printing faxes or Auto Report is not loaded. Paper has been jammed in the input tray. Close the maintenance cover completely. Load A4 or Letter size paper in the paper tray. Press the [Start] key to begin printing, or press the [Clear/Stop] key to cancel the job. See p.19 "Loading Paper". Open the front ...
See p.52 "Paper Feed Problems". • Load paper to cancel the job. 61 See p.45 "Replacing the Print Cartridge". Prepare a new print cartridge. The paper size set for the document differs from the size of the paper. The paper type set for making copies, printing faxes or Auto Report is not loaded. Paper has been jammed in the input tray. Close the maintenance cover completely. Load A4 or Letter size paper in the paper tray. Press the [Start] key to begin printing, or press the [Clear/Stop] key to cancel the job. See p.19 "Loading Paper". Open the front ...
User Guide
Page 64
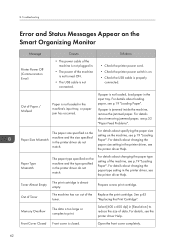
... driver, see p.19 "Loading Paper". For details about changing the paper type setting of the machine is not turned ON. • The USB cable is not connected. • Check the printer power cord. • Check the printer power switch is not loaded in the input tray. For details about specifying the paper size setting on the machine and the type specified in [Resolution:] to print. Prepare a new print cartridge. For details about removing jammed paper, see p.52 "Paper Feed Problems". Open the front cover completely. 62 Troubleshooting Error and Status Messages...
... driver, see p.19 "Loading Paper". For details about changing the paper type setting of the machine is not turned ON. • The USB cable is not connected. • Check the printer power cord. • Check the printer power switch is not loaded in the input tray. For details about specifying the paper size setting on the machine and the type specified in [Resolution:] to print. Prepare a new print cartridge. For details about removing jammed paper, see p.52 "Paper Feed Problems". Open the front cover completely. 62 Troubleshooting Error and Status Messages...
User Guide
Page 67
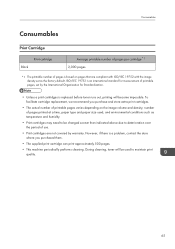
During cleaning, toner will become impossible. Consumables Consumables Print Cartridge Black Print cartridge Average printable number of pages per cartridge *1 2,000 pages *1 The printable number of pages is based on the image volume and density, number of pages printed at a time, paper type and paper size used to deterioration over the period of printable pages varies depending on pages that are not covered by the International Organization for measurement of printable pages, set as the factory default. ISO/IEC 19752 is...
During cleaning, toner will become impossible. Consumables Consumables Print Cartridge Black Print cartridge Average printable number of pages per cartridge *1 2,000 pages *1 The printable number of pages is based on the image volume and density, number of pages printed at a time, paper type and paper size used to deterioration over the period of printable pages varies depending on pages that are not covered by the International Organization for measurement of printable pages, set as the factory default. ISO/IEC 19752 is...
User Guide
Page 73
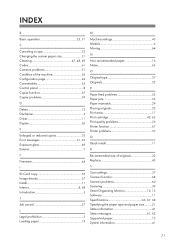
INDEX B Basic operation 25, 31 C Canceling a copy 32 Changing the custom paper size 21 Cleaning 47, 48, 49 Codes 61 Common problems 51 Condition of the machine 56 Configuration page 42 Consumables 65 Control panel 8 Copier function 67 Copier problems 59 D Delete 12 Disclaimer 5 Driver 11 Duplex 26 E Enlarged or reduced copies 33 Error messages 61, 62 Exposure glass 49 Exterior 7 F Firmware 44 I ID Card copy 35 Image density 37 Install 11 Interior 8, 48 Introduction 5 J Job cancel 27 L Legal prohibition 5 Loading paper 19 M Machine settings 43 Models 6 Moving...
INDEX B Basic operation 25, 31 C Canceling a copy 32 Changing the custom paper size 21 Cleaning 47, 48, 49 Codes 61 Common problems 51 Condition of the machine 56 Configuration page 42 Consumables 65 Control panel 8 Copier function 67 Copier problems 59 D Delete 12 Disclaimer 5 Driver 11 Duplex 26 E Enlarged or reduced copies 33 Error messages 61, 62 Exposure glass 49 Exterior 7 F Firmware 44 I ID Card copy 35 Image density 37 Install 11 Interior 8, 48 Introduction 5 J Job cancel 27 L Legal prohibition 5 Loading paper 19 M Machine settings 43 Models 6 Moving...
Product Guide
Page 1
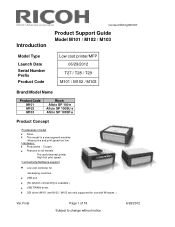
... Support Guide Model M101 / M102 / M103 Model Type Launch Date Serial Number Prefix Product Code Low cost printer/MFP 06/29/2012 T27 / T28 / T29 M101 / M102 / M103 Brand/Model Name Product Code M101 M102 M103 Ricoh Aficio SP 100 e Aficio SP 100SU e Aficio SP 100SF e Product Concept Predecessor model None. Features for developing countries. Connectivity/Software support Low cost controller for all models: The world thinnest printer. USB port (No network connectivity is a new segment machine whose price and print speed are only supported for use with Windows. ) Ver.Final Page...
... Support Guide Model M101 / M102 / M103 Model Type Launch Date Serial Number Prefix Product Code Low cost printer/MFP 06/29/2012 T27 / T28 / T29 M101 / M102 / M103 Brand/Model Name Product Code M101 M102 M103 Ricoh Aficio SP 100 e Aficio SP 100SU e Aficio SP 100SF e Product Concept Predecessor model None. Features for developing countries. Connectivity/Software support Low cost controller for all models: The world thinnest printer. USB port (No network connectivity is a new segment machine whose price and print speed are only supported for use with Windows. ) Ver.Final Page...
Product Guide
Page 12
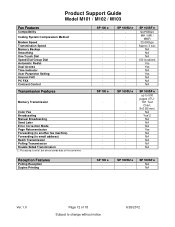
...NA NA SP 100SF e up to change without notice 6/26/2012 SP 100 e - - - Product Support Guide Model M101 / M102 / M103 Fax Features Compatibility Coding System Compression Method Modem Speed Transmission Speed Memory Backup Smoothing One Touch Dial Speed Dial/Group Dial Automatic Redial Dual Access Time Indicator User Parameter Setting Internet FAX PC FAX Contrast Control Transmission Features Memory Transmission Color Fax Broadcasting Manual Broadcasting Send Later Error Correction Mode Page Retransmission Forwarding (to another fax machine) Forwarding (to email address) Batch Transmission...
...NA NA SP 100SF e up to change without notice 6/26/2012 SP 100 e - - - Product Support Guide Model M101 / M102 / M103 Fax Features Compatibility Coding System Compression Method Modem Speed Transmission Speed Memory Backup Smoothing One Touch Dial Speed Dial/Group Dial Automatic Redial Dual Access Time Indicator User Parameter Setting Internet FAX PC FAX Contrast Control Transmission Features Memory Transmission Color Fax Broadcasting Manual Broadcasting Send Later Error Correction Mode Page Retransmission Forwarding (to another fax machine) Forwarding (to email address) Batch Transmission...


