User Guide
Page 4
... Copier Mode Screen...35 Basic Operation...36 Canceling a Copy...37 Making Enlarged or Reduced Copies...38 Specifying Reduce/Enlarge...39 Combining Multiple Pages...40 Specifying Combine...41 Copying Both Sides of an ID Card onto One Side of Paper 43 Copying an ID Card...43 Making 2-sided Copies...45 Specifying 2 Sided Copy...46 Specifying the Scan Settings...49 Adjusting Image Density...49 Selecting the Document Type According to Original 49 5. Scanning from a Computer Basic Operation...51 TWAIN Scanning...51 Basic Operation for Sending a Fax...
... Copier Mode Screen...35 Basic Operation...36 Canceling a Copy...37 Making Enlarged or Reduced Copies...38 Specifying Reduce/Enlarge...39 Combining Multiple Pages...40 Specifying Combine...41 Copying Both Sides of an ID Card onto One Side of Paper 43 Copying an ID Card...43 Making 2-sided Copies...45 Specifying 2 Sided Copy...46 Specifying the Scan Settings...49 Adjusting Image Density...49 Selecting the Document Type According to Original 49 5. Scanning from a Computer Basic Operation...51 TWAIN Scanning...51 Basic Operation for Sending a Fax...

User Guide
Page 5
... Page...94 Configuring the Machine Settings...95 Tab Settings...95 Updating the Firmware...96 9. Configuring the Machine Using the Control Panel Basic Operation...75 Copier Features Settings...76 Fax Features Settings...78 Address Book Settings...84 System Settings...85 Printing Lists/Reports...90 Printing the Configuration Page...90 Types of the Machine...100 Cleaning the Exposure Glass...101 Cleaning the Auto Document Feeder...102 10. Specifying the Scan Settings...68 Receiving a Fax...70 Selecting Reception Mode...70 Lists/Reports Related to Fax...73 7. Maintaining the Machine Replacing...
... Page...94 Configuring the Machine Settings...95 Tab Settings...95 Updating the Firmware...96 9. Configuring the Machine Using the Control Panel Basic Operation...75 Copier Features Settings...76 Fax Features Settings...78 Address Book Settings...84 System Settings...85 Printing Lists/Reports...90 Printing the Configuration Page...90 Types of the Machine...100 Cleaning the Exposure Glass...101 Cleaning the Auto Document Feeder...102 10. Specifying the Scan Settings...68 Receiving a Fax...70 Selecting Reception Mode...70 Lists/Reports Related to Fax...73 7. Maintaining the Machine Replacing...
User Guide
Page 11
...the machine to copier or fax mode. 2. [Speed Dial] Key Use this button to send a fax using a registered speed dial number. 3. [User Tools] Key Press to display the menu for configuring the machine's system settings. 4. [OK] Key Use this key to confirm settings, and setting values, or move to the next menu level. 5. [Clear/Stop] Key Use this button to cancel or stop a print job, document copying, fax transmission/reception, and other actions in progress. 6. [Start] Key Use this button to start fax transmit/receive or copy. 7. [ID Card Copy/On Hook Dial] Key When the machine is in fax mode, use...
...the machine to copier or fax mode. 2. [Speed Dial] Key Use this button to send a fax using a registered speed dial number. 3. [User Tools] Key Press to display the menu for configuring the machine's system settings. 4. [OK] Key Use this key to confirm settings, and setting values, or move to the next menu level. 5. [Clear/Stop] Key Use this button to cancel or stop a print job, document copying, fax transmission/reception, and other actions in progress. 6. [Start] Key Use this button to start fax transmit/receive or copy. 7. [ID Card Copy/On Hook Dial] Key When the machine is in fax mode, use...

User Guide
Page 12
Screen Displays current status and messages. 10. It flashes when a print job is received and while printing, scanning, or fax transmission/reception is turned on. Scroll Keys Press these keys to the Machine 8. Guide to move the cursor in progress. 9. Power Indicator This indicator lights up red when the machine runs out of toner. 11. Alert Indicator This indicator lights up blue when the machine is in each direction. 12. It flashes...
Screen Displays current status and messages. 10. It flashes when a print job is received and while printing, scanning, or fax transmission/reception is turned on. Scroll Keys Press these keys to the Machine 8. Guide to move the cursor in progress. 9. Power Indicator This indicator lights up red when the machine runs out of toner. 11. Alert Indicator This indicator lights up blue when the machine is in each direction. 12. It flashes...
User Guide
Page 13
... operating system you want to disconnect the USB cable from the CD-ROM. 1. Follow the instructions in this machine are using the included CD-ROM. On the [Start] menu, click [Devices and Printers]. 2. Quick Install Use Quick Install to close the printer properties window. 11 Close all applications except this machine using . • Be sure to modify, and then click [Printer properties]. 3. Upgrading or Deleting the Printer Driver Upgrading the printer driver 1. Click [OK] to install the printer driver, TWAIN driver...
... operating system you want to disconnect the USB cable from the CD-ROM. 1. Follow the instructions in this machine are using the included CD-ROM. On the [Start] menu, click [Devices and Printers]. 2. Quick Install Use Quick Install to close the printer properties window. 11 Close all applications except this machine using . • Be sure to modify, and then click [Printer properties]. 3. Upgrading or Deleting the Printer Driver Upgrading the printer driver 1. Click [OK] to install the printer driver, TWAIN driver...

User Guide
Page 14
... [Change Driver Settings] button if it is Smart Organizing Monitor?". 1. Click [Remove...]. 8. Click [OK]. 12. Select a language for Smart Organizing Monitor. 5. Guide to close the print server properties window. Deleting the printer driver 1. Click [Yes]. 10. For details, see p.14 "What is displayed. 7. Click the [Drivers] tab. 6. On the [Start] menu, click [Devices and Printers]. 2. Select [Remove driver and driver package.], and then click [OK]. 9. Close all applications except this manual. 2. From...
... [Change Driver Settings] button if it is Smart Organizing Monitor?". 1. Click [Remove...]. 8. Click [OK]. 12. Select a language for Smart Organizing Monitor. 5. Guide to close the print server properties window. Deleting the printer driver 1. Click [Yes]. 10. For details, see p.14 "What is displayed. 7. Click the [Drivers] tab. 6. On the [Start] menu, click [Devices and Printers]. 2. Select [Remove driver and driver package.], and then click [OK]. 9. Close all applications except this manual. 2. From...

User Guide
Page 16
... the following functions: • Displays the status of the machine Displays paper jam messages and other error messages. • Paper size and type settings Displays the settings for paper sizes or types available on this machine. • Print test and configuration pages Prints List/Report to check the list of settings for this machine. • Modify the Speed Dial Register, change custom paper size settings and other settings on this machine and other information. • Modify the system settings Use to use Smart Organizing Monitor, see p.93 "Configuring the Machine Using Smart...
... the following functions: • Displays the status of the machine Displays paper jam messages and other error messages. • Paper size and type settings Displays the settings for paper sizes or types available on this machine. • Print test and configuration pages Prints List/Report to check the list of settings for this machine. • Modify the Speed Dial Register, change custom paper size settings and other settings on this machine and other information. • Modify the system settings Use to use Smart Organizing Monitor, see p.93 "Configuring the Machine Using Smart...

User Guide
Page 31
... multiple sheets • Printing on both sides of sheets • Not having blank pages printed • Having prints sorted • Saving printer driver settings • Recalling and deleting saved printer properties settings • Printing on a custom size paper • Printing a large paper size document on smaller size paper • Reducing and enlarging a document size • Changing the print resolution • Saving on toner when printing • Changing the dithering pattern • Having text stamped on prints For details about each setting items, click [Help]. 29 Change...
... multiple sheets • Printing on both sides of sheets • Not having blank pages printed • Having prints sorted • Saving printer driver settings • Recalling and deleting saved printer properties settings • Printing on a custom size paper • Printing a large paper size document on smaller size paper • Reducing and enlarging a document size • Changing the print resolution • Saving on toner when printing • Changing the dithering pattern • Having text stamped on prints For details about each setting items, click [Help]. 29 Change...

User Guide
Page 54
... [Full Color], [Grayscale], [Photo], [Text], or [Text/Photo]. 7. If [Text], [Text/Photo], or [Photo] is selected, all settings. Scan Mode: Select from the list. Basic Operation for WIA Scanning 1. Select Mode Up to ten scan settings can be adjusted are as follow: Rotation, Curve, Brightness/Contrast, Level, Color Balance, and Hue/Saturation. On the [Start] menu, click [Devices and Printers]. 3. When [Manual] is selected in [Scan Mode:], the scan resolution cannot be saved. Image Quality Adjustment You...
... [Full Color], [Grayscale], [Photo], [Text], or [Text/Photo]. 7. If [Text], [Text/Photo], or [Photo] is selected, all settings. Scan Mode: Select from the list. Basic Operation for WIA Scanning 1. Select Mode Up to ten scan settings can be adjusted are as follow: Rotation, Curve, Brightness/Contrast, Level, Color Balance, and Hue/Saturation. On the [Start] menu, click [Devices and Printers]. 3. When [Manual] is selected in [Scan Mode:], the scan resolution cannot be saved. Image Quality Adjustment You...

User Guide
Page 61
... want to enter the outside line access number specified in [PBX Access Number] before the fax number. • No separator characters or spaces can be stored in the [Pause Time] setting under fax transmission settings. A fax number can contain up to 9, pause, " ", " ", and space. The machine pauses briefly before the fax number. To use tone services on a pulse-dialing line, insert " " in the fax number. In Memory Transmission mode, a single job can contain 0 to 10 pages, and...
... want to enter the outside line access number specified in [PBX Access Number] before the fax number. • No separator characters or spaces can be stored in the [Pause Time] setting under fax transmission settings. A fax number can contain up to 9, pause, " ", " ", and space. The machine pauses briefly before the fax number. To use tone services on a pulse-dialing line, insert " " in the fax number. In Memory Transmission mode, a single job can contain 0 to 10 pages, and...
User Guide
Page 90
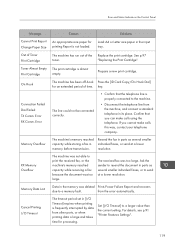
... as the machine is used . Print Cartridge Displays information about consumables. • (New) • • • • • (Needs replacing) Low Humidity Mode When the machine is the same model. • Off You must install the driver separately for multiple machines or not under USB connection. Adjust the value by using the [ ] or [ ] key. Selecting [On] should prevent such black stripes from appearing. Make sure to +15 mm, in fax transmissions. Default: [USA] Fixed USB Port Specifies...
... as the machine is used . Print Cartridge Displays information about consumables. • (New) • • • • • (Needs replacing) Low Humidity Mode When the machine is the same model. • Off You must install the driver separately for multiple machines or not under USB connection. Adjust the value by using the [ ] or [ ] key. Selecting [On] should prevent such black stripes from appearing. Make sure to +15 mm, in fax transmissions. Default: [USA] Fixed USB Port Specifies...

User Guide
Page 98
... held liable for SP 100 Series]. 3. Click [OK]. 7. 8. After a message is displayed on the Smart Organizing Monitor to customers for damages of this software. • To make sure that a firmware update has successfully completed, print the configuration page before and after the update. • Never disconnect the USB cable during a firmware update. • Download the firmware from the machine when running a firmware update. • If necessary, modify power management settings on your computer...
... held liable for SP 100 Series]. 3. Click [OK]. 7. 8. After a message is displayed on the Smart Organizing Monitor to customers for damages of this software. • To make sure that a firmware update has successfully completed, print the configuration page before and after the update. • Never disconnect the USB cable during a firmware update. • Download the firmware from the machine when running a firmware update. • If necessary, modify power management settings on your computer...

User Guide
Page 117
... error code appears. If you can make calls this way, contact your telephone company. • If the problem persists, contact your sales or service representative. Press the [ID Card Copy/On Hook Dial] key after, for your service representative. 115 Err:5) The [Clear/Stop] key was pressed while the fax was being scanned. See p.78 "Fax Features Settings". Err:2) Err:3) Err:4) Dial fails when trying to send faxes. • Confirm that the fax number...
... error code appears. If you can make calls this way, contact your telephone company. • If the problem persists, contact your sales or service representative. Press the [ID Card Copy/On Hook Dial] key after, for your service representative. 115 Err:5) The [Clear/Stop] key was pressed while the fax was being scanned. See p.78 "Fax Features Settings". Err:2) Err:3) Err:4) Dial fails when trying to send faxes. • Confirm that the fax number...

User Guide
Page 118
... a transmission speed supported by the support G3 standard. Print, send, or delete the jobs stored in the input tray. The recipient's fax machine did not respond within 35 seconds. To send a fax to troubleshoot problems that do not produce an error code. paper. Remove the jammed original. Cannot receive faxes even when sending them to check that the telephone line is possible. See p.97 "Replacing the Print Cartridge". • The input tray is jammed. Load paper in the memory. See p.70 "Receiving a Fax". 116
... a transmission speed supported by the support G3 standard. Print, send, or delete the jobs stored in the input tray. The recipient's fax machine did not respond within 35 seconds. To send a fax to troubleshoot problems that do not produce an error code. paper. Remove the jammed original. Cannot receive faxes even when sending them to check that the telephone line is possible. See p.97 "Replacing the Print Cartridge". • The input tray is jammed. Load paper in the memory. See p.70 "Receiving a Fax". 116
User Guide
Page 120
...; Remove the jammed paper. An original has been jammed inside the ADF. Memory has reached capacity during sort copy. Load the appropriate size paper. 10. Troubleshooting Error and Status Indicate on the Control Panel Messages on the Screen Message Misfeed: Stnd. A cover is closed. If several originals are still to start printing now, and copy the remaining originals separately. If originals are suitable for printing fax or Auto Report is not loaded. Tray Out of paper. See p.104 "Paper Feed Problems". • Check...
...; Remove the jammed paper. An original has been jammed inside the ADF. Memory has reached capacity during sort copy. Load the appropriate size paper. 10. Troubleshooting Error and Status Indicate on the Control Panel Messages on the Screen Message Misfeed: Stnd. A cover is closed. If several originals are still to start printing now, and copy the remaining originals separately. If originals are suitable for printing fax or Auto Report is not loaded. Tray Out of paper. See p.104 "Paper Feed Problems". • Check...
User Guide
Page 121
... Connection Failed Dial Failed TX Comm. For details, see p.91 "Printer Features Settings". 119 The received fax was not able to send at a lower resolution. Error RX Comm. The timeout period set in its place. Error and Status Indicate on the Control Panel Message Cannot Print Report Change Paper Size Out of the Replace the print cartridge. See p.97 toner. "Replacing the Print Cartridge". The print cartridge is not loaded. The machine has been off-hook Press the [ID Card Copy/On Hook Dial] for printing Report...
... Connection Failed Dial Failed TX Comm. For details, see p.91 "Printer Features Settings". 119 The received fax was not able to send at a lower resolution. Error RX Comm. The timeout period set in its place. Error and Status Indicate on the Control Panel Message Cannot Print Report Change Paper Size Out of the Replace the print cartridge. See p.97 toner. "Replacing the Print Cartridge". The print cartridge is not loaded. The machine has been off-hook Press the [ID Card Copy/On Hook Dial] for printing Report...
User Guide
Page 122
... the fax number you dialed is too large or complex to reduce the size of the paper. Cannot Copy Change Paper Size An appropriate size paper for the document differs from the size of fax jobs in [Resolution] to print. Reconnect the USB cable properly, and then try the operation again. Paper Size Mismatch Press Start or Stop The paper size set for the document differs from a computer. Press the [Start] key to begin printing, or press the [Clear/Stop] key to cancel the job. Troubleshooting Message...
... the fax number you dialed is too large or complex to reduce the size of the paper. Cannot Copy Change Paper Size An appropriate size paper for the document differs from the size of fax jobs in [Resolution] to print. Reconnect the USB cable properly, and then try the operation again. Paper Size Mismatch Press Start or Stop The paper size set for the document differs from a computer. Press the [Start] key to begin printing, or press the [Clear/Stop] key to cancel the job. Troubleshooting Message...
User Guide
Page 123
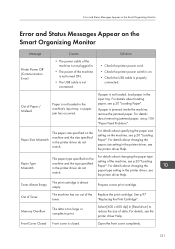
... printer driver do not match. Prepare a new print cartridge. For details about removing jammed paper, see the printer driver Help. "Replacing the Print Cartridge". Paper Type Mismatch The paper type specified on the machine and the type specified in the input tray. For details about changing the paper size setting in the printer driver do not match. Error and Status Messages Appear on the Smart Organizing Monitor Error and Status Messages Appear on the Smart Organizing Monitor Message Causes Solutions Printer Power Off (Communication Error) • The power cable...
... printer driver do not match. Prepare a new print cartridge. For details about removing jammed paper, see the printer driver Help. "Replacing the Print Cartridge". Paper Type Mismatch The paper type specified on the machine and the type specified in the input tray. For details about changing the paper size setting in the printer driver do not match. Error and Status Messages Appear on the Smart Organizing Monitor Error and Status Messages Appear on the Smart Organizing Monitor Message Causes Solutions Printer Power Off (Communication Error) • The power cable...

User Guide
Page 135
... 76 Copier function 128 Copier mode screen 35 Copier problems 113 D Date 54 Delete 12 Disclaimer 5 Driver 11 Duplex 30 E Enlarged or reduced copies 38 Entering characters 55 Error messages 118, 121 Exposure glass 101 Exterior 7 F Fax destinations 56 Fax features 78 Fax function 129 Fax mode screen 53 Fax problems 115 Firmware 96 I ID Card copy 43 Image density 49, 68 Initial setup 13 Install 11 Interior 8, 100 Introduction 5 J Job cancel 31 L Legal prohibition 5 Lists 73, 90 Loading paper 20 M Machine settings 95 Manual mode 71 Messages 118 Models 6 Moving...
... 76 Copier function 128 Copier mode screen 35 Copier problems 113 D Date 54 Delete 12 Disclaimer 5 Driver 11 Duplex 30 E Enlarged or reduced copies 38 Entering characters 55 Error messages 118, 121 Exposure glass 101 Exterior 7 F Fax destinations 56 Fax features 78 Fax function 129 Fax mode screen 53 Fax problems 115 Firmware 96 I ID Card copy 43 Image density 49, 68 Initial setup 13 Install 11 Interior 8, 100 Introduction 5 J Job cancel 31 L Legal prohibition 5 Lists 73, 90 Loading paper 20 M Machine settings 95 Manual mode 71 Messages 118 Models 6 Moving...

User Guide
Page 136
... Q Quick install 11 R Receiving a fax 70 Reception mode 70 Recommended size of originals 25 Redial function 64 Replace 97 Reports 73, 90 Resolution 68 S Scan settings 49 Scanner function 128 Scanner problems 114 Scanning 51 Sending a fax 59, 60 Smart Organizing Monitor 12, 14 Software 11 Specifications 126, 127, 128, 129 Specifying a custom paper size 23 Specifying the paper type 22 Specifying the paper type and paper size..........24 Specifying the standard paper size 23 Speed dial 62 Status information 93 Status messages 118, 121 Supported paper...
... Q Quick install 11 R Receiving a fax 70 Reception mode 70 Recommended size of originals 25 Redial function 64 Replace 97 Reports 73, 90 Resolution 68 S Scan settings 49 Scanner function 128 Scanner problems 114 Scanning 51 Sending a fax 59, 60 Smart Organizing Monitor 12, 14 Software 11 Specifications 126, 127, 128, 129 Specifying a custom paper size 23 Specifying the paper type 22 Specifying the paper type and paper size..........24 Specifying the standard paper size 23 Speed dial 62 Status information 93 Status messages 118, 121 Supported paper...


