
Maintenance Guide
Page 3
... only and might be trademarks of their respective companies. We disclaim any and all rights in the United States and/or other countries. IPS-PRINT Printer Language Emulation Copyright© 1999-2000 Oak Technology, Inc., All rights reserved. Note The proper names of the Windows operating systems are as follows: •...
... only and might be trademarks of their respective companies. We disclaim any and all rights in the United States and/or other countries. IPS-PRINT Printer Language Emulation Copyright© 1999-2000 Oak Technology, Inc., All rights reserved. Note The proper names of the Windows operating systems are as follows: •...
Maintenance Guide
Page 4
..., not the cable) if the power cable or plug becomes frayed or otherwise damaged. • To avoid hazardous electric shock or laser radiation exposure, do not remove any of the used toner cartridge in death or serious injury. R CAUTION: Indicates a potentially hazardous situation... or at appropriate collection sites. • Dispose of the following safety precautions should always be followed. ii Safety Information When using your printer, the following conditions exists: • You spill something into the equipment. • You suspect that your equipment needs service or repair...
..., not the cable) if the power cable or plug becomes frayed or otherwise damaged. • To avoid hazardous electric shock or laser radiation exposure, do not remove any of the used toner cartridge in death or serious injury. R CAUTION: Indicates a potentially hazardous situation... or at appropriate collection sites. • Dispose of the following safety precautions should always be followed. ii Safety Information When using your printer, the following conditions exists: • You spill something into the equipment. • You suspect that your equipment needs service or repair...
Maintenance Guide
Page 6
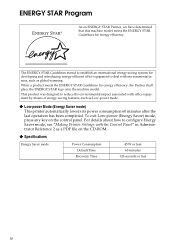
...less iv For details about how to deal with environmental issues, such as Low-power mode. ❖ Low-power Mode (Energy Saver mode) This printer automatically lowers its power consumption 60 minutes after the last operation has been completed. When a product meets the ENERGY STAR Guidelines for energy efficiency. ... intend to establish an international energy-saving system for developing and introducing energy-efficient office equipment to configure Energy Saver mode, see "Making Printer Settings with office equipment by means of energy-saving features, such as global warming.
...less iv For details about how to deal with environmental issues, such as Low-power mode. ❖ Low-power Mode (Energy Saver mode) This printer automatically lowers its power consumption 60 minutes after the last operation has been completed. When a product meets the ENERGY STAR Guidelines for energy efficiency. ... intend to establish an international energy-saving system for developing and introducing energy-efficient office equipment to configure Energy Saver mode, see "Making Printer Settings with office equipment by means of energy-saving features, such as global warming.
Maintenance Guide
Page 8
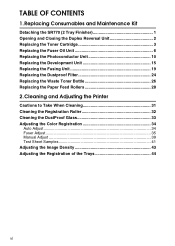
TABLE OF CONTENTS 1. Cleaning and Adjusting the Printer Cautions to Take When Cleaning 31 Cleaning the Registration Roller 32 Cleaning the DustProof Glass 33 Adjusting the Color Registration 34 Auto Adjust 34 Fuser Adjust 35 Manual Adjust 39 Test Sheet Samples 41 Adjusting the Image Density 43 Adjusting the Registration of the ...
TABLE OF CONTENTS 1. Cleaning and Adjusting the Printer Cautions to Take When Cleaning 31 Cleaning the Registration Roller 32 Cleaning the DustProof Glass 33 Adjusting the Color Registration 34 Auto Adjust 34 Fuser Adjust 35 Manual Adjust 39 Test Sheet Samples 41 Adjusting the Image Density 43 Adjusting the Registration of the ...
Maintenance Guide
Page 9
Troubleshooting Error & Status Messages on the Control Panel 69 Printer Does Not Print 81 Other Printing Problems 84 Removing Misfed Paper 88 Detaching the 2 Tray Finisher 88 Opening and Closing the Duplex Reversal Unit 89 ...Removing Misfed Paper in the Bypass Tray 64 4. Paper and Other Media Paper and Other Media Supported by This Printer 47 Paper Sizes 47 Paper Recommendations 53 Loading Paper 53 Storing Paper 53 Types of Paper and Other Media 54 Printable Area 57 Loading Paper...
Troubleshooting Error & Status Messages on the Control Panel 69 Printer Does Not Print 81 Other Printing Problems 84 Removing Misfed Paper 88 Detaching the 2 Tray Finisher 88 Opening and Closing the Duplex Reversal Unit 89 ...Removing Misfed Paper in the Bypass Tray 64 4. Paper and Other Media Paper and Other Media Supported by This Printer 47 Paper Sizes 47 Paper Recommendations 53 Loading Paper 53 Storing Paper 53 Types of Paper and Other Media 54 Printable Area 57 Loading Paper...

Maintenance Guide
Page 11
... let go when it stops. See p.2 "Opening and Closing the Duplex Reversal Unit". B Use both hands to the printer. 1 ZDJP202J The 2 Tray Finisher is detached from the printer to detach the 2 Tray Finisher from the printer. Important ❒ Be sure to attach the 2 Tray Finisher to detach the 2 Tray Finisher. 1. Replacing Consumables and...
... let go when it stops. See p.2 "Opening and Closing the Duplex Reversal Unit". B Use both hands to the printer. 1 ZDJP202J The 2 Tray Finisher is detached from the printer to detach the 2 Tray Finisher from the printer. Important ❒ Be sure to attach the 2 Tray Finisher to detach the 2 Tray Finisher. 1. Replacing Consumables and...

Maintenance Guide
Page 12
... slowly with both hands, and push it in place. ZDJP204J Important ❒ Open the Duplex Reversal Unit after closing the upper left cover of the printer. Replacing Consumables and Maintenance Kit Opening and Closing the Duplex Reversal Unit 1 There are times when you might have to remove the External Tray even... the SR770 (2 Tray Finisher)". 2 ZDJP205J The Duplex Reversal Unit is opened. Important ❒ Attach the Duplex Reversal Unit after detaching the 2 Tray Finisher from the printer. This section describes how to remove misfed paper.
... slowly with both hands, and push it in place. ZDJP204J Important ❒ Open the Duplex Reversal Unit after closing the upper left cover of the printer. Replacing Consumables and Maintenance Kit Opening and Closing the Duplex Reversal Unit 1 There are times when you might have to remove the External Tray even... the SR770 (2 Tray Finisher)". 2 ZDJP205J The Duplex Reversal Unit is opened. Important ❒ Attach the Duplex Reversal Unit after detaching the 2 Tray Finisher from the printer. This section describes how to remove misfed paper.
Maintenance Guide
Page 13
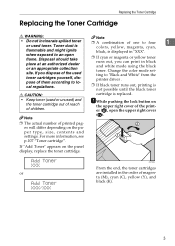
... print in "XXX". Note ❒ The actual number of printed pages will differ depending on the panel display, replace the toner cartridge. Toner dust is colors, yellow, magenta, cyan, flammable and might ignite black, is replaced. • Keep toner (used toner. pose of them according to an open the upper ...yourself, dis- Add Toner XXX or Add Toner XXX/XXX ZDJT006J From the end, the toner cartridges are installed in the order of the print- printer driver . A While pushing the lock button on the upper right cover of magenta (M), cyan (C), yellow (Y), and black (K). 3
... print in "XXX". Note ❒ The actual number of printed pages will differ depending on the panel display, replace the toner cartridge. Toner dust is colors, yellow, magenta, cyan, flammable and might ignite black, is replaced. • Keep toner (used toner. pose of them according to an open the upper ...yourself, dis- Add Toner XXX or Add Toner XXX/XXX ZDJT006J From the end, the toner cartridges are installed in the order of the print- printer driver . A While pushing the lock button on the upper right cover of magenta (M), cyan (C), yellow (Y), and black (K). 3

Maintenance Guide
Page 15
.... 1 ZDJT004J Important ❒ Do not touch the metal contact point with the metal contact area in front, at- appears on the panel display to avoid a printer malfunction. Loading Toner...
.... 1 ZDJT004J Important ❒ Do not touch the metal contact point with the metal contact area in front, at- appears on the panel display to avoid a printer malfunction. Loading Toner...

Maintenance Guide
Page 16
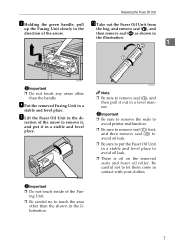
... Oil Unit, turn off the power switch and unplug the power cable. Not waiting for the unit to 1 • The Fusing Unit becomes very the printer, raise it in a burn. If "Replace Fuser Oil Unit (TypeG)" appears on the panel display, replace the Fuser Oil Unit. tach it (B). Replacing Consumables and... Finisher)" C If the Duplex Unit is installed, de- hot. When installing the new tion of the print- Replace Fuser Oil Unit (TypeG) A Turn off the printer it from the printer. Important ❒ Be sure to wait about an hour.
... Oil Unit, turn off the power switch and unplug the power cable. Not waiting for the unit to 1 • The Fusing Unit becomes very the printer, raise it in a burn. If "Replace Fuser Oil Unit (TypeG)" appears on the panel display, replace the Fuser Oil Unit. tach it (B). Replacing Consumables and... Finisher)" C If the Duplex Unit is installed, de- hot. When installing the new tion of the print- Replace Fuser Oil Unit (TypeG) A Turn off the printer it from the printer. Important ❒ Be sure to wait about an hour.
Maintenance Guide
Page 17
... avoid oil leak. ❒ There is oil on the removed seals and fuser oil roller. Important ❒ Be sure to remove the seals to avoid printer malfunction. ❒ Be sure to remove seal (A) first, and then remove seal (B) to avoid oil leak. ❒ Be sure to put the Fuser Oil Unit...
... avoid oil leak. ❒ There is oil on the removed seals and fuser oil roller. Important ❒ Be sure to remove the seals to avoid printer malfunction. ❒ Be sure to remove seal (A) first, and then remove seal (B) to avoid oil leak. ❒ Be sure to put the Fuser Oil Unit...
Maintenance Guide
Page 18
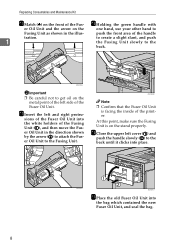
... upper left cover (A) and push the handle slowly (B) to the back. At this point, make sure the Fusing Unit is facing the inside of the printer. push the front area of the handle tration. 1 to create a slight slant, and push the Fusing Unit slowly to the back until it clicks into...
... upper left cover (A) and push the handle slowly (B) to the back. At this point, make sure the Fusing Unit is facing the inside of the printer. push the front area of the handle tration. 1 to create a slight slant, and push the Fusing Unit slowly to the back until it clicks into...
Maintenance Guide
Page 19
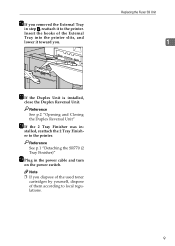
Note ❒ If you dispose of the used toner cartridges by yourself, dispose of the External Tray into the printer slits, and lower it to local regulations. 9 Reference See p.2 "Opening and Closing the Duplex Reversal Unit" R If the 2 Tray Finisher was in the ... (2 Tray Finisher)" S Plug in - P If you removed the External Tray in step D, reattach it toward you. stalled, reattach the 2 Tray Finisher to the printer. Insert the hooks of them according to the printer. Replacing the Fuser Oil Unit 1 ZDJH010J Q If the Duplex Unit is installed, close the Duplex Reversal Unit.
Note ❒ If you dispose of the used toner cartridges by yourself, dispose of the External Tray into the printer slits, and lower it to local regulations. 9 Reference See p.2 "Opening and Closing the Duplex Reversal Unit" R If the 2 Tray Finisher was in the ... (2 Tray Finisher)" S Plug in - P If you removed the External Tray in step D, reattach it toward you. stalled, reattach the 2 Tray Finisher to the printer. Insert the hooks of them according to the printer. Replacing the Fuser Oil Unit 1 ZDJH010J Q If the Duplex Unit is installed, close the Duplex Reversal Unit.
Maintenance Guide
Page 22
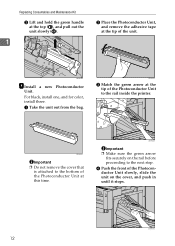
... H Install a new Photoconductor Unit. ZDJH221J Important ❒ Do not remove the cover that is attached to the next step. For black, install one, and for color, install three. A Take the unit out from the bag. Replacing Consumables and Maintenance Kit C Lift and hold the green handle at the top (A), and pull... of the Photoconductor Unit slowly, slide the unit on the rail before proceeding to the bottom of the Photoconductor Unit to the rail inside the printer.
... H Install a new Photoconductor Unit. ZDJH221J Important ❒ Do not remove the cover that is attached to the next step. For black, install one, and for color, install three. A Take the unit out from the bag. Replacing Consumables and Maintenance Kit C Lift and hold the green handle at the top (A), and pull... of the Photoconductor Unit slowly, slide the unit on the rail before proceeding to the bottom of the Photoconductor Unit to the rail inside the printer.

Maintenance Guide
Page 24
Calibrating... Replacing Consumables and Maintenance Kit M Plug in the power cable and turn off the power switch during calibration to avoid a printer malfunction. 14 The printer starts calibration. Important ❒ Do not turn on 1 the panel display. The following message appears on the power switch. Please wait until it stops.
Calibrating... Replacing Consumables and Maintenance Kit M Plug in the power cable and turn off the power switch during calibration to avoid a printer malfunction. 14 The printer starts calibration. Important ❒ Do not turn on 1 the panel display. The following message appears on the power switch. Please wait until it stops.

Maintenance Guide
Page 27
... the tape to its original position on the inside of the front cover. ZDJH019J Note ❒ Be sure to return the provided screwdriver to avoid printer malfunction during operation. ❒ The removed tape is dirty. ZDJH020E 17 Be careful not to let it get in slowly until it stops. ed screwdriver...
... the tape to its original position on the inside of the front cover. ZDJH019J Note ❒ Be sure to return the provided screwdriver to avoid printer malfunction during operation. ❒ The removed tape is dirty. ZDJH020E 17 Be careful not to let it get in slowly until it stops. ed screwdriver...

Maintenance Guide
Page 28
Please wait until it stops. Replacing Consumables and Maintenance Kit L Close the front cover slowly by pushing the two areas on the left and right. 1 ZDJH041J M Plug in the power cable and turn off the power switch during adjustments to avoid a printer malfunction. 18 Please Wait Important ❒ Do not turn on the panel display, and initial adjustments begin. "Please Wait " appears on the power switch.
Please wait until it stops. Replacing Consumables and Maintenance Kit L Close the front cover slowly by pushing the two areas on the left and right. 1 ZDJH041J M Plug in the power cable and turn off the power switch during adjustments to avoid a printer malfunction. 18 Please Wait Important ❒ Do not turn on the panel display, and initial adjustments begin. "Please Wait " appears on the power switch.
Maintenance Guide
Page 29
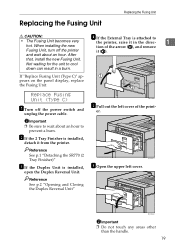
... Replacing the Fusing Unit R CAUTION: • The Fusing Unit becomes very hot. Replace Fusing Unit (Type C) A Turn off the printer and wait about an hour to the printer, raise it from the printer. After D If the External Tray is attached to prevent a burn. When installing the new Fusing Unit, turn off the power...
... Replacing the Fusing Unit R CAUTION: • The Fusing Unit becomes very hot. Replace Fusing Unit (Type C) A Turn off the printer and wait about an hour to the printer, raise it from the printer. After D If the External Tray is attached to prevent a burn. When installing the new Fusing Unit, turn off the power...

Maintenance Guide
Page 31
... following message appears on the power switch. ZDJH051J ZDJH010J P If the Duplex Unit is facing the inside of the handle to the printer. Please wait for a while. Reference See p.1 "Detaching the SR770 (2 Tray Finisher)" R Plug in step D, reattach it toward you removed the External ... See p.2 "Opening and Closing the Duplex Reversal Unit" Q If the 2 Tray Finisher was in Insert the hooks of the External front of the printer. ❒ Confirm that the Fusing Unit is properly positioned in the machine. ZDJH050E Important ❒ Confirm that the Fuser Oil Unit is installed, close...
... following message appears on the power switch. ZDJH051J ZDJH010J P If the Duplex Unit is facing the inside of the handle to the printer. Please wait for a while. Reference See p.1 "Detaching the SR770 (2 Tray Finisher)" R Plug in step D, reattach it toward you removed the External ... See p.2 "Opening and Closing the Duplex Reversal Unit" Q If the 2 Tray Finisher was in Insert the hooks of the External front of the printer. ❒ Confirm that the Fusing Unit is properly positioned in the machine. ZDJH050E Important ❒ Confirm that the Fuser Oil Unit is installed, close...
Maintenance Guide
Page 32
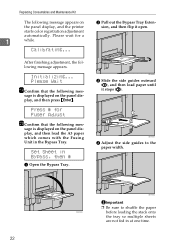
... comes with the Fusing Unit in the Bypass Tray. Please Wait S Confirm that the following mes- sage is displayed on the panel display, and the printer starts color registration adjustment automatically. ZDJH203J C Slide the side guides outward (A), and then load paper until it open.
... comes with the Fusing Unit in the Bypass Tray. Please Wait S Confirm that the following mes- sage is displayed on the panel display, and the printer starts color registration adjustment automatically. ZDJH203J C Slide the side guides outward (A), and then load paper until it open.


