
User's Guide
Page 15
... 8.3 Cleaning the Inside 8.3 Cleaning the Scan Unit 8.5 Maintaining the Toner Cartridge 8.6 Redistributing Toner 8.7 Replacing the Toner Cartridge 8.8 Setting the Notify Toner Option 8.10 Cleaning the Drum 8.11 Ignoring the Toner Empty Message 8.12 Setting E-mail Notification 8.13 Setting the Machine Setup tab 8.13 Setting the Contact Information tab 8.16 xiv
... 8.3 Cleaning the Inside 8.3 Cleaning the Scan Unit 8.5 Maintaining the Toner Cartridge 8.6 Redistributing Toner 8.7 Replacing the Toner Cartridge 8.8 Setting the Notify Toner Option 8.10 Cleaning the Drum 8.11 Ignoring the Toner Empty Message 8.12 Setting E-mail Notification 8.13 Setting the Machine Setup tab 8.13 Setting the Contact Information tab 8.16 xiv

User's Guide
Page 197
... panel until "Maintenance" appears on the bottom line and press Enter. 3 Press the scroll button ( or ) to be replaced. The first available menu item, "Clean Drum," displays on the bottom line. 2 Press the scroll button ( or ) to display "Notify Toner " on the top line of the display. Selecting "Off" disables this...
... panel until "Maintenance" appears on the bottom line and press Enter. 3 Press the scroll button ( or ) to be replaced. The first available menu item, "Clean Drum," displays on the bottom line. 2 Press the scroll button ( or ) to display "Notify Toner " on the top line of the display. Selecting "Off" disables this...
User's Guide
Page 198
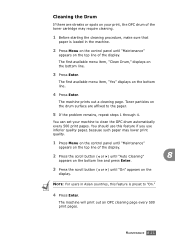
...500 print pages. The first available menu item, "Yes" displays on the bottom line. 3 Press Enter. You can set your print, the OPC drum of the toner cartridge may lower print quality. 1 Press Menu on the control panel until "Maintenance" appears on the top line of the display....machine prints out a cleaning page. MAINTENANCE 8.11 The first available menu item, "Clean Drum," displays on the bottom line. 4 Press Enter. Toner particles on the drum surface are streaks or spots on the display. Cleaning the Drum If there are affixed to the paper. 5 If the problem remains, repeat steps 1 ...
...500 print pages. The first available menu item, "Yes" displays on the bottom line. 3 Press Enter. You can set your print, the OPC drum of the toner cartridge may lower print quality. 1 Press Menu on the control panel until "Maintenance" appears on the top line of the display....machine prints out a cleaning page. MAINTENANCE 8.11 The first available menu item, "Clean Drum," displays on the bottom line. 4 Press Enter. Toner particles on the drum surface are streaks or spots on the display. Cleaning the Drum If there are affixed to the paper. 5 If the problem remains, repeat steps 1 ...

User's Guide
Page 222
... streak or faded area appears on page 8.7. See "Redistributing Toner" on the page: AaBbCc AaBbCc AaBbCc • The toner supply is wrong. See "Cleaning the Drum" on . If necessary, replace the toner cartridge. Printing Quality Problems If the inside the machine may notice a reduction in the software application is low. See...
... streak or faded area appears on page 8.7. See "Redistributing Toner" on the page: AaBbCc AaBbCc AaBbCc • The toner supply is wrong. See "Cleaning the Drum" on . If necessary, replace the toner cartridge. Printing Quality Problems If the inside the machine may notice a reduction in the software application is low. See...

User's Guide
Page 223
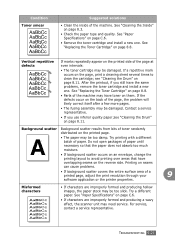
Clean the inside the toner cartridge has probably been scratched. See "Cleaning the Drum" on page 8.8. The manufacturing processes can increase the amount of the paper is uneven or the paper has moist spots on page 9.21. • If ...; The moisture content of background shading. • Remove the old toner cartridge and install a new one . See "Cleaning the Inside" on the page: • The drum inside of paper. • The toner cartridge may be dirty. Try a different kind or brand of your machine. See "Vertical repetitive defects" on its surface...
Clean the inside the toner cartridge has probably been scratched. See "Cleaning the Drum" on page 8.8. The manufacturing processes can increase the amount of the paper is uneven or the paper has moist spots on page 9.21. • If ...; The moisture content of background shading. • Remove the old toner cartridge and install a new one . See "Cleaning the Inside" on the page: • The drum inside of paper. • The toner cartridge may be dirty. Try a different kind or brand of your machine. See "Vertical repetitive defects" on its surface...
User's Guide
Page 224
.... Misformed characters • If characters are improperly formed and producing a wavy effect, the scanner unit may be damaged. see "Cleaning the Drum" on page 8.11. Contact a service representative. • If you still have the same problems, remove the toner cartridge and install a...; If background scatter covers the entire surface area of paper. After the printout, if you use inferior quality paper;see "Cleaning the Drum" on page 8.3. • Check the paper type and quality. Try a different paper. TROUBLESHOOTING 9.21 Condition Toner smear Suggested solutions ...
.... Misformed characters • If characters are improperly formed and producing a wavy effect, the scanner unit may be damaged. see "Cleaning the Drum" on page 8.11. Contact a service representative. • If you still have the same problems, remove the toner cartridge and install a...; If background scatter covers the entire surface area of paper. After the printout, if you use inferior quality paper;see "Cleaning the Drum" on page 8.3. • Check the paper type and quality. Try a different paper. TROUBLESHOOTING 9.21 Condition Toner smear Suggested solutions ...

User's Guide
Page 274
...28 C canceling copy 5.5 fax 7.12 print 4.3 scan 6.6, 6.8 scheduled faxes 7.33 CCD power save mode, use 2.24 characters, enter 2.18 cleaning drum 8.11 inside 8.3 LSU 8.4 outside 8.3 scan unit 8.5 clone, special copy 5.10 collation, special copy 5.10 components 1.4 connection AC power 2.15 ... jam, clear 9.2 loading ADF 5.5, 7.6 document glass 5.4, 7.7 preparing 5.3 document glass cleaning 8.5 loading 7.7 DRPD (Distinctive Ring Pattern Detection) 7.17 drum, clean 8.11 E error messages 9.12 F Favorite setting, use 4.12 fax system, set advanced settings 7.37 basic settings 7.3 fit to page copying 5.11...
...28 C canceling copy 5.5 fax 7.12 print 4.3 scan 6.6, 6.8 scheduled faxes 7.33 CCD power save mode, use 2.24 characters, enter 2.18 cleaning drum 8.11 inside 8.3 LSU 8.4 outside 8.3 scan unit 8.5 clone, special copy 5.10 collation, special copy 5.10 components 1.4 connection AC power 2.15 ... jam, clear 9.2 loading ADF 5.5, 7.6 document glass 5.4, 7.7 preparing 5.3 document glass cleaning 8.5 loading 7.7 DRPD (Distinctive Ring Pattern Detection) 7.17 drum, clean 8.11 E error messages 9.12 F Favorite setting, use 4.12 fax system, set advanced settings 7.37 basic settings 7.3 fit to page copying 5.11...

Service Manual
Page 14
... 4.3.1 INCORRECT PRINT POSITION 4-12 4.3.2 JAM 0 4-12 4.3.3 JAM 1 4-13 4.3.4 JAM 2 4-13 4.3.5 MULTI-FEEDING 4-14 4.3.6 PAPER IN THE FUSING UNIT 4-14 4.3.7 PAPER BECOMES ROLLED AROUND THE OPC DRUM 4-15 4.3.8 DEFECTIVE ADF 4-15 4.4 MACHINE MALFUNCTIONS 4-16 4.4.1 LCD DISPLAY DEFECTIVE 4-16 4.4.2 DEFECTIVE CONTROL PANEL 4-16 4.4.3 FUSING GEAR MELTS (OVERHEATS 4-16 4.4.4 PAPER EMPTY 1 4-17 4.4.5 PAPER EMPTY...
... 4.3.1 INCORRECT PRINT POSITION 4-12 4.3.2 JAM 0 4-12 4.3.3 JAM 1 4-13 4.3.4 JAM 2 4-13 4.3.5 MULTI-FEEDING 4-14 4.3.6 PAPER IN THE FUSING UNIT 4-14 4.3.7 PAPER BECOMES ROLLED AROUND THE OPC DRUM 4-15 4.3.8 DEFECTIVE ADF 4-15 4.4 MACHINE MALFUNCTIONS 4-16 4.4.1 LCD DISPLAY DEFECTIVE 4-16 4.4.2 DEFECTIVE CONTROL PANEL 4-16 4.4.3 FUSING GEAR MELTS (OVERHEATS 4-16 4.4.4 PAPER EMPTY 1 4-17 4.4.5 PAPER EMPTY...

Service Manual
Page 22
... or replace any user settings. Exposure for as little as light can be admitted to the OPC area and can damage the OPC Drum. • Take care not to direct sunlight, fluorescent, or incandescent Caution2.tif lighting. ASSEMBLY/DISASSEMBLY PRECAUTIONS Replace with the covers (... can damage the surface's photoconductive properties and will be compromised. Check the contents of the machine memory and make a note of OPC Drum. If the green surface of components and correct cable routing before you disassemble any electrical parts. 3. Take care to note the exact ...
... or replace any user settings. Exposure for as little as light can be admitted to the OPC area and can damage the OPC Drum. • Take care not to direct sunlight, fluorescent, or incandescent Caution2.tif lighting. ASSEMBLY/DISASSEMBLY PRECAUTIONS Replace with the covers (... can damage the surface's photoconductive properties and will be compromised. Check the contents of the machine memory and make a note of OPC Drum. If the green surface of components and correct cable routing before you disassemble any electrical parts. 3. Take care to note the exact ...

Service Manual
Page 101
... bare hands). 2) Rotate the gear wheel and remove the paper from the cassette. 3) Clean all fingerprints from the OPC Drum with a soft tissue. Do not scratch the drum surface. 4.3.8 DEFECTIVE ADF Description: ADF does not operate correctly. Paper is stored correctly. Use paper supported for use in this machine. (See Operator Guide... toner cartridge from the machine (do not touch the green surface of the paper is curled. 1. PAPER FEED PROBLEMS 4.3.7 PAPER BECOMES ROLLED AROUND THE OPC DRUM Description: Paper becomes rolled around the OPC...
... bare hands). 2) Rotate the gear wheel and remove the paper from the cassette. 3) Clean all fingerprints from the OPC Drum with a soft tissue. Do not scratch the drum surface. 4.3.8 DEFECTIVE ADF Description: ADF does not operate correctly. Paper is stored correctly. Use paper supported for use in this machine. (See Operator Guide... toner cartridge from the machine (do not touch the green surface of the paper is curled. 1. PAPER FEED PROBLEMS 4.3.7 PAPER BECOMES ROLLED AROUND THE OPC DRUM Description: Paper becomes rolled around the OPC...

Service Manual
Page 106
Digital Printer Digital Printer Digital Printer Digital Printer Digital Printer Cause Solution B273T914.WMF 1. Particles, contamination, or burrs on the top of black images. 5. OPC drum is fed despite the paper being in the incorrect position in the paper cassette. Replace the toner cartridge. 6. Replace the transfer roller. 6. Cause Solution Defective ...
Digital Printer Digital Printer Digital Printer Digital Printer Digital Printer Cause Solution B273T914.WMF 1. Particles, contamination, or burrs on the top of black images. 5. OPC drum is fed despite the paper being in the incorrect position in the paper cassette. Replace the toner cartridge. 6. Replace the transfer roller. 6. Cause Solution Defective ...

Service Manual
Page 107
... free cloth. Digital Printer Digital Printer Digital Printer Digital Printer Digital Printer Cause 1. Clean all high-voltage terminals on the output print. Examine the OPC drum surface and remove any particles with paper dust or other matter. 2. Remove toner and dust particles. 2. Transfer roller has reached end of life. The following...
... free cloth. Digital Printer Digital Printer Digital Printer Digital Printer Digital Printer Cause 1. Clean all high-voltage terminals on the output print. Examine the OPC drum surface and remove any particles with paper dust or other matter. 2. Remove toner and dust particles. 2. Transfer roller has reached end of life. The following...

Service Manual
Page 124
OPC drum is empty. B273 4-38 SM Toner cartridge mechanical life has expired. The toner cartridge is near end of remaining toner is still toner in the ... less than 10%. TONER CARTRIDGE 4.10.3 TONER CARTRIDGE ERROR MESSAGES The following table shows toner cartridge-related error messages. Error Message Toner Low Toner Empty Drum Warning Replace Drum Description The amount of life (14,000 pages). Replace the cartridge. Solution Replace the cartridge.
OPC drum is empty. B273 4-38 SM Toner cartridge mechanical life has expired. The toner cartridge is near end of remaining toner is still toner in the ... less than 10%. TONER CARTRIDGE 4.10.3 TONER CARTRIDGE ERROR MESSAGES The following table shows toner cartridge-related error messages. Error Message Toner Low Toner Empty Drum Warning Replace Drum Description The amount of life (14,000 pages). Replace the cartridge. Solution Replace the cartridge.

Service Manual
Page 125
Measure the time between contamination marks. • B) Check both ends are not printed. If both ends of the toner cartridge OPC drum. Contamination at regular intervals: • A) Check the distance between 'ticks' if this sound is heard. Replace the toner are contaminated with toner, the waste toner ...
Measure the time between contamination marks. • B) Check both ends are not printed. If both ends of the toner cartridge OPC drum. Contamination at regular intervals: • A) Check the distance between 'ticks' if this sound is heard. Replace the toner are contaminated with toner, the waste toner ...

Service Manual
Page 126
... where they should not appear. The transfer roller's life has expired if a black or white image is damaged or matter clings on the drum, if white spots are visible at irregular intervals. B273 4-40 SM Check for matter on the OPC surface. In this condition, perform the...replace the transfer roller. Clean with particles, if light or dark black dots appear periodically on the image. B) 75.5 mm intervals: Clean the OPC drum. 3. Also, check the transfer voltage and readjust it if necessary. Toner cartridge rollers are contaminated with isopropyl alcohol if necessary. A) 38 mm interval: ...
... where they should not appear. The transfer roller's life has expired if a black or white image is damaged or matter clings on the drum, if white spots are visible at irregular intervals. B273 4-40 SM Check for matter on the OPC surface. In this condition, perform the...replace the transfer roller. Clean with particles, if light or dark black dots appear periodically on the image. B) 75.5 mm intervals: Clean the OPC drum. 3. Also, check the transfer voltage and readjust it if necessary. Toner cartridge rollers are contaminated with isopropyl alcohol if necessary. A) 38 mm interval: ...

Service Manual
Page 143
... Jobs MSG Confirm Junk Fax List Scan Journal Reset Network Config Network Set to Default Print net CFG Speaker Ringer Key Sound Alarm Sound Clean Drum Auto Cleaning Notify Toner Clear Settings Network Scan Contents Phone Book List Transmission Journal Reception Journal System Data List Schedule Information List Message Confirmation Report...
... Jobs MSG Confirm Junk Fax List Scan Journal Reset Network Config Network Set to Default Print net CFG Speaker Ringer Key Sound Alarm Sound Clean Drum Auto Cleaning Notify Toner Clear Settings Network Scan Contents Phone Book List Transmission Journal Reception Journal System Data List Schedule Information List Message Confirmation Report...

Service Manual
Page 157
... Fusing unit • Toner cartridge Detailed Descriptions SM 6-3 B273 The transfer roller moves toner from the OPC drum surface to the machine. The motor supplies power to the OPC drum. A friction pad separates the paper and ensures that paper is a gear-driven power unit. A sensor ... ASSEMBLY The transfer assembly consists of the PTL (Pre-Transfer Lamp) and the transfer roller. At this time a message appears on the drum's surface, and improves transfer efficiency. SYSTEM LAYOUT 6.2 SYSTEM LAYOUT 6.2.1 PAPER FEED The paper tray unit and the manual by-pass unit automatically...
... Fusing unit • Toner cartridge Detailed Descriptions SM 6-3 B273 The transfer roller moves toner from the OPC drum surface to the machine. The motor supplies power to the OPC drum. A friction pad separates the paper and ensures that paper is a gear-driven power unit. A sensor ... ASSEMBLY The transfer assembly consists of the PTL (Pre-Transfer Lamp) and the transfer roller. At this time a message appears on the drum's surface, and improves transfer efficiency. SYSTEM LAYOUT 6.2 SYSTEM LAYOUT 6.2.1 PAPER FEED The paper tray unit and the manual by-pass unit automatically...
Service Manual
Page 159
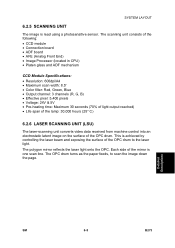
Each side of the mirror is read using a photosensitive sensor. The polygon mirror reflects the laser light onto the OPC. The OPC drum turns as the paper feeds, to the laser light. Detailed Descriptions SM 6-5 B273 SYSTEM LAYOUT 6.2.5 SCANNING UNIT The image is one scan line. ...This is achieved by controlling the laser beam and exposing the surface of the OPC drum. The scanning unit consists of the following: • CCD module • Connection board • ADF board • AFE (Analog Front End) • Image ...
Each side of the mirror is read using a photosensitive sensor. The polygon mirror reflects the laser light onto the OPC. The OPC drum turns as the paper feeds, to the laser light. Detailed Descriptions SM 6-5 B273 SYSTEM LAYOUT 6.2.5 SCANNING UNIT The image is one scan line. ...This is achieved by controlling the laser beam and exposing the surface of the OPC drum. The scanning unit consists of the following: • CCD module • Connection board • ADF board • AFE (Analog Front End) • Image ...

Service Manual
Page 160
The toner cartridge unit consists of the OPC drum and the charging roller. There is used to collect used toner. • Developing method: Non-magnetic, one-element contacting method • Toner: Non-magnetic... consists of the toner, supply roller, developing roller, and doctor blade. SYSTEM LAYOUT 6.2.7 TONER CARTRIDGE [A] [C] [B] -430V -950V [D] -580V [E] [F] B273D05.WMF [A] Charging roller [B] OPC drum [C] Developing roller [D] Doctor blade [E] Supply roller [F] Transfer roller The toner cartridge contains the OPC unit and toner unit. A cleaning blade is no Toner Near End...
The toner cartridge unit consists of the OPC drum and the charging roller. There is used to collect used toner. • Developing method: Non-magnetic, one-element contacting method • Toner: Non-magnetic... consists of the toner, supply roller, developing roller, and doctor blade. SYSTEM LAYOUT 6.2.7 TONER CARTRIDGE [A] [C] [B] -430V -950V [D] -580V [E] [F] B273D05.WMF [A] Charging roller [B] OPC drum [C] Developing roller [D] Doctor blade [E] Supply roller [F] Transfer roller The toner cartridge contains the OPC unit and toner unit. A cleaning blade is no Toner Near End...

Service Manual
Page 166
...-900V to -1000V. • Output voltage: -1550V DC ± 50V • Failure Symptom: Toner particles are transferred to the whole OPC drum surface if MHV is printed out. Therefore, toner with negative polarity is developed onto an exposed section of the paper by the LSU. At printing... negative polarity to the transfer roller. Ghost images may appear which repeat at 76mm intervals. This forces toner to transfer back to the to OPC drum. • Output Voltage: -1200V, +300V/-150V • Failure Symptom: Smudges and toner contamination appear on the section of the printed page....
...-900V to -1000V. • Output voltage: -1550V DC ± 50V • Failure Symptom: Toner particles are transferred to the whole OPC drum surface if MHV is printed out. Therefore, toner with negative polarity is developed onto an exposed section of the paper by the LSU. At printing... negative polarity to the transfer roller. Ghost images may appear which repeat at 76mm intervals. This forces toner to transfer back to the to OPC drum. • Output Voltage: -1200V, +300V/-150V • Failure Symptom: Smudges and toner contamination appear on the section of the printed page....


