User's Guide
Page 4
Do not use this manual might occur. Do not touch the parts with a label indicating the " ". Otherwise, an injury might result in hazardous radiation exposure. Normally, the ozone level is considered a class 1 laser device. If ozone odor ...
Do not use this manual might occur. Do not touch the parts with a label indicating the " ". Otherwise, an injury might result in hazardous radiation exposure. Normally, the ozone level is considered a class 1 laser device. If ozone odor ...
User's Guide
Page 8
... "Setting the Machine ID"in this manual. If this information into your document by the party responsible for compliance could void the user's authority to Part 15 of the FCC Rules. Caution Changes or modifications not expressly approved by the FAX HEADER feature. The Telephone Consumer Protection Act of 1991 makes...
... "Setting the Machine ID"in this manual. If this information into your document by the party responsible for compliance could void the user's authority to Part 15 of the FCC Rules. Caution Changes or modifications not expressly approved by the FAX HEADER feature. The Telephone Consumer Protection Act of 1991 makes...
User's Guide
Page 9
...a telephone interface. Excessive RENs on a telephone line may be advised of your right to file a complaint with the applicable FCC Part 68 rules and requirements adopted by the ACTA. Contact the state public utility commission, public service commission or corporation commission for detail. ...REN of the product identifier that contains, among other information, a product identifier in order for repair or warranty information, please contact RICOH CORP. at 1-800-FASTFIX. If the equipment is causing harm to the telephone network, the telephone company may request that could affect...
...a telephone interface. Excessive RENs on a telephone line may be advised of your right to file a complaint with the applicable FCC Part 68 rules and requirements adopted by the ACTA. Contact the state public utility commission, public service commission or corporation commission for detail. ...REN of the product identifier that contains, among other information, a product identifier in order for repair or warranty information, please contact RICOH CORP. at 1-800-FASTFIX. If the equipment is causing harm to the telephone network, the telephone company may request that could affect...

User's Guide
Page 222
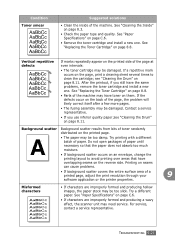
The illustrations print incorrectly in print quality. Adjust the print resolution and turn the toner save mode is low. Some parts, such as Bit Image in the software application is dirty or paper has been loaded improperly, you may notice a reduction in Adobe Illustrator. ... or faded area appears on the page: AaBbCc AaBbCc AaBbCc • The toner supply is on page 8.11. • The surface of the LSU part inside of toner. See "Cleaning the Drum" on . If necessary, replace the toner cartridge. Printing Quality Problems If the inside the machine may be ...
The illustrations print incorrectly in print quality. Adjust the print resolution and turn the toner save mode is low. Some parts, such as Bit Image in the software application is dirty or paper has been loaded improperly, you may notice a reduction in Adobe Illustrator. ... or faded area appears on the page: AaBbCc AaBbCc AaBbCc • The toner supply is on page 8.11. • The surface of the LSU part inside of toner. See "Cleaning the Drum" on . If necessary, replace the toner cartridge. Printing Quality Problems If the inside the machine may be ...

User's Guide
Page 223
... to reject toner. Remove the toner cartridge and install a new one . If white vertical streaks appear on the page: • A single sheet of the LSU part inside of paper. • The toner cartridge may not meet specifications; See "Replacing the Toner Cartridge" on page 8.8. If faded areas, generally rounded, occur randomly...
... to reject toner. Remove the toner cartridge and install a new one . If white vertical streaks appear on the page: • A single sheet of the LSU part inside of paper. • The toner cartridge may not meet specifications; See "Replacing the Toner Cartridge" on page 8.8. If faded areas, generally rounded, occur randomly...
User's Guide
Page 224
... too much moisture. • If background scatter occurs on an envelope, change the printing layout to clean the cartridge; See "Paper Specifications" on page 8.8. • Parts of the page, the problem will likely correct itself after a few more pages. • The fusing assembly may have overlapping seams on the printed page...
... too much moisture. • If background scatter occurs on an envelope, change the printing layout to clean the cartridge; See "Paper Specifications" on page 8.8. • Parts of the page, the problem will likely correct itself after a few more pages. • The fusing assembly may have overlapping seams on the printed page...

User's Guide
Page 226
... install a new one . See "Replacing the Toner Cartridge" on page C.6. • Remove the toner cartridge and install a new one . Character voids are white areas within parts of transparencies, some character voids are using transparencies, try rotating the paper 180° in the input tray. See "Paper Specifications" on page 8.3. • Check...
... install a new one . See "Replacing the Toner Cartridge" on page C.6. • Remove the toner cartridge and install a new one . Character voids are white areas within parts of transparencies, some character voids are using transparencies, try rotating the paper 180° in the input tray. See "Paper Specifications" on page 8.3. • Check...

User's Guide
Page 255
Use only a Manufacture-approved DIMM, part numbers Memory Unit Type SA 32MB or Memory Unit Type SA 128MB. Installing Memory DIMM Your machine has dual in-line memory module (DIMM) slot. ...
Use only a Manufacture-approved DIMM, part numbers Memory Unit Type SA 32MB or Memory Unit Type SA 128MB. Installing Memory DIMM Your machine has dual in-line memory module (DIMM) slot. ...

Service Manual
Page 7
NO PART OF THIS DOCUMENT MAY BE REPRODUCED IN ANY FASHION AND DISTRIBUTED WITHOUT THE PRIOR PERMISSION OF RICOH CORPORATION. No such use, or the use of any trade name, or web site is in this document are used in the best ... when discussing the information contained within this document to maintain a level of confidentiality that is intended to convey endorsement or other affiliation with Ricoh products. 2005 RICOH Corporation. All product names, domain names or product illustrations, including desktop images, used throughout this book in an informational or editorial fashion ...
NO PART OF THIS DOCUMENT MAY BE REPRODUCED IN ANY FASHION AND DISTRIBUTED WITHOUT THE PRIOR PERMISSION OF RICOH CORPORATION. No such use, or the use of any trade name, or web site is in this document are used in the best ... when discussing the information contained within this document to maintain a level of confidentiality that is intended to convey endorsement or other affiliation with Ricoh products. 2005 RICOH Corporation. All product names, domain names or product illustrations, including desktop images, used throughout this book in an informational or editorial fashion ...

Service Manual
Page 9
WARNING The Service Manual contains information regarding service techniques, procedures, processes and spare parts of warranty protection. Users of this service manual to repair or modify Ricoh equipment risk personal injury, damage to property or loss of office equipment distributed by successfully completing a Ricoh Technical Training Program. Untrained and uncertified users utilizing information contained in this manual should be either service trained or certified by Ricoh Corporation. Ricoh Corporation
WARNING The Service Manual contains information regarding service techniques, procedures, processes and spare parts of warranty protection. Users of this service manual to repair or modify Ricoh equipment risk personal injury, damage to property or loss of office equipment distributed by successfully completing a Ricoh Technical Training Program. Untrained and uncertified users utilizing information contained in this manual should be either service trained or certified by Ricoh Corporation. Ricoh Corporation
Service Manual
Page 19
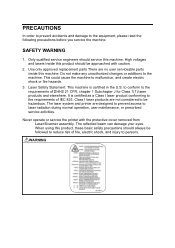
...certified in the U.S. Never operate or service the printer with caution. 2. The laser system and printer are no user serviceable parts inside this product should service this product, these basic safety precautions should always be approached with the protective cover removed from ...Laser/Scanner assembly. Use only approved replacement parts There are designed to prevent access to the equipment, please read the following precautions before you service the machine. PRECAUTIONS ...
...certified in the U.S. Never operate or service the printer with caution. 2. The laser system and printer are no user serviceable parts inside this product should service this product, these basic safety precautions should always be approached with the protective cover removed from ...Laser/Scanner assembly. Use only approved replacement parts There are designed to prevent access to the equipment, please read the following precautions before you service the machine. PRECAUTIONS ...

Service Manual
Page 21
.... 5. Dampness and dust build-up inside the machine can cause damage, shock, or fire if spilled into the machine through the ventilator fan or other part of water, chemicals, or other liquids close to the wall socket in operation. 3. Failure to do so could lead to cut or damage the power...
.... 5. Dampness and dust build-up inside the machine can cause damage, shock, or fire if spilled into the machine through the ventilator fan or other part of water, chemicals, or other liquids close to the wall socket in operation. 3. Failure to do so could lead to cut or damage the power...

Service Manual
Page 22
... Drum. • Take care not to direct sunlight, fluorescent, or incandescent Caution2.tif lighting. Perform the following procedures before you disassemble any parts: 1. Disconnect interface cables and power cables. 4. Check the contents of the machine memory and make a note of the OPC Drum is... 2. Handling of components and correct cable routing before you service or replace any user settings. Take care when working with approved replacement parts only. CAUTION1.TIF 5. These will be erased if the main board or network card is exposed to light. • Take care...
... Drum. • Take care not to direct sunlight, fluorescent, or incandescent Caution2.tif lighting. Perform the following procedures before you disassemble any parts: 1. Disconnect interface cables and power cables. 4. Check the contents of the machine memory and make a note of the OPC Drum is... 2. Handling of components and correct cable routing before you service or replace any user settings. Take care when working with approved replacement parts only. CAUTION1.TIF 5. These will be erased if the main board or network card is exposed to light. • Take care...

Service Manual
Page 37
... See or refer to which it is latched. Remove the toner cartridge before you service the machine. 2. Use only approved replacement parts. Ensure that all cables are correctly routed. Unplug the power cord before you begin service on the machine. B273R901.WMF SM 3-1... B273 Return all components are held in place with plastic latches. Machine function cannot be guaranteed if unauthorized replacement parts are no documents stored in their original position after you service the machine. 4. Use a flat clean surface to their correct positions...
... See or refer to which it is latched. Remove the toner cartridge before you service the machine. 2. Use only approved replacement parts. Ensure that all cables are correctly routed. Unplug the power cord before you begin service on the machine. B273R901.WMF SM 3-1... B273 Return all components are held in place with plastic latches. Machine function cannot be guaranteed if unauthorized replacement parts are no documents stored in their original position after you service the machine. 4. Use a flat clean surface to their correct positions...

Service Manual
Page 44
Free the scanner cable harness [E] from the frame. [G] B273R915.WMF 7. Lift the front part of the OPE front cover [G] to release it from the hooks connecting it from the clips [F] underneath the scanner. B273 3-8 SM Remove it to the scanning assembly. Remove the OPE front cover. SCANNER ASSEMBLY [F] [E] B273R914.WMF 6.
Free the scanner cable harness [E] from the frame. [G] B273R915.WMF 7. Lift the front part of the OPE front cover [G] to release it from the hooks connecting it from the clips [F] underneath the scanner. B273 3-8 SM Remove it to the scanning assembly. Remove the OPE front cover. SCANNER ASSEMBLY [F] [E] B273R914.WMF 6.

Service Manual
Page 45
Remove 4 x securing the upper part [J] of the scanning unit upward and remove it. Lift the upper part of the scanning unit. 10. NOTE: Ensure that the harness is threaded through the frame. [J] B273R917.WMF 9. SM 3-9 B273 Then remove the OPE as shown. Unclip 2 x clip securing the upper part of the OPE unit [I ] [H] Replacement Adjustment B273R916.WMF 8. SCANNER ASSEMBLY [I ]. Release the 3 x clips [H] on the front of the scanning unit from the scanner assembly.
Remove 4 x securing the upper part [J] of the scanning unit upward and remove it. Lift the upper part of the scanning unit. 10. NOTE: Ensure that the harness is threaded through the frame. [J] B273R917.WMF 9. SM 3-9 B273 Then remove the OPE as shown. Unclip 2 x clip securing the upper part of the OPE unit [I ] [H] Replacement Adjustment B273R916.WMF 8. SCANNER ASSEMBLY [I ]. Release the 3 x clips [H] on the front of the scanning unit from the scanner assembly.

Service Manual
Page 68
... the fusing unit onto the bottom part of the left and right side stripper pawl holder slots (shown in white circles below ). 4. Place the four stripper pawls [A] back into the stripper pawl ...
... the fusing unit onto the bottom part of the left and right side stripper pawl holder slots (shown in white circles below ). 4. Place the four stripper pawls [A] back into the stripper pawl ...
Service Manual
Page 87
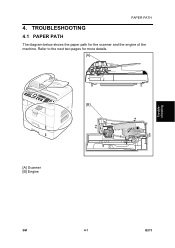
PAPER PATH 4. TROUBLESHOOTING 4.1 PAPER PATH The diagram below shows the paper path for more details. [A] (3e0tSsh) e [A] Scanner [B] Engine [B] Engine Part 4 Fuser 7 PR 1 3 L S U CR Toner Cartridge DR OPC SR 2 TR PTL 6 FR 8 5 B273T04.WMF Troubleshooting SM 4-1 B273 Refer to the next two pages for the scanner and the engine of the machine.
PAPER PATH 4. TROUBLESHOOTING 4.1 PAPER PATH The diagram below shows the paper path for more details. [A] (3e0tSsh) e [A] Scanner [B] Engine [B] Engine Part 4 Fuser 7 PR 1 3 L S U CR Toner Cartridge DR OPC SR 2 TR PTL 6 FR 8 5 B273T04.WMF Troubleshooting SM 4-1 B273 Refer to the next two pages for the scanner and the engine of the machine.

Service Manual
Page 89
Paper output area (face down) 4. Paper empty sensor (by-pass) 5. Paper empty sensor (paper feed unit) 6. Paper feed sensor 7. PAPER PATH Engine Engine Part 3 L S U 7 2 PTL 6 4 5 1 B273T06.WMF 1. Paper exit sensor Troubleshooting SM 4-3 B273 Paper feed unit 2. By-pass tray 3.
Paper output area (face down) 4. Paper empty sensor (by-pass) 5. Paper empty sensor (paper feed unit) 6. Paper feed sensor 7. PAPER PATH Engine Engine Part 3 L S U 7 2 PTL 6 4 5 1 B273T06.WMF 1. Paper exit sensor Troubleshooting SM 4-3 B273 Paper feed unit 2. By-pass tray 3.

Service Manual
Page 99
... unit, after it passes through the actuator feed. Jam 2 can appear even if the paper is damaged: • Check if burrs show on the assembly part of the exit actuator. • Check if particles prevent or other debris correct operation of the pressure roller with dry gauze. Disassemble the fusing unit...
... unit, after it passes through the actuator feed. Jam 2 can appear even if the paper is damaged: • Check if burrs show on the assembly part of the exit actuator. • Check if particles prevent or other debris correct operation of the pressure roller with dry gauze. Disassemble the fusing unit...


