User Manual
Page 8
... ...69 Audio Processor...69 Sound Logic ...70 Audio Mode ...70 SAP (Second Audio Program 70 Balance ...70 Audio Connections...71 Connections Menu ...72 Signal Strength...72 Channel Search...72 Signal Source ...73 Auto Tuning ...73 Special Features...73 Preferences Menu ...74 Closed Captioning...74 Screen Format ...76 Time Menu ...77 Color Scheme...77 Translucency ...77 Menu Language ...77 Power Indicator...78 Lamp Power...78 Chapter 5: Other Information Frequently Asked Questions (FAQs 80 Troubleshooting ...81 Lamp Replacement Information ...85...
... ...69 Audio Processor...69 Sound Logic ...70 Audio Mode ...70 SAP (Second Audio Program 70 Balance ...70 Audio Connections...71 Connections Menu ...72 Signal Strength...72 Channel Search...72 Signal Source ...73 Auto Tuning ...73 Special Features...73 Preferences Menu ...74 Closed Captioning...74 Screen Format ...76 Time Menu ...77 Color Scheme...77 Translucency ...77 Menu Language ...77 Power Indicator...78 Lamp Power...78 Chapter 5: Other Information Frequently Asked Questions (FAQs 80 Troubleshooting ...81 Lamp Replacement Information ...85...

User Manual
Page 11
... receive cable channels. To complete a channel search now, go to the connection on page 14 for these locations. Connections & Setup Choose Your Signal The first part of your TV is to get a signal. The back panel of connecting your TV allows you are tuned to the Cable Input. Using the Antenna Input Connect a coaxial cable from the wall outlet to the CABLE INPUT on page 88. • When you get to the Channel Search screen...
... receive cable channels. To complete a channel search now, go to the connection on page 14 for these locations. Connections & Setup Choose Your Signal The first part of your TV is to get a signal. The back panel of connecting your TV allows you are tuned to the Cable Input. Using the Antenna Input Connect a coaxial cable from the wall outlet to the CABLE INPUT on page 88. • When you get to the Channel Search screen...
User Manual
Page 18
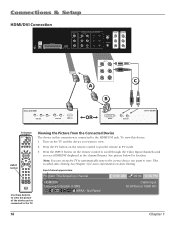
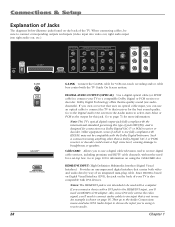
... 1 Connections & Setup HDMI/DVI Connection G-LINK DIGITAL AUDIO OUTPUT (OPTICAL) COMPOSITE INPUT INPUT 1 COMPONENT (1080i/720p/480p/480i)/COMPOSITE INPUTS INPUT 2 VIDEO Y/VIDEO L L PB R R PR S-VIDEO CABLE INPUT AUDIO/VIDEO OUTPUT FIXED/VARIABLE AUDIO OUTPUT VIDEO SUBWOOFER L L R R Device with HDMI Y Pb Pr Video Out R L Audio Out HDMI Out INPUT 3 Y/VIDEO L PB R A PR S-VIDEO B OR DVI Out C R L Audio Out Device with DVI TV button learning ON-OFF TV DVD VCR SAT/CAB AUX AUDIO CC PRESETS FREEZE LIGHT CC FORMAT CLEAR C INFO i MENU M SOUND...
... 1 Connections & Setup HDMI/DVI Connection G-LINK DIGITAL AUDIO OUTPUT (OPTICAL) COMPOSITE INPUT INPUT 1 COMPONENT (1080i/720p/480p/480i)/COMPOSITE INPUTS INPUT 2 VIDEO Y/VIDEO L L PB R R PR S-VIDEO CABLE INPUT AUDIO/VIDEO OUTPUT FIXED/VARIABLE AUDIO OUTPUT VIDEO SUBWOOFER L L R R Device with HDMI Y Pb Pr Video Out R L Audio Out HDMI Out INPUT 3 Y/VIDEO L PB R A PR S-VIDEO B OR DVI Out C R L Audio Out Device with DVI TV button learning ON-OFF TV DVD VCR SAT/CAB AUX AUDIO CC PRESETS FREEZE LIGHT CC FORMAT CLEAR C INFO i MENU M SOUND...
User Manual
Page 20
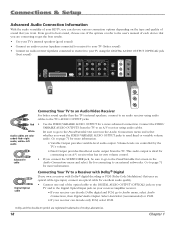
... Out screen in the Audio Connections menu and select Audio cables are registered trademarks of Dolby Laboratories. 18 Chapter 1 Select AutoSelect (recommended) or PCM. • If your HDTV, you can choose various connection options depending on your receiver/amplifier receiver. • If your TV using the DIGITAL AUDIO OUTPUT (OPTICAL) jack (best sound) G-LINK DIGITAL AUDIO OUTPUT (OPTICAL) COMPOSITE INPUT INPUT 1 COMPONENT (1080i/720p/480p/480i)/COMPOSITE INPUTS INPUT 2 INPUT 3 VIDEO Y/VIDEO L Y/VIDEO L CABLE INPUT AUDIO/VIDEO OUTPUT FIXED/V AUDIO OUTPU VIDEO SU...
... Out screen in the Audio Connections menu and select Audio cables are registered trademarks of Dolby Laboratories. 18 Chapter 1 Select AutoSelect (recommended) or PCM. • If your HDTV, you can choose various connection options depending on your receiver/amplifier receiver. • If your TV using the DIGITAL AUDIO OUTPUT (OPTICAL) jack (best sound) G-LINK DIGITAL AUDIO OUTPUT (OPTICAL) COMPOSITE INPUT INPUT 1 COMPONENT (1080i/720p/480p/480i)/COMPOSITE INPUTS INPUT 2 INPUT 3 VIDEO Y/VIDEO L Y/VIDEO L CABLE INPUT AUDIO/VIDEO OUTPUT FIXED/V AUDIO OUTPU VIDEO SU...
User Manual
Page 30
... the Digital Audio Out screen in use. Note: This TV's optical digital output jack fully complies with the international standard governing this jack. CableCARD Allows you can use a digital cable television card to page 10 for a set-top box. Notes: The HDMI/DVI jack is not intended to a Dolby Digital (AC-3® or PCM) receiver or decoder. Also, since DVI only carries the video signal, you'll need to connect audio cables to an input that receiver for connection...
... the Digital Audio Out screen in use. Note: This TV's optical digital output jack fully complies with the international standard governing this jack. CableCARD Allows you can use a digital cable television card to page 10 for a set-top box. Notes: The HDMI/DVI jack is not intended to a Dolby Digital (AC-3® or PCM) receiver or decoder. Also, since DVI only carries the video signal, you'll need to connect audio cables to an input that receiver for connection...

User Manual
Page 34
... down through the channel list. Connections & Setup Front Panel If you cannot locate your TV to operate many of the TV's features. Power Indicator Light Status On TV is on . For more information. The Front Button Block feature disables all front panel buttons but not the jacks. Note: Pressing any front panel button also activates the backlight. (Power button) Turns the TV on and off (standby mode) Blinks Light blinks 5 times, pauses, and blinks again 5 times: Lamp is on . A few...
... down through the channel list. Connections & Setup Front Panel If you cannot locate your TV to operate many of the TV's features. Power Indicator Light Status On TV is on . For more information. The Front Button Block feature disables all front panel buttons but not the jacks. Note: Pressing any front panel button also activates the backlight. (Power button) Turns the TV on and off (standby mode) Blinks Light blinks 5 times, pauses, and blinks again 5 times: Lamp is on . A few...
User Manual
Page 53
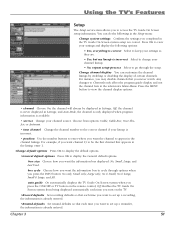
...; Yes, everything is correct Select to keep your settings as they are correct. Press the MENU button to change your settings and display the following in the Setup menu: Change system settings Confirms the settings you turn on the remote control; Off, the channel is already entered. box cycle Choose how you want to be displayed in the TV Guide On Screen system setup are . • Yes, but my lineup...
...; Yes, everything is correct Select to keep your settings as they are correct. Press the MENU button to change your settings and display the following in the Setup menu: Change system settings Confirms the settings you turn on the remote control; Off, the channel is already entered. box cycle Choose how you want to be displayed in the TV Guide On Screen system setup are . • Yes, but my lineup...
User Manual
Page 66
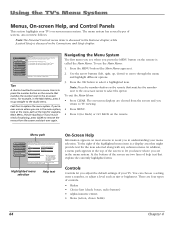
... two lines of controls: • Sliders • Choice lists (check boxes, radio buttons) • Alpha/numeric entries • Menu (action, choice fields) 64 Chapter 4 Tips A shortcut method to the on -screen menu system. Feel free to access the TV Guide menu. Press the OK button to the Audio menu. VCR Front Input AUDIO (Audio Receiver/Amp) Not Connected VCR2 Not Connected RCA SAT2 Not Connected DVD Input 2 SAT-CABLE (Satellite or Cable Box) Not Connected Tip: If you indicated in TV Guide Setup...
... two lines of controls: • Sliders • Choice lists (check boxes, radio buttons) • Alpha/numeric entries • Menu (action, choice fields) 64 Chapter 4 Tips A shortcut method to the on -screen menu system. Feel free to access the TV Guide menu. Press the OK button to the Audio menu. VCR Front Input AUDIO (Audio Receiver/Amp) Not Connected VCR2 Not Connected RCA SAT2 Not Connected DVD Input 2 SAT-CABLE (Satellite or Cable Box) Not Connected Tip: If you indicated in TV Guide Setup...
User Manual
Page 68
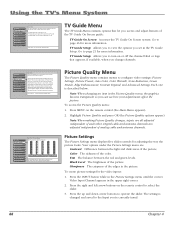
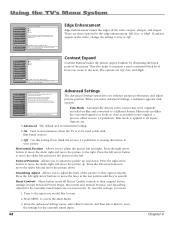
... change channels. 0 Go Back 1 TV Guide Menu 2 Picture Quality 3 Audio 4 Parental Controls 5 Connections 6 Preferences 7 Assisted Setup Main Menu The Picture Quality menu has screens for optimizing the picture for each other. Note: When making Picture Quality changes, inputs are adjusted independent of analog cable and antenna channels. Your options under the Picture Settings menu are viewing. Sharpness The crispness of the color. Press the up the TV Guide On Screen™ guide. •TV Guide Label: Turn the channel label/logo on the remote control (the Main Menu...
... change channels. 0 Go Back 1 TV Guide Menu 2 Picture Quality 3 Audio 4 Parental Controls 5 Connections 6 Preferences 7 Assisted Setup Main Menu The Picture Quality menu has screens for optimizing the picture for each other. Note: When making Picture Quality changes, inputs are adjusted independent of analog cable and antenna channels. Your options under the Picture Settings menu are viewing. Sharpness The crispness of the color. Press the up the TV Guide On Screen™ guide. •TV Guide Label: Turn the channel label/logo on the remote control (the Main Menu...
User Manual
Page 70
... options for the currently tuned input. 68 Chapter 4 Reset Controls Menu button resets all inputs. Press 3to return to access the Main Menu. 3. Tune to the input you to adjust the lines of the picture. Film mode modifies the converted signal so it looks as close as possible to the menu. Vertical Position Allows you to adjust the picture left /right. •Vertical Position: Center the picture up/down . Press 3to...
... options for the currently tuned input. 68 Chapter 4 Reset Controls Menu button resets all inputs. Press 3to return to access the Main Menu. 3. Tune to the input you to adjust the lines of the picture. Film mode modifies the converted signal so it looks as close as possible to the menu. Vertical Position Allows you to adjust the picture left /right. •Vertical Position: Center the picture up/down . Press 3to...
User Manual
Page 71
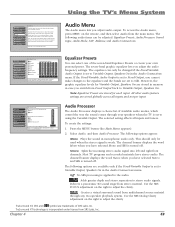
... separation to the menu. Chapter 4 69 Using the TV's Menu System 0 Go Back 1 TV Guide Menu 2 Picture Quality 3 Audio 4 Parental Controls 5 Connections 6 Preferences 7 Assisted Setup Main Menu The Audio menu has screens for setting the audio features and for tweaking the sound: •Equalizer Presets: Select a preset or adjust the equalizer. •Audio Processor: Choose the way for programs to sound. •Sound Logic: Turn it . Press to return to stereo audio signals. Most TV programs and recorded materials...
... separation to the menu. Chapter 4 69 Using the TV's Menu System 0 Go Back 1 TV Guide Menu 2 Picture Quality 3 Audio 4 Parental Controls 5 Connections 6 Preferences 7 Assisted Setup Main Menu The Audio menu has screens for setting the audio features and for tweaking the sound: •Equalizer Presets: Select a preset or adjust the equalizer. •Audio Processor: Choose the way for programs to sound. •Sound Logic: Turn it . Press to return to stereo audio signals. Most TV programs and recorded materials...
User Manual
Page 73
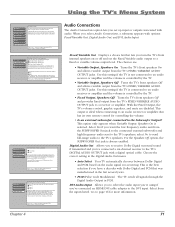
...; Variable Output, Speakers On Turns the TV's front speakers On and allows variable output from the TV's FIXED/VARIABLE AUDIO OUTPUT jack to a receiver or amplifier. Go to an audio receiver or amplifier with a digital optical cable. Use Fixed Output when connecting to page 16 for volume control. Fixed/Variable Out Displays a choice list that are associated with options: Fixed/Variable Out, Digital Audio Out, and DVI Audio Input. Choose the correct setting in the Digital Audio Out menu: • Auto Select Your TV automatically...
...; Variable Output, Speakers On Turns the TV's front speakers On and allows variable output from the TV's FIXED/VARIABLE AUDIO OUTPUT jack to a receiver or amplifier. Go to an audio receiver or amplifier with a digital optical cable. Use Fixed Output when connecting to page 16 for volume control. Fixed/Variable Out Displays a choice list that are associated with options: Fixed/Variable Out, Digital Audio Out, and DVI Audio Input. Choose the correct setting in the Digital Audio Out menu: • Auto Select Your TV automatically...

User Manual
Page 74
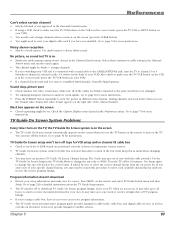
... the TV channels available through the Antenna and Cable inputs. If a cable box is strong enough for use , don't check the Cable Input box. 72 Chapter 4 This screen changes inputs. •Auto Tuning: Create one button access to your television. Items in the Connections menu are: Signal Strength, Channel Search, Signal Source, Video Input Setup, Auto Tuning, and Special Features. 0 Go Back 1 Signal Strength 2 Channel Search 3 Signal Source 4 Auto Tuning 5 Special Features Main Menu4Connections Channel 1 Channel 2 Channel 3 Channel 4 Channel 5 Antenna Input Analog Antenna Input Digital...
... the TV channels available through the Antenna and Cable inputs. If a cable box is strong enough for use , don't check the Cable Input box. 72 Chapter 4 This screen changes inputs. •Auto Tuning: Create one button access to your television. Items in the Connections menu are: Signal Strength, Channel Search, Signal Source, Video Input Setup, Auto Tuning, and Special Features. 0 Go Back 1 Signal Strength 2 Channel Search 3 Signal Source 4 Auto Tuning 5 Special Features Main Menu4Connections Channel 1 Channel 2 Channel 3 Channel 4 Channel 5 Antenna Input Analog Antenna Input Digital...

User Manual
Page 76
...the remote to access the Preferences menu. Press OK to the default setting. HDMI/DVI input is displayed. Changing channels or inputs restores CC to continue. Caption Display The Caption Display menu displays a choice list that is available. Go to continue. Program a second RCA TV to fit your TV to the DVD, VCR, AUX, SAT•CABLE, or AUDIO component button, using the TV3 code 1223. The Closed Captioning menu lets you to change some aspects of digital captions. Choices within the Closed Captioning menu are: Caption Display, Analog Captions, Digital Captions...
...the remote to access the Preferences menu. Press OK to the default setting. HDMI/DVI input is displayed. Changing channels or inputs restores CC to continue. Caption Display The Caption Display menu displays a choice list that is available. Go to continue. Program a second RCA TV to fit your TV to the DVD, VCR, AUX, SAT•CABLE, or AUDIO component button, using the TV3 code 1223. The Closed Captioning menu lets you to change some aspects of digital captions. Choices within the Closed Captioning menu are: Caption Display, Analog Captions, Digital Captions...

User Manual
Page 83
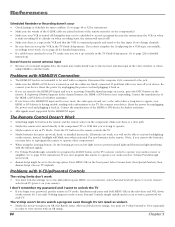
... lamp may be set to unlock the front panel controls by selecting the Front Button Block in TV mode. • The front panel controls may have tried to turn on the front of the TV. Power indicator is blinking or flashing If the light blinks 5 times, pauses, and blinks again 5 times, the lamp is plugged in . Use the remote control to the wrong option. For additional assistance while using the remote control, press the TV button...
... lamp may be set to unlock the front panel controls by selecting the Front Button Block in TV mode. • The front panel controls may have tried to turn on the front of the TV. Power indicator is blinking or flashing If the light blinks 5 times, pauses, and blinks again 5 times, the lamp is plugged in . Use the remote control to the wrong option. For additional assistance while using the remote control, press the TV button...
User Manual
Page 85
... channel, Unusable Signal appears. Analog channels may need to reset your digital cable card if you have an incorrect TV Guide On Screen Channel Lineup. Use Audio menu to make sure the TV/VCR button on the VCR is slower than direct control of the cables are positioned correctly in the Preferences menu. Also check to choose Mono sound. Check the Caption Display control panel in front of components' remote sensors. • TV Guide On Screen system control of cable box is in use the TV button...
... channel, Unusable Signal appears. Analog channels may need to reset your digital cable card if you have an incorrect TV Guide On Screen Channel Lineup. Use Audio menu to make sure the TV/VCR button on the VCR is slower than direct control of the cables are positioned correctly in the Preferences menu. Also check to choose Mono sound. Check the Caption Display control panel in front of components' remote sensors. • TV Guide On Screen system control of cable box is in use the TV button...
User Manual
Page 86
... remote to operate other components.) • When using CLEAR to operate. • Maybe remote is connected properly and tuned to operate your audio receiver, Volume Punchthrough won 't let me watch a program even though it 's already on the TV's remote control to the line input. If you set V-Chip Unrated to View separately in TV mode. If batteries are firmly connected. instead, backlight will turn off during the time you can re-enter a password via Lock TV...
... remote to operate other components.) • When using CLEAR to operate. • Maybe remote is connected properly and tuned to operate your audio receiver, Volume Punchthrough won 't let me watch a program even though it 's already on the TV's remote control to the line input. If you set V-Chip Unrated to View separately in TV mode. If batteries are firmly connected. instead, backlight will turn off during the time you can re-enter a password via Lock TV...
User Manual
Page 94
... HDTV specifications 86 Help text 64 Home Theatre box remote codes 42 Horizontal Position 68 I Icons Channel banner 44 Indicator 32 Indirect light 8 INFO button 34 Initial channel 73 Initial volume 73 INPUT 1 jacks 29 INPUT 2 jacks 29 INPUT 3 jacks 29 INPUT button 34 J Jacks ANTENNA INPUT 29 AUDIO/VIDEO OUTPUT 30 CABLE INPUT 29 COMPONENT/COMPOSITE INPUTS 29 COMPOSITE INPUTS 29 DIGITAL AUDIO OUTPUT 30 Front panel 32 G-LINK 28 HDMI/DVI 28 S-VIDEO 29 SUBWOOFER 30 L Lamp 1 Power menu...
... HDTV specifications 86 Help text 64 Home Theatre box remote codes 42 Horizontal Position 68 I Icons Channel banner 44 Indicator 32 Indirect light 8 INFO button 34 Initial channel 73 Initial volume 73 INPUT 1 jacks 29 INPUT 2 jacks 29 INPUT 3 jacks 29 INPUT button 34 J Jacks ANTENNA INPUT 29 AUDIO/VIDEO OUTPUT 30 CABLE INPUT 29 COMPONENT/COMPOSITE INPUTS 29 COMPOSITE INPUTS 29 DIGITAL AUDIO OUTPUT 30 Front panel 32 G-LINK 28 HDMI/DVI 28 S-VIDEO 29 SUBWOOFER 30 L Lamp 1 Power menu...
Brochure
Page 1
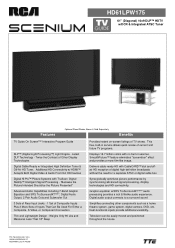
... Separately Benefits TV Guide On Screen™¹ Interactive Program Guide DLP™ (Digital Light Processing™) Light Engine - Twice the Contrast of current and future TV programs. Displays 16.7 million colors with no burn-in service allows quick review of Other Display Technologies Digital Cable Ready w/ Integrated High Definition Tuner & Off-Air HD Tuner. This free, built-in worries. SmoothPicture™ feature eliminates "screendoor" effect and provides a more film-like image. Weighs Only...
... Separately Benefits TV Guide On Screen™¹ Interactive Program Guide DLP™ (Digital Light Processing™) Light Engine - Twice the Contrast of current and future TV programs. Displays 16.7 million colors with no burn-in service allows quick review of Other Display Technologies Digital Cable Ready w/ Integrated High Definition Tuner & Off-Air HD Tuner. This free, built-in worries. SmoothPicture™ feature eliminates "screendoor" effect and provides a more film-like image. Weighs Only...
Brochure
Page 2
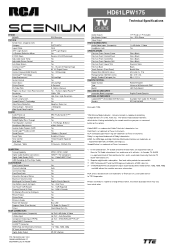
... Edge Replacement Format Control Green Boost Picture Presets Pix Tube Pitch Progressive Scan / Scan Rate Converter Resolution Screen Type Smart Lamp System SmoothPicture™ Technology Video Noise Reduction Viewing Angle - RCA Phono 1 1 L&R Audio, 1 Video Yes Gloss Black Gloss Black Gloss Black Gloss Black Scenium Silver Black Backlit Blue 62.8 x 38.2 x 17.8 68 x 41.9 x 23 90.4 / 111.3 RCN615TQLM1 Universal 6-Device with DMI* LED Fully Backlit English/French/Spanish Available from actual color. Auto Tune Yes - HD61LPW175 Technical Specifications BRAND BRAND PICTURE Screen Size...
... Edge Replacement Format Control Green Boost Picture Presets Pix Tube Pitch Progressive Scan / Scan Rate Converter Resolution Screen Type Smart Lamp System SmoothPicture™ Technology Video Noise Reduction Viewing Angle - RCA Phono 1 1 L&R Audio, 1 Video Yes Gloss Black Gloss Black Gloss Black Gloss Black Scenium Silver Black Backlit Blue 62.8 x 38.2 x 17.8 68 x 41.9 x 23 90.4 / 111.3 RCN615TQLM1 Universal 6-Device with DMI* LED Fully Backlit English/French/Spanish Available from actual color. Auto Tune Yes - HD61LPW175 Technical Specifications BRAND BRAND PICTURE Screen Size...


