
English Manual
Page 2
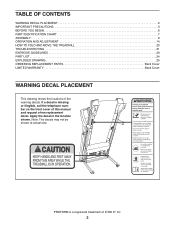
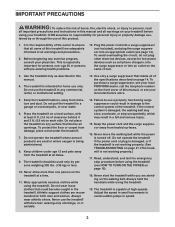
...2 IMPORTANT PRECAUTIONS 3 BEFORE YOU BEGIN 6 PART IDENTIFICATION CHART 7 ASSEMBLY 8 OPERATION AND ADJUSTMENT 14 HOW TO FOLD AND MOVE THE TREADMILL 20 TROUBLESHOOTING 21 EXERCISE GUIDELINES 23 PART LIST 24 EXPLODED DRAWING 25 ORDERING REPLACEMENT PARTS Back Cover LIMITED WARRANTY Back Cover WARNING DECAL PLACEMENT... locations of ICON IP, Inc. 2 Note: The decals may not be shown at actual size. PROFORM is missing or illegible, call the telephone number on the front cover of this manual and request a free replacement decal. If a decal is a registered trademark of the warning decals....
...2 IMPORTANT PRECAUTIONS 3 BEFORE YOU BEGIN 6 PART IDENTIFICATION CHART 7 ASSEMBLY 8 OPERATION AND ADJUSTMENT 14 HOW TO FOLD AND MOVE THE TREADMILL 20 TROUBLESHOOTING 21 EXERCISE GUIDELINES 23 PART LIST 24 EXPLODED DRAWING 25 ORDERING REPLACEMENT PARTS Back Cover LIMITED WARRANTY Back Cover WARNING DECAL PLACEMENT... locations of ICON IP, Inc. 2 Note: The decals may not be shown at actual size. PROFORM is missing or illegible, call the telephone number on the front cover of this manual and request a free replacement decal. If a decal is a registered trademark of the warning decals....
English Manual
Page 3
... the responsibility of the owner to persons, read all important precautions and instructions in this manual and all warnings on your treadmill before using your local PROFORM dealer, call the telephone number on the front cover of this manual, or see HOW TO TURN ON THE POWER on the walking belt. IMPORTANT PRECAUTIONS WARNING...
... the responsibility of the owner to persons, read all important precautions and instructions in this manual and all warnings on your treadmill before using your local PROFORM dealer, call the telephone number on the front cover of this manual, or see HOW TO TURN ON THE POWER on the walking belt. IMPORTANT PRECAUTIONS WARNING...
English Manual
Page 4
...in use , before performing the maintenance and adjustment procedures described in this manual. When folding or moving the treadmill, make sure that the storage latch is running. vice representative only. 28. Never leave the treadmill unattended while it is not a medical device. Always unplug the power ... other than the procedures in this manual should be able to safely lift 45 lbs. (20 kg) to do so by placing objects under the treadmill. 25. 20. Over exercising may affect the accuracy of the treadmill regularly. ing the treadmill, and before clean- Never insert any...
...in use , before performing the maintenance and adjustment procedures described in this manual. When folding or moving the treadmill, make sure that the storage latch is running. vice representative only. 28. Never leave the treadmill unattended while it is not a medical device. Always unplug the power ... other than the procedures in this manual should be able to safely lift 45 lbs. (20 kg) to do so by placing objects under the treadmill. 25. 20. Over exercising may affect the accuracy of the treadmill regularly. ing the treadmill, and before clean- Never insert any...
English Manual
Page 6
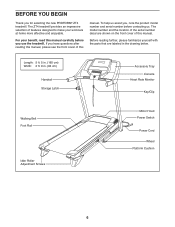
...on the front cover of this manual carefully before contacting us assist you, note the product model number and serial number before you for selecting the new PROFORM® ZT4 treadmill. The ZT4 treadmill provides an impressive selection of this manual, please see the front cover ...of features designed to make your benefit, read this manual. For your workouts at home more effective and enjoyable...
...on the front cover of this manual carefully before contacting us assist you, note the product model number and serial number before you for selecting the new PROFORM® ZT4 treadmill. The ZT4 treadmill provides an impressive selection of this manual, please see the front cover ...of features designed to make your benefit, read this manual. For your workouts at home more effective and enjoyable...
English Manual
Page 8
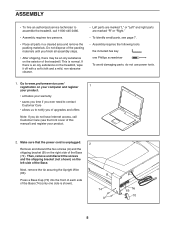
...149;• activates your warranty •• saves you time if you ever need to contact Customer Care •• allows us to assemble the treadmill, call Customer Care (see page 7. •• Assembly requires the following tools: the included hex key one side is shown). If there is ...148;" and right parts are marked “"R”" or “"Right.”" •• To identify small parts, see the front cover of this manual) and register your product. 2. Press a Base Cap (70) into the front of each side of the Base. ASSEMBLY •• To hire an...
...149;• activates your warranty •• saves you time if you ever need to contact Customer Care •• allows us to assemble the treadmill, call Customer Care (see page 7. •• Assembly requires the following tools: the included hex key one side is shown). If there is ...148;" and right parts are marked “"R”" or “"Right.”" •• To identify small parts, see the front cover of this manual) and register your product. 2. Press a Base Cap (70) into the front of each side of the Base. ASSEMBLY •• To hire an...
English Manual
Page 15
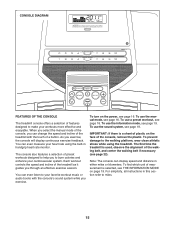
... The console also features a selection of a button. To turn on the face of the treadmill as it guides you exercise, the console will display continuous exercise feedback. When you select the manual mode of features designed to make your workouts more effective and enjoyable. CONSOLE DIAGRAM FEATURES OF THE...display speed and distance in this section refer to help you can even measure your heart rate using the treadmill. To use a preset workout, see page 18. To use the manual mode, see page 16. Note: The console can even listen to your favorite workout music or audio books...
... The console also features a selection of a button. To turn on the face of the treadmill as it guides you exercise, the console will display continuous exercise feedback. When you select the manual mode of features designed to make your workouts more effective and enjoyable. CONSOLE DIAGRAM FEATURES OF THE...display speed and distance in this section refer to help you can even measure your heart rate using the treadmill. To use a preset workout, see page 18. To use the manual mode, see page 16. Note: The console can even listen to your favorite workout music or audio books...
English Manual
Page 16
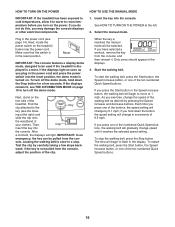
...If the displays remain lit, see the draw- Test the clip by 0.1 mph; Find the Key clip attached to be used if the treadmill is inserted, the manual mode will gradually change by carefully taking a few seconds. When the key is displayed in increments of the walking belt as you exercise, change... the Speed increase button, the walking belt will change the speed of 0.5 mph. To stop . HOW TO TURN ON THE POWER IMPORTANT: If the treadmill has been exposed to cold temperatures, allow it to warm to turn off the demo mode, hold down the Stop button for a few steps back...
...If the displays remain lit, see the draw- Test the clip by 0.1 mph; Find the Key clip attached to be used if the treadmill is inserted, the manual mode will gradually change by carefully taking a few seconds. When the key is displayed in increments of the walking belt as you exercise, change... the Speed increase button, the walking belt will change the speed of 0.5 mph. To stop . HOW TO TURN ON THE POWER IMPORTANT: If the treadmill has been exposed to cold temperatures, allow it to warm to turn off the demo mode, hold down the Stop button for a few steps back...
English Manual
Page 17
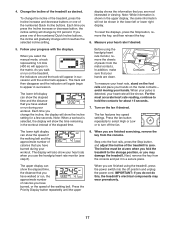
... button repeatedly until it in the lower left display can show your pulse is shown in viewing. To change the incline of the treadmill, press the Incline increase and decrease buttons or one of the walking belt. Note: While information is detected, your hands are ... the display will gradually change by 0.5 percent. The track will then disappear and the indicators will appear in succession. Each time you select the manual mode, a track representing 1/4 mile (400 m) will again begin to hold the contacts for a few seconds. In addition, make sure that your...
... button repeatedly until it in the lower left display can show your pulse is shown in viewing. To change the incline of the treadmill, press the Incline increase and decrease buttons or one of the walking belt. Note: While information is detected, your hands are ... the display will gradually change by 0.5 percent. The track will then disappear and the indicators will appear in succession. Each time you select the manual mode, a track representing 1/4 mile (400 m) will again begin to hold the contacts for a few seconds. In addition, make sure that your...
English Manual
Page 18
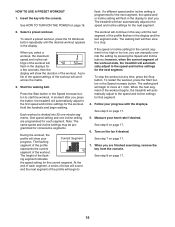
...speed and/or incline setting is too high or too low, you can manually override the setting by pressing the Speed and Incline buttons; To select a...on page 17. 7. Select a preset workout. A prole of the speed settings of the workout begins, the treadmill will then slow to the speed and incline settings for a few seconds; A moment after you select a workout, the ... button or the Speed increase button to The workout will show the duration of the workout ends, the treadmill will scroll across the matrix. 3. At the end of the prole will begin walking. To...
...speed and/or incline setting is too high or too low, you can manually override the setting by pressing the Speed and Incline buttons; To select a...on page 17. 7. Select a preset workout. A prole of the speed settings of the workout begins, the treadmill will then slow to the speed and incline settings for a few seconds; A moment after you select a workout, the ... button or the Speed increase button to The workout will show the duration of the workout ends, the treadmill will scroll across the matrix. 3. At the end of the prole will begin walking. To...
English Manual
Page 21
...remove the key from the console, and then reinsert it. SYMPTOM: The incline of this manual. Hold down the Stop button for ve minutes, and then plug it , wait for a few seconds. The treadmill will recalibrate the incline system. a. b. Make sure that applies, and follow the steps listed... the symptom that the power cord is plugged in, unplug it back in . Use only a surge suppressor that meets all of this manual. d. If the treadmill still will not run, please see the drawing above). Check the power switch (see the front cover of the specications described ...
...remove the key from the console, and then reinsert it. SYMPTOM: The incline of this manual. Hold down the Stop button for ve minutes, and then plug it , wait for a few seconds. The treadmill will recalibrate the incline system. a. b. Make sure that applies, and follow the steps listed... the symptom that the power cord is plugged in, unplug it back in . Use only a surge suppressor that meets all of this manual. d. If the treadmill still will not run, please see the drawing above). Check the power switch (see the front cover of the specications described ...
English Manual
Page 22
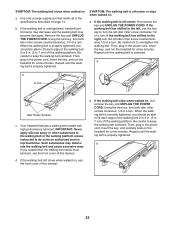
..., see the front cover of a turn ; b 22 Using the hex key, turn both idler roller screws clockwise, 1/4 of this manual. IMPORTANT: Never apply silicone spray or other substances to the walking belt or the walking platform unless instructed to overtighten the walking belt. Then... in . (5 to keep the walking belt centered. Then, plug in . (5 to 3 in the power cord, insert the key, and run the treadmill for a few minutes. Idler Roller Screws c. Repeat until the walking belt is properly tightened. Such substances may become damaged. if the walking belt has shifted...
..., see the front cover of a turn ; b 22 Using the hex key, turn both idler roller screws clockwise, 1/4 of this manual. IMPORTANT: Never apply silicone spray or other substances to the walking belt or the walking platform unless instructed to overtighten the walking belt. Then... in . (5 to keep the walking belt centered. Then, plug in . (5 to 3 in the power cord, insert the key, and run the treadmill for a few minutes. Idler Roller Screws c. Repeat until the walking belt is properly tightened. Such substances may become damaged. if the walking belt has shifted...


