
English Manual
Page 2
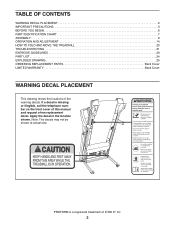
... IMPORTANT PRECAUTIONS 3 BEFORE YOU BEGIN 6 PART IDENTIFICATION CHART 7 ASSEMBLY 8 OPERATION AND ADJUSTMENT 14 HOW TO FOLD AND MOVE THE TREADMILL 20 TROUBLESHOOTING 21 EXERCISE GUIDELINES 23 PART LIST 24 EXPLODED DRAWING 25 ORDERING REPLACEMENT PARTS Back Cover LIMITED WARRANTY Back Cover WARNING ...DECAL PLACEMENT This drawing shows the locations of ICON IP, Inc. 2 Apply the decal in the location shown. PROFORM...
... IMPORTANT PRECAUTIONS 3 BEFORE YOU BEGIN 6 PART IDENTIFICATION CHART 7 ASSEMBLY 8 OPERATION AND ADJUSTMENT 14 HOW TO FOLD AND MOVE THE TREADMILL 20 TROUBLESHOOTING 21 EXERCISE GUIDELINES 23 PART LIST 24 EXPLODED DRAWING 25 ORDERING REPLACEMENT PARTS Back Cover LIMITED WARRANTY Back Cover WARNING ...DECAL PLACEMENT This drawing shows the locations of ICON IP, Inc. 2 Apply the decal in the location shown. PROFORM...
English Manual
Page 4
...procedures in serious injury or death. Inspect and properly tighten all parts of the power switch), and unplug the power cord when the treadmill is properly assembled. (See ASSEMBLY on page 8 and HOW TO FOLD AND MOVE THE TREADMILL on page 20.) You must be performed by an authorized ...an exercise aid in determining heart rate trends in the storage position. 24. The heart rate monitor is not a medical device. ing the treadmill, and before performing the maintenance and adjustment procedures described in use , before clean- If you feel faint or if you experience pain while ...
...procedures in serious injury or death. Inspect and properly tighten all parts of the power switch), and unplug the power cord when the treadmill is properly assembled. (See ASSEMBLY on page 8 and HOW TO FOLD AND MOVE THE TREADMILL on page 20.) You must be performed by an authorized ...an exercise aid in determining heart rate trends in the storage position. 24. The heart rate monitor is not a medical device. ing the treadmill, and before performing the maintenance and adjustment procedures described in use , before clean- If you feel faint or if you experience pain while ...
English Manual
Page 6
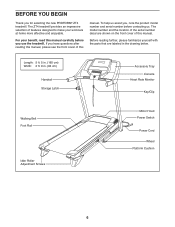
... of this manual carefully before contacting us assist you, note the product model number and serial number before you for selecting the new PROFORM® ZT4 treadmill. For your workouts at home more effective and enjoyable. The model number and the location of this manual. To help us .... Before reading further, please familiarize yourself with the parts that are shown on the front cover of the serial number decal are labeled in . (84...
... of this manual carefully before contacting us assist you, note the product model number and serial number before you for selecting the new PROFORM® ZT4 treadmill. For your workouts at home more effective and enjoyable. The model number and the location of this manual. To help us .... Before reading further, please familiarize yourself with the parts that are shown on the front cover of the serial number decal are labeled in . (84...
English Manual
Page 7
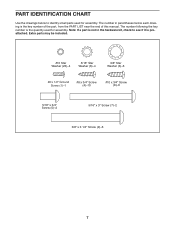
... CHART Use the drawings below each drawing is the key number of the part, from the PART LIST near the end of this manual. Extra parts may be included. #10 Star Washer (23)–-4 5/16" Star Washer (6)–-4 3/8" Star Washer (3)–-6 #8 x 1/2" Ground Screw (1)–-1 #8 x 3/4" Screw (4)–-10 #10... x 3/4" Screw (8)–-6 5/16" x 3/4" Screw (5)–-2 5/16" x 3" Screw (7)–-2 3/8" x 3 1/4" Screw (2)–-6 7 The number in the hardware kit, check to identify small parts used for assembly. The number following the key number is the quantity used for assembly.
... CHART Use the drawings below each drawing is the key number of the part, from the PART LIST near the end of this manual. Extra parts may be included. #10 Star Washer (23)–-4 5/16" Star Washer (6)–-4 3/8" Star Washer (3)–-6 #8 x 1/2" Ground Screw (1)–-1 #8 x 3/4" Screw (4)–-10 #10... x 3/4" Screw (8)–-6 5/16" x 3/4" Screw (5)–-2 5/16" x 3" Screw (7)–-2 3/8" x 3 1/4" Screw (2)–-6 7 The number in the hardware kit, check to identify small parts used for assembly. The number following the key number is the quantity used for assembly.
English Manual
Page 8
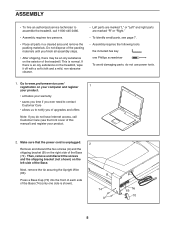
...Remove and discard the two screws (A) and the shipping bracket (B) on the treadmill, wipe it off with a soft cloth and a mild, non-abrasive cleaner. •• Left parts are marked “"L”" or “"Left”" and right parts are marked “"R”" or “"Right.”" •• To... 2. Then, remove and discard the screws and the shipping bracket (not shown) on the exterior of the treadmill. Do not dispose of the packing materials until you nish all parts in a cleared area and remove the packing materials. Make sure that the power cord is normal. Press ...
...Remove and discard the two screws (A) and the shipping bracket (B) on the treadmill, wipe it off with a soft cloth and a mild, non-abrasive cleaner. •• Left parts are marked “"L”" or “"Left”" and right parts are marked “"R”" or “"Right.”" •• To... 2. Then, remove and discard the screws and the shipping bracket (not shown) on the exterior of the treadmill. Do not dispose of the packing materials until you nish all parts in a cleared area and remove the packing materials. Make sure that the power cord is normal. Press ...
English Manual
Page 13
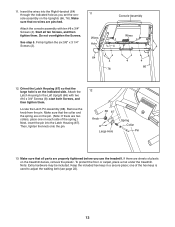
... (67). Attach the Latch Housing to adjust the walking belt (see page 22). 13 To protect the oor or carpet, place a mat under the treadmill. Do not overtighten the Screws. Remove the knob from the pin. one on each side of the spring.) Next, insert the pin into the Right... Handrail (64) through the indicated hole as you use the treadmill. Start all parts are pinched. Make sure that the collar and the spring are on the indicated side. If there are two collars, place one of plastic...
... (67). Attach the Latch Housing to adjust the walking belt (see page 22). 13 To protect the oor or carpet, place a mat under the treadmill. Do not overtighten the Screws. Remove the knob from the pin. one on each side of the spring.) Next, insert the pin into the Right... Handrail (64) through the indicated hole as you use the treadmill. Start all parts are pinched. Make sure that the collar and the spring are on the indicated side. If there are two collars, place one of plastic...
English Manual
Page 23
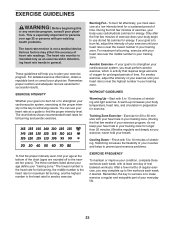
... in your training zone for energy. After a few minutes of your training zone. Remember, the key to success is to make exercise a regular and enjoyable part of exercise does your body begin to plan your “"training zone.”" The lowest number is the heart rate for fat burning, the middle...
... in your training zone for energy. After a few minutes of your training zone. Remember, the key to success is to make exercise a regular and enjoyable part of exercise does your body begin to plan your “"training zone.”" The lowest number is the heart rate for fat burning, the middle...

English Manual
Page 24
... 2 Cushion Bottom 78 2 Small Cushion * –- User’'s Manual Note: Specifications are not illustrated. 24 PFTL49013.0 R0813A Key No. Qty. For information about ordering replacement parts, see the back cover of this manual. *These...
... 2 Cushion Bottom 78 2 Small Cushion * –- User’'s Manual Note: Specifications are not illustrated. 24 PFTL49013.0 R0813A Key No. Qty. For information about ordering replacement parts, see the back cover of this manual. *These...

English Manual
Page 28
...or limitation of incidental or consequential damages. ICON’'s obligation under normal use , or costs of removal or installation; ORDERING REPLACEMENT PARTS To order replacement parts, please see the front cover of this product to be the customer’'s responsibility. damages with an extended service plan, see...name of the product (see the front cover of this manual) •• the key number and description of the replacement part(s) (see the PART LIST and the EXPLODED DRAWING near the end of this manual are not followed, if the product is abused or improperly or ...
...or limitation of incidental or consequential damages. ICON’'s obligation under normal use , or costs of removal or installation; ORDERING REPLACEMENT PARTS To order replacement parts, please see the front cover of this product to be the customer’'s responsibility. damages with an extended service plan, see...name of the product (see the front cover of this manual) •• the key number and description of the replacement part(s) (see the PART LIST and the EXPLODED DRAWING near the end of this manual are not followed, if the product is abused or improperly or ...


