
English Manual
Page 4
... leave the treadmill unattended while it is intended only as an exercise aid in determining heart rate trends in serious injury or death. Never insert any object into the off position (see the drawing on page 6 for the location of heart rate readings. Always remove the key, press the... power switch into any opening on page 20.) You must be performed by an authorized ser- Never remove the motor hood unless instructed to do so by placing objects under the treadmill. 25. SAVE THESE INSTRUCTIONS 4 Inspect and ...
... leave the treadmill unattended while it is intended only as an exercise aid in determining heart rate trends in serious injury or death. Never insert any object into the off position (see the drawing on page 6 for the location of heart rate readings. Always remove the key, press the... power switch into any opening on page 20.) You must be performed by an authorized ser- Never remove the motor hood unless instructed to do so by placing objects under the treadmill. 25. SAVE THESE INSTRUCTIONS 4 Inspect and ...
English Manual
Page 6
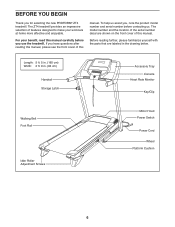
... manual carefully before contacting us assist you, note the product model number and serial number before you for selecting the new PROFORM® ZT4 treadmill. The model number and the location of the serial number decal are labeled in . (84 cm) Handrail Storage Latch ...Accessory Tray Console Heart Rate Monitor Key/Clip Walking Belt Foot Rail Idler Roller Adjustment Screws Motor Hood Power Switch Power Cord Wheel Platform Cushion 6 For your workouts at home more effective and enjoyable. The ZT4 treadmill provides an impressive selection of features designed ...
... manual carefully before contacting us assist you, note the product model number and serial number before you for selecting the new PROFORM® ZT4 treadmill. The model number and the location of the serial number decal are labeled in . (84 cm) Handrail Storage Latch ...Accessory Tray Console Heart Rate Monitor Key/Clip Walking Belt Foot Rail Idler Roller Adjustment Screws Motor Hood Power Switch Power Cord Wheel Platform Cushion 6 For your workouts at home more effective and enjoyable. The ZT4 treadmill provides an impressive selection of features designed ...
English Manual
Page 8
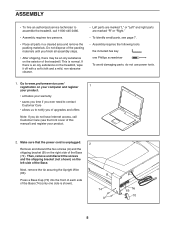
...;• Assembly requires two persons. •• Place all assembly steps. •• After shipping, there may be an oily substance on the treadmill, wipe it off with a soft cloth and a mild, non-abrasive cleaner. •• Left parts are marked “"L”" or “"Left...149;• To identify small parts, see page 7. •• Assembly requires the following tools: the included hex key one side is an oily substance on the exterior of the treadmill. If there is shown). This is unplugged. 2 Remove and discard the two screws (A) and the shipping bracket ...
...;• Assembly requires two persons. •• Place all assembly steps. •• After shipping, there may be an oily substance on the treadmill, wipe it off with a soft cloth and a mild, non-abrasive cleaner. •• Left parts are marked “"L”" or “"Left...149;• To identify small parts, see page 7. •• Assembly requires the following tools: the included hex key one side is an oily substance on the exterior of the treadmill. If there is shown). This is unplugged. 2 Remove and discard the two screws (A) and the shipping bracket ...
English Manual
Page 13
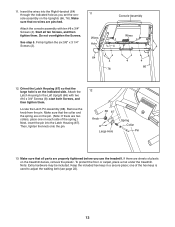
... of the spring.) Next, insert the pin into the Right Handrail (64) through the indicated hole as you use the treadmill. Note: Extra hardware may be included. Keep the included hex keys in a secure place; 11. Insert the wires into the Latch Housing (67). Attach the console assembly with two #10 x 3/4" Screws...). Orient the Latch Housing (67) so that the collar and the spring are on the pin. (Note: If there are sheets of the hex keys is on the treadmill decals, remove the plastic. Remove the knob from the pin. Locate the Latch Pin Assembly (68). Then, tighten the knob onto the pin...
... of the spring.) Next, insert the pin into the Right Handrail (64) through the indicated hole as you use the treadmill. Note: Extra hardware may be included. Keep the included hex keys in a secure place; 11. Insert the wires into the Latch Housing (67). Attach the console assembly with two #10 x 3/4" Screws...). Orient the Latch Housing (67) so that the collar and the spring are on the pin. (Note: If there are sheets of the hex keys is on the treadmill decals, remove the plastic. Remove the knob from the pin. Locate the Latch Pin Assembly (68). Then, tighten the knob onto the pin...
English Manual
Page 16
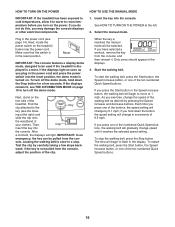
...be selected. To turn on . ing at the right) and slide the clip onto the waistband of the treadmill. When the key is inserted, the manual mode will be used if the treadmill is in increments of the ten numbered Quick Speed buttons. To start the walking belt, press the Start button... and decrease buttons. Make sure that the switch is displayed in the displays. 3. Find the Key clip attached to the key (see page 14). HOW TO TURN ON THE POWER IMPORTANT: If the treadmill has been exposed to cold temperatures, allow it to warm to room temperature before you may damage...
...be selected. To turn on . ing at the right) and slide the clip onto the waistband of the treadmill. When the key is inserted, the manual mode will be used if the treadmill is in increments of the ten numbered Quick Speed buttons. To start the walking belt, press the Start button... and decrease buttons. Make sure that the switch is displayed in the displays. 3. Find the Key clip attached to the key (see page 14). HOW TO TURN ON THE POWER IMPORTANT: If the treadmill has been exposed to cold temperatures, allow it to warm to room temperature before you may damage...
English Manual
Page 17
...you have burned, or the speed of the elapsed time. To reset the displays, press the Stop button, remove the key, and then reinsert the key. 6. Before using the treadmill, press the power switch into the off the fan. Contacts To measure your heart rate, stand on the foot rails ... in the matrix. Next, remove the key from the console and put it reaches the selected incline setting. Press the Priority Display button repeatedly until the upper When you press one of plastic from the console. 4. Change the incline of the treadmill to zero. Measure your hands. When ...
...you have burned, or the speed of the elapsed time. To reset the displays, press the Stop button, remove the key, and then reinsert the key. 6. Before using the treadmill, press the power switch into the off the fan. Contacts To measure your heart rate, stand on the foot rails ... in the matrix. Next, remove the key from the console and put it reaches the selected incline setting. Press the Priority Display button repeatedly until the upper When you press one of plastic from the console. 4. Change the incline of the treadmill to zero. Measure your hands. When ...
English Manual
Page 18
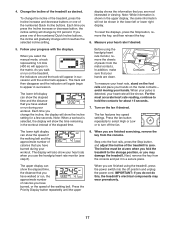
... 30 one incline setting are nished exercising, remove the key from the console. The treadmill will scroll across the matrix. 3. To select a preset workout, press the 16 Workouts button repeatedly until the last segment of the workout will then automatically... segment. then the display will automatically adjust to the rst speed and incline settings for that segment. 4. When you press the button, the treadmill will show the duration of each segment. The walking belt will ash in the display to the speed and incline settings for a few seconds...
... 30 one incline setting are nished exercising, remove the key from the console. The treadmill will scroll across the matrix. 3. To select a preset workout, press the 16 Workouts button repeatedly until the last segment of the workout will then automatically... segment. then the display will automatically adjust to the rst speed and incline settings for that segment. 4. When you press the button, the treadmill will show the duration of each segment. The walking belt will ash in the display to the speed and incline settings for a few seconds...
English Manual
Page 19
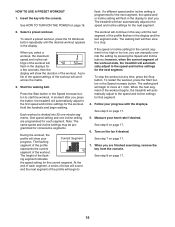
...console and into the console while holding down the Stop button. THE INFORMATION MODE The console features an information mode that keeps track of treadmill usage information and allows you are using the volume control on and turn off the demo mode, press the Speed decrease button. To.... However, when you exercise, plug a 3.5 mm male to select a unit of measurement, if desired. To exit the information mode, remove the key from the console. The console features a display demo mode, designed to change the unit of measurement for metric kilometers will show the total number of...
...console and into the console while holding down the Stop button. THE INFORMATION MODE The console features an information mode that keeps track of treadmill usage information and allows you are using the volume control on and turn off the demo mode, press the Speed decrease button. To.... However, when you exercise, plug a 3.5 mm male to select a unit of measurement, if desired. To exit the information mode, remove the key from the console. The console features a display demo mode, designed to change the unit of measurement for metric kilometers will show the total number of...
English Manual
Page 20
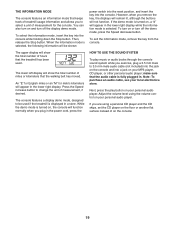
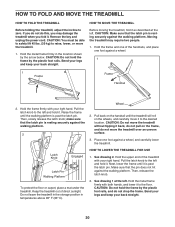
...frame rmly with both hands, and lower it as described at the left and hold the frame by the plastic foot rails. Remove the key and unplug the power cord. CAUTION: Do not hold it to the oor. Hold the frame and one of direct sunlight. Then, slowly... CAUTION: Do not move it . See drawing 2. Latch Knob Engaged Latch Pin Walking Platform To protect the oor or carpet, place a mat under the treadmill. Bend your legs and keep your back straight. 20 Hold the metal frame rmly in temperatures above 85° F (30° C). Pull the latch...
...frame rmly with both hands, and lower it as described at the left and hold the frame by the plastic foot rails. Remove the key and unplug the power cord. CAUTION: Do not hold it to the oor. Hold the frame and one of direct sunlight. Then, slowly... CAUTION: Do not move it . See drawing 2. Latch Knob Engaged Latch Pin Walking Platform To protect the oor or carpet, place a mat under the treadmill. Bend your legs and keep your back straight. 20 Hold the metal frame rmly in temperatures above 85° F (30° C). Pull the latch...
English Manual
Page 21
...cord is plugged into the console, and then release the Stop button and the Speed increase button. SYMPTOM: The incline of this manual. The treadmill will recalibrate the incline system. If further assistance is needed, see the front cover of the specications described on page 14. If...: The treadmill is turned on page 19 to the minimum level. To reset the power switch, wait for ve minutes, and then plug it , wait for ve minutes and then press the switch back in. SYMPTOM: The console displays remain lit when you remove the key, the demo...
...cord is plugged into the console, and then release the Stop button and the Speed increase button. SYMPTOM: The incline of this manual. The treadmill will recalibrate the incline system. If further assistance is needed, see the front cover of the specications described on page 14. If...: The treadmill is turned on page 19 to the minimum level. To reset the power switch, wait for ve minutes, and then plug it , wait for ve minutes and then press the switch back in. SYMPTOM: The console displays remain lit when you remove the key, the demo...
English Manual
Page 22
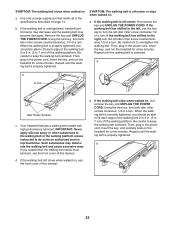
...the walking belt 2 to 3 in the power cord, insert the key, and run the treadmill for a few minutes. Your treadmill features a walking belt coated with high-performance lubricant. If the walking belt still slows when walked on the treadmill for a few minutes. When the walking belt is properly tightened, you... should be able to 7 cm) off -center, rst remove the key and UNPLUG THE POWER CORD. b. Be careful not to do ...
...the walking belt 2 to 3 in the power cord, insert the key, and run the treadmill for a few minutes. Your treadmill features a walking belt coated with high-performance lubricant. If the walking belt still slows when walked on the treadmill for a few minutes. When the walking belt is properly tightened, you... should be able to 7 cm) off -center, rst remove the key and UNPLUG THE POWER CORD. b. Be careful not to do ...


