

Canadian English Manual
Page 1
USERʼS MANUAL www.proform.com If you have questions, or if parts are damaged or missing, PLEASE CONTACT OUR CUSTOMER SERVICE DEPARTMENT DIRECTLY. Keep this equipment. CALL TOLL-FREE: 1-888-936-4266 Mon.-Fri., 8:00 until 17:00 ET (excluding holidays) OR E-MAIL US: [email protected] CAUTION Read all precautions and instructions in the space above for future reference. Model No. 30480.0 Serial No. Serial Number Decal QUESTIONS? Write the serial number in this manual before using this manual for reference.
USERʼS MANUAL www.proform.com If you have questions, or if parts are damaged or missing, PLEASE CONTACT OUR CUSTOMER SERVICE DEPARTMENT DIRECTLY. Keep this equipment. CALL TOLL-FREE: 1-888-936-4266 Mon.-Fri., 8:00 until 17:00 ET (excluding holidays) OR E-MAIL US: [email protected] CAUTION Read all precautions and instructions in the space above for future reference. Model No. 30480.0 Serial No. Serial Number Decal QUESTIONS? Write the serial number in this manual before using this manual for reference.

Canadian English Manual
Page 2
... trademark of ICON IP, Inc. 2 Apply the decal in the location shown. TABLE OF CONTENTS WARNING DECAL PLACEMENT 2 IMPORTANT PRECAUTIONS 3 BEFORE YOU BEGIN 4 ASSEMBLY 5 HOW TO USE THE EXERCISE CYCLE 13 MAINTENANCE AND TROUBLESHOOTING 19 EXERCISE GUIDELINES 20 PART LIST 21 EXPLODED DRAWING 22 ORDERING REPLACEMENT PARTS Back Cover LIMITED WARRANTY Back Cover WARNING DECAL PLACEMENT This drawing shows the location(s) of this manual and request a free replacement decal. PROFORM is...
... trademark of ICON IP, Inc. 2 Apply the decal in the location shown. TABLE OF CONTENTS WARNING DECAL PLACEMENT 2 IMPORTANT PRECAUTIONS 3 BEFORE YOU BEGIN 4 ASSEMBLY 5 HOW TO USE THE EXERCISE CYCLE 13 MAINTENANCE AND TROUBLESHOOTING 19 EXERCISE GUIDELINES 20 PART LIST 21 EXPLODED DRAWING 22 ORDERING REPLACEMENT PARTS Back Cover LIMITED WARRANTY Back Cover WARNING DECAL PLACEMENT This drawing shows the location(s) of this manual and request a free replacement decal. PROFORM is...
Canadian English Manual
Page 3
... especially important for home use only. Make sure that all users of the exercise cycle are adequately informed of this product. 1. Various factors, including the user's movement, may result in general. 11. The pulse sensor is intended only as described in a commercial, rental, or institutional setting. 5. If you feel faint or if you experience pain while exercising, stop immediately and cool...
... especially important for home use only. Make sure that all users of the exercise cycle are adequately informed of this product. 1. Various factors, including the user's movement, may result in general. 11. The pulse sensor is intended only as described in a commercial, rental, or institutional setting. 5. If you feel faint or if you experience pain while exercising, stop immediately and cool...

Canadian English Manual
Page 4
... us . Console Handlebar Backrest Water Bottle Holder* Seat Pedal/Strap Wheel Pulse Sensor Adjustment Handle *Water bottle is an effective exercise for selecting the revolutionary PROFORM® XP 400 R exercise cycle. If you have questions after reading this manual, please see the front cover of this manual. For your workouts at home more effective and enjoyable. Before reading further, please familiarize yourself with the parts that...
... us . Console Handlebar Backrest Water Bottle Holder* Seat Pedal/Strap Wheel Pulse Sensor Adjustment Handle *Water bottle is an effective exercise for selecting the revolutionary PROFORM® XP 400 R exercise cycle. If you have questions after reading this manual, please see the front cover of this manual. For your workouts at home more effective and enjoyable. Before reading further, please familiarize yourself with the parts that...
Canadian English Manual
Page 5
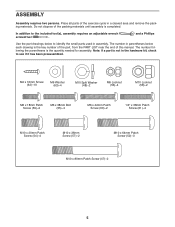
... Patch Screw (59)-2 M6 x 38mm Bolt (55)-4 M6 x 42mm Patch Screw (60)-2 1/4" x 38mm Patch Screw (61)-4 M10 x 20mm Patch Screw (54)-4 M10 x 36mm Screw (57)-2 M10 x 64mm Patch Screw (52)-3 M10 x 80mm Patch Screw (47)-2 5 ASSEMBLY Assembly requires two persons. Place all parts of the packing materials until assembly is the key number of the part, from the PART LIST near the end of this manual. The number in assembly.
... Patch Screw (59)-2 M6 x 38mm Bolt (55)-4 M6 x 42mm Patch Screw (60)-2 1/4" x 38mm Patch Screw (61)-4 M10 x 20mm Patch Screw (54)-4 M10 x 36mm Screw (57)-2 M10 x 64mm Patch Screw (52)-3 M10 x 80mm Patch Screw (47)-2 5 ASSEMBLY Assembly requires two persons. Place all parts of the packing materials until assembly is the key number of the part, from the PART LIST near the end of this manual. The number in assembly.

Canadian English Manual
Page 8
... on the Wire Harness (40). Attach the Upright with two M6 x 38mm Bolts (55) and two M6 Locknuts (56). Tip: Avoid pinching the Wire Harness (40) during this step. Slide the Upright (4) onto the Frame (1). Make sure that the hexagonal holes are marked with "R" and "L" stickers. 6 Attach each Handlebar (28, 29) to one of the Upright (4). Then, press the Top...
... on the Wire Harness (40). Attach the Upright with two M6 x 38mm Bolts (55) and two M6 Locknuts (56). Tip: Avoid pinching the Wire Harness (40) during this step. Slide the Upright (4) onto the Frame (1). Make sure that the hexagonal holes are marked with "R" and "L" stickers. 6 Attach each Handlebar (28, 29) to one of the Upright (4). Then, press the Top...

Canadian English Manual
Page 9
... the console displays or other end into the Upright. Tip: Avoid pinching the wires during this manual. Otherwise, you purchased this product or call the telephone number on the console; To avoid damaging the console, use four 1.5V "D" batteries (not included); Plug one end of this step. 8 While another person holds the Console (5) near the Upright (4), connect the console wires to the Upright (4) with all local codes and ordinances. 7 Batteries Battery Cover...
... the console displays or other end into the Upright. Tip: Avoid pinching the wires during this manual. Otherwise, you purchased this product or call the telephone number on the console; To avoid damaging the console, use four 1.5V "D" batteries (not included); Plug one end of this step. 8 While another person holds the Console (5) near the Upright (4), connect the console wires to the Upright (4) with all local codes and ordinances. 7 Batteries Battery Cover...

Canadian English Manual
Page 10
... Pulse Wire (38) during this step. 9 Orient the Pulse Bar (7) as shown. Attach the Pulse Bar to the Seat Carriage (6) with two M10 7 x 36mm Screws (57) and two M10 Locknuts (58). Tip: Avoid pinching the Pulse Wire (not shown) during this step. 10 Attach the Backrest (8) to the Seat Carriage (6) with two M6 x 18mm Patch Screws (59) and two M6 x 42mm Patch Screws (60). Tighten the M10 x 36mm Screws...
... Pulse Wire (38) during this step. 9 Orient the Pulse Bar (7) as shown. Attach the Pulse Bar to the Seat Carriage (6) with two M10 7 x 36mm Screws (57) and two M10 Locknuts (58). Tip: Avoid pinching the Pulse Wire (not shown) during this step. 10 Attach the Backrest (8) to the Seat Carriage (6) with two M6 x 18mm Patch Screws (59) and two M6 x 42mm Patch Screws (60). Tighten the M10 x 36mm Screws...

Canadian English Manual
Page 11
Orient the Seat (9) as shown. Note: The Patch Screws and the Washers may be preattached to the Seat 12 Carriage (6) with four 1/4" x 38mm Patch Screws (61) and four M6 Washers (63). Attach the Pulse Bar Cover (15) to the underside of the 9 Seat. 6 12. Attach the Seat to 11 the Seat Carriage (6) with two M4 x 16mm Screws (62). 63 61 61 15 6 62 11 11.
Orient the Seat (9) as shown. Note: The Patch Screws and the Washers may be preattached to the Seat 12 Carriage (6) with four 1/4" x 38mm Patch Screws (61) and four M6 Washers (63). Attach the Pulse Bar Cover (15) to the underside of the 9 Seat. 6 12. Attach the Seat to 11 the Seat Carriage (6) with two M4 x 16mm Screws (62). 63 61 61 15 6 62 11 11.

Canadian English Manual
Page 12
... of the Crank (17). Tighten the Left Pedal (not shown) counterclockwise into the left over. Adjust the strap on the Right Pedal. After using the exercise cycle for one week, retighten the Pedals. Note: After assembly is marked with an "R." 13. IMPORTANT: Tighten both Pedals as firmly as possible. Make sure that all parts are properly tightened before you use the exercise cycle. Plug the Pulse Wire (38) into...
... of the Crank (17). Tighten the Left Pedal (not shown) counterclockwise into the left over. Adjust the strap on the Right Pedal. After using the exercise cycle for one week, retighten the Pedals. Note: After assembly is marked with an "R." 13. IMPORTANT: Tighten both Pedals as firmly as possible. Make sure that all parts are properly tightened before you use the exercise cycle. Plug the Pulse Wire (38) into...

Canadian English Manual
Page 13
HOW TO USE THE EXERCISE CYCLE HOW TO ADJUST THE PEDAL STRAPS To adjust the pedal straps, first pull the ends of the straps onto the tabs. Carefully move the exercise cycle, lift the rear stabilizer until the exercise cycle can be moved on the pedals. Seat Adjustment Handle Lift Here Wheel 13 Pedal Strap Tab HOW TO MOVE THE EXERCISE CYCLE To move the exercise cycle to the desired location and then lower it to...
HOW TO USE THE EXERCISE CYCLE HOW TO ADJUST THE PEDAL STRAPS To adjust the pedal straps, first pull the ends of the straps onto the tabs. Carefully move the exercise cycle, lift the rear stabilizer until the exercise cycle can be moved on the pedals. Seat Adjustment Handle Lift Here Wheel 13 Pedal Strap Tab HOW TO MOVE THE EXERCISE CYCLE To move the exercise cycle to the desired location and then lower it to...

Canadian English Manual
Page 14
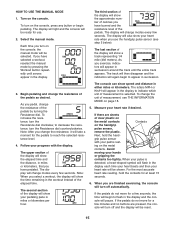
... trainer workouts. iFit cards are also available at select stores. To use a trainer workout, see page 17. When you select the manual mode of the console, you can even measure your heart rate using the handgrip pulse sensor. Each workout automatically changes the resistance of the pedals and prompts you to help you burn 150, 175, 200, or 225 calories in a 30 minute workout. The console also features the new iFit interactive workout...
... trainer workouts. iFit cards are also available at select stores. To use a trainer workout, see page 17. When you select the manual mode of the console, you can even measure your heart rate using the handgrip pulse sensor. Each workout automatically changes the resistance of the pedals and prompts you to help you burn 150, 175, 200, or 225 calories in a 30 minute workout. The console also features the new iFit interactive workout...
Canadian English Manual
Page 15
... you exercise, indicators will be ready for use the handgrip pulse sensor (see THE INFORMATION MODE on the handgrip pulse sensor, remove the plastic. To increase the resistance, turn on the console, the manual mode will be selected. The display will show your palms rest- The display will turn the Resistance dial counterclockwise. As you turn on the console, press any button or begin to decrease the resistance, turn off and the display will be reset...
... you exercise, indicators will be ready for use the handgrip pulse sensor (see THE INFORMATION MODE on the handgrip pulse sensor, remove the plastic. To increase the resistance, turn on the console, the manual mode will be selected. The display will show your palms rest- The display will turn the Resistance dial counterclockwise. As you turn on the console, press any button or begin to decrease the resistance, turn off and the display will be reset...

Canadian English Manual
Page 16
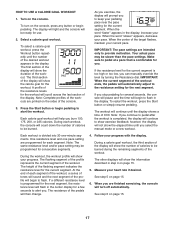
... restart the workout, press the Start button or simply resume pedaling. The workout will show exercise feedback; The height of 0:00. IMPORTANT: When the current segment of the pedals will automatically adjust to alert you. The resistance of the workout ends, the pedals will then change. 4. The display will light and the console will prompt you exercise, the display will be slower than the pace settings. As you...
... restart the workout, press the Start button or simply resume pedaling. The workout will show exercise feedback; The height of 0:00. IMPORTANT: When the current segment of the pedals will automatically adjust to alert you. The resistance of the workout ends, the pedals will then change. 4. The display will light and the console will prompt you exercise, the display will be slower than the pace settings. As you...
Canadian English Manual
Page 17
... completed, the display will prompt you select the manual mode or a new workout. During the workout, the workout profile will automatically adjust to the resistance setting for a few seconds to flash in step 4 on the sides of the workout. The resistance of the pedals will continue until the display shows a time of the resistance levels for the current segment. See step 6 on the console, press any button or begin...
... completed, the display will prompt you select the manual mode or a new workout. During the workout, the workout profile will automatically adjust to the resistance setting for a few seconds to flash in step 4 on the sides of the workout. The resistance of the pedals will continue until the display shows a time of the resistance levels for the current segment. See step 6 on the console, press any button or begin...

Canadian English Manual
Page 18
.... The total distance pedaled will light. To exit the information mode, press the Workout button. 18 When you turn on page 16. 3. To change the unit of measurement, press the Start button repeatedly to reselect the unit of the display. A tone will then sound and the console will appear in the first section of hours the exercise cycle has been used . When the iFit card is oriented so...
.... The total distance pedaled will light. To exit the information mode, press the Workout button. 18 When you turn on page 16. 3. To change the unit of measurement, press the Start button repeatedly to reselect the unit of the display. A tone will then sound and the console will appear in the first section of hours the exercise cycle has been used . When the iFit card is oriented so...

Canadian English Manual
Page 19
..., retighten the M8 x 22mm Flat Head Screw (67). Replace any worn parts immediately. To clean the exercise cycle, use a damp cloth and a small amount of low batteries. CONSOLE TROUBLESHOOTING If the console display becomes dim, the batteries should be adjusted. most console problems are pedaling, even when the resistance is aligned with the Reed Switch. See assembly step 7 on page 15. Next, remove the screws from the left and right shields. Then...
..., retighten the M8 x 22mm Flat Head Screw (67). Replace any worn parts immediately. To clean the exercise cycle, use a damp cloth and a small amount of low batteries. CONSOLE TROUBLESHOOTING If the console display becomes dim, the batteries should be adjusted. most console problems are pedaling, even when the resistance is aligned with the Reed Switch. See assembly step 7 on page 15. Next, remove the screws from the left and right shields. Then...

Canadian English Manual
Page 20
... bottom of exercise, your body uses carbohydrate calories for prolonged periods of regular exercise, you to make exercise a regular and enjoyable part of heart rate readings. For aerobic exercise, adjust the intensity of your exercise until your heart rate is to strengthen your training zone. Training Zone Exercise-Exercise for 20 to 10 minutes of your exercise program, do not keep your heart rate in your condition, complete three workouts each week...
... bottom of exercise, your body uses carbohydrate calories for prolonged periods of regular exercise, you to make exercise a regular and enjoyable part of heart rate readings. For aerobic exercise, adjust the intensity of your exercise until your heart rate is to strengthen your training zone. Training Zone Exercise-Exercise for 20 to 10 minutes of your exercise program, do not keep your heart rate in your condition, complete three workouts each week...
Canadian English Manual
Page 21
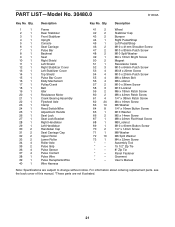
... Rear Stabilizer Front Stabilizer Upright Console Seat Carriage Pulse Bar Backrest Seat Right Shield Left Shield Right Stabilizer Cover Left Stabilizer Cover Top Shield Pulse Bar Cover Eddy Mechanism Pulley/Crank Belt Idler Resistance Motor Crank Bearing Assembly Flywheel Axle Clamp Reed Switch/Wire Adjustment Handle Seat Lock Seat Lock Bracket Right Handlebar Left Handlebar Handlebar Cap Seat Carriage Cap Upper Roller Lower Roller Roller Axle Pulse Grip Pulse Sensor Pulse Contact Pulse Wire Pulse Receptacle/Wire Wire Harness Key No. Description Wheel Stabilizer Cap Bumper Right Pedal/Strap...
... Rear Stabilizer Front Stabilizer Upright Console Seat Carriage Pulse Bar Backrest Seat Right Shield Left Shield Right Stabilizer Cover Left Stabilizer Cover Top Shield Pulse Bar Cover Eddy Mechanism Pulley/Crank Belt Idler Resistance Motor Crank Bearing Assembly Flywheel Axle Clamp Reed Switch/Wire Adjustment Handle Seat Lock Seat Lock Bracket Right Handlebar Left Handlebar Handlebar Cap Seat Carriage Cap Upper Roller Lower Roller Roller Axle Pulse Grip Pulse Sensor Pulse Contact Pulse Wire Pulse Receptacle/Wire Wire Harness Key No. Description Wheel Stabilizer Cap Bumper Right Pedal/Strap...
Canadian English Manual
Page 24
... province. products used as store display models. ICONʼs obligation under normal use and service conditions. The warranty extended hereunder is warranted for commercial or rental purposes; Accordingly, the above is authorized by ICON. ORDERING REPLACEMENT PARTS To order replacement parts, see the PART LIST and the EXPLODED DRAWING near the end of this manual) LIMITED WARRANTY ICON of Canada, Inc. (ICON) warrants this product to be free from defects...
... province. products used as store display models. ICONʼs obligation under normal use and service conditions. The warranty extended hereunder is warranted for commercial or rental purposes; Accordingly, the above is authorized by ICON. ORDERING REPLACEMENT PARTS To order replacement parts, see the PART LIST and the EXPLODED DRAWING near the end of this manual) LIMITED WARRANTY ICON of Canada, Inc. (ICON) warrants this product to be free from defects...

