
English Manual
Page 1
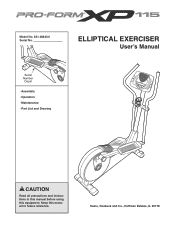
Sears, Roebuck and Co., Hoffman Estates, IL 60179 Keep this equipment. Serial Number Decal • Assembly • Operation • Maintenance • Part List and Drawing ELLIPTICAL EXERCISER User's Manual CAUTION Read all precautions and instructions in this manual before using this manual for future reference. Model No. 831.28643.0 Serial No.
Sears, Roebuck and Co., Hoffman Estates, IL 60179 Keep this equipment. Serial Number Decal • Assembly • Operation • Maintenance • Part List and Drawing ELLIPTICAL EXERCISER User's Manual CAUTION Read all precautions and instructions in this manual before using this manual for future reference. Model No. 831.28643.0 Serial No.
English Manual
Page 2
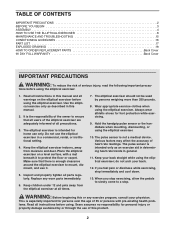
... BEGIN 3 ASSEMBLY 4 HOW TO USE THE ELLIPTICAL EXERCISER 8 MAINTENANCE AND TROUBLESHOOTING 15 CONDITIONING GUIDELINES 16 PART LIST 17 EXPLODED DRAWING 18 HOW TO ORDER REPLACEMENT PARTS Back Cover 90 DAY FULL WARRANTY Back Cover IMPORTANT PRECAUTIONS WARNING: To reduce the risk of this product. 2 The elliptical exerciser is not a medical device. Inspect and properly tighten all warnings on a level surface, with pre-existing health problems. Read all instructions in...
... BEGIN 3 ASSEMBLY 4 HOW TO USE THE ELLIPTICAL EXERCISER 8 MAINTENANCE AND TROUBLESHOOTING 15 CONDITIONING GUIDELINES 16 PART LIST 17 EXPLODED DRAWING 18 HOW TO ORDER REPLACEMENT PARTS Back Cover 90 DAY FULL WARRANTY Back Cover IMPORTANT PRECAUTIONS WARNING: To reduce the risk of this product. 2 The elliptical exerciser is not a medical device. Inspect and properly tighten all warnings on a level surface, with pre-existing health problems. Read all instructions in...
English Manual
Page 3
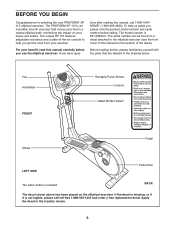
... a free replacement decal. tions after reading this manual carefully before calling. BEFORE YOU BEGIN Congratulations for the location of this manual for selecting the new PROFORM® XP 115 elliptical exerciser. The PROFORM XP 115 is included BACK The decal shown above has been placed on a decal attached to help us assist you, please note the product model number and serial number before you have ques- The model number is...
... a free replacement decal. tions after reading this manual carefully before calling. BEFORE YOU BEGIN Congratulations for the location of this manual for selecting the new PROFORM® XP 115 elliptical exerciser. The PROFORM XP 115 is included BACK The decal shown above has been placed on a decal attached to help us assist you, please note the product model number and serial number before you have ques- The model number is...
English Manual
Page 4
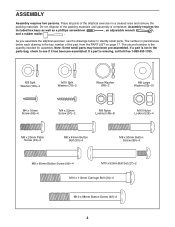
... to see if it has been pre-assembled. The second number is the key number of the part, from the PART LIST on page 17. Place all parts of the packing materials until assembly is missing, call toll-free 1-888-533-1333. As you assemble the elliptical exerciser, use the drawings below each drawing is the quantity needed for assembly. M8 Split Washer (100)-4 M10 Split...
... to see if it has been pre-assembled. The second number is the key number of the part, from the PART LIST on page 17. Place all parts of the packing materials until assembly is missing, call toll-free 1-888-533-1333. As you assemble the elliptical exerciser, use the drawings below each drawing is the quantity needed for assembly. M8 Split Washer (100)-4 M10 Split...
English Manual
Page 5
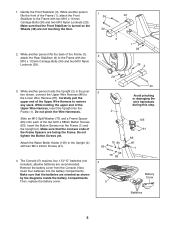
... holds the Upright (2) in the position shown, connect the Upper Wire Harness (86) to remove any slack. While another person lifts the front of the Frame (1), 2 attach the Rear Stabilizer (4) to the Frame with two M10 x 112mm Carriage Bolts (34) and two M10 Nylon Locknuts (29). Insert the Button Screws into the battery compartments. The Console (5) requires four 1.5V "D" batteries (not included...
... holds the Upright (2) in the position shown, connect the Upper Wire Harness (86) to remove any slack. While another person lifts the front of the Frame (1), 2 attach the Rear Stabilizer (4) to the Frame with two M10 x 112mm Carriage Bolts (34) and two M10 Nylon Locknuts (29). Insert the Button Screws into the battery compartments. The Console (5) requires four 1.5V "D" batteries (not included...
English Manual
Page 6
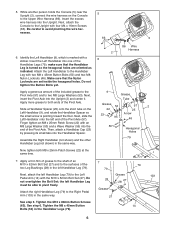
... 50 Hexagonal Holes 79 Now, tighten both ends of an M10 x 52mm Bolt Set (27) and to the Right Pedal Arm (103) in the Handlebar Legs (79). 7 79 79 Grease 28 28 27 Grease 27 14 5 2 103 6 Next, attach the Console to avoid pinching the wire harnesses. 5 66 6. Do not tighten the Button Bolts yet. Apply a thin film of grease to the shaft of the...
... 50 Hexagonal Holes 79 Now, tighten both ends of an M10 x 52mm Bolt Set (27) and to the Right Pedal Arm (103) in the Handlebar Legs (79). 7 79 79 Grease 28 28 27 Grease 27 14 5 2 103 6 Next, attach the Console to avoid pinching the wire harnesses. 5 66 6. Do not tighten the Button Bolts yet. Apply a thin film of grease to the shaft of the...
English Manual
Page 7
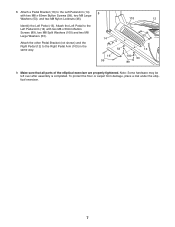
... 16 99 100 53 89 9. Make sure that all parts of the elliptical exerciser are properly tightened. To protect the floor or carpet from damage, place a mat under the elliptical exerciser. 7 Attach the other Pedal Bracket (not shown) and the Right Pedal (12) to the Left Pedal Arm (14) with two M8 x 65mm Button Screws (99), two M8 Large Washers (53), and two...
... 16 99 100 53 89 9. Make sure that all parts of the elliptical exerciser are properly tightened. To protect the floor or carpet from damage, place a mat under the elliptical exerciser. 7 Attach the other Pedal Bracket (not shown) and the Right Pedal (12) to the Left Pedal Arm (14) with two M8 x 65mm Button Screws (99), two M8 Large Washers (53), and two...
English Manual
Page 8
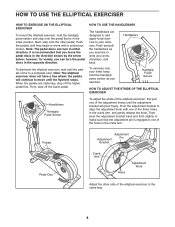
... adjust the stride of the elliptical exerciser, first pull one of the elliptical exerciser in the opposite direction. the pedals will pivot freely. Pivot the adjustment bracket to move the pedal discs in one of the adjustment knobs until the adjustment bracket will continue to align the adjustment knob with a continuous motion. To exercise only your lower body, hold the handgrip pulse sensor and step onto the pedal that the adjustment pin is in the crank arm...
... adjust the stride of the elliptical exerciser, first pull one of the elliptical exerciser in the opposite direction. the pedals will pivot freely. Pivot the adjustment bracket to move the pedal discs in one of the adjustment knobs until the adjustment bracket will continue to align the adjustment knob with a continuous motion. To exercise only your lower body, hold the handgrip pulse sensor and step onto the pedal that the adjustment pin is in the crank arm...
English Manual
Page 9
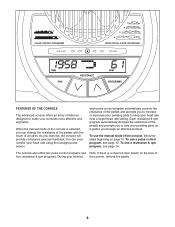
... to make your heart rate using the handgrip pulse sensor. As you to increase or decrease your pedaling pace to keep your heart rate near a target heart rate setting. To use the manual mode of the console, follow the steps beginning on the face of four resistance & rpm programs. During your pedaling pace as it guides you can even monitor your workouts more effective and enjoyable. each pulse control program automatically controls the resistance of clear plastic...
... to make your heart rate using the handgrip pulse sensor. As you to increase or decrease your pedaling pace to keep your heart rate near a target heart rate setting. To use the manual mode of the console, follow the steps beginning on the face of four resistance & rpm programs. During your pedaling pace as it guides you can even monitor your workouts more effective and enjoyable. each pulse control program automatically controls the resistance of clear plastic...
English Manual
Page 10
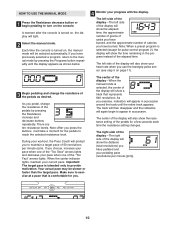
.... Make sure to exercise at a pace that represents 640 revolutions. The center of the pedals by pressing the Programs button repeatedly until the entire track appears. The center of the display will appear in succession around the track until the display appears as shown below. 3 Begin pedaling and change the resistance of the display-When the manual mode is turned on , the manual mode will be slower or...
.... Make sure to exercise at a pace that represents 640 revolutions. The center of the pedals by pressing the Programs button repeatedly until the entire track appears. The center of the display will appear in succession around the track until the display appears as shown below. 3 Begin pedaling and change the resistance of the display-When the manual mode is turned on , the manual mode will be slower or...

English Manual
Page 11
... positioned as described. To turn off and the display will then show your palms rest- If the pedals are not moved for at high speed, press the button a second time. grip pulse sensor, with the other modes. Avoid moving your heart rate if desired. Be care- never use alcohol, abrasives, or chemicals. 6 Turn on the fan at low speed, press the Fan button. To turn on the right side...
... positioned as described. To turn off and the display will then show your palms rest- If the pedals are not moved for at high speed, press the button a second time. grip pulse sensor, with the other modes. Avoid moving your heart rate if desired. Be care- never use alcohol, abrasives, or chemicals. 6 Turn on the fan at low speed, press the Fan button. To turn on the right side...

English Manual
Page 12
... target heart rate setting of the display. HOW TO USE A PULSE CONTROL PROGRAM 1 Press the Resistance decrease button or begin pedaling to turn on , the display will light. 2 Select one column to the left. If pulse control program 1 is programmed for the program to operate properly. however, you are using the handgrip pulse sensor, the pulse symbol will appear in the display. A moment after the console is divided into 40 oneminute segments. Pulse control program 1 is turned on the console...
... target heart rate setting of the display. HOW TO USE A PULSE CONTROL PROGRAM 1 Press the Resistance decrease button or begin pedaling to turn on , the display will light. 2 Select one column to the left. If pulse control program 1 is programmed for the program to operate properly. however, you are using the handgrip pulse sensor, the pulse symbol will appear in the display. A moment after the console is divided into 40 oneminute segments. Pulse control program 1 is turned on the console...
English Manual
Page 13
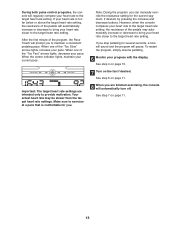
... buttons. Note: During the program, you are intended only to the target heart rate setting. When one of the pedals will automatically increase or decrease to bring your heart rate closer to maintain a consistent pedaling pace. Important: The target heart rate settings are finished exercising, the console will prompt you . See step 6 on page 11. 8 When you can manually override the resistance setting for you to the target heart rate setting...
... buttons. Note: During the program, you are intended only to the target heart rate setting. When one of the pedals will automatically increase or decrease to bring your heart rate closer to maintain a consistent pedaling pace. Important: The target heart rate settings are finished exercising, the console will prompt you . See step 6 on page 11. 8 When you can manually override the resistance setting for you to the target heart rate setting...

English Manual
Page 14
... step 6 on the console. tance settings for the next four segments will pause. HOW TO USE A RESISTANCE & RPM PROGRAM 1 Press the Resistance decrease button or begin pedaling to provide motivation. A moment after the resistance settings have moved to the resistance setting for the current segment. One resistance setting and one -minute segments. play. (Note: The pace settings are finished exercising, the console will light. 2 Select one of the resistance & rpm programs. Press the Programs button...
... step 6 on the console. tance settings for the next four segments will pause. HOW TO USE A RESISTANCE & RPM PROGRAM 1 Press the Resistance decrease button or begin pedaling to provide motivation. A moment after the resistance settings have moved to the resistance setting for the current segment. One resistance setting and one -minute segments. play. (Note: The pace settings are finished exercising, the console will light. 2 Select one of the resistance & rpm programs. Press the Programs button...
English Manual
Page 15
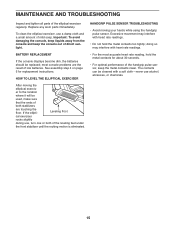
... handgrip pulse sensor. HANDGRIP PULSE SENSOR TROUBLESHOOTING • Avoid moving the elliptical exercis- er to the location where it will be replaced; Important: To avoid damaging the console, keep liquids away from the console and keep the metal contacts clean. Replace any worn parts immediately. To clean the elliptical exerciser, use alcohol, abrasives, or chemicals. 15 most accurate heart rate reading, hold the metal contacts too tightly; See assembly step...
... handgrip pulse sensor. HANDGRIP PULSE SENSOR TROUBLESHOOTING • Avoid moving the elliptical exercis- er to the location where it will be replaced; Important: To avoid damaging the console, keep liquids away from the console and keep the metal contacts clean. Replace any worn parts immediately. To clean the elliptical exerciser, use alcohol, abrasives, or chemicals. 15 most accurate heart rate reading, hold the metal contacts too tightly; See assembly step...
English Manual
Page 16
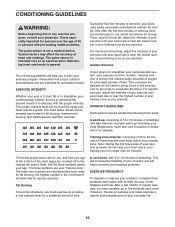
... exercise is intended only as a guide. A proper warm-up increases your training zone as you exercise. The pulse sensor is activity that proper nutrition and adequate rest are rounded off to exercise with your heart rate in general. For maximum fat burning, adjust the intensity of your exercise until your heart rate is near the lowest number in your body temperature, heart rate, and circulation in your body uses...
... exercise is intended only as a guide. A proper warm-up increases your training zone as you exercise. The pulse sensor is activity that proper nutrition and adequate rest are rounded off to exercise with your heart rate in general. For maximum fat burning, adjust the intensity of your exercise until your heart rate is near the lowest number in your body temperature, heart rate, and circulation in your body uses...
English Manual
Page 17
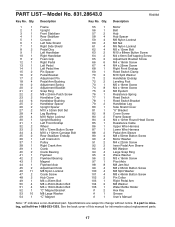
... back cover of this manual for information about replacement parts. 17 Description 1 1 Frame 2 1 Upright 3 1 Front Stabilizer 4 1 Rear Stabilizer 5 1 Console 6 1 Left Side Shield 7 1 Right Side Shield 8 2 Pedal Disc 9 1 Left Handlebar 10 1 Right Handlebar 11 2 Foam Grip 12 1 Right Pedal 13 1 Left Pedal 14 1 Left Pedal Arm 15 2 Pin Spacer 16 2 Pedal Bracket 17 2 Adjustment Pin 18 4 Pedal Arm Bushing 19 2 Adjustment Spring 20 2 Adjustment Bracket 21 2 Snap Ring 22 2 M8 x 25mm Patch Screw...
... back cover of this manual for information about replacement parts. 17 Description 1 1 Frame 2 1 Upright 3 1 Front Stabilizer 4 1 Rear Stabilizer 5 1 Console 6 1 Left Side Shield 7 1 Right Side Shield 8 2 Pedal Disc 9 1 Left Handlebar 10 1 Right Handlebar 11 2 Foam Grip 12 1 Right Pedal 13 1 Left Pedal 14 1 Left Pedal Arm 15 2 Pin Spacer 16 2 Pedal Bracket 17 2 Adjustment Pin 18 4 Pedal Arm Bushing 19 2 Adjustment Spring 20 2 Adjustment Bracket 21 2 Snap Ring 22 2 M8 x 25mm Patch Screw...

English Manual
Page 18
EXPLODED DRAWING A-Model No. 831.28643.0 11 71 18 10 5 80 23 84 95 71 66 24 22 53 24 84 7 67 74 24 26 25 96 50 24 46 51 74 91 9 97 105 79 59 74 74 26 95 22 23 96 25 24 2 24 46 53 50 79 86 30 27 28 28 6 27 74 87 59 51 74 67 74 27 27 28 74 R0406A
EXPLODED DRAWING A-Model No. 831.28643.0 11 71 18 10 5 80 23 84 95 71 66 24 22 53 24 84 7 67 74 24 26 25 96 50 24 46 51 74 91 9 97 105 79 59 74 74 26 95 22 23 96 25 24 2 24 46 53 50 79 86 30 27 28 28 6 27 74 87 59 51 74 67 74 27 27 28 74 R0406A
English Manual
Page 19
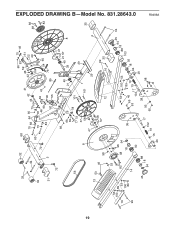
EXPLODED DRAWING B-Model No. 831.28643.0 32 33 34 32 72 31 3 72 56 8 13 53 46 98 68 63 41 70 83 64 60 42 7510444 70 83 81 46 90 61 62 43 90 55 60 93 75 46 59 46 51 42 52 49 104 59 54 60 76 85 66 66 29 69 78 77 73 37 58 47 61 40 21 101 1 101 29 47 40 21 57 39 29 58 57 12 99 35 16 82 48 82 8 35 4 19 53 100 89 16 53 53 82 98 48 94 100 89 18 36 99 14 92 45 88 18 94 17 102 19 15 20 53 100 53 94 45 34 88 18 89 65 46 19 93 17 15 102 38 103 92 18 94 20 93 98 65 R0406A
EXPLODED DRAWING B-Model No. 831.28643.0 32 33 34 32 72 31 3 72 56 8 13 53 46 98 68 63 41 70 83 64 60 42 7510444 70 83 81 46 90 61 62 43 90 55 60 93 75 46 59 46 51 42 52 49 104 59 54 60 76 85 66 66 29 69 78 77 73 37 58 47 61 40 21 101 1 101 29 47 40 21 57 39 29 58 57 12 99 35 16 82 48 82 8 35 4 19 53 100 89 16 53 53 82 98 48 94 100 89 18 36 99 14 92 45 88 18 94 17 102 19 15 20 53 100 53 94 45 34 88 18 89 65 46 19 93 17 15 102 38 103 92 18 94 20 93 98 65 R0406A

English Manual
Page 20
... Trademark / SM Service Mark of home appliances and items like vacuums, lawn equipment, and electronics, call 1-800-4-MY-HOME® (1-800-469-4663) to do-it ! This warranty gives you specific legal rights, and you need to arrange for free repair (or replacement if repair proves impossible) This warranty does not apply when the Elliptical Exerciser is used commercially or for the location of all...
... Trademark / SM Service Mark of home appliances and items like vacuums, lawn equipment, and electronics, call 1-800-4-MY-HOME® (1-800-469-4663) to do-it ! This warranty gives you specific legal rights, and you need to arrange for free repair (or replacement if repair proves impossible) This warranty does not apply when the Elliptical Exerciser is used commercially or for the location of all...


