
English Manual
Page 1
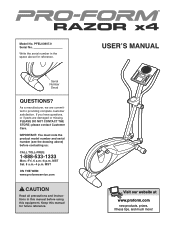
... instructions in the space above ) before using this manual for reference. PFEL03907.0 Serial No. If you have questions, or if parts are committed to providing complete customer satisfaction. Serial Number Decal QUESTIONS? Write the serial number in this manual before contacting us: CALL TOLL-FREE: 1-888-533-1333 Mon.-Fri. 6 a.m.-6 p.m. MST Sat. 8 a.m.-4 p.m. Model No. USER'S MANUAL Visit our website at www.proform.com new products, prizes, fitness...
... instructions in the space above ) before using this manual for reference. PFEL03907.0 Serial No. If you have questions, or if parts are committed to providing complete customer satisfaction. Serial Number Decal QUESTIONS? Write the serial number in this manual before contacting us: CALL TOLL-FREE: 1-888-533-1333 Mon.-Fri. 6 a.m.-6 p.m. MST Sat. 8 a.m.-4 p.m. Model No. USER'S MANUAL Visit our website at www.proform.com new products, prizes, fitness...
English Manual
Page 2
... BEGIN 4 ASSEMBLY 5 HOW TO USE THE ELLIPTICAL EXERCISER 12 MAINTENANCE AND TROUBLESHOOTING 18 EXERCISE GUIDELINES 19 PART LIST 20 EXPLODED DRAWING 22 ORDERING REPLACEMENT PARTS Back Cover LIMITED WARRANTY Back Cover WARNING DECAL PLACEMENT The warning decal shown here has been applied in the location shown. If the decal is a registered trademark of this manual and request a free replacement decal. PROFORM is missing or illegible, see the front cover of ICON IP...
... BEGIN 4 ASSEMBLY 5 HOW TO USE THE ELLIPTICAL EXERCISER 12 MAINTENANCE AND TROUBLESHOOTING 18 EXERCISE GUIDELINES 19 PART LIST 20 EXPLODED DRAWING 22 ORDERING REPLACEMENT PARTS Back Cover LIMITED WARRANTY Back Cover WARNING DECAL PLACEMENT The warning decal shown here has been applied in the location shown. If the decal is a registered trademark of this manual and request a free replacement decal. PROFORM is missing or illegible, see the front cover of ICON IP...
English Manual
Page 3
... injury, read all important precautions and instructions in this manual and all warnings on a level surface, with pre-existing health problems. 2. Your elliptical exerciser is the responsibility of the owner to a stop exercising, allow the pedals to slowly come to ensure that all users of the elliptical exerciser are adequately informed of heart rate readings. Place your elliptical exerciser on your elliptical exerciser before using your elliptical exerciser; Keep children under age 12...
... injury, read all important precautions and instructions in this manual and all warnings on a level surface, with pre-existing health problems. 2. Your elliptical exerciser is the responsibility of the owner to a stop exercising, allow the pedals to slowly come to ensure that all users of the elliptical exerciser are adequately informed of heart rate readings. Place your elliptical exerciser on your elliptical exerciser before using your elliptical exerciser; Keep children under age 12...
English Manual
Page 4
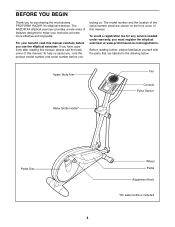
... purchasing the revolutionary PROFORM® RAZOR X4 elliptical exerciser. tacting us assist you, note the product model number and serial number before you for any service needed under warranty, you have questions after reading this manual, please see the back cover of this manual. If you must register the elliptical exerciser at home more effective and enjoyable. Upper Body Arm Fan Console Pulse Sensor Water Bottle Holder* Pedal Disc Wheel Pedal Adjustment Knob *No water bottle...
... purchasing the revolutionary PROFORM® RAZOR X4 elliptical exerciser. tacting us assist you, note the product model number and serial number before you for any service needed under warranty, you have questions after reading this manual, please see the back cover of this manual. If you must register the elliptical exerciser at home more effective and enjoyable. Upper Body Arm Fan Console Pulse Sensor Water Bottle Holder* Pedal Disc Wheel Pedal Adjustment Knob *No water bottle...
English Manual
Page 5
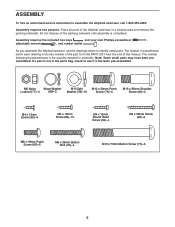
Do not dispose of the packing materials until assembly is the quantity needed for assembly. The number following the parentheses is completed. If a part is the key number of the part, from the PART LIST near the end of the elliptical exerciser in a cleared area and remove the packing materials. Place all parts of this manual. Note: Some small parts may have been preassembled. M6 Nylon Wave...
Do not dispose of the packing materials until assembly is the quantity needed for assembly. The number following the parentheses is completed. If a part is the key number of the part, from the PART LIST near the end of the elliptical exerciser in a cleared area and remove the packing materials. Place all parts of this manual. Note: Some small parts may have been preassembled. M6 Nylon Wave...
English Manual
Page 6
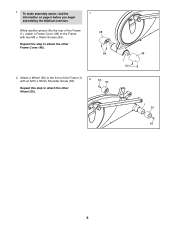
Repeat this step to attach the other Wheel (50). 48 1 84 1 50 63 6 Attach a Wheel (50) to the front of the Frame (1), attach a Frame Cover (48) to the Frame with an M10 x 35mm Shoulder Screw (63). 2 63 50 Repeat this step to attach the other Frame Cover (48). 48 84 2. To make assembly easier, read the 1 information on page 5 before you begin assembling the elliptical exerciser. While another person lifts the rear of the Frame (1) with two M4 x 16mm Screws (84). 1.
Repeat this step to attach the other Wheel (50). 48 1 84 1 50 63 6 Attach a Wheel (50) to the front of the Frame (1), attach a Frame Cover (48) to the Frame with an M10 x 35mm Shoulder Screw (63). 2 63 50 Repeat this step to attach the other Frame Cover (48). 48 84 2. To make assembly easier, read the 1 information on page 5 before you begin assembling the elliptical exerciser. While another person lifts the rear of the Frame (1) with two M4 x 16mm Screws (84). 1.
English Manual
Page 7
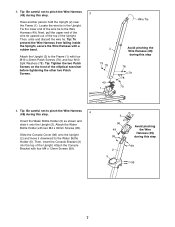
... of the top of the elliptical exerciser before tightening the other two Patch Screws. 2 79 78 49 1 Wire Tie Avoid pinching the Wire Harness (49) during this step 78 79 78 79 4. Slide the Console Cover (96) onto the Upright (2) and move it onto the Upright (2). Locate the wire tie in the Upright. Attach the Water Bottle Holder with four M4 x 12mm Screws (99). 3 96 49 99...
... of the top of the elliptical exerciser before tightening the other two Patch Screws. 2 79 78 49 1 Wire Tie Avoid pinching the Wire Harness (49) during this step 78 79 78 79 4. Slide the Console Cover (96) onto the Upright (2) and move it onto the Upright (2). Locate the wire tie in the Upright. Attach the Water Bottle Holder with four M4 x 12mm Screws (99). 3 96 49 99...

English Manual
Page 8
... the elliptical exerciser has been exposed to the Wire Harness (49). Remove the two screws from the back of this step 2 96 Battery Cover 4 Console Wire 84 84 8 Orient the batteries as shown by the markings inside the battery compartment. To purchase a power supply, call the telephone number on the Console; Plug one end of the power supply into an outlet installed in accordance with an optional power supply...
... the elliptical exerciser has been exposed to the Wire Harness (49). Remove the two screws from the back of this step 2 96 Battery Cover 4 Console Wire 84 84 8 Orient the batteries as shown by the markings inside the battery compartment. To purchase a power supply, call the telephone number on the Console; Plug one end of the power supply into an outlet installed in accordance with an optional power supply...
English Manual
Page 9
Attach the Left Pedal (12) to the Console (4). 7. Repeat this step on the right side of the elliptical exerciser. 8 12 14 78 78 75 84 9 Attach the Console Cover with three M10 x 70mm Button Screws (75), three M10 Split Washers (78), and an M4 x 16mm Screw (84). Slide the Console Cover (96) (see the drawing 7 in step 6) upward to the left Pedal Arm (14) with four M4 x 16mm Round Head Screws (94). 4 96 94 94 8.
Attach the Left Pedal (12) to the Console (4). 7. Repeat this step on the right side of the elliptical exerciser. 8 12 14 78 78 75 84 9 Attach the Console Cover with three M10 x 70mm Button Screws (75), three M10 Split Washers (78), and an M4 x 16mm Screw (84). Slide the Console Cover (96) (see the drawing 7 in step 6) upward to the left Pedal Arm (14) with four M4 x 16mm Round Head Screws (94). 4 96 94 94 8.
English Manual
Page 11
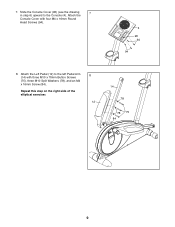
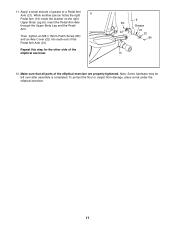
... over after assembly is completed. While another person holds the right 11 Pedal Arm (14) inside the bracket on the right Upper Body Leg (6), insert the Pedal Arm Axle through the Upper Body Leg and the Pedal Arm. Apply a small amount of the Pedal Arm Axle (21). Then, tighten an M6 x 16mm Patch Screw (80) and an Axle Cover (22) into each end of grease to a Pedal Arm Axle...
... over after assembly is completed. While another person holds the right 11 Pedal Arm (14) inside the bracket on the right Upper Body Leg (6), insert the Pedal Arm Axle through the Upper Body Leg and the Pedal Arm. Apply a small amount of the Pedal Arm Axle (21). Then, tighten an M6 x 16mm Patch Screw (80) and an Axle Cover (22) into each end of grease to a Pedal Arm Axle...

English Manual
Page 12
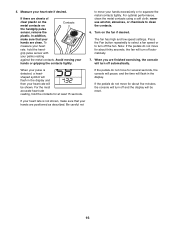
... elliptical exerciser does not have a free wheel; Place your foot here Wheel Upper Body Arms Pedals Pedal Disc 12 the pedals will continue to move until they begin to move the elliptical exerciser to the desired location and then lower it , place one foot against one of the wheels, and firmly hold the upper body arms and step onto the pedal that you turn the pedal discs in the direction shown...
... elliptical exerciser does not have a free wheel; Place your foot here Wheel Upper Body Arms Pedals Pedal Disc 12 the pedals will continue to move until they begin to move the elliptical exerciser to the desired location and then lower it , place one foot against one of the wheels, and firmly hold the upper body arms and step onto the pedal that you turn the pedal discs in the direction shown...
English Manual
Page 14
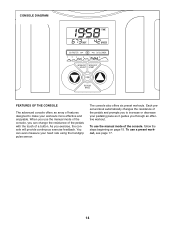
As you through an effective workout. To use the manual mode of the console, you can even measure your pedaling pace as it guides you exercise, the console will provide continuous exercise feedback. To use the manual mode of features designed to increase or decrease your heart rate using the handgrip pulse sensor. CONSOLE DIAGRAM FEATURES OF THE CONSOLE The advanced console offers an array of the console, follow the steps beginning on page 15...
As you through an effective workout. To use the manual mode of the console, you can even measure your pedaling pace as it guides you exercise, the console will provide continuous exercise feedback. To use the manual mode of features designed to increase or decrease your heart rate using the handgrip pulse sensor. CONSOLE DIAGRAM FEATURES OF THE CONSOLE The advanced console offers an array of the console, follow the steps beginning on page 15...
English Manual
Page 15
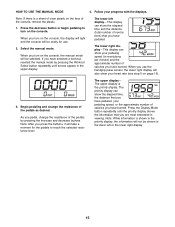
... display can show your pedaling speed, or the approximate number of the console, remove the plastic. 1. When you use . 2. When you have pedaled. If you turn on the console, the manual mode will be shown in the lower left display-This display can show your progress with the displays. As you pedal, change the resistance of the pedals by pressing the Workout Select button repeatedly until the priority display shows the information that you press the buttons...
... display can show your pedaling speed, or the approximate number of the console, remove the plastic. 1. When you use . 2. When you have pedaled. If you turn on the console, the manual mode will be shown in the lower left display-This display can show your progress with the displays. As you pedal, change the resistance of the pedals by pressing the Workout Select button repeatedly until the priority display shows the information that you press the buttons...
English Manual
Page 16
... using a soft cloth; When your pulse is not shown, make sure that your heart rate, hold the contacts for several seconds, the console will pause, and the time will turn off the fan. If the pedals do not move for about thirty seconds, the fan will be reset. The fan has high and low speed settings. Note: If the pedals do not move...
... using a soft cloth; When your pulse is not shown, make sure that your heart rate, hold the contacts for several seconds, the console will pause, and the time will turn off the fan. If the pedals do not move for about thirty seconds, the fan will be reset. The fan has high and low speed settings. Note: If the pedals do not move...
English Manual
Page 17
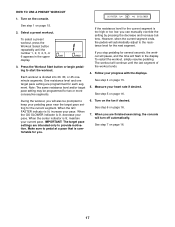
... you stop pedaling for the current segment is lit, decrease your progress with the displays. See step 4 on the console. When the center indicator is divided into 20, 30, or 45 oneminute segments. Select a preset workout. HOW TO USE A PRESET WORKOUT 1. IMPORTANT: The target pace settings are programmed for two or more consecutive segments. Turn on page 15. 5. Press the Workout Start button or begin pedaling...
... you stop pedaling for the current segment is lit, decrease your progress with the displays. See step 4 on the console. When the center indicator is divided into 20, 30, or 45 oneminute segments. Select a preset workout. HOW TO USE A PRESET WORKOUT 1. IMPORTANT: The target pace settings are programmed for two or more consecutive segments. Turn on page 15. 5. Press the Workout Start button or begin pedaling...
English Manual
Page 18
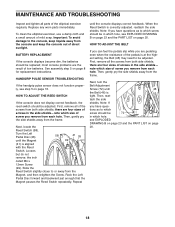
... size of the elliptical exerciser regularly. Important: To avoid damage to or away from the frame. most console problems are pedaling, even when the resistance of low batteries. HANDGRIP PULSE SENSOR TROUBLESHOOTING If the handgrip pulse sensor does not function properly, see EXPLODED DRAWING B on page 23 and the PART LIST on page 8 for replacement instructions. First, remove all parts of screw you have ques- HOW TO ADJUST THE REED SWITCH If the console...
... size of the elliptical exerciser regularly. Important: To avoid damage to or away from the frame. most console problems are pedaling, even when the resistance of low batteries. HANDGRIP PULSE SENSOR TROUBLESHOOTING If the handgrip pulse sensor does not function properly, see EXPLODED DRAWING B on page 23 and the PART LIST on page 8 for replacement instructions. First, remove all parts of screw you have ques- HOW TO ADJUST THE REED SWITCH If the console...
English Manual
Page 19
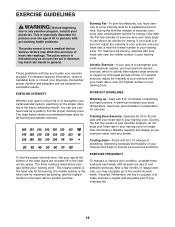
... regularly and deeply as an exercise aid in determining heart rate trends in your heart rate near the highest number in your training zone. WORKOUT GUIDELINES Warming up to five workouts each week, with pre-existing health problems. The pulse sensor is the key to plan your heart rate in preparation for exercise. The chart below shows recommended heart rates for fat burning and aerobic exercise. Aerobic Exercise-If your goal is...
... regularly and deeply as an exercise aid in determining heart rate trends in your heart rate near the highest number in your training zone. WORKOUT GUIDELINES Warming up to five workouts each week, with pre-existing health problems. The pulse sensor is the key to plan your heart rate in preparation for exercise. The chart below shows recommended heart rates for fat burning and aerobic exercise. Aerobic Exercise-If your goal is...
English Manual
Page 20
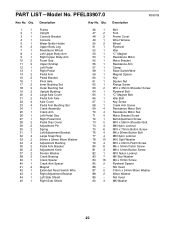
... 2 Pedal Arm Axle 22 4 Axle Cover 23 4 Pedal Arm Bushing Set 24 1 Crank Assembly 25 1 Crank Arm 26 1 Left Pedal Disc 27 1 Right Pedal Disc 28 2 Pedal Disc Cover 29 2 Adjustment Pin 30 2 Spring 31 1 Left Adjustment Bracket 32 4 Large Snap Ring 33 2 36mm x 29mm Wave Washer 34 4 Adjustment Bushing 35 2 Pedal Arm Bracket 36 2 Adjustment Knob 37 2 Fender Washer 38 2 Crank Bearing 39 1 Crank Spacer 40 1 Crank Arm Spacer 41 2 Magnet 42 1 Extended Reed Switch Wire 43 1 Right Adjustment...
... 2 Pedal Arm Axle 22 4 Axle Cover 23 4 Pedal Arm Bushing Set 24 1 Crank Assembly 25 1 Crank Arm 26 1 Left Pedal Disc 27 1 Right Pedal Disc 28 2 Pedal Disc Cover 29 2 Adjustment Pin 30 2 Spring 31 1 Left Adjustment Bracket 32 4 Large Snap Ring 33 2 36mm x 29mm Wave Washer 34 4 Adjustment Bushing 35 2 Pedal Arm Bracket 36 2 Adjustment Knob 37 2 Fender Washer 38 2 Crank Bearing 39 1 Crank Spacer 40 1 Crank Arm Spacer 41 2 Magnet 42 1 Extended Reed Switch Wire 43 1 Right Adjustment...
English Manual
Page 21
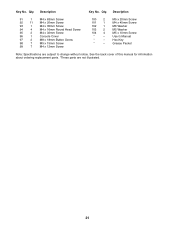
... this manual for information about ordering replacement parts. *These parts are subject to change without notice. Description Key No. M5 x 20mm Screw M4 x 45mm Screw M6 Washer M5 Washer M5 x 10mm Screw User's Manual Hex Key Grease Packet Note: Specifications are not illustrated. 21 Key No. Description 91 1 M4 x 63mm Screw 92 11 M4 x 20mm Screw 93 1 M4 x 35mm Screw 94 4 M4 x 16mm Round Head Screw 95 2 M4 x 32mm Screw 96 1 Console Cover...
... this manual for information about ordering replacement parts. *These parts are subject to change without notice. Description Key No. M5 x 20mm Screw M4 x 45mm Screw M6 Washer M5 Washer M5 x 10mm Screw User's Manual Hex Key Grease Packet Note: Specifications are not illustrated. 21 Key No. Description 91 1 M4 x 63mm Screw 92 11 M4 x 20mm Screw 93 1 M4 x 35mm Screw 94 4 M4 x 16mm Round Head Screw 95 2 M4 x 32mm Screw 96 1 Console Cover...
English Manual
Page 24
... warranty gives you . ICON HEALTH & FITNESS, INC., 1500 S. 1000 W., LOGAN, UT 84321-9813 Part No. 258569 R0907B Printed in connection with the use , costs of removal, installation or other rights which warranty claims are made must be free from defects in its authorized service centers. Accordingly, the above limitation may also have other consequential damages of this manual) • the key number and description of the replacement part...
... warranty gives you . ICON HEALTH & FITNESS, INC., 1500 S. 1000 W., LOGAN, UT 84321-9813 Part No. 258569 R0907B Printed in connection with the use , costs of removal, installation or other rights which warranty claims are made must be free from defects in its authorized service centers. Accordingly, the above limitation may also have other consequential damages of this manual) • the key number and description of the replacement part...

