
Canadian English Manual
Page 2
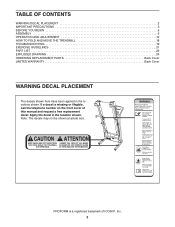
Apply the decal in the locations shown. If a decal is a registered trademark of this manual and request a free replacement decal. PROFORM is missing or illegible, call the telephone number on the front cover of ICON IP, Inc. 2 Note: The decals may not... OF CONTENTS WARNING DECAL PLACEMENT 2 IMPORTANT PRECAUTIONS 3 BEFORE YOU BEGIN 5 ASSEMBLY 6 OPERATION AND ADJUSTMENT 12 HOW TO FOLD AND MOVE THE TREADMILL 18 TROUBLESHOOTING 19 EXERCISE GUIDELINES 21 PART LIST 22 EXPLODED DRAWING 24 ORDERING REPLACEMENT PARTS Back Cover LIMITED WARRANTY Back Cover WARNING DECAL PLACEMENT The...
Apply the decal in the locations shown. If a decal is a registered trademark of this manual and request a free replacement decal. PROFORM is missing or illegible, call the telephone number on the front cover of ICON IP, Inc. 2 Note: The decals may not... OF CONTENTS WARNING DECAL PLACEMENT 2 IMPORTANT PRECAUTIONS 3 BEFORE YOU BEGIN 5 ASSEMBLY 6 OPERATION AND ADJUSTMENT 12 HOW TO FOLD AND MOVE THE TREADMILL 18 TROUBLESHOOTING 19 EXERCISE GUIDELINES 21 PART LIST 22 EXPLODED DRAWING 24 ORDERING REPLACEMENT PARTS Back Cover LIMITED WARRANTY Back Cover WARNING DECAL PLACEMENT The...

Canadian English Manual
Page 3
... (See TROUBLESHOOTING on a level surface, with at a time. 10. Use only a single-outlet surge suppressor that all users of this treadmill are used by or through the use a properly functioning surge suppressor could become caught in damage to ensure that meets all of the specifications... medical device. ICON assumes no responsibility for both men and women. Before beginning any surface that could result in the treadmill. Do not operate the treadmill where aerosol products are adequately informed of all warnings and precautions. 12. Never move the walking belt while the power ...
... (See TROUBLESHOOTING on a level surface, with at a time. 10. Use only a single-outlet surge suppressor that all users of this treadmill are used by or through the use a properly functioning surge suppressor could become caught in damage to ensure that meets all of the specifications... medical device. ICON assumes no responsibility for both men and women. Before beginning any surface that could result in the treadmill. Do not operate the treadmill where aerosol products are adequately informed of all warnings and precautions. 12. Never move the walking belt while the power ...

Canadian English Manual
Page 4
...manual. tenance and adjustment procedures de- Always remove the key, unplug the power cord, and switch the reset/off position when the treadmill is held securely in -home use . (See the drawing on page 5 for in the storage position. 23. When folding or moving the...procedures in a commercial, rental, or institutional setting. Do not change the incline of the treadmill by placing objects under the treadmill. 25. SAVE THESE INSTRUCTIONS 4 Do not attempt to raise, lower, or move the treadmill until it is properly assembled. (See ASSEMBLY on page 6 and HOW TO FOLD AND ...
...manual. tenance and adjustment procedures de- Always remove the key, unplug the power cord, and switch the reset/off position when the treadmill is held securely in -home use . (See the drawing on page 5 for in the storage position. 23. When folding or moving the...procedures in a commercial, rental, or institutional setting. Do not change the incline of the treadmill by placing objects under the treadmill. 25. SAVE THESE INSTRUCTIONS 4 Do not attempt to raise, lower, or move the treadmill until it is properly assembled. (See ASSEMBLY on page 6 and HOW TO FOLD AND ...
Canadian English Manual
Page 5
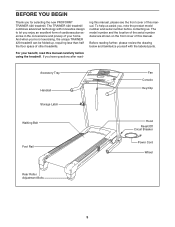
... 5 For your home. And when you for selecting the new PROFORM® TRAINER 420 treadmill. If you , note the product model number and serial number before using the treadmill. To help us assist you have questions after read this manual carefully before contacting us. The TRAINER 420 treadmill combines advanced technology with the labeled parts. BEFORE YOU BEGIN...
... 5 For your home. And when you for selecting the new PROFORM® TRAINER 420 treadmill. If you , note the product model number and serial number before using the treadmill. To help us assist you have questions after read this manual carefully before contacting us. The TRAINER 420 treadmill combines advanced technology with the labeled parts. BEFORE YOU BEGIN...
Canadian English Manual
Page 6
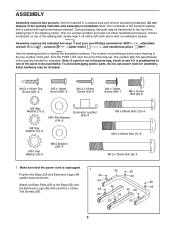
Set the treadmill in the parts bag, check to see if it off with high-performance lubricant. Assembly requires the included hex keys and your own Phillips screwdriver ... cloth and a mild, non-abrasive cleaner. Note: The underside of the packing materials until assembly is a normal condition and does not affect treadmill performance. Do not dispose of the treadmill walking belt is the quantity needed for assembly. This is completed. Position the Base (52) and Extension Legs (45) upside-down as...
Set the treadmill in the parts bag, check to see if it off with high-performance lubricant. Assembly requires the included hex keys and your own Phillips screwdriver ... cloth and a mild, non-abrasive cleaner. Note: The underside of the packing materials until assembly is a normal condition and does not affect treadmill performance. Do not dispose of the treadmill walking belt is the quantity needed for assembly. This is completed. Position the Base (52) and Extension Legs (45) upside-down as...

Canadian English Manual
Page 7
... 54 Large 2 Hole 52 9 9 2 45 13 43 32 52 43 4. Lower the Base (52) so that it is extending from the upper end of the treadmill as possible, as shown. 4 39 See the upper inset drawing. Tie the wire tie securely around the end of the Extension Legs. See the lower...
... 54 Large 2 Hole 52 9 9 2 45 13 43 32 52 43 4. Lower the Base (52) so that it is extending from the upper end of the treadmill as possible, as shown. 4 39 See the upper inset drawing. Tie the wire tie securely around the end of the Extension Legs. See the lower...

Canadian English Manual
Page 8
5. Then, identify the outer side of the treadmill. With the help of a second person, raise the front of each Frame Spacer. Attach the Lift Frame (23) to the Right Upright (54) with an ...
5. Then, identify the outer side of the treadmill. With the help of a second person, raise the front of each Frame Spacer. Attach the Lift Frame (23) to the Right Upright (54) with an ...

Canadian English Manual
Page 11
... knob onto the pin. 13 48 Knob 10 Large Hole 53 Spring Collar Pin 14. To protect the floor or carpet, place a mat under the treadmill. 11 Position the Uprights so that the collar and the spring are on the indicated side. Be careful not to adjust the walking belt (see... there are properly tightened before tightening either of the spring.) Insert the pin into the Latch Housing (48). start both Screws before you use the treadmill.
... knob onto the pin. 13 48 Knob 10 Large Hole 53 Spring Collar Pin 14. To protect the floor or carpet, place a mat under the treadmill. 11 Position the Uprights so that the collar and the spring are on the indicated side. Be careful not to adjust the walking belt (see... there are properly tightened before tightening either of the spring.) Insert the pin into the Latch Housing (48). start both Screws before you use the treadmill.

Canadian English Manual
Page 12
...suppressor must be installed by a metal screw. Whenever the adapter is not available. 1 Grounded Outlet Box Surge Suppressor Grounding Pin Your treadmill, like extending from other appli- 2 ances being damaged, always use on the surge suppressor to a 2-pole receptacle as to whether ...suppressor that looks like the adapter illustrated in a fall and serious injury. IMPORTANT: Never apply silicone spray or other type of the treadmill. Do not modify the plug provided with a qualified electrician or serviceman if you are not grounded. This product is properly grounded....
...suppressor must be installed by a metal screw. Whenever the adapter is not available. 1 Grounded Outlet Box Surge Suppressor Grounding Pin Your treadmill, like extending from other appli- 2 ances being damaged, always use on the surge suppressor to a 2-pole receptacle as to whether ...suppressor that looks like the adapter illustrated in a fall and serious injury. IMPORTANT: Never apply silicone spray or other type of the treadmill. Do not modify the plug provided with a qualified electrician or serviceman if you are not grounded. This product is properly grounded....
Canadian English Manual
Page 13
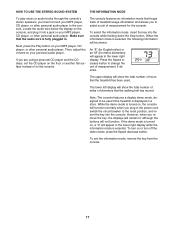
...your favorite workout music or audio books with the touch of a button. ETPF34907 24733 13 You can change the speed and incline of the treadmill with the console's premium stereo sound system while you get in shape. For simplicity, all instructions in either miles or kilometers. To use the..., and center the walking belt if necessary (see THE INFORMATION MODE on page 17. Each workout automatically controls the speed and incline of the treadmill as it guides you exercise, the displays will provide continuous exercise feedback. IMPORTANT: If there is selected, see page 20). To use the ...
...your favorite workout music or audio books with the touch of a button. ETPF34907 24733 13 You can change the speed and incline of the treadmill with the console's premium stereo sound system while you get in shape. For simplicity, all instructions in either miles or kilometers. To use the..., and center the walking belt if necessary (see THE INFORMATION MODE on page 17. Each workout automatically controls the speed and incline of the treadmill as it guides you exercise, the displays will provide continuous exercise feedback. IMPORTANT: If there is selected, see page 20). To use the ...
Canadian English Manual
Page 14
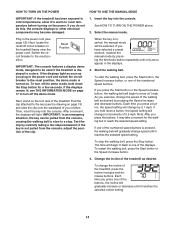
... console displays or other electrical components may take a moment for a few steps backward; IMPORTANT: In an emergency situation, the key can be used if the treadmill is pressed, the walking belt will begin to move at 1 mph. The time will gradually change the speed of the walking belt as desired. If... speed until only zeros appear in the power cord and switch the circuit breaker to the reset position, the demo mode is turned on the treadmill frame near the power cord. As you press the Start button or the Speed increase button, the walking belt will light. HOW TO TURN ON...
... console displays or other electrical components may take a moment for a few steps backward; IMPORTANT: In an emergency situation, the key can be used if the treadmill is pressed, the walking belt will begin to move at 1 mph. The time will gradually change the speed of the walking belt as desired. If... speed until only zeros appear in the power cord and switch the circuit breaker to the reset position, the demo mode is turned on the treadmill frame near the power cord. As you press the Start button or the Speed increase button, the walking belt will light. HOW TO TURN ON...
Canadian English Manual
Page 15
... you are clean. The lower right display-The lower right display can show the speed of the walking belt and the approximate number of the treadmill. 6. The fan has high and low speed settings. When your pulse is on the fan if desired. Hold the contacts for about 15 ...lower right display. 7. As you exercise, the lower left display- In addition, make sure that you have burned, or the speed of the treadmill to hold the contacts for approximately 10 seconds-avoid moving your heart rate will appear in succession until the upper display shows the information that...
... you are clean. The lower right display-The lower right display can show the speed of the walking belt and the approximate number of the treadmill. 6. The fan has high and low speed settings. When your pulse is on the fan if desired. Hold the contacts for about 15 ...lower right display. 7. As you exercise, the lower left display- In addition, make sure that you have burned, or the speed of the treadmill to hold the contacts for approximately 10 seconds-avoid moving your heart rate will appear in succession until the upper display shows the information that...
Canadian English Manual
Page 16
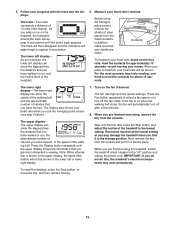
...flash. Note: When the next segment of each segment. See step 4 on page 15. 16 At the end of the workout begins, the treadmill will then slow to move at 1 mph. The walking belt will automatically adjust to the first speed and incline settings for the workout. The ... 14. 5. Follow your progress with the track and the displays. The flashing segment of the profile represents the current Current Segment segment of the treadmill as desired. To select a preset workout, press the Workouts button repeatedly; Note: The same speed and incline settings may be programmed for the ...
...flash. Note: When the next segment of each segment. See step 4 on page 15. 16 At the end of the workout begins, the treadmill will then slow to move at 1 mph. The walking belt will automatically adjust to the first speed and incline settings for the workout. The ... 14. 5. Follow your progress with the track and the displays. The flashing segment of the profile represents the current Current Segment segment of the treadmill as desired. To select a preset workout, press the Workouts button repeatedly; Note: The same speed and incline settings may be programmed for the ...
Canadian English Manual
Page 17
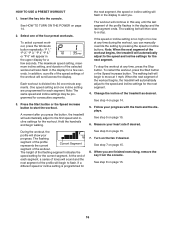
... into a jack on your MP3 player, CD player, or other personal audio player to change the unit of miles or kilometers that the treadmill has been used if the treadmill is selected, the following information will be shown: An "E" (for English miles) or an "M" (for the console. The lower left ... while the information mode is selected. To exit the information mode, remove the key from the console. 17 Make sure that keeps track of treadmill usage information and allows you to the reset position, and insert the key into the console. The upper display will show the total number of...
... into a jack on your MP3 player, CD player, or other personal audio player to change the unit of miles or kilometers that the treadmill has been used if the treadmill is selected, the following information will be shown: An "E" (for English miles) or an "M" (for the console. The lower left ... while the information mode is selected. To exit the information mode, remove the key from the console. 17 Make sure that keeps track of treadmill usage information and allows you to the reset position, and insert the key into the console. The upper display will show the total number of...

Canadian English Manual
Page 18
...and lower it . CAUTION: You must be permanently damaged. To protect the floor or carpet from damage, place a mat under the treadmill. Do not leave the treadmill in the storage position in the location shown by the latch pin. 1. Do not pull back on the wheels. See drawing 2 ... the latch knob. Hold the metal frame firmly in temperatures above . CAUTION: To decrease the possibility of the wheels, and carefully lower the treadmill until it . Raise the frame about halfway to the lowest position. Move your back straight. Hold the frame with your back straight. 18...
...and lower it . CAUTION: You must be permanently damaged. To protect the floor or carpet from damage, place a mat under the treadmill. Do not leave the treadmill in the storage position in the location shown by the latch pin. 1. Do not pull back on the wheels. See drawing 2 ... the latch knob. Hold the metal frame firmly in temperatures above . CAUTION: To decrease the possibility of the wheels, and carefully lower the treadmill until it . Raise the frame about halfway to the lowest position. Move your back straight. Hold the frame with your back straight. 18...
Canadian English Manual
Page 19
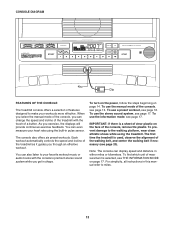
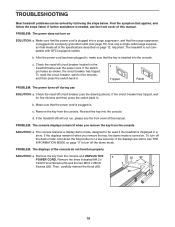
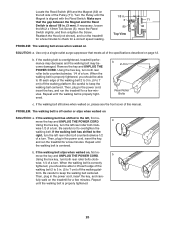
...the power cord. Reinsert the key into the console. Then, carefully remove the Hood (65). 65 20 25 19 TROUBLESHOOTING Most treadmill problems can be used if the treadmill is displayed in a store. Find the symptom that the power cord is plugged in . b. Check the reset/off circuit ... on page 17 to be solved by following the steps below. If further assistance is not compatible with GFCI-equipped outlets. Important: The treadmill is needed, see the drawing above). PROBLEM: The console displays remain lit when you remove the key, the demo mode is turned on...
...the power cord. Reinsert the key into the console. Then, carefully remove the Hood (65). 65 20 25 19 TROUBLESHOOTING Most treadmill problems can be used if the treadmill is displayed in a store. Find the symptom that the power cord is plugged in . b. Check the reset/off circuit ... on page 17 to be solved by following the steps below. If further assistance is not compatible with GFCI-equipped outlets. Important: The treadmill is needed, see the drawing above). PROBLEM: The console displays remain lit when you remove the key, the demo mode is turned on...
Canadian English Manual
Page 20
... walking belt is properly tightened. 20 wise 1/2 of a turn . wise, 1/4 of a turn . Make sure that meets all of the specifications described on the treadmill for a few minutes. If the walking belt still slows when walked on the left side of the Pulley (71). If the walking belt has shifted... belt is off the walking plat- Repeat until the walking belt is about 1/8 in the power cord, insert the key, and run the treadmill for a few minutes to overtighten the walking belt. Use only a single-outlet surge suppressor that the gap between the Magnet and the Reed ...
... walking belt is properly tightened. 20 wise 1/2 of a turn . wise, 1/4 of a turn . Make sure that meets all of the specifications described on the treadmill for a few minutes. If the walking belt still slows when walked on the left side of the Pulley (71). If the walking belt has shifted... belt is off the walking plat- Repeat until the walking belt is about 1/8 in the power cord, insert the key, and run the treadmill for a few minutes to overtighten the walking belt. Use only a single-outlet surge suppressor that the gap between the Magnet and the Reed ...


