
Canadian English Manual
Page 2
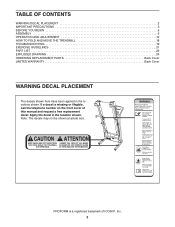
... number on the front cover of ICON IP, Inc. 2 Note: The decals may not be shown at actual size. Apply the decal in the locations shown. TABLE OF CONTENTS WARNING DECAL PLACEMENT 2 IMPORTANT PRECAUTIONS 3 BEFORE YOU BEGIN 5 ASSEMBLY 6 OPERATION AND ADJUSTMENT 12 HOW TO FOLD AND MOVE THE TREADMILL 18 TROUBLESHOOTING 19 EXERCISE GUIDELINES 21 PART LIST 22 EXPLODED DRAWING 24 ORDERING REPLACEMENT PARTS Back Cover LIMITED WARRANTY Back Cover...
... number on the front cover of ICON IP, Inc. 2 Note: The decals may not be shown at actual size. Apply the decal in the locations shown. TABLE OF CONTENTS WARNING DECAL PLACEMENT 2 IMPORTANT PRECAUTIONS 3 BEFORE YOU BEGIN 5 ASSEMBLY 6 OPERATION AND ADJUSTMENT 12 HOW TO FOLD AND MOVE THE TREADMILL 18 TROUBLESHOOTING 19 EXERCISE GUIDELINES 21 PART LIST 22 EXPLODED DRAWING 24 ORDERING REPLACEMENT PARTS Back Cover LIMITED WARRANTY Back Cover...
Canadian English Manual
Page 3
... and dust. Never move the walking belt while the power is not a medical device. never use of the treadmill. The pulse sensor is turned off. The treadmill is damaged, the walking belt may change speed, accelerate, or stop procedure before using the treadmill (see page 12), plug the power cord into a grounded circuit capable of all of heart rate readings. Place the treadmill on any exercise program, consult your treadmill. If the control system is capable of...
... and dust. Never move the walking belt while the power is not a medical device. never use of the treadmill. The pulse sensor is turned off. The treadmill is damaged, the walking belt may change speed, accelerate, or stop procedure before using the treadmill (see page 12), plug the power cord into a grounded circuit capable of all of heart rate readings. Place the treadmill on any exercise program, consult your treadmill. If the control system is capable of...
Canadian English Manual
Page 4
... properly assembled. (See ASSEMBLY on page 6 and HOW TO FOLD AND MOVE THE TREADMILL on page 18.) You must be performed by an authorized service representative only. 24. Do not use only. tenance and adjustment procedures de- Always remove the key, unplug the power cord, and switch the reset/off circuit breaker to do so by placing objects under the treadmill. 25. Never remove the motor hood unless instructed...
... properly assembled. (See ASSEMBLY on page 6 and HOW TO FOLD AND MOVE THE TREADMILL on page 18.) You must be performed by an authorized service representative only. 24. Do not use only. tenance and adjustment procedures de- Always remove the key, unplug the power cord, and switch the reset/off circuit breaker to do so by placing objects under the treadmill. 25. Never remove the motor hood unless instructed...
Canadian English Manual
Page 5
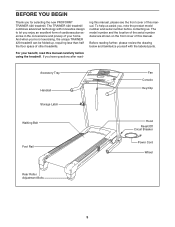
The model number and the location of the serial number decal are shown on the front cover of this manual. If you for selecting the new PROFORM® TRAINER 420 treadmill. Accessory Tray Handrail Storage Latch Fan Console Key/Clip Walking Belt Foot Rail Hood Reset/Off Circuit Breaker Power Cord Wheel Rear Roller Adjustment Bolts 5 BEFORE YOU BEGIN Thank you have questions after read this manual carefully before contacting us. Before reading further, please review the drawing...
The model number and the location of the serial number decal are shown on the front cover of this manual. If you for selecting the new PROFORM® TRAINER 420 treadmill. Accessory Tray Handrail Storage Latch Fan Console Key/Clip Walking Belt Foot Rail Hood Reset/Off Circuit Breaker Power Cord Wheel Rear Roller Adjustment Bolts 5 BEFORE YOU BEGIN Thank you have questions after read this manual carefully before contacting us. Before reading further, please review the drawing...
Canadian English Manual
Page 6
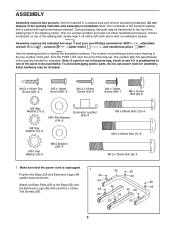
... remove all packing materials. Assembly requires the included hex keys and your own Phillips screwdriver wrench , scissors , rubber mallet , and needlenose pliers , adjustable . Position the Base (52) and Extension Legs (45) upside-down as shown. The number after the parentheses is the key number of the part, from the PART LIST near the end of the walking belt or the shipping carton. Set the treadmill...
... remove all packing materials. Assembly requires the included hex keys and your own Phillips screwdriver wrench , scissors , rubber mallet , and needlenose pliers , adjustable . Position the Base (52) and Extension Legs (45) upside-down as shown. The number after the parentheses is the key number of the part, from the PART LIST near the end of the walking belt or the shipping carton. Set the treadmill...

Canadian English Manual
Page 9
... CONNECTED PROPERLY, THE CONSOLE MAY BE DAMAGED WHEN THE POWER IS TURNED ON. Make sure that no wires are pinched. 8 5 54 9 8 5 53 Using needlenose pliers, pull the console wire out of the hole near the Console Assembly. Finger tighten an M5 x 16mm Screw 91 (85) with four 91 M8 x 15mm Bolts (8) and four M8 Star Washers (5). Attach the Left Handrail (not shown) to the console wire...
... CONNECTED PROPERLY, THE CONSOLE MAY BE DAMAGED WHEN THE POWER IS TURNED ON. Make sure that no wires are pinched. 8 5 54 9 8 5 53 Using needlenose pliers, pull the console wire out of the hole near the Console Assembly. Finger tighten an M5 x 16mm Screw 91 (85) with four 91 M8 x 15mm Bolts (8) and four M8 Star Washers (5). Attach the Left Handrail (not shown) to the console wire...

Canadian English Manual
Page 10
See step 9. Tighten the M8 x 15mm Bolts (8) used in the Base (52) with two M8 10 Star Washers (5) into the Uprights (53, 54). With the help of a second person, carefully lower the Uprights (53, 54) to the indicated hole in step 9. Attach the ground wire on the Wire Harness (39) 11 to the floor. 85 53 54 85 11. 10. Tighten two M8 x 15mm Bolts (8) with an M4 x 10mm Screw (84). 52 Hole Ground Wire 84 39 10
See step 9. Tighten the M8 x 15mm Bolts (8) used in the Base (52) with two M8 10 Star Washers (5) into the Uprights (53, 54). With the help of a second person, carefully lower the Uprights (53, 54) to the indicated hole in step 9. Attach the ground wire on the Wire Harness (39) 11 to the floor. 85 53 54 85 11. 10. Tighten two M8 x 15mm Bolts (8) with an M4 x 10mm Screw (84). 52 Hole Ground Wire 84 39 10

Canadian English Manual
Page 11
... the Latch Housing is used to adjust the walking belt (see page 20). Remove the knob from the pin. Be careful not to the Left Upright (53) with two M4.2 x 19mm Screws (10); One hex key is on each side of them . Attach the Latch Housing (48) to overtighten the Bolts. Make sure that the Frame 12 (51) is centered between them . Then, tighten the knob...
... the Latch Housing is used to adjust the walking belt (see page 20). Remove the knob from the pin. Be careful not to the Left Upright (53) with two M4.2 x 19mm Screws (10); One hex key is on each side of them . Attach the Latch Housing (48) to overtighten the Bolts. Make sure that the Frame 12 (51) is centered between them . Then, tighten the knob...

Canadian English Manual
Page 12
... the outlet box cover is properly grounded. plug. If the control system is not compatible with GFCI-equipped outlets. If it must be installed by a qualified electrician. Whenever the adapter is used it should be held in place by sudden voltage changes in a fall and serious injury. Important: The treadmill is damaged, the walking belt may change speed, accelerate or stop unexpectedly, which...
... the outlet box cover is properly grounded. plug. If the control system is not compatible with GFCI-equipped outlets. If it must be installed by a qualified electrician. Whenever the adapter is used it should be held in place by sudden voltage changes in a fall and serious injury. Important: The treadmill is damaged, the walking belt may change speed, accelerate or stop unexpectedly, which...
Canadian English Manual
Page 13
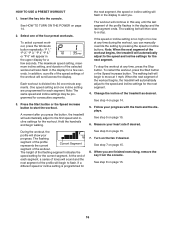
... instructions in this manual refer to the walking platform, wear clean athletic shoes while using the built-in pulse sensor. To use a preset workout, see page 17. To use the information mode, see page 14. To prevent damage to miles. Each workout automatically controls the speed and incline of the console, see page 17. To turn on the power, follow the steps beginning on page 17. The first time the treadmill...
... instructions in this manual refer to the walking platform, wear clean athletic shoes while using the built-in pulse sensor. To use a preset workout, see page 17. To use the information mode, see page 14. To prevent damage to miles. Each workout automatically controls the speed and incline of the console, see page 17. To turn on the power, follow the steps beginning on page 17. The first time the treadmill...
Canadian English Manual
Page 14
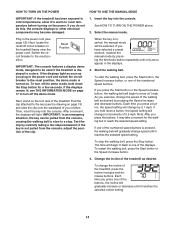
... treadmill as desired by carefully taking a few seconds. To stop . As you press a button, the speed setting will change by pressing the Workouts button repeatedly until it reaches the selected incline setting. 14 The time will gradually increase or decrease until only zeros appear in the power cord (see the drawing on . Plug in the displays. 3. To restart the walking belt, press the Start button or the Speed increase button. 4. When the key is turned...
... treadmill as desired by carefully taking a few seconds. To stop . As you press a button, the speed setting will change by pressing the Workouts button repeatedly until it reaches the selected incline setting. 14 The time will gradually increase or decrease until only zeros appear in the power cord (see the drawing on . Plug in the displays. 3. To restart the walking belt, press the Start button or the Speed increase button. 4. When the key is turned...
Canadian English Manual
Page 15
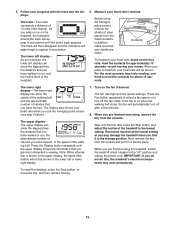
... rails, press the Stop button, and adjust the incline of 1/4 mile (400 meters). When you may wear prematurely. The track will then disappear and the indicators will appear in a secure place. As you exercise, the lower left display can show the speed of the walking belt and the approximate number of clear plastic from the console and put it to the lowest setting. When your pulse is...
... rails, press the Stop button, and adjust the incline of 1/4 mile (400 meters). When you may wear prematurely. The track will then disappear and the indicators will appear in a secure place. As you exercise, the lower left display can show the speed of the walking belt and the approximate number of clear plastic from the console and put it to the lowest setting. When your pulse is...
Canadian English Manual
Page 16
... incline setting will automatically adjust to move at any time, press the Stop button. When the next segment of the four preset workouts. If a different speed or incline setting is divided into the console. To stop . Note: The same speed and incline settings may be programmed for See step 6 on page 15. 7. HOW TO USE A PRESET WORKOUT 1. To select a preset workout, press the Workouts button repeatedly; The maximum speed setting, maximum incline setting, and duration of the workout. The walking belt...
... incline setting will automatically adjust to move at any time, press the Stop button. When the next segment of the four preset workouts. If a different speed or incline setting is divided into the console. To stop . Note: The same speed and incline settings may be programmed for See step 6 on page 15. 7. HOW TO USE A PRESET WORKOUT 1. To select a preset workout, press the Workouts button repeatedly; The maximum speed setting, maximum incline setting, and duration of the workout. The walking belt...
Canadian English Manual
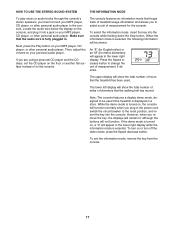
Page 17
... walking belt has moved. To exit the information mode, remove the key from the console. 17 When the information mode is turned on your MP3 player, CD player, or other personal audio player. While the demo mode is selected. To turn on your personal audio player. If you are using a personal CD player and the CD skips, set the CD player on , the console will not function. Press the Speed increase button...
... walking belt has moved. To exit the information mode, remove the key from the console. 17 When the information mode is turned on your MP3 player, CD player, or other personal audio player. While the demo mode is selected. To turn on your personal audio player. If you are using a personal CD player and the CD skips, set the CD player on , the console will not function. Press the Speed increase button...
Canadian English Manual
Page 19
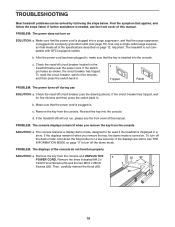
... 12. d. PROBLEM: The displays of the specifications described on . To turn off circuit breaker (see the front cover of this manual. Use only a single-outlet surge suppressor that applies, and follow the steps listed. Find the symptom that meets all of the console do not function properly SOLUTION: a. After the power cord has been plugged in . The console features a display demo mode, designed to turn on the treadmill frame...
... 12. d. PROBLEM: The displays of the specifications described on . To turn off circuit breaker (see the front cover of this manual. Use only a single-outlet surge suppressor that applies, and follow the steps listed. Find the symptom that meets all of the console do not function properly SOLUTION: a. After the power cord has been plugged in . The console features a display demo mode, designed to turn on the treadmill frame...
Canadian English Manual
Page 20
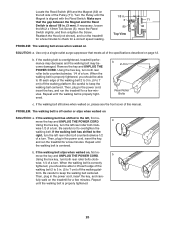
....2 x 13mm Tek Screw (3), move the key and UNPLUG THE POWER CORD. Repeat until the walking belt is aligned with the Reed Switch. PROBLEM: The walking belt is about 1/8 in . (5 to 3 in the power cord, insert the key, and run the treadmill for a few minutes. a Using the hex key, turn the left , first remove the key and UNPLUG THE POWER CORD. If the walking belt has shifted to the left rear roller bolt clock- wise, 1/4 of a turn . Then, plug in . 3 89...
....2 x 13mm Tek Screw (3), move the key and UNPLUG THE POWER CORD. Repeat until the walking belt is aligned with the Reed Switch. PROBLEM: The walking belt is about 1/8 in . (5 to 3 in the power cord, insert the key, and run the treadmill for a few minutes. a Using the hex key, turn the left , first remove the key and UNPLUG THE POWER CORD. If the walking belt has shifted to the left rear roller bolt clock- wise, 1/4 of a turn . Then, plug in . 3 89...

Canadian English Manual
Page 21
..., if desired. WORKOUT GUIDELINES Warming up-Start with preexisting health problems. The pulse sensor is the heart rate for fat burning and aerobic exercise. Stretching increases the flexibility of your goal is to burn fat, adjust the intensity of time. The chart below shows recommended heart rates for aerobic exercise. The lowest number is the heart rate for fat burning, the middle number is the heart rate for maximum fat...
..., if desired. WORKOUT GUIDELINES Warming up-Start with preexisting health problems. The pulse sensor is the heart rate for fat burning and aerobic exercise. Stretching increases the flexibility of your goal is to burn fat, adjust the intensity of time. The chart below shows recommended heart rates for aerobic exercise. The lowest number is the heart rate for fat burning, the middle number is the heart rate for maximum fat...

Canadian English Manual
Page 22
... Left Upright Right Upright Rear Roller Motor Belt Electronics Bracket 3/8" x 1 3/4" Bolt Motor Bracket Left Rear Roller Bracket Right Rear Roller Bracket Magnet Base Pad Catch Hood Belly Pan Left Foot Rail Right Foot Rail Wheel Spacer Wheel Front Roller/Pulley 3/8" x 1 1/4" Bolt Access Door Rear Foot, Left Long Foot Rail Screw Walking Belt Handrail Endcap Platform Cushion Drive Motor Wire Tie 8" Tie 3/8" Locknut Reed Switch Clip M4 x 10mm Screw M5 x 16mm Screw Walking Platform Controller Console Crossbar Reed Switch Power Cord Console 3/8" Jamnut Belt Guide 5mm Hex Key Frame...
... Left Upright Right Upright Rear Roller Motor Belt Electronics Bracket 3/8" x 1 3/4" Bolt Motor Bracket Left Rear Roller Bracket Right Rear Roller Bracket Magnet Base Pad Catch Hood Belly Pan Left Foot Rail Right Foot Rail Wheel Spacer Wheel Front Roller/Pulley 3/8" x 1 1/4" Bolt Access Door Rear Foot, Left Long Foot Rail Screw Walking Belt Handrail Endcap Platform Cushion Drive Motor Wire Tie 8" Tie 3/8" Locknut Reed Switch Clip M4 x 10mm Screw M5 x 16mm Screw Walking Platform Controller Console Crossbar Reed Switch Power Cord Console 3/8" Jamnut Belt Guide 5mm Hex Key Frame...

Canadian English Manual
Page 23
Qty. Specifications are not illustrated. Key No. Qty. 101 2 102 3 103 1 104 2 105 2 106 2 107 2 108 2 109 1 Description Front Roller Washer M4.2 x 18mm Screw Console Fan M10 x 58mm Bolt Cage Nut Caution Decal Isolator M4 x 10mm Controller Screw Audio Wire Key No. User's Manual *These parts are subject to change without notice. 23 Description 110 1 French Latch Warning Decal 111 1 Warning Decal * - 6" Red Wire, M/F * - 8" Black Wire, M/F * - 4" Blue Wire, 2F * - 16" Blue Wire, 2F * -
Qty. Specifications are not illustrated. Key No. Qty. 101 2 102 3 103 1 104 2 105 2 106 2 107 2 108 2 109 1 Description Front Roller Washer M4.2 x 18mm Screw Console Fan M10 x 58mm Bolt Cage Nut Caution Decal Isolator M4 x 10mm Controller Screw Audio Wire Key No. User's Manual *These parts are subject to change without notice. 23 Description 110 1 French Latch Warning Decal 111 1 Warning Decal * - 6" Red Wire, M/F * - 8" Black Wire, M/F * - 4" Blue Wire, 2F * - 16" Blue Wire, 2F * -
Canadian English Manual
Page 28
... an ICON authorized service center; Some provinces do not allow limitations on how long an implied warranty lasts. This warranty gives you , be prepared to provide the following information when contacting us: • the model number and serial number of the product (see the front cover of this manual) • the name of the product (see the front cover of this manual) • the key number...
... an ICON authorized service center; Some provinces do not allow limitations on how long an implied warranty lasts. This warranty gives you , be prepared to provide the following information when contacting us: • the model number and serial number of the product (see the front cover of this manual) • the name of the product (see the front cover of this manual) • the key number...

