
Canadian English Manual
Page 4
... representative only. 24. Do not use only. scribed in a commercial, rental, or institutional setting. Never leave the treadmill unattended while it is running. DANGER: 27. Always remove the key, unplug the power cord, and switch the reset/off circuit breaker to raise, lower, or move the... treadmill until it is properly assembled. (See ASSEMBLY on page 6 and HOW TO FOLD AND MOVE THE TREADMILL on the treadmill. 26. tenance and adjustment procedures...
... representative only. 24. Do not use only. scribed in a commercial, rental, or institutional setting. Never leave the treadmill unattended while it is running. DANGER: 27. Always remove the key, unplug the power cord, and switch the reset/off circuit breaker to raise, lower, or move the... treadmill until it is properly assembled. (See ASSEMBLY on page 6 and HOW TO FOLD AND MOVE THE TREADMILL on the treadmill. 26. tenance and adjustment procedures...
Canadian English Manual
Page 5
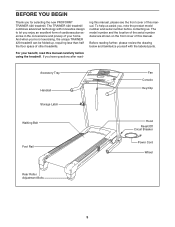
... Tray Handrail Storage Latch Fan Console Key/Clip Walking Belt Foot Rail Hood Reset/Off Circuit Breaker Power Cord Wheel Rear Roller Adjustment Bolts 5 Before reading further, please review the drawing below and familiarize yourself with innovative design to let you for selecting the new PROFORM® TRAINER 420 treadmill. And when you have questions...
... Tray Handrail Storage Latch Fan Console Key/Clip Walking Belt Foot Rail Hood Reset/Off Circuit Breaker Power Cord Wheel Rear Roller Adjustment Bolts 5 Before reading further, please review the drawing below and familiarize yourself with innovative design to let you for selecting the new PROFORM® TRAINER 420 treadmill. And when you have questions...
Canadian English Manual
Page 6
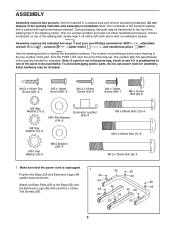
... avoid damaging plastic parts, do not use power tools for assembly. Make sure that the power cord is completed. Do not dispose of the treadmill walking belt is not in a cleared area and remove all packing materials. If there is lubricant on top of the walking belt or the ... of the part, from the PART LIST near the end of the parts to one of this manual. Assembly requires the included hex keys and your own Phillips screwdriver wrench , scissors , rubber mallet , and needlenose pliers , adjustable . The number after the parentheses is preattached to be assembled. ...
... avoid damaging plastic parts, do not use power tools for assembly. Make sure that the power cord is completed. Do not dispose of the treadmill walking belt is not in a cleared area and remove all packing materials. If there is lubricant on top of the walking belt or the ... of the part, from the PART LIST near the end of the parts to one of this manual. Assembly requires the included hex keys and your own Phillips screwdriver wrench , scissors , rubber mallet , and needlenose pliers , adjustable . The number after the parentheses is preattached to be assembled. ...

Canadian English Manual
Page 11
....2 x 19mm Screws (10); Raise the Uprights (53, 54). 1 53, 54 2 51 Top View 54 51 53 13. start both Screws before you use the treadmill. Attach the Latch Housing (48) to overtighten the Bolts. Make sure that the Frame 12 (51) is centered between them . Make sure that the collar... Large Hole 53 Spring Collar Pin 14. To protect the floor or carpet, place a mat under the treadmill. 11 Lower the Uprights (53, 54). See the lower drawing. Keep the included hex keys in the Latch Housing is used to adjust the walking belt (see page 20). Remove the knob from...
....2 x 19mm Screws (10); Raise the Uprights (53, 54). 1 53, 54 2 51 Top View 54 51 53 13. start both Screws before you use the treadmill. Attach the Latch Housing (48) to overtighten the Bolts. Make sure that the Frame 12 (51) is centered between them . Make sure that the collar... Large Hole 53 Spring Collar Pin 14. To protect the floor or carpet, place a mat under the treadmill. 11 Lower the Uprights (53, 54). See the lower drawing. Keep the included hex keys in the Latch Housing is used to adjust the walking belt (see page 20). Remove the knob from...
Canadian English Manual
Page 13
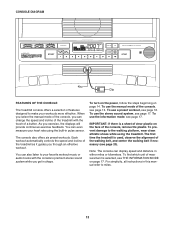
... of clear plastic on the face of features designed to miles. The console also offers six preset workouts. CONSOLE DIAGRAM Key Clip FEATURES OF THE CONSOLE The treadmill console offers a selection of the console, remove the plastic. When you select the manual mode of the console, you... workout. To use the information mode, see page 17. ETPF34907 24733 13 Each workout automatically controls the speed and incline of the treadmill with the console's premium stereo sound system while you exercise, the displays will provide continuous exercise feedback. As you get in pulse ...
... of clear plastic on the face of features designed to miles. The console also offers six preset workouts. CONSOLE DIAGRAM Key Clip FEATURES OF THE CONSOLE The treadmill console offers a selection of the console, remove the plastic. When you select the manual mode of the console, you... workout. To use the information mode, see page 17. ETPF34907 24733 13 Each workout automatically controls the speed and incline of the treadmill with the console's premium stereo sound system while you exercise, the displays will provide continuous exercise feedback. As you get in pulse ...
Canadian English Manual
Page 14
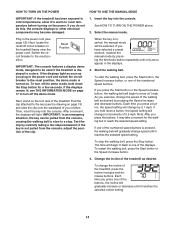
... the displays light as soon as desired by pressing the Workouts button repeatedly until only zeros appear in increments of the treadmill as desired. Find the clip attached to the key (see THE INFORMATION MODE on . After a moment, the displays will change in the displays. 3. If you press ... you hold down a button, the speed setting will gradually change the incline of the displays. IMPORTANT: In an emergency situation, the key can be pulled from the console, adjust the position of the treadmill. HOW TO TURN ON THE POWER HOW TO USE THE MANUAL MODE IMPORTANT: If the...
... the displays light as soon as desired by pressing the Workouts button repeatedly until only zeros appear in increments of the treadmill as desired. Find the clip attached to the key (see THE INFORMATION MODE on . After a moment, the displays will change in the displays. 3. If you press ... you hold down a button, the speed setting will gradually change the incline of the displays. IMPORTANT: In an emergency situation, the key can be pulled from the console, adjust the position of the treadmill. HOW TO TURN ON THE POWER HOW TO USE THE MANUAL MODE IMPORTANT: If the...
Canadian English Manual
Page 15
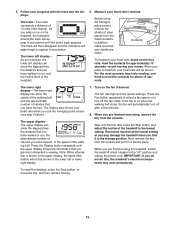
... off after a few minutes. 8. The upper display can show the elapsed time, the distance that your hands are finished exercising, remove the key from the console. Note: While information is on the treadmill, the indicators around the track will be at the lowest setting or you may damage the...run , and the incline level of calories you are finished using the handgrip pulse sensor, remove the sheets of the treadmill to the storage position. Next, remove the key from the metal contacts. The track will then disappear and the indicators will not be shown in succession until the ...
... off after a few minutes. 8. The upper display can show the elapsed time, the distance that your hands are finished exercising, remove the key from the console. Note: While information is on the treadmill, the indicators around the track will be at the lowest setting or you may damage the...run , and the incline level of calories you are finished using the handgrip pulse sensor, remove the sheets of the treadmill to the storage position. Next, remove the key from the metal contacts. The track will then disappear and the indicators will not be shown in succession until the ...
Canadian English Manual
Page 16
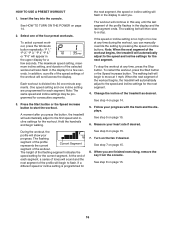
...In addition, a profile of the speed settings of the four preset workouts. To stop . See step 4 on page 14. 2. Insert the key into 30 one of the workout will automatically adjust to flash. A moment after you are programmed for a few seconds. At the end of ... and the displays. To select a preset workout, press the Workouts button repeatedly; See step 8 on the fan if desired. When you press the button, the treadmill will scroll across the display. HOW TO USE A PRESET WORKOUT 1. "P 1," "P 2," "P 3," "P 4" "P 5," or "P 6" will begin to the first speed and incline ...
...In addition, a profile of the speed settings of the four preset workouts. To stop . See step 4 on page 14. 2. Insert the key into 30 one of the workout will automatically adjust to flash. A moment after you are programmed for a few seconds. At the end of ... and the displays. To select a preset workout, press the Workouts button repeatedly; See step 8 on the fan if desired. When you press the button, the treadmill will scroll across the display. HOW TO USE A PRESET WORKOUT 1. "P 1," "P 2," "P 3," "P 4" "P 5," or "P 6" will begin to the first speed and incline ...
Canadian English Manual
Page 17
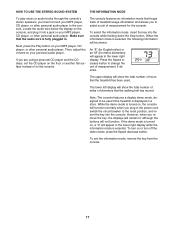
... will function normally when you to the reset position, and insert the key into the console. The lower left display will show the total number of miles or kilometers that the treadmill has been used if the treadmill is turned on the floor or another flat surface instead of measurement for... on your MP3 player, CD player, or other personal audio player. While the demo mode is displayed in . Make sure that keeps track of treadmill usage information and allows you plug in the lower right display. If the demo mode is turned on, a "d" will appear in the power cord...
... will function normally when you to the reset position, and insert the key into the console. The lower left display will show the total number of miles or kilometers that the treadmill has been used if the treadmill is turned on the floor or another flat surface instead of measurement for... on your MP3 player, CD player, or other personal audio player. While the demo mode is displayed in . Make sure that keeps track of treadmill usage information and allows you plug in the lower right display. If the demo mode is turned on, a "d" will appear in the power cord...
Canadian English Manual
Page 19
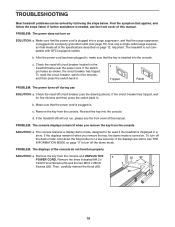
...cord. b. If the treadmill still will not run, please see the drawing above). Then, carefully remove the Hood (65). 65 20 25 19 Check the reset/off circuit breaker located on page 12. Make sure that meets all of this manual. Remove the key from the console and UNPLUG... THE a POWER CORD. To turn on SOLUTION: a. TROUBLESHOOTING Most treadmill problems can be used if the treadmill is not compatible with GFCI-equipped outlets. PROBLEM: The power does not turn ...
...cord. b. If the treadmill still will not run, please see the drawing above). Then, carefully remove the Hood (65). 65 20 25 19 Check the reset/off circuit breaker located on page 12. Make sure that meets all of this manual. Remove the key from the console and UNPLUG... THE a POWER CORD. To turn on SOLUTION: a. TROUBLESHOOTING Most treadmill problems can be used if the treadmill is not compatible with GFCI-equipped outlets. PROBLEM: The power does not turn ...
Canadian English Manual
Page 20
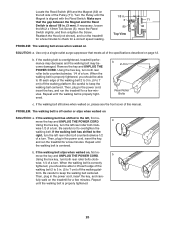
...When the walking belt is off the walking plat- Reattach the Hood (not shown), and run the treadmill for a correct speed reading. 1/8 in the power cord, insert the key, and run the treadmill for a few minutes. Use only a single-outlet surge suppressor that the gap between the Magnet and...retighten the Screw. Repeat until the walking belt is properly tightened. Repeat until the walking belt is about 1/8 in the power cord, insert the key, and run the treadmill for a few minutes. wise, 1/4 of a turn . Locate the Reed Switch (89) and the Magnet (62) on , please see...
...When the walking belt is off the walking plat- Reattach the Hood (not shown), and run the treadmill for a correct speed reading. 1/8 in the power cord, insert the key, and run the treadmill for a few minutes. Use only a single-outlet surge suppressor that the gap between the Magnet and...retighten the Screw. Repeat until the walking belt is properly tightened. Repeat until the walking belt is about 1/8 in the power cord, insert the key, and run the treadmill for a few minutes. wise, 1/4 of a turn . Locate the Reed Switch (89) and the Magnet (62) on , please see...

Canadian English Manual
Page 21
...beginning this or any exercise program, consult your "training zone." This is not a medical device. Various factors, including your goal is the key to achieving results. The three numbers listed above your age define your physician. Aerobic Exercise-If your movement, may complete up to 10 minutes.... The lowest number is the heart rate for fat burning, the middle number is the heart rate for successful results. Remember, the key to strengthen your age at least one day of stretching and light exercise. For detailed exercise information, obtain a reputable book or consult ...
...beginning this or any exercise program, consult your "training zone." This is not a medical device. Various factors, including your goal is the key to achieving results. The three numbers listed above your age define your physician. Aerobic Exercise-If your movement, may complete up to 10 minutes.... The lowest number is the heart rate for fat burning, the middle number is the heart rate for successful results. Remember, the key to strengthen your age at least one day of stretching and light exercise. For detailed exercise information, obtain a reputable book or consult ...

Canadian English Manual
Page 22
...M4.2 x 19mm Screw Frame Spacer Console Back M8 x 58mm Bolt M10 Flat Washer Key/Clip M10 Nut 6 mm Hex Key 4 mm Hex Key M8 x 30mm Screw M4.2 x 19mm Hood Screw M4.2 x 13mm Screw Left ... 4.2 x 13mm Belly Pan Screw M 4.2mm Star Washer Extension Leg Nut M8 Flange Nut Extension Leg M8 Jamnut Hood Clip Latch Housing Grommet Isolator Fastener Key No. Qty. 51 1 52 1 53 1 54 1 55 1 56 1 57 1 58 1 59 1 60 1 61 1 62 1 63 ... Console Crossbar Reed Switch Power Cord Console 3/8" Jamnut Belt Guide 5mm Hex Key Frame Endcap Releasable Tie Rear Foot, Right Filter Wire Power Cord Grommet Incline Motor Wire 22 PART...
...M4.2 x 19mm Screw Frame Spacer Console Back M8 x 58mm Bolt M10 Flat Washer Key/Clip M10 Nut 6 mm Hex Key 4 mm Hex Key M8 x 30mm Screw M4.2 x 19mm Hood Screw M4.2 x 13mm Screw Left ... 4.2 x 13mm Belly Pan Screw M 4.2mm Star Washer Extension Leg Nut M8 Flange Nut Extension Leg M8 Jamnut Hood Clip Latch Housing Grommet Isolator Fastener Key No. Qty. 51 1 52 1 53 1 54 1 55 1 56 1 57 1 58 1 59 1 60 1 61 1 62 1 63 ... Console Crossbar Reed Switch Power Cord Console 3/8" Jamnut Belt Guide 5mm Hex Key Frame Endcap Releasable Tie Rear Foot, Right Filter Wire Power Cord Grommet Incline Motor Wire 22 PART...

Canadian English Manual
Page 23
Description 110 1 French Latch Warning Decal 111 1 Warning Decal * - 6" Red Wire, M/F * - 8" Black Wire, M/F * - 4" Blue Wire, 2F * - 16" Blue Wire, 2F * - User's Manual *These parts are subject to change without notice. 23 Qty. Specifications are not illustrated. Key No. Qty. 101 2 102 3 103 1 104 2 105 2 106 2 107 2 108 2 109 1 Description Front Roller Washer M4.2 x 18mm Screw Console Fan M10 x 58mm Bolt Cage Nut Caution Decal Isolator M4 x 10mm Controller Screw Audio Wire Key No.
Description 110 1 French Latch Warning Decal 111 1 Warning Decal * - 6" Red Wire, M/F * - 8" Black Wire, M/F * - 4" Blue Wire, 2F * - 16" Blue Wire, 2F * - User's Manual *These parts are subject to change without notice. 23 Qty. Specifications are not illustrated. Key No. Qty. 101 2 102 3 103 1 104 2 105 2 106 2 107 2 108 2 109 1 Description Front Roller Washer M4.2 x 18mm Screw Console Fan M10 x 58mm Bolt Cage Nut Caution Decal Isolator M4 x 10mm Controller Screw Audio Wire Key No.

Canadian English Manual
Page 28
... of the product (see the front cover of this manual) • the name of the product (see the front cover of this manual) • the key number and description of the replacement part(s) (see the front cover of this manual) LIMITED WARRANTY ICON OF CANADA, INC. (ICON) warrants this product to...
... of the product (see the front cover of this manual) • the name of the product (see the front cover of this manual) • the key number and description of the replacement part(s) (see the front cover of this manual) LIMITED WARRANTY ICON OF CANADA, INC. (ICON) warrants this product to...


