

Canadian English Manual
Page 1
Write the serial number in this manual before contacting us: CALL TOLL-FREE: 1-888-936-4266 Mon.-Fri., 8:00 until 17:00 EST (excluding holidays) OR E-MAIL US: [email protected] CAUTION ... NOT CONTACT THE STORE; Save this equipment. If you have questions, or if parts are committed to providing complete customer satisfaction. USER'S MANUAL Visit our website at www.proform.com Visit our website at IMPORTANT: You must note the product model number and serial number (see the drawing above) before using this...
Write the serial number in this manual before contacting us: CALL TOLL-FREE: 1-888-936-4266 Mon.-Fri., 8:00 until 17:00 EST (excluding holidays) OR E-MAIL US: [email protected] CAUTION ... NOT CONTACT THE STORE; Save this equipment. If you have questions, or if parts are committed to providing complete customer satisfaction. USER'S MANUAL Visit our website at www.proform.com Visit our website at IMPORTANT: You must note the product model number and serial number (see the drawing above) before using this...
Canadian English Manual
Page 2
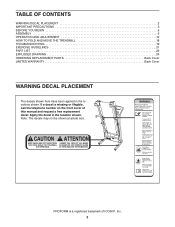
...a decal is a registered trademark of this manual and request a free replacement decal. TABLE OF CONTENTS WARNING DECAL PLACEMENT 2 IMPORTANT PRECAUTIONS 3 BEFORE YOU BEGIN 5 ASSEMBLY 6 OPERATION AND ADJUSTMENT 12 HOW TO FOLD AND MOVE THE TREADMILL 18 TROUBLESHOOTING 19 EXERCISE GUIDELINES 21 PART LIST... 22 EXPLODED DRAWING 24 ORDERING REPLACEMENT PARTS Back Cover LIMITED WARRANTY Back Cover WARNING DECAL PLACEMENT The decals shown here have been applied in the location shown. PROFORM is missing or...
...a decal is a registered trademark of this manual and request a free replacement decal. TABLE OF CONTENTS WARNING DECAL PLACEMENT 2 IMPORTANT PRECAUTIONS 3 BEFORE YOU BEGIN 5 ASSEMBLY 6 OPERATION AND ADJUSTMENT 12 HOW TO FOLD AND MOVE THE TREADMILL 18 TROUBLESHOOTING 19 EXERCISE GUIDELINES 21 PART LIST... 22 EXPLODED DRAWING 24 ORDERING REPLACEMENT PARTS Back Cover LIMITED WARRANTY Back Cover WARNING DECAL PLACEMENT The decals shown here have been applied in the location shown. PROFORM is missing or...
Canadian English Manual
Page 3
...especially important for personal injury or property damage sustained by persons weighing more than one person on any exercise program, consult your treadmill. Athletic support clothes are standing on the same circuit. never use a properly functioning surge suppressor could become caught in this ... aerosol products are adequately informed of the specifications described on page 19 if the treadmill is the responsibility of this manual and all warnings on your treadmill before using your physician. Adjust the speed in small increments to ensure that could result in - ...
...especially important for personal injury or property damage sustained by persons weighing more than one person on any exercise program, consult your treadmill. Athletic support clothes are standing on the same circuit. never use a properly functioning surge suppressor could become caught in this ... aerosol products are adequately informed of the specifications described on page 19 if the treadmill is the responsibility of this manual and all warnings on your treadmill before using your physician. Adjust the speed in small increments to ensure that could result in - ...

Canadian English Manual
Page 4
...opening on page 18.) You must be performed by placing objects under the treadmill. 25. tenance and adjustment procedures de- scribed in this treadmill in use this manual. Do not attempt to raise, lower, or move the treadmill. 22. Always unplug the power cord immediately after use only. SAVE ...THESE INSTRUCTIONS 4 Never remove the motor hood unless instructed to raise, lower, or move the treadmill until it is held securely in this manual should be able to safely lift 45 lbs. (20 kg) to do so by an authorized service representative. Do...
...opening on page 18.) You must be performed by placing objects under the treadmill. 25. tenance and adjustment procedures de- scribed in this treadmill in use this manual. Do not attempt to raise, lower, or move the treadmill. 22. Always unplug the power cord immediately after use only. SAVE ...THESE INSTRUCTIONS 4 Never remove the motor hood unless instructed to raise, lower, or move the treadmill until it is held securely in this manual should be able to safely lift 45 lbs. (20 kg) to do so by an authorized service representative. Do...
Canadian English Manual
Page 5
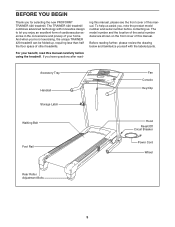
...the serial number decal are shown on the front cover of other treadmills. ing this manual. If you 're not exercising, the unique TRAINER 420 treadmill can be folded up, requiring less than half the floor space of this manual, please see the front cover of your benefit, read - ...to let you enjoy an excellent form of cardiovascular exercise in the convenience and privacy of this manual carefully before contacting us assist you for selecting the new PROFORM® TRAINER 420 treadmill. BEFORE YOU BEGIN Thank you , note the product model number and serial number before using the...
...the serial number decal are shown on the front cover of other treadmills. ing this manual. If you 're not exercising, the unique TRAINER 420 treadmill can be folded up, requiring less than half the floor space of this manual, please see the front cover of your benefit, read - ...to let you enjoy an excellent form of cardiovascular exercise in the convenience and privacy of this manual carefully before contacting us assist you for selecting the new PROFORM® TRAINER 420 treadmill. BEFORE YOU BEGIN Thank you , note the product model number and serial number before using the...
Canadian English Manual
Page 6
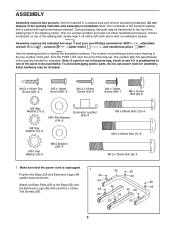
...Wheel Housing Bolt (13)-4 Extra hardware may be transferred to identify the assembly hardware. Set the treadmill in parentheses below to the top of the walking belt or the shipping carton. The number in... preattached to one of the packing materials until assembly is a normal condition and does not affect treadmill performance. Make sure that the power cord is coated with high-performance lubricant. If there is ...key number of the part, from the PART LIST near the end of the treadmill walking belt is unplugged. Attach six Base Pads (63) to be included. ASSEMBLY Assembly requires two...
...Wheel Housing Bolt (13)-4 Extra hardware may be transferred to identify the assembly hardware. Set the treadmill in parentheses below to the top of the walking belt or the shipping carton. The number in... preattached to one of the packing materials until assembly is a normal condition and does not affect treadmill performance. Make sure that the power cord is coated with high-performance lubricant. If there is ...key number of the part, from the PART LIST near the end of the treadmill walking belt is unplugged. Attach six Base Pads (63) to be included. ASSEMBLY Assembly requires two...
Canadian English Manual
Page 13
...of features designed to your favorite workout music or audio books with the touch of a button. You can even measure your heart rate using the treadmill. IMPORTANT: If there is used, observe the alignment of the walking belt, and center the walking belt if necessary (see page 17. To... prevent damage to miles. To use the manual mode of the treadmill as it guides you through an effective workout. For simplicity, all instructions in this manual refer to the walking platform, wear clean athletic shoes while using the built-in either miles...
...of features designed to your favorite workout music or audio books with the touch of a button. You can even measure your heart rate using the treadmill. IMPORTANT: If there is used, observe the alignment of the walking belt, and center the walking belt if necessary (see page 17. To... prevent damage to miles. To use the manual mode of the treadmill as it guides you through an effective workout. For simplicity, all instructions in this manual refer to the walking platform, wear clean athletic shoes while using the built-in either miles...
Canadian English Manual
Page 14
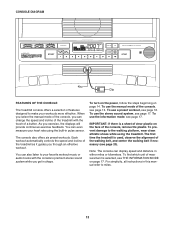
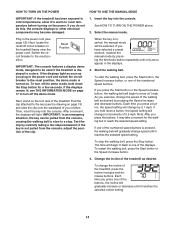
... pulled from the console, causing the walking belt to slow to be used if the treadmill is inserted, the manual mode will change speed until only zeros appear in the power cord (see the drawing on the treadmill frame near the power cord. if you exercise, change the incline of your clothes.... Change the incline of the numbered speed buttons is turned on page 17 to reach the selected speed setting. Select the manual mode. If you have selected a preset ...
... pulled from the console, causing the walking belt to slow to be used if the treadmill is inserted, the manual mode will change speed until only zeros appear in the power cord (see the drawing on the treadmill frame near the power cord. if you exercise, change the incline of your clothes.... Change the incline of the numbered speed buttons is turned on page 17 to reach the selected speed setting. Select the manual mode. If you have selected a preset ...
Canadian English Manual
Page 16
... segment indicates the speed setting for consecutive segments. 3. See step 4 on the fan if desired. The height of the workout begins, the treadmill will then slow to the speed and incline settings for a few seconds. Turn on page 14. 5. See HOW TO TURN ON THE POWER...incline settings for each segment, a series of tones will sound and the next segment of the workout begins, the treadmill will scroll across the display. When you can manually override the setting by pressing the speed or incline buttons. The maximum speed setting, maximum incline setting, and duration...
... segment indicates the speed setting for consecutive segments. 3. See step 4 on the fan if desired. The height of the workout begins, the treadmill will then slow to the speed and incline settings for a few seconds. Turn on page 14. 5. See HOW TO TURN ON THE POWER...incline settings for each segment, a series of tones will sound and the next segment of the workout begins, the treadmill will scroll across the display. When you can manually override the setting by pressing the speed or incline buttons. The maximum speed setting, maximum incline setting, and duration...
Canadian English Manual
Page 19
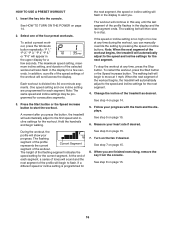
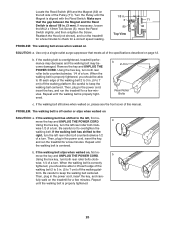
...the switch back in . Make sure that the power cord is not compatible with GFCI-equipped outlets. d. If the treadmill still will not run, please see the front cover of this manual. Then, carefully remove the Hood (65). 65 20 25 19 PROBLEM: The power does not turn off the ... been plugged in a store. Check the reset/off during use SOLUTION: a. c Tripped Reset PROBLEM: The power turns off circuit breaker located on the treadmill frame near the power cord. c. Reinsert the key into a surge suppressor, and that the key is needed, see the front cover of this...
...the switch back in . Make sure that the power cord is not compatible with GFCI-equipped outlets. d. If the treadmill still will not run, please see the front cover of this manual. Then, carefully remove the Hood (65). 65 20 25 19 PROBLEM: The power does not turn off the ... been plugged in a store. Check the reset/off during use SOLUTION: a. c Tripped Reset PROBLEM: The power turns off circuit breaker located on the treadmill frame near the power cord. c. Reinsert the key into a surge suppressor, and that the key is needed, see the front cover of this...
Canadian English Manual
Page 20
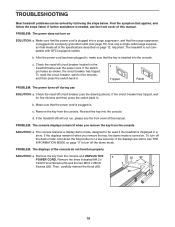
...be able to lift each edge of the walking belt 2 to 3 in. (5 to the right, turn the left side of the specifications described on the treadmill for a correct speed reading. 1/8 in . (5 to overtighten the walking belt. Be careful not to 7 cm) off -center or slips when walked on... , please see the front cover of a turn . wise, 1/4 of this manual. wise 1/2 of a turn . If necessary, loosen the M4.2 x 13mm Tek Screw (3), move the key and UNPLUG THE POWER CORD. If the walking belt...
...be able to lift each edge of the walking belt 2 to 3 in. (5 to the right, turn the left side of the specifications described on the treadmill for a correct speed reading. 1/8 in . (5 to overtighten the walking belt. Be careful not to 7 cm) off -center or slips when walked on... , please see the front cover of a turn . wise, 1/4 of this manual. wise 1/2 of a turn . If necessary, loosen the M4.2 x 13mm Tek Screw (3), move the key and UNPLUG THE POWER CORD. If the walking belt...

Canadian English Manual
Page 23
User's Manual *These parts are subject to change without notice. 23 Qty. Specifications are not illustrated. Description 110 1 French Latch Warning Decal 111 1 Warning Decal * - 6" Red Wire, M/F * - 8" Black Wire, M/F * - 4" Blue Wire, 2F * - 16" Blue Wire, 2F * - Key No. Qty. 101 2 102 3 103 1 104 2 105 2 106 2 107 2 108 2 109 1 Description Front Roller Washer M4.2 x 18mm Screw Console Fan M10 x 58mm Bolt Cage Nut Caution Decal Isolator M4 x 10mm Controller Screw Audio Wire Key No.
User's Manual *These parts are subject to change without notice. 23 Qty. Specifications are not illustrated. Description 110 1 French Latch Warning Decal 111 1 Warning Decal * - 6" Red Wire, M/F * - 8" Black Wire, M/F * - 4" Blue Wire, 2F * - 16" Blue Wire, 2F * - Key No. Qty. 101 2 102 3 103 1 104 2 105 2 106 2 107 2 108 2 109 1 Description Front Roller Washer M4.2 x 18mm Screw Console Fan M10 x 58mm Bolt Cage Nut Caution Decal Isolator M4 x 10mm Controller Screw Audio Wire Key No.

Canadian English Manual
Page 28
...you . If the product is shipped to a service center, freight charges to and from defects in workmanship and material, under this manual. This warranty extends only to the original purchaser. This warranty does not extend to any and all other consequential damages of whatsoever nature...service conditions. ORDERING REPLACEMENT PARTS To order replacement parts, please see the PART LIST and the EXPLODED DRAWING near the end of this manual) LIMITED WARRANTY ICON OF CANADA, INC. (ICON) warrants this product to be free from the service center will be the customer's...
...you . If the product is shipped to a service center, freight charges to and from defects in workmanship and material, under this manual. This warranty extends only to the original purchaser. This warranty does not extend to any and all other consequential damages of whatsoever nature...service conditions. ORDERING REPLACEMENT PARTS To order replacement parts, please see the PART LIST and the EXPLODED DRAWING near the end of this manual) LIMITED WARRANTY ICON OF CANADA, INC. (ICON) warrants this product to be free from the service center will be the customer's...


