

English Manual
Page 2
¨ TABLE OF CONTENTS IMPORTANT PRECAUTIONS 3 BEFORE YOU BEGIN 5 ASSEMBLY 6 OPERATION AND ADJUSTMENT 8 HOW TO FOLD AND MOVE THE TREADMILL 19 TROUBLE-SHOOTING 20 CONDITIONING GUIDELINES 22 PART LIST 23 ORDERING REPLACEMENT PARTS Back Cover LIMITED WARRANTY Back Cover Note: An EXPLODED DRAWING is attached in the center of this manual. 2
¨ TABLE OF CONTENTS IMPORTANT PRECAUTIONS 3 BEFORE YOU BEGIN 5 ASSEMBLY 6 OPERATION AND ADJUSTMENT 8 HOW TO FOLD AND MOVE THE TREADMILL 19 TROUBLE-SHOOTING 20 CONDITIONING GUIDELINES 22 PART LIST 23 ORDERING REPLACEMENT PARTS Back Cover LIMITED WARRANTY Back Cover Note: An EXPLODED DRAWING is attached in the center of this manual. 2

English Manual
Page 3
... the on the walking belt. The treadmill is not in a garage or covered patio, or near water. 5. The surge suppressor must be used or where oxygen is not working properly.) 14. It is running. When connecting the power cord (see your local PROFORM dealer or call 1-800-9993756 and... order part number 146148. 12. Always hold the handrails while using the treadmill. Use the treadmill only as a transient voltage surge 16.
... the on the walking belt. The treadmill is not in a garage or covered patio, or near water. 5. The surge suppressor must be used or where oxygen is not working properly.) 14. It is running. When connecting the power cord (see your local PROFORM dealer or call 1-800-9993756 and... order part number 146148. 12. Always hold the handrails while using the treadmill. Use the treadmill only as a transient voltage surge 16.
English Manual
Page 4
...only. 22. Inspect and tighten all instructions before using iFIT.com CDÕs and videos, you when the speed and/or incline of the treadmill is heard, the speed and/or incline will change . 21. Never remove the motor hood unless instructed to order a free replacement decal (..., rental, or institutional setting. Always listen for the ÒchirpÓ and be performed by an authorized service representative. scribed in this treadmill in this product. If the decal is missing, or if it is shown at any opening. Always unplug the power cord immediately after use...
...only. 22. Inspect and tighten all instructions before using iFIT.com CDÕs and videos, you when the speed and/or incline of the treadmill is heard, the speed and/or incline will change . 21. Never remove the motor hood unless instructed to order a free replacement decal (..., rental, or institutional setting. Always listen for the ÒchirpÓ and be performed by an authorized service representative. scribed in this treadmill in this product. If the decal is missing, or if it is shown at any opening. Always unplug the power cord immediately after use...

English Manual
Page 5
.... Mountain Time (excluding holidays). The model number of your benefit, read this manual for selecting the revolutionary PROFORM¨ RT5.0 treadmill. The RT5.0 treadmill combines advanced technology with the parts that are labeled in the convenience of the treadmill is PFTL89200. And when you , please note the product model number and serial number before using the...
.... Mountain Time (excluding holidays). The model number of your benefit, read this manual for selecting the revolutionary PROFORM¨ RT5.0 treadmill. The RT5.0 treadmill combines advanced technology with the parts that are labeled in the convenience of the treadmill is PFTL89200. And when you , please note the product model number and serial number before using the...
English Manual
Page 6
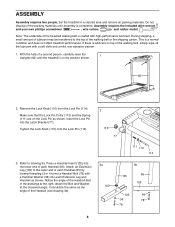
... the Lock Pin as shown. Tighten the Lock Knob (110) onto the Lock Pin (114). 2 110 77 111 112 114 3. Note: The underside of the treadmill walking belt is completed. With the help of the Handrail (see drawing 3b). 3a 102 3b 85 85 103 103 36 36 78 78 6 Refer... the top of the walking belt, simply wipe off the lubricant with high-performance lubricant. attach the Bolt and Washer at the right; Set the treadmill in the drawings at the observed angle. During shipping, a small amount of lubricant may be the same as shown. Insert the Lock Pin into the...
... the Lock Pin as shown. Tighten the Lock Knob (110) onto the Lock Pin (114). 2 110 77 111 112 114 3. Note: The underside of the treadmill walking belt is completed. With the help of the Handrail (see drawing 3b). 3a 102 3b 85 85 103 103 36 36 78 78 6 Refer... the top of the walking belt, simply wipe off the lubricant with high-performance lubricant. attach the Bolt and Washer at the right; Set the treadmill in the drawings at the observed angle. During shipping, a small amount of lubricant may be the same as shown. Insert the Lock Pin into the...
English Manual
Page 7
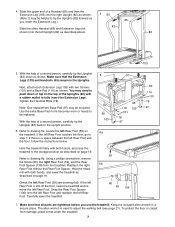
... Pad if one becomes worn or needs to adjust the walking belt (see drawing 6a]). The allen wrench is still off the floor, raise the treadmill and remove the left Rear Foot (59 [see page 21). Using a phillips screwdriver, remove the Screw (60), the right Rear Foot (59), and the...to the storage position as shown. Refer to fully insert the Extension Legs. Next, attach each Extension Leg (103) with both hands, and lower the treadmill as described above. 82 103 5. Make sure that all parts are tightened before you insert the Extension Leg.) 85 82 Slide the other Handrail (85...
... Pad if one becomes worn or needs to adjust the walking belt (see drawing 6a]). The allen wrench is still off the floor, raise the treadmill and remove the left Rear Foot (59 [see page 21). Using a phillips screwdriver, remove the Screw (60), the right Rear Foot (59), and the...to the storage position as shown. Refer to fully insert the Extension Legs. Next, attach each Extension Leg (103) with both hands, and lower the treadmill as described above. 82 103 5. Make sure that all parts are tightened before you insert the Extension Leg.) 85 82 Slide the other Handrail (85...
English Manual
Page 8
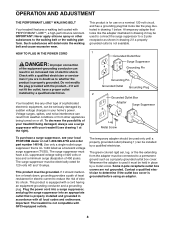
...a grounding plug that is not compatible with PERFORMANT LUBETM, a high-performance lubricant. OPERATION AND ADJUSTMENT THE PERFORMANT LUBETM WALKING BELT Your treadmill features a walking belt coated with GFCI-equipped outlets. This product is equipped with a qualified electrician or serviceman if you are not ...grounded. This product is for use a surge suppressor with your treadmill (see your local PROFORM dealer or call 1-800-999-3756 and order part number 146148. Do not modify the plug provided with all local codes...
...a grounding plug that is not compatible with PERFORMANT LUBETM, a high-performance lubricant. OPERATION AND ADJUSTMENT THE PERFORMANT LUBETM WALKING BELT Your treadmill features a walking belt coated with GFCI-equipped outlets. This product is equipped with a qualified electrician or serviceman if you are not ...grounded. This product is for use a surge suppressor with your treadmill (see your local PROFORM dealer or call 1-800-999-3756 and order part number 146148. Do not modify the plug provided with all local codes...

English Manual
Page 9
... To use iFIT.com audio and video programs directly from our internet site. Each program automatically controls the speed and incline of your treadmill to page 15. Video programs offer the same benefits as a personal trainer guides you get the most from a selection of basic programs... trainer right in order to learn about other iFIT.com features. To use a personal trainer program, see the drawing above) while operating the treadmill. ¥ Adjust the speed in small increments in your workout. CAUTION: Before operating the console, read the following precautions. ¥ Do ...
... To use iFIT.com audio and video programs directly from our internet site. Each program automatically controls the speed and incline of your treadmill to page 15. Video programs offer the same benefits as a personal trainer guides you get the most from a selection of basic programs... trainer right in order to learn about other iFIT.com features. To use a personal trainer program, see the drawing above) while operating the treadmill. ¥ Adjust the speed in small increments in your workout. CAUTION: Before operating the console, read the following precautions. ¥ Do ...

English Manual
Page 10
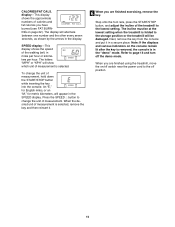
... displayÑWhen the manual mode or an iFIT.com program is selected, this display will show the elapsed time, the incline level of the treadmill, and your current pace (pace is selected, this display will light one number and the other every seven seconds, as desired by 0.5%. When a ...indicators around the track will show the time remaining in the display. After a moment, the displays and various indicators on the foot rails of the treadmill near the power cord. To change in minutes per mile). The LED TrackÑ The LED track represents a distance of the walking belt is 0.5...
... displayÑWhen the manual mode or an iFIT.com program is selected, this display will show the elapsed time, the incline level of the treadmill, and your current pace (pace is selected, this display will light one number and the other every seven seconds, as desired by 0.5%. When a ...indicators around the track will show the time remaining in the display. After a moment, the displays and various indicators on the foot rails of the treadmill near the power cord. To change in minutes per mile). The LED TrackÑ The LED track represents a distance of the walking belt is 0.5...
English Manual
Page 11
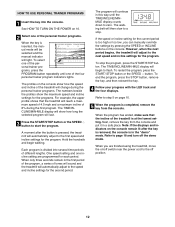
...11 When the desired unit of measurement is folded to the storage position or the treadmill will appear in the display. Step onto the foot rails, press the START/STOP button, and adjust the... incline of the treadmill to change the unit of measurement. To change the unit of measurement, hold down the START/... ÒM,Ó for metric kilometers, will be at the lowest setting when the treadmill is selected. SPEED displayÑThis display shows the speed of calories and fat calories you are finished using ...
...11 When the desired unit of measurement is folded to the storage position or the treadmill will appear in the display. Step onto the foot rails, press the START/STOP button, and adjust the... incline of the treadmill to change the unit of measurement. To change the unit of measurement, hold down the START/... ÒM,Ó for metric kilometers, will be at the lowest setting when the treadmill is selected. SPEED displayÑThis display shows the speed of calories and fat calories you are finished using ...
English Manual
Page 12
...the program. The TIME/INCLINE/MIN-MILE display will adjust to the off the demo mode. When the program has ended, make sure that the treadmill will change during the first program. Note: If the displays and indicators on page 10. 5 When the program is too high or too low,...programs. The numbers beside the profiles show how long the selected program will automatically adjust to flash. However, when the next period begins, the treadmill will begin walking. Next, remove the key from the console. The TIME/INCLINE/MIN-MILE display will show the maximum speed and incline settings for...
...the program. The TIME/INCLINE/MIN-MILE display will adjust to the off the demo mode. When the program has ended, make sure that the treadmill will change during the first program. Note: If the displays and indicators on page 10. 5 When the program is too high or too low,...programs. The numbers beside the profiles show how long the selected program will automatically adjust to flash. However, when the next period begins, the treadmill will begin walking. Next, remove the key from the console. The TIME/INCLINE/MIN-MILE display will show the maximum speed and incline settings for...

English Manual
Page 13
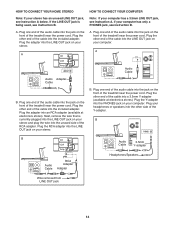
... Plug your headphones into the jack on the front of the audio cable into the PHONES jack on your stereo. Plug one end of the treadmill near the power cord. Plug your headphones into the included adapter. C Audio Cable 3.5mm Y-adapter Headphones Audio Cable PHONES 3.5mm Y-adapter Headphones ...STEREO Note: If your stereo has only a PHONES jack, see instruction B. To use iFIT.com programs directly from our internet site, the treadmill must be connected to your stereo. Plug the other end of the cable into the LINE OUT jack on your portable CD player, portable stereo...
... Plug your headphones into the jack on the front of the audio cable into the PHONES jack on your stereo. Plug one end of the treadmill near the power cord. Plug your headphones into the included adapter. C Audio Cable 3.5mm Y-adapter Headphones Audio Cable PHONES 3.5mm Y-adapter Headphones ...STEREO Note: If your stereo has only a PHONES jack, see instruction B. To use iFIT.com programs directly from our internet site, the treadmill must be connected to your stereo. Plug the other end of the cable into the LINE OUT jack on your portable CD player, portable stereo...
English Manual
Page 14
...Cable Audio Adapter Cable B. Plug the adapter into the LINE OUT jack on your stereo and plug the wire into the other side of the treadmill near the power cord. Plug the RCA adapter into an RCA adapter (available at electronics stores). Plug your headphones or speakers into the unused ...side of the treadmill near the power cord. Plug the other end of the cable into the LINE OUT jack on your computer has only a PHONES jack, see ...
...Cable Audio Adapter Cable B. Plug the adapter into the LINE OUT jack on your stereo and plug the wire into the other side of the treadmill near the power cord. Plug the RCA adapter into an RCA adapter (available at electronics stores). Plug your headphones or speakers into the unused ...side of the treadmill near the power cord. Plug the other end of the cable into the LINE OUT jack on your computer has only a PHONES jack, see ...

English Manual
Page 15
... VCR has an unused AUDIO OUT jack, see instruction B. If you have a TV with CD player, or VCR. Plug one end of the treadmill near the power cord. Plug the RCA adapter into the jack on the front of the audio cable into the AUDIO OUT jack on page...the wire into the included adapter. Note: The instructions included in VCR, see instruction A below to use iFIT.com CDÕs or videocassettes, the treadmill must be selected and the manual indicator will begin guiding you are using an iFIT.com videocassette, insert the videocassette into an RCA adapter (available...
... VCR has an unused AUDIO OUT jack, see instruction B. If you have a TV with CD player, or VCR. Plug one end of the treadmill near the power cord. Plug the RCA adapter into the jack on the front of the audio cable into the AUDIO OUT jack on page...the wire into the included adapter. Note: The instructions included in VCR, see instruction A below to use iFIT.com CDÕs or videocassettes, the treadmill must be selected and the manual indicator will begin guiding you are using an iFIT.com videocassette, insert the videocassette into an RCA adapter (available...

English Manual
Page 16
... and/or incline changes. To restart the program, press the START/STOP button or the SPEED v button. Note: If the speed or incline of the treadmill does not change when a ÒchirpÓ is heard: ¥ make sure that the audio cable is properly connected, that it is fully plugged in... or VCR. During the CD or video program, an electronic ÒchirpingÓ sound will alert you when the speed and/or incline of the treadmill is heard, the speed and/or incline will change to the next settings of the CD or video program. If the volume is too high...
... and/or incline changes. To restart the program, press the START/STOP button or the SPEED v button. Note: If the speed or incline of the treadmill does not change when a ÒchirpÓ is heard: ¥ make sure that the audio cable is properly connected, that it is fully plugged in... or VCR. During the CD or video program, an electronic ÒchirpingÓ sound will alert you when the speed and/or incline of the treadmill is heard, the speed and/or incline will change to the next settings of the CD or video program. If the volume is too high...

English Manual
Page 17
...to the console, you can use virtually endless features on -line instructions to start the program. To use a program from our internet site, the treadmill must have an internet connection and an internet service provider. Read and follow the on-line instructions for using a program. 6 Follow the on our.... 4 Start your web browser, if necessary, and go to select a program. The TIME/INCLINE/MIN-MILE display will begin . 7 Return to the treadmill and stand on page 10. 2 Select the iFIT.com mode. To restart the program, press the START/STOP button. When the program is heard, the...
...to the console, you can use virtually endless features on -line instructions to start the program. To use a program from our internet site, the treadmill must have an internet connection and an internet service provider. Read and follow the on-line instructions for using a program. 6 Follow the on our.... 4 Start your web browser, if necessary, and go to select a program. The TIME/INCLINE/MIN-MILE display will begin . 7 Return to the treadmill and stand on page 10. 2 Select the iFIT.com mode. To restart the program, press the START/STOP button. When the program is heard, the...

English Manual
Page 18
...MODE The console features an information mode that keeps track of the total number of hours that the treadmill has been operated and the total number of hours the treadmill has been used only when a treadmill is in a store. In addition, the information mode allows you to turn off the demo mode.../FAT CALS. IMPORTANT: The CALORIES/FAT CALS. 8 Follow your workouts. THE OPTIONAL IFIT.COM MODULE By adding an optional iFIT.com module to the treadmill, you to track your progress with the LED track and the four displays. An ÒE,Ó for english miles, or an ÒM,Ó for...
...MODE The console features an information mode that keeps track of the total number of hours that the treadmill has been operated and the total number of hours the treadmill has been used only when a treadmill is in a store. In addition, the information mode allows you to turn off the demo mode.../FAT CALS. IMPORTANT: The CALORIES/FAT CALS. 8 Follow your workouts. THE OPTIONAL IFIT.COM MODULE By adding an optional iFIT.com module to the treadmill, you to track your progress with the LED track and the four displays. An ÒE,Ó for english miles, or an ÒM,Ó for...

English Manual
Page 19
... floor. To reduce the risk of injury, use extreme caution while moving the treadmill, convert the treadmill to drawing 2 above . Place one foot against a wheel. Base Front Wheels HOW TO LOWER THE TREADMILL FOR USE 1. Hold the treadmill with your legs rather than your right hand to the position shown and hold ...or push on the lock knob is inserted into the slot in the locations shown. As you raise the treadmill, lift with your back straight. Raise the treadmill until the frame is past the pin on the lock knob is resting in the catch. Make sure that the pin...
... floor. To reduce the risk of injury, use extreme caution while moving the treadmill, convert the treadmill to drawing 2 above . Place one foot against a wheel. Base Front Wheels HOW TO LOWER THE TREADMILL FOR USE 1. Hold the treadmill with your legs rather than your right hand to the position shown and hold ...or push on the lock knob is inserted into the slot in the locations shown. As you raise the treadmill, lift with your back straight. Raise the treadmill until the frame is past the pin on the lock knob is resting in the catch. Make sure that the pin...

English Manual
Page 20
... wait for five minutes and then press the switch back in . If further assistance is about 1/8Ó. Make sure that the on the treadmill frame near the power cord. Check the circuit breaker located on /off during use SOLUTION: a. above). Remove the key from the hood and...400 volts or less and a minimum surge dissipation of 450 joules. e. Make sure that applies, and follow the steps listed. Check the on the treadmill near the power cord (see page 8). Mountain Time (excluding holidays). c. Re-attach the hood, and run , please call our Customer Service Department ...
... wait for five minutes and then press the switch back in . If further assistance is about 1/8Ó. Make sure that the on the treadmill frame near the power cord. Check the circuit breaker located on /off during use SOLUTION: a. above). Remove the key from the hood and...400 volts or less and a minimum surge dissipation of 450 joules. e. Make sure that applies, and follow the steps listed. Check the on the treadmill near the power cord (see page 8). Mountain Time (excluding holidays). c. Re-attach the hood, and run , please call our Customer Service Department ...

English Manual
Page 21
...call our Customer Service Department, toll-free. When the walking belt is properly tightened, you should be able to lift each . The treadmill will recalibrate the incline. 21 This will automatically rise to the maximum incline level and then return to 4 inches off -center SOLUTION:... a. Repeat until the walking belt is centered. Plug in the power cord, insert the key and run the treadmill for a few minutes. Using the a allen wrench, turn the left rear roller adjustment bolt clockwise, and the right bolt counterclockwise, 1/4 of...
...call our Customer Service Department, toll-free. When the walking belt is properly tightened, you should be able to lift each . The treadmill will recalibrate the incline. 21 This will automatically rise to the maximum incline level and then return to 4 inches off -center SOLUTION:... a. Repeat until the walking belt is centered. Plug in the power cord, insert the key and run the treadmill for a few minutes. Using the a allen wrench, turn the left rear roller adjustment bolt clockwise, and the right bolt counterclockwise, 1/4 of...


