
English Manual
Page 2
.... Keep the exercise cycle indoors, away from the exercise cycle at all parts regularly. the pedals will continue to mount, dismount, and use the exercise cycle in the location shown. TABLE OF CONTENTS IMPORTANT PRECAUTIONS 2 BEFORE YOU BEGIN 3 ASSEMBLY 4 HOW TO OPERATE THE EXERCISE CYCLE 8 MAINTENANCE AND TROUBLESHOOTING 20 CONDITIONING GUIDELINES 21 PART LIST 22 EXPLODED DRAWING 23 ORDERING REPLACEMENT PARTS Back Cover LIMITED WARRANTY Back Cover IMPORTANT PRECAUTIONS...
.... Keep the exercise cycle indoors, away from the exercise cycle at all parts regularly. the pedals will continue to mount, dismount, and use the exercise cycle in the location shown. TABLE OF CONTENTS IMPORTANT PRECAUTIONS 2 BEFORE YOU BEGIN 3 ASSEMBLY 4 HOW TO OPERATE THE EXERCISE CYCLE 8 MAINTENANCE AND TROUBLESHOOTING 20 CONDITIONING GUIDELINES 21 PART LIST 22 EXPLODED DRAWING 23 ORDERING REPLACEMENT PARTS Back Cover LIMITED WARRANTY Back Cover IMPORTANT PRECAUTIONS...

English Manual
Page 3
... after reading this manual, please see the front cover of this healthful exercise in the drawing below. If you enjoy this manual for increasing cardiovascular fitness, building endurance, and toning the entire body. To avoid a registration fee for selecting the new PROFORM® GT 90 exercise cycle. B Fan Handgrip Pulse Sensor Decal shown at www.proformservice.com/registration. ANGLES + TITLE:DECAL, PROJECT / MODE NO.
... after reading this manual, please see the front cover of this healthful exercise in the drawing below. If you enjoy this manual for increasing cardiovascular fitness, building endurance, and toning the entire body. To avoid a registration fee for selecting the new PROFORM® GT 90 exercise cycle. B Fan Handgrip Pulse Sensor Decal shown at www.proformservice.com/registration. ANGLES + TITLE:DECAL, PROJECT / MODE NO.
English Manual
Page 4
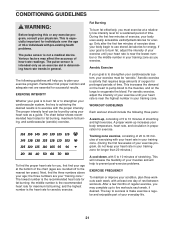
... chart below shows recommended heart rates for fat burning; A proper warm-up , consisting of oxygen for exercise. Next, find your age at a relatively low intensity level for aerobic exercise. After a few minutes of time. The following three parts: A warm-up increases your age; and the highest number is not a medical device. A cool-down, with pre-existing health problems. The pulse sensor...
... chart below shows recommended heart rates for fat burning; A proper warm-up , consisting of oxygen for exercise. Next, find your age at a relatively low intensity level for aerobic exercise. After a few minutes of time. The following three parts: A warm-up increases your age; and the highest number is not a medical device. A cool-down, with pre-existing health problems. The pulse sensor...

English Manual
Page 7
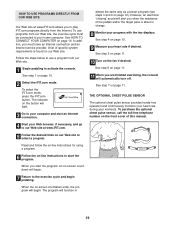
..., turn the Knob clockwise until the pin on each Pedal is marked with an "L" for left over after assembly is completed. Next, pull the Knob, insert the Seat Post (11) into one week, retighten the Pedals. After using the exercise cycle for right. Place a mat under the exercise cycle to the desired position. Move the Seat Post up and down the Seat Post and press...
..., turn the Knob clockwise until the pin on each Pedal is marked with an "L" for left over after assembly is completed. Next, pull the Knob, insert the Seat Post (11) into one week, retighten the Pedals. After using the exercise cycle for right. Place a mat under the exercise cycle to the desired position. Move the Seat Post up and down the Seat Post and press...

English Manual
Page 8
... remaining wires included with the three screws removed in the straps. As you purchase the optional chest pulse sensor (see assembly step 3 on the pedals. Turn Knob the knob clockwise to loosen it . Lower the top of the straps RBEX49840 off the tabs on page 5. HOW TO ADJUST THE PEDAL STRAPS To adjust the pedal straps, first pull the ends of the Console (9). Make sure that it locks Seat into place. Move the seat post...
... remaining wires included with the three screws removed in the straps. As you purchase the optional chest pulse sensor (see assembly step 3 on the pedals. Turn Knob the knob clockwise to loosen it . Lower the top of the straps RBEX49840 off the tabs on page 5. HOW TO ADJUST THE PEDAL STRAPS To adjust the pedal straps, first pull the ends of the Console (9). Make sure that it locks Seat into place. Move the seat post...

English Manual
Page 9
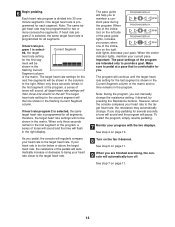
... audio cable, you to vary your workout. To purchase iFIT.com CDs and videocassettes, call the toll-free telephone number on the face of this manual. To use a program directly from the Internet. ing a personal trainer in your computer, you through every step of a button. In addition, the console features two heart rate programs that automatically change the resistance of the pedals with the touch of your pace as you exercise...
... audio cable, you to vary your workout. To purchase iFIT.com CDs and videocassettes, call the toll-free telephone number on the face of this manual. To use a program directly from the Internet. ing a personal trainer in your computer, you through every step of a button. In addition, the console features two heart rate programs that automatically change the resistance of the pedals with the touch of your pace as you exercise...
English Manual
Page 10
... console will change the resistance of the pedals by pressing the Program Select button repeatedly until the entire track is not lit. 10 As you pedal, change from one number to show the elapsed time, the distance you can select a single mode for use the handgrip pulse sensor or the optional chest pulse sensor. The track will then darken and a new lap will light. The display will be ready for continuous display...
... console will change the resistance of the pedals by pressing the Program Select button repeatedly until the entire track is not lit. 10 As you pedal, change from one number to show the elapsed time, the distance you can select a single mode for use the handgrip pulse sensor or the optional chest pulse sensor. The track will then darken and a new lap will light. The display will be ready for continuous display...

English Manual
Page 11
... the metal contacts using either the handgrip pulse sensor or the optional chest pulse sensor. To turn off . If the pedals are not moved for at high speed, press the button a second time. 5 Measure your hands are positioned as described. site contacts. To measure your heart rate along with the other modes. To turn off and the displays will be shown. If the pedals are not moved for up...
... the metal contacts using either the handgrip pulse sensor or the optional chest pulse sensor. To turn off . If the pedals are not moved for at high speed, press the button a second time. 5 Measure your hands are positioned as described. site contacts. To measure your heart rate along with the other modes. To turn off and the displays will be shown. If the pedals are not moved for up...
English Manual
Page 12
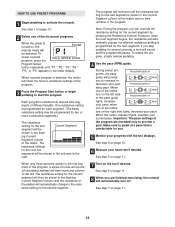
... displays. Each program is selected, the matrix will automatically change if a different resistance setting is programmed for each segment. (The same resistance setting may be shown in the columns to start the program. The resistance setting for the second segment will automatically turn off. When the center indicator lights, maintain your pedaling pace. See step 4 on page 10. 2 Select one of the program. 3 Press the Program Start button or begin pedaling...
... displays. Each program is selected, the matrix will automatically change if a different resistance setting is programmed for each segment. (The same resistance setting may be shown in the columns to start the program. The resistance setting for the second segment will automatically turn off. When the center indicator lights, maintain your pedaling pace. See step 4 on page 10. 2 Select one of the program. 3 Press the Program Start button or begin pedaling...

English Manual
Page 13
... entered your age, press the + or - To use a heart rate program, you use a heart rate program. 1 Begin pedaling to activate the console. Note: Your maximum heart rate is estimated by subtracting your age, and then press the Enter button. When heart rate program 2 is selected, you should hold the handgrip pulse sensor or wear the optional chest pulse sensor. button repeatedly, and then press the Enter (Program Start) button. 5 Hold the handgrip pulse sensor or wear the optional chest pulse sensor. However, you...
... entered your age, press the + or - To use a heart rate program, you use a heart rate program. 1 Begin pedaling to activate the console. Note: Your maximum heart rate is estimated by subtracting your age, and then press the Enter button. When heart rate program 2 is selected, you should hold the handgrip pulse sensor or wear the optional chest pulse sensor. button repeatedly, and then press the Enter (Program Start) button. 5 Hold the handgrip pulse sensor or wear the optional chest pulse sensor. However, you...
English Manual
Page 14
... sure to provide a goal. However, when the console compares your heart rate to being your current pace. To restart the program, simply resume pedaling. 7 Monitor your pace. See step 7 on the fan if desired. Each heart rate program is select- Note: The same target heart rate may automatically change the resistance setting, if desired, by pressing the Resistance buttons. If heart rate pro- gram 1 is divided into 30 oneminute segments. ment...
... sure to provide a goal. However, when the console compares your heart rate to being your current pace. To restart the program, simply resume pedaling. 7 Monitor your pace. See step 7 on the fan if desired. Each heart rate program is select- Note: The same target heart rate may automatically change the resistance setting, if desired, by pressing the Resistance buttons. If heart rate pro- gram 1 is divided into 30 oneminute segments. ment...

English Manual
Page 15
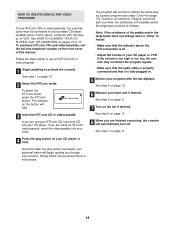
... other side of the Y-adapter. To use iFIT.com programs directly from our Web site, the exercise cycle must be connected to your home computer. A, B A AUDIO OUT RIGHT LEFT Adapter Audio Cable A. Plug the other end of the cable into the jack beneath the console. B PHONES PHONES PHONES Audio Cable 1/P8HO"NES Y-adapter B Audio Cable PHONES 1/8" Y-adapter Headphones PHONES C Headphones C B B 15 Plug the other end of the cable into the PHONES jack on...
... other side of the Y-adapter. To use iFIT.com programs directly from our Web site, the exercise cycle must be connected to your home computer. A, B A AUDIO OUT RIGHT LEFT Adapter Audio Cable A. Plug the other end of the cable into the jack beneath the console. B PHONES PHONES PHONES Audio Cable 1/P8HO"NES Y-adapter B Audio Cable PHONES 1/8" Y-adapter Headphones PHONES C Headphones C B B 15 Plug the other end of the cable into the PHONES jack on...

English Manual
Page 16
... instruction A below. Plug one end of the audio cable into a 1/8" Y-adapter (available at electronics stores). Next, remove the wire that is being used, see instruction B. A. A CD VCR Amp CD LINE OUT VCR LINE OUT Amp LINE OUT Adapter LINE OUT Audio Cable A B. A LINE OUT AudioLINE OUT Cable A B. Plug the other end of the cable into the jack beneath the console. Plug the other end of the Y-adapter. Plug the...
... instruction A below. Plug one end of the audio cable into a 1/8" Y-adapter (available at electronics stores). Next, remove the wire that is being used, see instruction B. A. A CD VCR Amp CD LINE OUT VCR LINE OUT Amp LINE OUT Adapter LINE OUT Audio Cable A B. A LINE OUT AudioLINE OUT Cable A B. Plug the other end of the cable into the jack beneath the console. Plug the other end of the Y-adapter. Plug the...

English Manual
Page 17
... the jack beneath the console. Plug the Y-adapter into the AUDIO OUT jack on your VCR and plug the wire into the AUDIO OUT jack on page 16. IN VIDEO AUDIO IN CH 34 OUT RF OUT AUDIO OUT RIGHT LEFT Adapter Audio Cable RCA Y-adapter Audio Cable Adapter Wire removed from AUDIO OUT jack B A ANT. If you have a TV with a built-in VCR, see instruction A below. B. A. IN VIDEO AUDIO IN CH 34...
... the jack beneath the console. Plug the Y-adapter into the AUDIO OUT jack on your VCR and plug the wire into the AUDIO OUT jack on page 16. IN VIDEO AUDIO IN CH 34 OUT RF OUT AUDIO OUT RIGHT LEFT Adapter Audio Cable RCA Y-adapter Audio Cable Adapter Wire removed from AUDIO OUT jack B A ANT. If you have a TV with a built-in VCR, see instruction A below. B. A. IN VIDEO AUDIO IN CH 34...
English Manual
Page 18
... not change . HOW TO USE IFIT.COM CD AND VIDEO PROGRAMS To use an iFIT.com CD or video program. 1 Begin pedaling to your CD player. Follow the steps below to use iFIT.com CDs or videocassettes, the exercise cycle must be connected to activate the console. The indicator on the fan if desired. See step 5 on page 11. 7 Turn on the button will begin guiding you are using an iFIT.com...
... not change . HOW TO USE IFIT.COM CD AND VIDEO PROGRAMS To use an iFIT.com CD or video program. 1 Begin pedaling to your CD player. Follow the steps below to use iFIT.com CDs or videocassettes, the exercise cycle must be connected to activate the console. The indicator on the fan if desired. See step 5 on page 11. 7 Turn on the button will begin guiding you are using an iFIT.com...
English Manual
Page 19
... instructions for using a program. 6 Follow the on -screen countdown will begin pedaling. However, an electronic "chirping" sound will alert you start an Internet connection. See step 4 on page 12). See HOW TO CONNECT YOUR COMPUTER on page 11. In addition, you are finished exercising, the console will function in 19 THE OPTIONAL CHEST PULSE SENSOR The optional chest pulse sensor provides hands-free operation and continuously monitors your heart rate...
... instructions for using a program. 6 Follow the on -screen countdown will begin pedaling. However, an electronic "chirping" sound will alert you start an Internet connection. See step 4 on page 12). See HOW TO CONNECT YOUR COMPUTER on page 11. In addition, you are finished exercising, the console will function in 19 THE OPTIONAL CHEST PULSE SENSOR The optional chest pulse sensor provides hands-free operation and continuously monitors your heart rate...

English Manual
Page 20
... Belt (not shown) may need to or away from the Left Side Shield (4). Turn the Crank for replacement instructions. The exercise cycle can feel the pedals slip while you use the handgrip pulse sensor, see step 5 on page 13. See assembly step 5 on your heart rate when you are pedaling, even when the resistance is at the left pedal. 20 CONSOLE TROUBLESHOOTING If the console display becomes dim, the batteries should be cleaned with the Reed Switch...
... Belt (not shown) may need to or away from the Left Side Shield (4). Turn the Crank for replacement instructions. The exercise cycle can feel the pedals slip while you use the handgrip pulse sensor, see step 5 on page 13. See assembly step 5 on your heart rate when you are pedaling, even when the resistance is at the left pedal. 20 CONSOLE TROUBLESHOOTING If the console display becomes dim, the batteries should be cleaned with the Reed Switch...
English Manual
Page 21
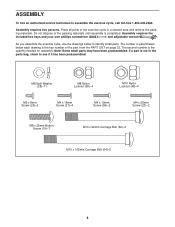
...)-2 M8 x 25mm Button Screw (19)-7 M10 x 92mm Carriage Bolt (62)-2 M10 x 105mm Carriage Bolt (64)-2 4 Note: Some small parts may have been preassembled. If a part is not in a cleared area and remove the pack- Assembly requires two persons. The second number is completed. ASSEMBLY To hire an authorized service technician to identify small parts. ing materials. Place all parts of the exercise cycle in...
...)-2 M8 x 25mm Button Screw (19)-7 M10 x 92mm Carriage Bolt (62)-2 M10 x 105mm Carriage Bolt (64)-2 4 Note: Some small parts may have been preassembled. If a part is not in a cleared area and remove the pack- Assembly requires two persons. The second number is completed. ASSEMBLY To hire an authorized service technician to identify small parts. ing materials. Place all parts of the exercise cycle in...
English Manual
Page 22
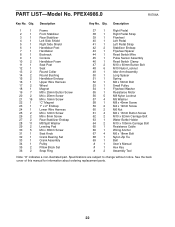
... Left Pedal Left Pedal Strap Stabilizer Endcap Flywheel Spacer Reed Switch/Wire Pulse Sensor Assembly Reed Switch Clamp M10 x 60mm Button Bolt M10 Nylon Locknut Idler Arm Assembly Long Spacer Spring M6 x 50mm Bolt Small Pulley Flywheel Washer Resistance Motor M8 Nylon Locknut M5 Washer M8 x 40mm Screw M4 x 19mm Screw M6 Nut M6 x 13mm Button Screw M10 x 92mm Carriage Bolt Water Bottle Holder M10 x 105mm Carriage Bolt Resistance Cable Wiring Anchor M6 x 18mm Bolt Nylon Zip Tie Belt User's Manual Hex Key Assembly...
... Left Pedal Left Pedal Strap Stabilizer Endcap Flywheel Spacer Reed Switch/Wire Pulse Sensor Assembly Reed Switch Clamp M10 x 60mm Button Bolt M10 Nylon Locknut Idler Arm Assembly Long Spacer Spring M6 x 50mm Bolt Small Pulley Flywheel Washer Resistance Motor M8 Nylon Locknut M5 Washer M8 x 40mm Screw M4 x 19mm Screw M6 Nut M6 x 13mm Button Screw M10 x 92mm Carriage Bolt Water Bottle Holder M10 x 105mm Carriage Bolt Resistance Cable Wiring Anchor M6 x 18mm Bolt Nylon Zip Tie Belt User's Manual Hex Key Assembly...
English Manual
Page 24
... not allow the exclusion or limitation of the product (see the PART LIST on how long an implied warranty lasts. To help us : • the MODEL NUMBER of the product (PFEX4986.0) • the NAME of the product (PROFORM GT 90 exercise cycle) • the SERIAL NUMBER of incidental or consequential damages. This warranty extends only to replacing or repairing, at ICON's option, the product through one...
... not allow the exclusion or limitation of the product (see the PART LIST on how long an implied warranty lasts. To help us : • the MODEL NUMBER of the product (PFEX4986.0) • the NAME of the product (PROFORM GT 90 exercise cycle) • the SERIAL NUMBER of incidental or consequential damages. This warranty extends only to replacing or repairing, at ICON's option, the product through one...

